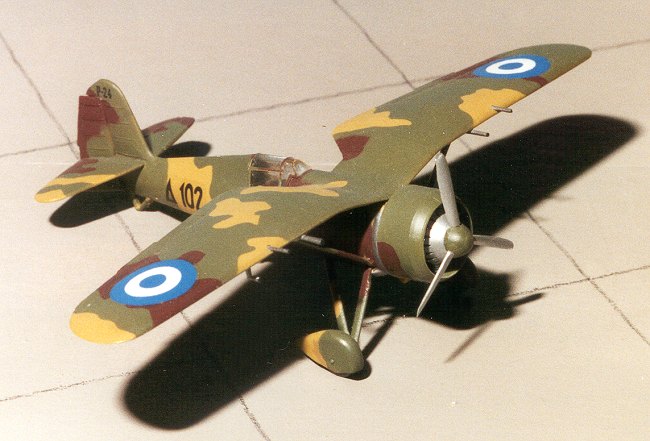
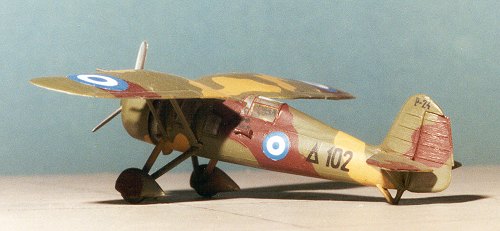
1/72 PZL P.24G
Kit Number: ???
Price: $7.00
Decals : two Greek AF schemes
Comments: I first noticed this little PZL P.24G kit offered in the back of Small Air Forces Observer magazine and I knew I had to have it. When it arrived, what I got was a low-grade plastic bag with a simple card header on which was drawn a P.24. The instructions were in rather poor English, the decal sheet looked suspect and I had two trees of a rather disgusting green plastic and a semi-clear canopy.
I suspect this kit is of Eastern European origin as it has all the trademarks. Thick tree attachment points, rather brittle plastic, misaligned molds, and relatively well-detailed parts, which are sanded off during construction. With very little reference other than an old Profile, I also got from SAFO, an interesting 'in-action' format booklet on the P.24, including detail drawings and a huge number of color schemes (considering the subject). Armed with this book, I was able to make a pretty good representation of a camouflaged Greek P.24G.
 Construction begins by carefully removing the parts from the tree and then
the laborious job of cleaning them up. Flash wasn't the problem, it
was the misalignment of the molds that needed to be surmounted. the
interior is surprisingly detailed with instrument panel, rudder pedals,
seat, stick and a few other bits. Too bad that they cannot be seen
through the thick canopy, so don't put a lot of effort into it. All
of the exterior fuselage bits are separate including venturi tube, oil cooler
radiators and carb intake. Although PZL was cutting edge in early 1930s,
this bird has lots of struts (all of which need carefully measured and cut).
As frail looking as they are, the landing gear struts are a lot more
sturdy than on Revell or Hellers PZL P.11, and the P.24 includes the extra
weight of spats!
Construction begins by carefully removing the parts from the tree and then
the laborious job of cleaning them up. Flash wasn't the problem, it
was the misalignment of the molds that needed to be surmounted. the
interior is surprisingly detailed with instrument panel, rudder pedals,
seat, stick and a few other bits. Too bad that they cannot be seen
through the thick canopy, so don't put a lot of effort into it. All
of the exterior fuselage bits are separate including venturi tube, oil cooler
radiators and carb intake. Although PZL was cutting edge in early 1930s,
this bird has lots of struts (all of which need carefully measured and cut).
As frail looking as they are, the landing gear struts are a lot more
sturdy than on Revell or Hellers PZL P.11, and the P.24 includes the extra
weight of spats!
Once all the bits and pieces are stuck together, it is time for paint and decals. Now the P.24 is a rather small aircraft and has a relatively complicated camo scheme of ochre, brown and green over light blue. The light blue is only under the wings and tailplanes so those are easily painted and masked. Next, I painted the aircraft ochre. After that dried, I masked the ochre and painted the medium green. When that had dried, I brush painted the dark brown. I then went back and brush painted the struts the appropriate colors. The use of Gunze Sangyo Acrylics makes brush painting a snap and I believe I could have brush painted all the upper surface colors without a problem.
Finally came the decals. They were thin and the colors so transparent
that they almost disappeared on the camoflage upper surfaces. I quickly
cut some white circles to put under the roundels and that fixed the problem.
The black was no problem at all and the decals succumbed to the Microscale
system with a little prodding. The final result is a 'cute' aircraft
that fits almost anywhere and is one of the smallest 1/72 fighters in my
collection. I would recommend this to anyone familiar with the foibles
of the older Eastern European kits.
Back to Reviews Page 2025