|
KIT: |
Azur 1/72 NA.57 (BT-9) |
|
KIT # |
009 |
|
PRICE: |
$14.95 |
|
DECALS: |
Three Aircraft |
|
REVIEW & |
|
|
NOTES: |
Short run with resin and vac canopy` |

|
BACKGROUND |
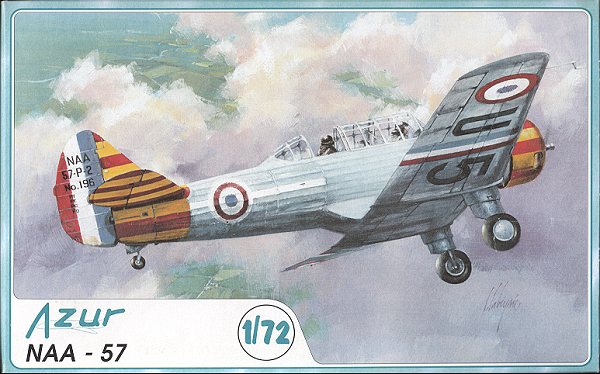
For a look at the kit in the box and a short history, please visit the preview.
|
CONSTRUCTION |
Construction starts with the wings. They had the ejector pins snipped off, were glued together, cleaned up and set aside until needed. Then the interior was worked on. This basically involved gluing the seats onto the floor pan. This assembly and the interior walls were then painted US interior green using Model Master's enamel. While this was drying, the cowling halves were glued together and the resin bits cut off their resin blocks. Some of the resin parts are very fine and will either break or go flying off into the aether!
With paint dry, the forward instrument panel was glued in place, but not after being severely trimmed to fit. There is a back cockpit section and that was glued in place. The second instrument panel was glued onto the housing for the back seater. Fit was good. The two control stubs (the stick parts broke) were glued to the cockpit floor with superglue. The floor was then glued to one sidewall and the fuselage halves glued together.
 The floor did not
fit at all well and needed some shims and lots of superglue and accelerator to
where it fit semi-well. All the seams were given filler (some more than once)
and then the tail was glued on (again, filler needed). With the tail in place,
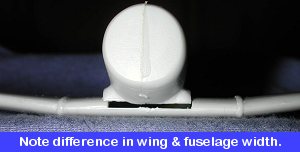
the wings were glued on. Well, this was after the fuselage wing roots were
sanded down as the fuselage was too wide to accommodate the wings. In addition,
the rear part of the wing attachment is all wrong for an NA.57. If you look at
the box art, you'll notice a fairing that juts down to the wing. The kit does
not have this. In fact, it is more like a T-6 or a Wirraway where the rear of
the wing is flush with the bottom of the fuselage. I suspect that the Wirraway
fuselage was used as a master.
After a considerable amount of
sanding and such, the wings were mated to the fuselage. Again, multiple
applications of filler were needed. The tail planes were next attached. More
filler was used. I now had a pretty complete airframe so turned my attention to
the wheel spats. 
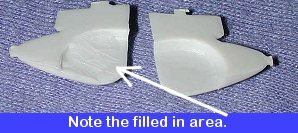
The NA.57/BT-9/Yale, had fixed landing gear in semi covered spats. Well, my kit had one of the wells partially filled in where it should have been more open. A hassle, but not unexpected from a short run kit. This required some time scraping out the excess plastic so that the wheel could actually be put into the spat.
|
PAINT & DECALS |
|
CONSTRUCTION CONTINUES |
|
CONCLUSIONS |
|
REFERENCES |
Review kit courtesy of me and my wallet!
If you would like your product reviewed fairly and quickly by a site that averages thousands of visits a day, please contact me or see other details in the Note to Contributors.