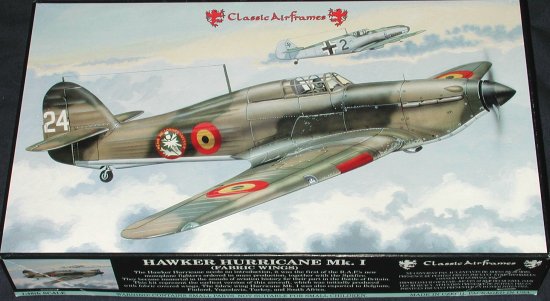
Classic Airframes 1/48 Hurricane I (early)
|
KIT # |
461 |
|
PRICE: |
$39.95 MSRP |
|
DECALS: |
6 aircraft |
|
REVIEWER: |
|
|
NOTES: |
Fabric wings, foreign air forces boxing |
|
HISTORY |
I'll let Tom Cleaver's historical background and preview tell you about the basic kit.
|
THE KIT |
I was very pleased with the lack of ejector pin marks and sink areas as
that is something that I tend to find, even on the best of kits. I'm also
most appreciative of having multiple vac canopies as I'm a real klutz when
it comes to these things. I recall a comment about the shape of the side
panels to the windscreen being the wrong shape, but they look very much
like what I see in photos and drawings. I note that the 'separate blades
and hub' deal is alive and well with this kit for the Rotol and deHavilland
props, but fortunately, I'll be doing a Watts-prop version so no worries on
that front!
I should give special recognition to the decals. They are absolutely
superb. Printed by Microscale, they are crisp, totally in register and a
know quality in terms of decal solvents. For this boxing, there are
markings for Belgium (2), Finland (2), Italy, and Jugoslavia.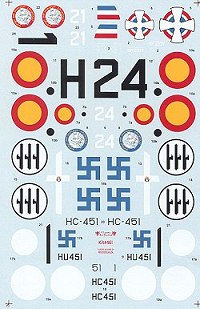 I'd just like to add some of my own observations to Tom's description. One
is that there is a tad of flash on many of the parts. My lower wings had
the shell ejector chutes blocked to some extent or the other and the
thinner parts, like the interior framework, gear legs and such will need a
touch more than the usual cleanup. Nothing at all major, but there,
nonetheless.
I'd just like to add some of my own observations to Tom's description. One
is that there is a tad of flash on many of the parts. My lower wings had
the shell ejector chutes blocked to some extent or the other and the
thinner parts, like the interior framework, gear legs and such will need a
touch more than the usual cleanup. Nothing at all major, but there,
nonetheless.
|
CONSTRUCTION |
Then I glued the wheel wells onto
the bottom wing. A bit of a fussy job as I had to be very careful not to
get it out of alignment. I next went to work on the interior. The
instructions show the left sidewall being glued in place first and then the
rest of the parts attached to it. I glued it in place and when I got the
floor/rear bulkhead part together and test fit it, I found it didn't fit
properly. Therefore, I cut away the sidewall piece and fit the cockpit
section together first. I left off the two supports to the instrument panel
as they just didn't seem to want to fit well and I figured few would notice
their absence. I also found out that the control stick kept the instrument
panel from fitting in the slots on the sidewalls so had to remove the
control column. It was later reattached, though it butts right up against
the instrument panel.
Meanwhile, back
at the fuselage, I worried over how to fit the engine face in place. There
is no real locator pins or anything for it, and when I did finally get it
into place, I found out that the prop shaft was not sticking out far enough
to attach a prop! Figuring that it wouldn't be missed and that I'll just
glue the prop straight onto the nose, I left it off. I also backed up the
exhaust openings with some strip styrene as these openings are very open
and test fitting the exhaust to them showed they'd easily fall into the
fuselage. I followed this up by closing the fuselage halves together. The
fit is very good and a dab of additional cement on the unsecured side of
the cockpit was all that was needed to keep it in place.
The wing has two different inserts for the leading edge. One are a pair of
landing lights. The instructions say that these areas need to be cut out,
but apparently it was decided to mold the wings with these openings already
in there. The resin light housings fit very well indeed. The other is the
gun ports. These you do have to cut from the wing if you want to use them.
I didn't see any real need to do so as I was perfectly happy with the ones
already there.
This aircraft is
not a very early Hurricane I so has the small ventral strake. It has to
cover the earlier version's hole in the bottom of the rear fuselage and
doesn't do it perfectly well. I needed filler to take care of the small
gaps as well as to fill the sink areas on the side of the piece. Then I
attached the rudder. This part needs the alignment pins removed in order to
fit properly. I also found the lower part of the rudder was fatter than the
end of the ventral fin. To overcome this somewhat, I glued the rudder
slightly off to one side. CA offers two different rudders, one longer than
the other so be sure to use the proper one! Next bits were
on the underside. This consisted of the small carb intake, which was glued
in place once removed from the resin block. The larger radiator 'bath' is
several pieces that fit quite well together. They do need to have the
mating surface to the wing sanded smooth as some of the bits stick 'up'
more than others. Once that was accomplished, it was glued to the lower
fuselage.
CAMOUFLAGE
Then I used Testors Model Master Dark Green enamels over the entire upper
surface. I used this darker color first for one reason. I've always had
trouble getting dark greens to look good when I do the fine work that is
needed with hand-sprayed camo schemes. For me, it is much easier to do
these colors in a broad spray. I let this dry overnight and then applied
the Dark Brown. For this, I used Xtracolor, mostly because I had two
tinlets of the stuff. As you know, this dries a gloss, which contrasted
quite a bit from the matte Testors paint. Both of these paints were thinned
with Floquil lacquer thinner so dried rather quickly. I was able to apply
several coats of the upper colors in the same day. After touching up some
overspray, I returned to the workbench to add a few more bits. MORE BITS
Before applying gloss coats, I like to get the model on its landing gear to
keep from picking up more trash than normal! The landing gear for this kit
requires some trimming and general clean-up as the mold seams are a bit
much. I also found it nearly
Then the kit was sprayed with clear gloss acrylic (Future). Two thin coats
took care of things and I had no problems with it on the gloss Xtracolor
paint, much to my relief.
Next it was time to put on the decals. These are printed by Microscale and
superbly done. The roundels are two part with the center dots separate.
They went on very well and a touch of Sovaset ensured they wouldn't move. I
found the center dots on the insignia to be quite a bit smaller than shown
on the box art. I'm not an expert on Belgian insignia so they may well be
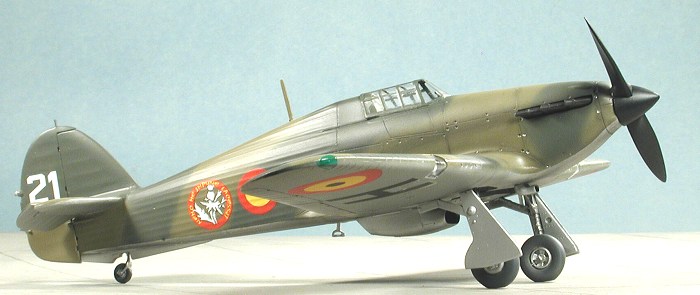
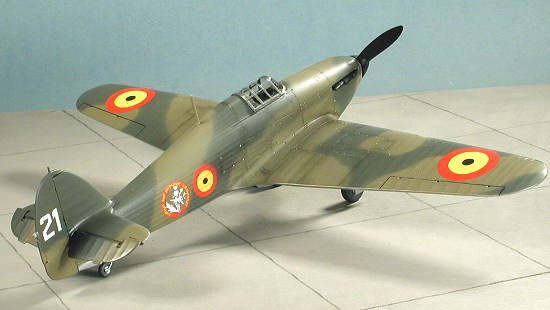
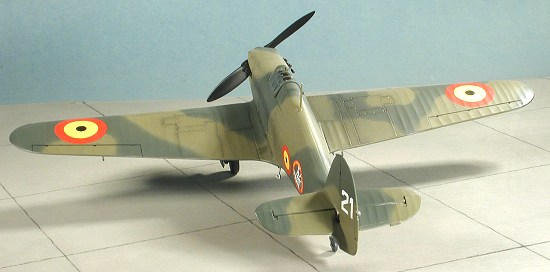
right. You get two different Belgian Hurricanes and I picked the #21 with
the red surround unit badge. The other was #24 with the blue surround
badge. Only real difference was that the camo schemes of the two are
mirrored. It also seemed to me that the black detail work in the unit
badges were off register. It
 I started this one by actually reading the instructions.
This was because I wanted to make one with a two-bladed prop. This
basically meant the Belgian version. Fine with me as I have NO WWII 1/48
Belgian AF models. I got down to things by removing the resin plugs from
the various resin bits I'd be using. This included the wheel wells, landing
lights, and intake faces.
I started this one by actually reading the instructions.
This was because I wanted to make one with a two-bladed prop. This
basically meant the Belgian version. Fine with me as I have NO WWII 1/48
Belgian AF models. I got down to things by removing the resin plugs from
the various resin bits I'd be using. This included the wheel wells, landing
lights, and intake faces.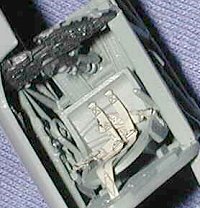 One
addition I decided to make was to add a pilot's harness. I used the
prepainted Eduard set for this and since I wasn't sure which style to use,
I just picked one. As one who is inept at painting seatbelts, I'm very glad
these sets exist and find them well worth the money. Meanwhile, I assembled
the Watts prop. I also removed the horizontal stabilizers from the sprues
and glued them together. Classic Airframes has actually designed little
alignment tabs for when the tailplanes are glued in place. I like it and
will be anxious to see how well they work.
One
addition I decided to make was to add a pilot's harness. I used the
prepainted Eduard set for this and since I wasn't sure which style to use,
I just picked one. As one who is inept at painting seatbelts, I'm very glad
these sets exist and find them well worth the money. Meanwhile, I assembled
the Watts prop. I also removed the horizontal stabilizers from the sprues
and glued them together. Classic Airframes has actually designed little
alignment tabs for when the tailplanes are glued in place. I like it and
will be anxious to see how well they work. Next was the wing attachment. Now, rather than do what I usually do, which
is glued the upper and lower wings together first, in this case, I just
glued on the lower wing. Initial dry fits showed the wing to be a tad too
long to fit the opening. However, once the glue is applied, it sufficiently
melts the plastic to where it is a nice, snug fit. Once that was dry, I
cemented the upper wings in place. This method gave me a good fit at the
wing roots, which are usually a problem on most kits. There was still a bit
of a gap near the front that needed filled, but it seriously cut back on
the usual amount of filler/sanding that I usually have to do on kits.
Next was the wing attachment. Now, rather than do what I usually do, which
is glued the upper and lower wings together first, in this case, I just
glued on the lower wing. Initial dry fits showed the wing to be a tad too
long to fit the opening. However, once the glue is applied, it sufficiently
melts the plastic to where it is a nice, snug fit. Once that was dry, I
cemented the upper wings in place. This method gave me a good fit at the
wing roots, which are usually a problem on most kits. There was still a bit
of a gap near the front that needed filled, but it seriously cut back on
the usual amount of filler/sanding that I usually have to do on kits.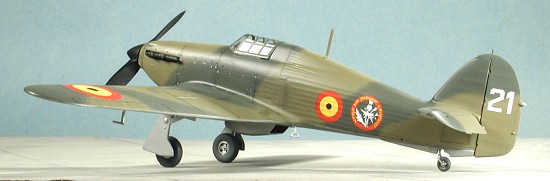 With the wings on, I moved to the tail
planes. These are separate from the elevators. Fit wasn't as great as I'd
have hoped, but it wasn't anything unusual. The elevators are separate, but
if you want to glue them drooped (as they normally would be), then you'll
have to do what I did. I filled the alignment holes in the back of the tail
planes and then sanded the leading edge of the elevators a bit so that they
wouldn't look too odd when glued in place.
With the wings on, I moved to the tail
planes. These are separate from the elevators. Fit wasn't as great as I'd
have hoped, but it wasn't anything unusual. The elevators are separate, but
if you want to glue them drooped (as they normally would be), then you'll
have to do what I did. I filled the alignment holes in the back of the tail
planes and then sanded the leading edge of the elevators a bit so that they
wouldn't look too odd when glued in place.
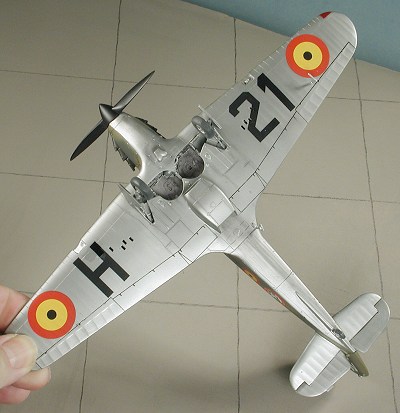 A good time to start painting. Belgian Hurricanes were in the RAF colors of
Dark Green/Dark Earth uppers with Aluminum (painted) undersides. I started
by masking off the cockpit area. Then the entire underside was given
several very fine coats of Alclad II Aluminum. I used Alclad II because I
like how hard it dries and because I can handle it and mask it with no fear
of the paint departing the surface of the plastic during all this. I
sprayed it right on the bare plastic, filler and all. It gave a very
convincing look of painted aluminum instead of the bare metal look it would
have had would I have used a gloss undercoat. I gave it about 6 hours to
dry (yeah, I know, overkill but I wanted to make sure it was cured), then
masked off the aluminum parts I wanted to protect from overspray. The
upper/lower demarcation line on Hurricanes was a very sharp line.
A good time to start painting. Belgian Hurricanes were in the RAF colors of
Dark Green/Dark Earth uppers with Aluminum (painted) undersides. I started
by masking off the cockpit area. Then the entire underside was given
several very fine coats of Alclad II Aluminum. I used Alclad II because I
like how hard it dries and because I can handle it and mask it with no fear
of the paint departing the surface of the plastic during all this. I
sprayed it right on the bare plastic, filler and all. It gave a very
convincing look of painted aluminum instead of the bare metal look it would
have had would I have used a gloss undercoat. I gave it about 6 hours to
dry (yeah, I know, overkill but I wanted to make sure it was cured), then
masked off the aluminum parts I wanted to protect from overspray. The
upper/lower demarcation line on Hurricanes was a very sharp line.
& DECALS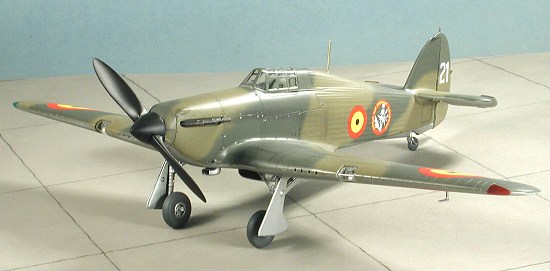 impossible to attach the two small struts that
go in the well itself so left them out. The radio mast was also glued on at
this time.
impossible to attach the two small struts that
go in the well itself so left them out. The radio mast was also glued on at
this time.
|
FINAL CONSTRUCTION |
With the decals on and dry, I wiped down the plane and put a matte coat
on. This included the underside as it was supposed to be aluminum paint.
The matte really made the Alclad II look like paint instead of natural
metal. Then the wheels, gear doors and prop were glued in place. I found
the exhaust to stick out too far so trimmed a considerable amount from the
back with a pair of cutters before gluing them in place. At this time, I
did some panel line accentuation with pastels. After somewhat scrubbing the
pastels into the lines, I wiped most of it away. Black was used to
 give a
good contrast. More pastels were used on the bottom to provide dirt from
the radiator/oil cooler and for the exhaust. Then the model was given
another coat of matte clear to seal all that in.
give a
good contrast. More pastels were used on the bottom to provide dirt from
the radiator/oil cooler and for the exhaust. Then the model was given
another coat of matte clear to seal all that in.
The formation lights were painted using Vallejo paints. I've been using quite a bit of these paints and like them. They are acrylic and perfect for the small, touchup jobs. I next tried to cut out the landing light lenses and botched them both rather badly. I thought that two sets were supplied, but couldn't find the second one. The remedy for this is to use clear tape. I find it works fairly well and sticks in place nicely if you go over the seams with clear paint.
The last bits were the footstep and the pitot tube under the wing. I didn't install the venturi as I wasn't sure that Belgian Hurricanes used it or not. At least, none of the pictures I saw seemed to have it. It almost seems that when the ventral fin was added, the venturi went away. The masking was taken from the canopy, some wash added to the wheel wells and that was it!
|
CONCLUSIONS |
I found this kit much easier to build than the I-152 I did earlier. It just shows, at least to me, that Classic Airframes has been steadily improving over the years and that is great. I'm very much looking forward to giving one of their even newer releases a try here in the future.
August 2003
#1278 in a series
|
REFERENCES |

Hawker Aircraft since 1920 by Francis Mason, Naval Institute Press, 3rd Edition, 1991
Copyright ModelingMadness.com. All rights reserved. No reproduction in part or in whole without express permission from the editor
If you would like your product reviewed fairly and quickly, please contact the editor or see other details in the Note to Contributors.