Airfix 1/48 Spitfire I
|
KIT #: |
A05126 |
|
PRICE: |
$24.95 SRP
|
|
DECALS: |
Three options |
|
REVIEWER: |
Scott Van Aken |
|
NOTES: |
|
One of the few aircraft to remain in production from the beginning of the war
to the end, the Supermarine Spitfire gained popular acclaim during the Battle of
Britain as its pilots bravely fought against the Luftwaffe
 during the Summer of
1940. Ignoring the fact that the Hurricane was the more numerous of the two and
that it did most of the bomber interception, the Spitfire is the one that
strikes our fancy of 'the few' who fought during those perilous time.
during the Summer of
1940. Ignoring the fact that the Hurricane was the more numerous of the two and
that it did most of the bomber interception, the Spitfire is the one that
strikes our fancy of 'the few' who fought during those perilous time.
Designed about the same time as it's adversary, the Bf-109, the Spitfire was a
much more elegant aircraft; full of curves where the 109 was all angles. This
curvaceous design also meant that it was more difficult to construct and repair,
but gave it excellent maneuverability compared to the faster 109E.
Like the 109, the Spitfire was designed as a point defense fighter and not a
longer range bomber escort. The Spitfire I and II was never fitted with the
bulky long range drop tanks as eventually was the 109E since most combat between
the two occurred over British territory and bases. Subsequent Spitfire designs
changed that and the Spitfires of 1945, while still obviously a Spitfire, had no
parts in common with the 1939 versions.
As usual,
our LHS seems to be one of the last ones to get in new Airfix kits. This is
entirely because they are shipped from the UK, through the Panama Canal, to
Seattle, to Hornby USA, to the various distributors and then back east across
the country, back towards its point of origin.
The kit has a lot of parts and multiples of all sorts of things. Three different
props, three different windscreens, three different canopies, three different
upper rear cowling sections, two different exhaust, and two different spinners.
The kit can be built wheels up so separate gear doors, one set with partial
struts installed for the gear up option. A stand is an extra, but I'm glad
Hornby has them for those who want to buy them.
 Other options are the ability to have all the gun access panels removed to show
the wing mounted weapons. The builder will need to cut open the access doors,
but the kit includes spares. One can also have the cockpit door open. This
includes a crowbar, which I understand is not correct for early Spits. The
cockpit canopy can be posed open if one wishes and there are parts where the
canopy is molded with the rear clear section for the closed option. To use this
latter option, the fuselage area will need to be trimmed. One can also install
an armored headrest. The instructions dictate which markings option uses which
of the optional bits so one pretty well has to know what is being built before
starting.
Other options are the ability to have all the gun access panels removed to show
the wing mounted weapons. The builder will need to cut open the access doors,
but the kit includes spares. One can also have the cockpit door open. This
includes a crowbar, which I understand is not correct for early Spits. The
cockpit canopy can be posed open if one wishes and there are parts where the
canopy is molded with the rear clear section for the closed option. To use this
latter option, the fuselage area will need to be trimmed. One can also install
an armored headrest. The instructions dictate which markings option uses which
of the optional bits so one pretty well has to know what is being built before
starting.
The cockpit
is very nicely detailed with all he various bits and pieces one needs. There is
plenty of sidewall detail and one can install armor with the seat. My seat
center section was rather oddly warped so it will be interesting to see if I can
get the seat together properly. The fore and aft bulkheads fit into the cockpit
side sections making a strong tub. There are decals for the main instrument
panel and the entire tub assembly then fits into the two fuselage halves. A
pilot is provided so those not using one will have to find a harness somewhere.
One does built up the wheel wells with a circular insert for each well backed by
a nice spar. The main gear legs attach to this separate spar. There is another
to box in the gear well and short spar sections to fit outboard of the gear
wells. There are eleven construction steps regarding the installation of the
wing guns so those who wish to finish the kit faster, these can be skipped.
Apparently gun barrels did not protrude from the wings as none are included.
 Tailplanes
are upper and lower, right and left sides with an insert. The elevators are a
single piece so can be posed down. Separate also are the ailerons and the
rudder. The large radiator has a separate cooling flap that can be posed down.
Apparently Airfix has realized after all these decades that Spitfires do not
have lowered flaps on the ground so those are not an option.
Tailplanes
are upper and lower, right and left sides with an insert. The elevators are a
single piece so can be posed down. Separate also are the ailerons and the
rudder. The large radiator has a separate cooling flap that can be posed down.
Apparently Airfix has realized after all these decades that Spitfires do not
have lowered flaps on the ground so those are not an option.
Apparently all three options have tubular exhaust and none of them use the Rotol
prop. Two use the deHavilland and one the Watts. One of the final attachments is
the radio mast. Three different styles are provided.
Instructions are very nicely done with the usual Humbrol only color numbers
except for the overall camo and markings scheme. All are in green/brown uppers.
The box art plane is with 602 Squadron in August 1940. This has a sky underside.
The 19 Squadron plane has the Watts prop and black/white underside with aluminum
painted lower control surfaces. Finally, with what looks like a zinc chromate
yellow nose is a plane with 57 OTU in mid 1941. The decal sheet is very nicely
printed and should provide no issues. There are LOTS of Spitfire I aftermarket
sheets for those who want something different.
I'm not a huge Spitfire fan. In fact, the only reason I started this is that I
wanted a replacement for my old Tamiya Spit I. Rather than start the Tamiya kit,
I figured I'd give the somewhat recent Airfix kit a go. So I started by
slavishly following the instructions and building up the cockpit. As mentioned
above, part B8, the armor plating for the seat was badly warped. When it came
time to attach that, I simply bent it a lot (thanks to
 the soft plastic this is
fairly easy to do) and clamped it to the bottom of the seat when it came time to
glue it. I also found that the notch for the joining of part C 34 and C 42 was
too narrow. In addition, part C 20 was short shot so I didn't install it.
the soft plastic this is
fairly easy to do) and clamped it to the bottom of the seat when it came time to
glue it. I also found that the notch for the joining of part C 34 and C 42 was
too narrow. In addition, part C 20 was short shot so I didn't install it.
When one builds up the cockpit, you are actually building a tub with sidewalls
and the whole deal. This then fits in between the two fuselage halves when you
close the fuselage. It takes a lot more effort to get some of the pieces to fit
in place. Using good glue will help in this by softening the plastic and acting
as a lubricant. You think you are going to break a piece getting it in place
when it will suddenly go that little extra distance and fit as it should. I
should mention that I didn't add seat belts to this.
I also decided to do this one with the canopy closed. I know a lot of folks like
the open option, but I'm not a huge fan. To do so a small section around the
rear of the cockpit needs to be removed from each side. It is clearly marked and
thanks to the soft plastic I had both modified in about five minutes. The
cockpit was installed in one fuselage half. There is a compressed air bottle
that fits behind the seat (part C1), and it is about impossible to fit with the
fuselage half in place. I left it out. The other half was attached and the fit
here is excellent.
Same cannot be said for the upper cowling section that covers the cockpit. I had
to do a lot of pushing and clamping as well as using super glue to get it in
place. Even then I had to deal with gaps. Since I use clear super glue, these
are easy to see even after sanding. This was rather typical of gaps I had when
dealing with 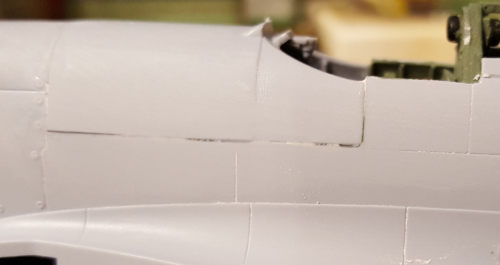 the wings. Moving to the wing, I installed the
wheel wells, spars and the upper landing gear attachments. In my mind, this is a
fairly lame way of doing things and seems unnecessarily complex.
the wings. Moving to the wing, I installed the
wheel wells, spars and the upper landing gear attachments. In my mind, this is a
fairly lame way of doing things and seems unnecessarily complex.
With the wings together, These were attached to the fuselage. The attachment is
quite positive, but I had the usual gaps to deal with, especially the forward
wing root area, where they were fairly large. The tailplane halves were joined
and attached as well. Then the elevators and rudder. There is a small insert
that holds the elevators in place that is a bit fussy to attach, but does its
job. I glued the rudder at a bit of an angle and didn't glue the elevators at
this time.
Moving back to the underside, the radiators were assembled as needed and glued
in place. The carb intake piece and lower nose piece were attached at this time.
Then I masked and installed the canopy sections after attaching the gun sight. I
chose the closed position for several reasons. One is that the canopy is fairly
clear and shows the interior well enough. Secondly, I'd have to cut open the
door and get a resin replacement as the Mk.I did not have a crowbar (that was
added with the Mk.V).
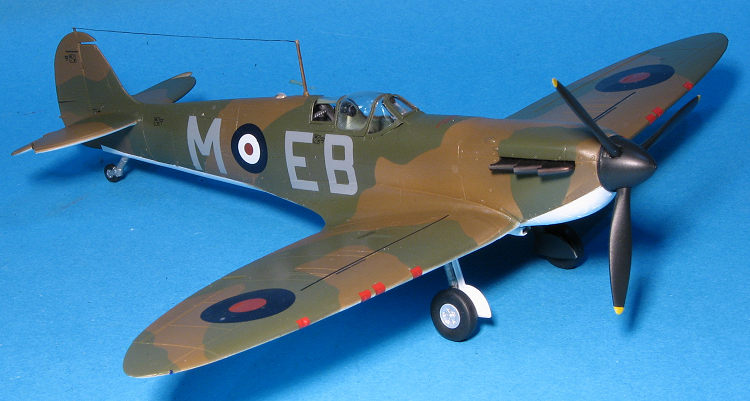
 At this time, I prepped for painting. I chose an offering on Illiad Decals 48003
'Prewar Spitfires' that had an armored windscreen. It was an aircraft from 41
Squadron in 1939. This plane had the deHavilland prop and 'straight' antenna
mast. The underside was split down the middle with black on the left side and
white on the right. I first painted the white, then did some masking and did the
black.
At this time, I prepped for painting. I chose an offering on Illiad Decals 48003
'Prewar Spitfires' that had an armored windscreen. It was an aircraft from 41
Squadron in 1939. This plane had the deHavilland prop and 'straight' antenna
mast. The underside was split down the middle with black on the left side and
white on the right. I first painted the white, then did some masking and did the
black.
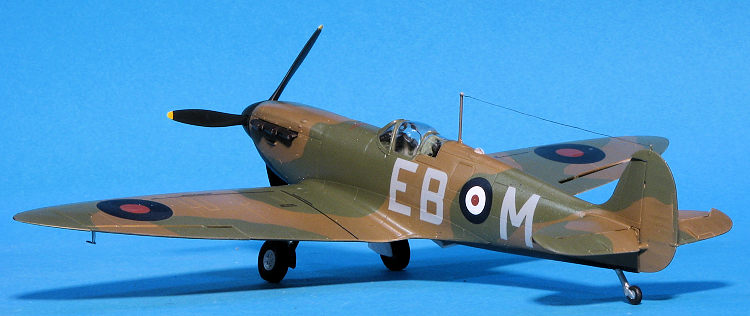
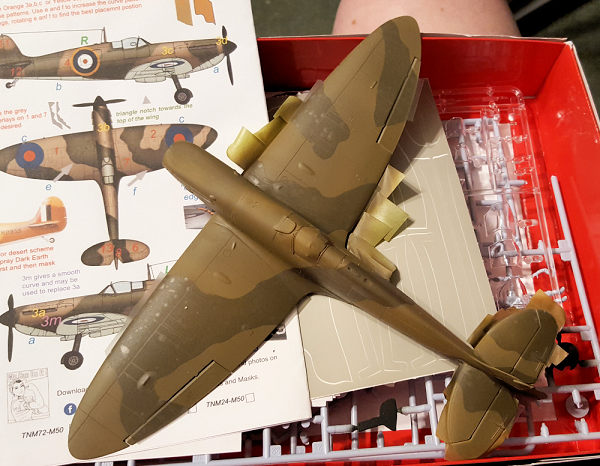
On the upper
side, I painted everything with dark earth. This time, I decided to try some
camouflage masks. I used Top Notch set TNM48-50, which is pattern A as it
matched what Illiad showed in the decal instructions. These took a bit of
practice, especially the large one for the left wing, but worked as advertised.
For 'hard' masked planes like the Spitfire, these really are a time saver.
In the image you see, the dark areas are the masks. When this photo was taken,
the nose one, which is the most complex, had not yet been attached. Once on, the
dark green was applied in light coats to keep it from creeping under the mask at
areas such as the flight control hinge areas. I used Model Master enamels for
the upper shades. I then removed the masks and put them back on the backing
sheet as it looks like they have enough stick to be reusable.
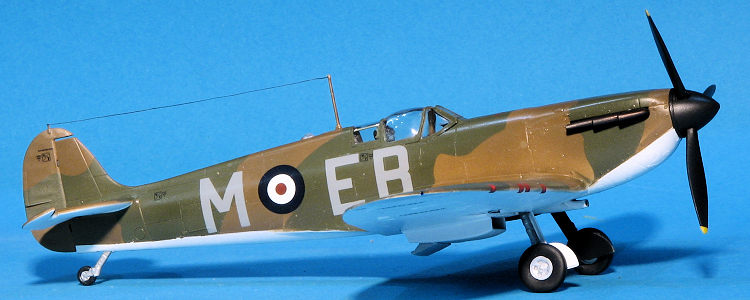
 Next step was to attach the landing gear. I'm probably not the first one to say
this, but the way Airfix has designed the main gear is poor. It does nothing to
ensure the correct angles and as expected, both of my gear legs have issues.
What is wrong with positive locators? Once the gear were installed, I gave the
airframe a coat of gloss clear for the decals. I also painted the prop and
spinner in preparation for installation after the markings are in place.
Next step was to attach the landing gear. I'm probably not the first one to say
this, but the way Airfix has designed the main gear is poor. It does nothing to
ensure the correct angles and as expected, both of my gear legs have issues.
What is wrong with positive locators? Once the gear were installed, I gave the
airframe a coat of gloss clear for the decals. I also painted the prop and
spinner in preparation for installation after the markings are in place.
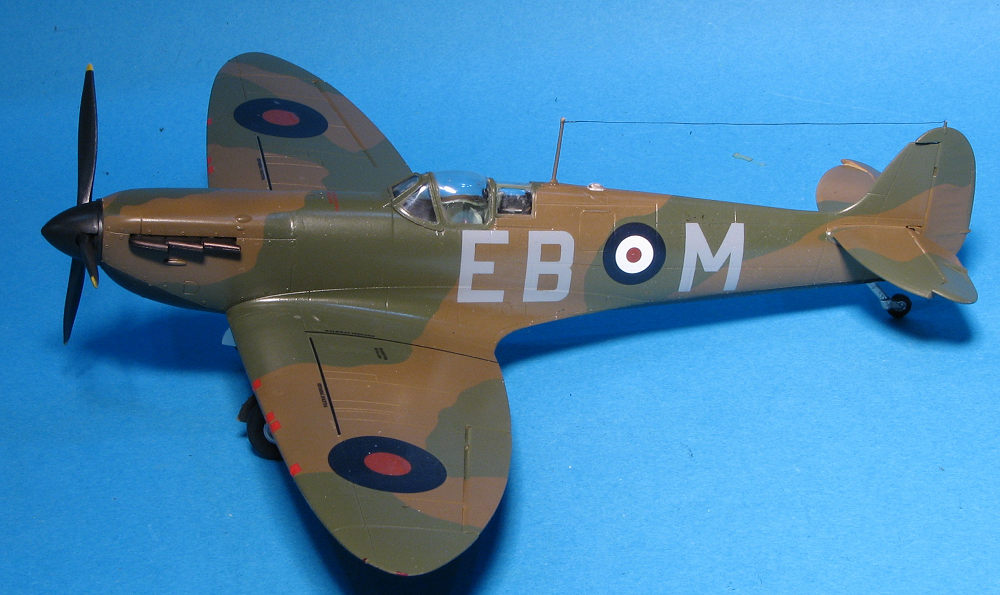
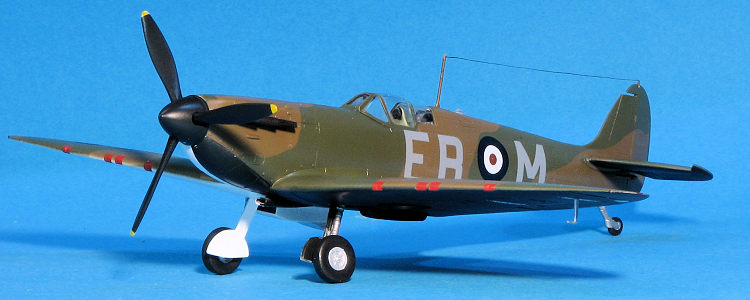
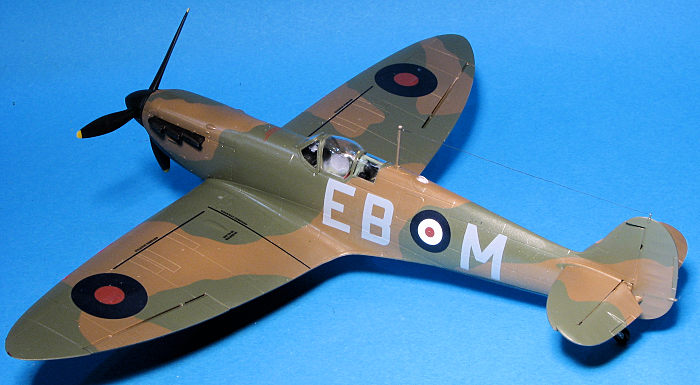
As mentioned, I chose a scheme from Iliad Decals Prewar Spitfire sheets. The
option I chose is minimal at best when it comes to markings with only upper wing
roundels and for the sides, roundels and code letters. I did use some of the
stencils from the kit decals to keep things from looking too barren. The Iliad
decals are great. No setting solution was required and they snuggled right into
panel lines like a champ. Kit decals did require solution.
Not much left. I attached and painted the straight radio mast, the prop assembly
and the pitot tube. Then I gave the airframe a coat of semi-matte clear to seal
everything in. I then painted the formation lights and glued on the exhaust. As
I'd forgotten to install the lower light before assembling the wings, I used
some clear cement to duplicate it. The masking came off, I added the upper clear
light lens and strung an EZ-line radio wire.
 My past experience with Airfix kits did me well. I did
not expect Tamiya fit and didn't get it. Despite the areas that I've mentioned
that I did not like, the overall build went without too much trauma. The kit
offers a lot of options not mentioned in the instructions so those with a fair
knowledge of the aircraft can model pretty much any Mk.I that was built. I was
also quite pleased with the performance of the camouflage masks. This is the
first time I've used these and can easily recommend them. Same with the Iliad
decals. They are top notch and I use them whenever I do a subject they cover.
Probably the biggest benefits of the Airfix kit over the new Tamiya (and I've not
built the Tamiya kit yet), are the ability to do multiple variants with the bits
in the box and the price.
My past experience with Airfix kits did me well. I did
not expect Tamiya fit and didn't get it. Despite the areas that I've mentioned
that I did not like, the overall build went without too much trauma. The kit
offers a lot of options not mentioned in the instructions so those with a fair
knowledge of the aircraft can model pretty much any Mk.I that was built. I was
also quite pleased with the performance of the camouflage masks. This is the
first time I've used these and can easily recommend them. Same with the Iliad
decals. They are top notch and I use them whenever I do a subject they cover.
Probably the biggest benefits of the Airfix kit over the new Tamiya (and I've not
built the Tamiya kit yet), are the ability to do multiple variants with the bits
in the box and the price.
27 September 2019
Copyright ModelingMadness.com. All rights reserved.
Thanks to me for picking this one up.
If you would like your product reviewed fairly and fairly quickly, please contact the editor
or see other details in the
Note to
Contributors.
Back to the Main Page
Back to the Previews Index Page