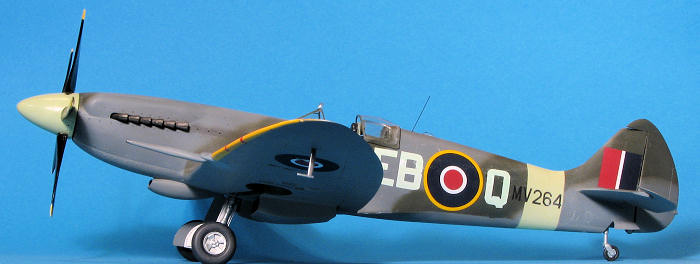
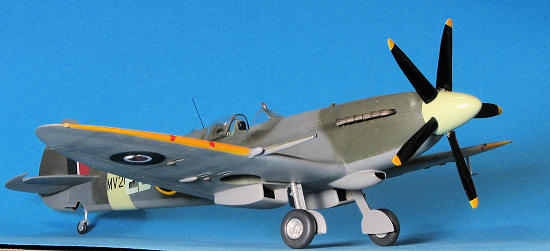
Revell/Warbirds 1/32 Spitfire XIV
|
KIT # |
Revell 5516 for base kit. |
|
PRICE: |
Total of $106 for kit and conversion sets |
|
DECALS: |
See review |
|
REVIEWER: |
|
|
NOTES: |
Warbird Productions sets 3210 and 3214c used |
|
BACKGROUND |
The whole purpose of this particular review is to build a Spitfire XIV using the Revell Spitfire I/II kit #5516 and two Warbird Productions conversions, #3210 Universal Wing and #3241c Spit XIV (early) conversion set.
 The Spitfire XIV was powered by the Griffon 65 engine and also
incorporated a larger fin and rudder from the earlier marks of Spit. Like the Mk
IX, it was intended as an interim aircraft prior to the definitive Mk 21/22.
Like the Mk. IX it was built in much larger quantities than the aircraft that
was to replace it! The Spitfire XIV was the first series produced Spitfire to
include the Griffon 65 and was mated to the Mk. VIII airframe. In fact, six Mk.
VIIIs were converted and provided to various entities for testing. Though
initially to use a DeHavilland counter rotating prop, the Mk. XIV used a five
bladed Rotol prop instead; the first production Spitfire to do so. The initial
prototypes were built in mid-1943 with the first units receiving the planes
around late 1943, early 1944. Early Mk. XIV aircraft had the older sliding hood,
though later models had a full vision 'bubble' canopy. The aircraft were used
post war by both the RAF and Belgian Air Force. The aircraft was produced with
regular span and clipped wing tips.
The Spitfire XIV was powered by the Griffon 65 engine and also
incorporated a larger fin and rudder from the earlier marks of Spit. Like the Mk
IX, it was intended as an interim aircraft prior to the definitive Mk 21/22.
Like the Mk. IX it was built in much larger quantities than the aircraft that
was to replace it! The Spitfire XIV was the first series produced Spitfire to
include the Griffon 65 and was mated to the Mk. VIII airframe. In fact, six Mk.
VIIIs were converted and provided to various entities for testing. Though
initially to use a DeHavilland counter rotating prop, the Mk. XIV used a five
bladed Rotol prop instead; the first production Spitfire to do so. The initial
prototypes were built in mid-1943 with the first units receiving the planes
around late 1943, early 1944. Early Mk. XIV aircraft had the older sliding hood,
though later models had a full vision 'bubble' canopy. The aircraft were used
post war by both the RAF and Belgian Air Force. The aircraft was produced with
regular span and clipped wing tips.
|
CONSTRUCTION |
The base kit for this conversion is the
Revell/Hasegawa 1/32 Spitfire I/II,
though any of the Hasegawa 1/32 Spitfires could be used as well. The first step
in this conversion was to cut the wings and fuselage. You will be using the
center 'gull' of the lower wings for this conversion. I scribed the area to be
cut several times with an X-acto blade and then just 'snapped' the part out. It
took about 10 minutes.
At this time, I also cut away the elevators from the tail planes as they will be
replaced with different versions as supplied in the conversion set. The task was
quite simple as all I did was to take a small razor saw and start cutting on the
hinge lines. A few minutes work and the old elevators were gone. The new ones
are a bit of a different design on the outside, so some filing will be needed to
properly match things up.
Meanwhile, I started work on the interior parts. No new cockpit bits are
provided, though that shouldn't be much of a problem. I also picked up a set of
Eduard etched harnesses. Set # 32-039 provides the later version that would have
been used on the Mk.
With most of the resin bits roughly cleaned up. I went to work on the interior.
Now I'm not really sure how different the Spit XIV cockpit is from the Spit V,
but I figured it wouldn't be much and most modelers wouldn't know the difference
so I built the cockpit straight from the box. Probably the most trouble was with
the seat adjustment assembly as it has to be just right to get all the bits to
fit, but at this scale even that wasn't too tough. Everything was painted RAF
Interior Green, then bits were picked out in flat black. The fire bottles were
painted red as indicated in the Revell instructions. The O2 bottle
was painted white, and the '
Once the cockpit parts were painted, the assembly was given a black wash. When
dry, I drybrushed much of it with a lighter green and with aluminum. At this
time, I installed an Eduard brass harness as the seat looked a bit bare without
it. I also used some Reheat instrument decals to make the instrument panel look
a bit better. Then I glued the stick and instrument panel in place and cemented
this assembly to one of the fuselage halves. The other half was glued on and set
aside to dry.
Unfortunately, I had to sand off the nice wing root fairings for the landing
gear as there was no way I could smooth out the join of three major parts next
to it without damaging them. It might not be a bad idea to have these provided
as separate resin castings. As often happens with large and somewhat
complicated kits, this one was built sporadically, often sitting for
several weeks or a month between time of construction. Guess that is what
basically qualifies a long time build!
Next step was to install the lower carb intake. Fit was rather good, though
I did use filler to smooth things out a bit. While that was setting, I cut
out the tail wheel area as shown on the instructions. You end up taking out
quite a chunk so I urge care when doing this with lots of referring back to
the plans. The tailplanes were then cleaned up from where I'd cut off the
elevators and glued in place. They fit very well on the top, which was the
resin bit, but the underside had a bit of a gap that needed filled. I also
filled in the antenna mount behind the cockpit as this variant used a whip
radio antenna. Meanwhile, I removed the resin casting stubs from the bottom
of the coolant radiators in preparation for mounting those. Then the kit
sat for about a year and a half. When one loses interest in something it
sometimes will take that long
But going again I did get. The rudder was glued in place at a bit of an
angle. I then mounted the wing tips. The kit parts have to be used and I
wanted to do a full span wing (for some reason, the clipped wings are not
appealing to me). Fit was fair and filler was needed. The lower radiators
were then attached. There are no instructions at all that show just exactly
where these radiators are to be mounted. I finally used a drawing in an old
Harleyford book on the Spitfire to at least get them close. At this time, I
added on the aft clear part and the windscreen. Around this time, I was told
that what the instructions state are fire bottles were something else and shouldn't have
been red. Well,
unless the rear clear bit pops off, red they will stay.
The project then sat for several years (yes, that is years) as I'd just lost interest in the kit.
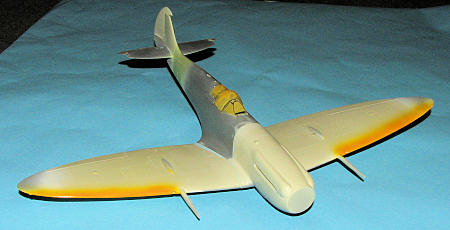
Unfortunately, I left the kit with the wings propped over the edges of the box
and like all good resin, it performed its role as an elastic material. As a result there is considerably more dihedral in the wings than in the
real plane. One of the down sides of resin. However, I was now determined to
finish it off and remove one more albatross from around my neck.
In preparation for painting, I masked the clear bits and tacked the canopy in
place.  Warbirds Productions provides a template for the fuselage. When I compared the
kit fuselage to the template, I found my template to be a bit on the small
side (see image to right). Perhaps a result of imprecise scanning or copying, but all was not lost. I
simply took the resin replacement parts and lined them up with the kit. It is
from this alignment that determined where the fuselage was to be cut. Those
areas were outlined in tape prior to cutting to provide a guide.
Warbirds Productions provides a template for the fuselage. When I compared the
kit fuselage to the template, I found my template to be a bit on the small
side (see image to right). Perhaps a result of imprecise scanning or copying, but all was not lost. I
simply took the resin replacement parts and lined them up with the kit. It is
from this alignment that determined where the fuselage was to be cut. Those
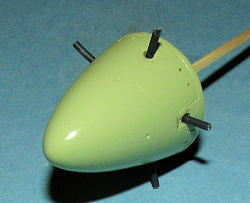
areas were outlined in tape prior to cutting to provide a guide.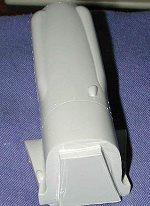 In order to get a good match, I removed the resin casting blocks from the
fin and the engine. The engine has a huge block so being a bit lazy, I only cut
into it a short distance all around. I then counter cut at 90 degrees to the
original and then simply snapped off a section. As you can see from the image to
the left, I
still have a rather hefty plug left, but it should be out of the way when it
comes time to add some glue!
In order to get a good match, I removed the resin casting blocks from the
fin and the engine. The engine has a huge block so being a bit lazy, I only cut
into it a short distance all around. I then counter cut at 90 degrees to the
original and then simply snapped off a section. As you can see from the image to
the left, I
still have a rather hefty plug left, but it should be out of the way when it
comes time to add some glue!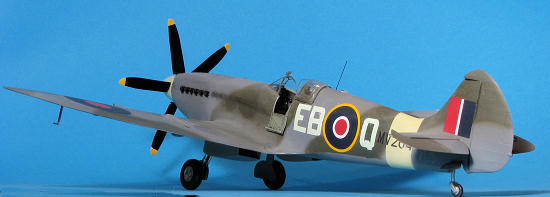 XIV. I found most of the interior pieces needed cleaning up
in terms of seams and ejector pin/sink marks. This is an old kit and suffered
somewhat from mis-alignment of the mold halves. While in this area, I drilled
out all the lightening holes and filled as many of the sink areas and ejector
pin holes as I thought would be visible. When one looks carefully at the parts
for this kit, one finds these things everywhere!
XIV. I found most of the interior pieces needed cleaning up
in terms of seams and ejector pin/sink marks. This is an old kit and suffered
somewhat from mis-alignment of the mold halves. While in this area, I drilled
out all the lightening holes and filled as many of the sink areas and ejector
pin holes as I thought would be visible. When one looks carefully at the parts
for this kit, one finds these things everywhere!
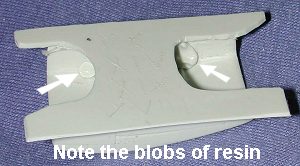 During this process, I also decided to remove all the casting block from the
resin bits that were still left. Most of these were incredibly easy to remove,
taking but a minute or so. I did run into a problem when it came to the under
wing radiators. Both of these are identical castings and both of them had large
blobs of resin tucked into an upper corner. They were quite visible and not
something that could be covered over. The only choice is to try to remove them
as best as one can. It took quite some time with various X-acto knife blades to
cut these out. I highly recommend wearing eye protection of some sort during
this process as the little chunks of resin tend to go flinging out at a
relatively high velocity.
During this process, I also decided to remove all the casting block from the
resin bits that were still left. Most of these were incredibly easy to remove,
taking but a minute or so. I did run into a problem when it came to the under
wing radiators. Both of these are identical castings and both of them had large
blobs of resin tucked into an upper corner. They were quite visible and not
something that could be covered over. The only choice is to try to remove them
as best as one can. It took quite some time with various X-acto knife blades to
cut these out. I highly recommend wearing eye protection of some sort during
this process as the little chunks of resin tend to go flinging out at a
relatively high velocity.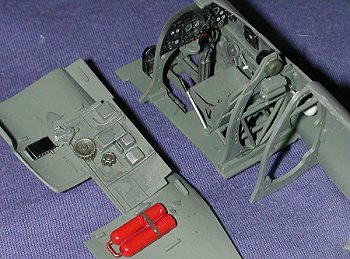 headrest' thingie in a
darker green. I also painted a few other items in this darker green just to give
some differentiation in color. The instrument panel was painted in flat black.
headrest' thingie in a
darker green. I also painted a few other items in this darker green just to give
some differentiation in color. The instrument panel was painted in flat black.
 I then carefully trimmed the area on the rear of the fuselage and attached
the resin tail. The fit is quite good and I aligned things by making sure that
the tailplane holes were properly squared. Then I moved forward to see about the
most difficult part; the nose. I couldn't seem to get a good fit so thought that
perhaps with the wings installed, things would be better. With that in mind, I
started to dry fit the wings. I needed to remove more plastic from the wing root
to get a good fit otherwise they tended to sit too high. I first glued the lower
section with superglue and when that had cured, I mated up the wing root area.
Since I'd done a LOT of test fitting, this seemed to work the best. Doing the
lower section also insured that the lower plastic areas would mate properly then
be drawn up with the wings when the roots were glued.
I then carefully trimmed the area on the rear of the fuselage and attached
the resin tail. The fit is quite good and I aligned things by making sure that
the tailplane holes were properly squared. Then I moved forward to see about the
most difficult part; the nose. I couldn't seem to get a good fit so thought that
perhaps with the wings installed, things would be better. With that in mind, I
started to dry fit the wings. I needed to remove more plastic from the wing root
to get a good fit otherwise they tended to sit too high. I first glued the lower
section with superglue and when that had cured, I mated up the wing root area.
Since I'd done a LOT of test fitting, this seemed to work the best. Doing the
lower section also insured that the lower plastic areas would mate properly then
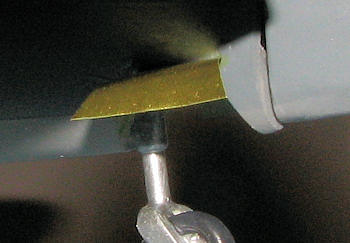
be drawn up with the wings when the roots were glued.  The next step was to start getting the nose to fit. This required a great deal
of sanding and other trimming to get it in place as it should have been. I had
gaps, but some plastic sheet for filler as well as the usual 3-M putty would be
needed to get all to be properly smoothed off. All of this took quite a lot of
work to get things finally as I liked them. As you can see from the image, it
wasn't a pretty sight! It was also very time consuming and the cause of a rather
long delay in construction. Fortunately, the resin is of excellent quality and I
had no problems with air bubbles during all this sanding.
The next step was to start getting the nose to fit. This required a great deal
of sanding and other trimming to get it in place as it should have been. I had
gaps, but some plastic sheet for filler as well as the usual 3-M putty would be
needed to get all to be properly smoothed off. All of this took quite a lot of
work to get things finally as I liked them. As you can see from the image, it
wasn't a pretty sight! It was also very time consuming and the cause of a rather
long delay in construction. Fortunately, the resin is of excellent quality and I
had no problems with air bubbles during all this sanding. 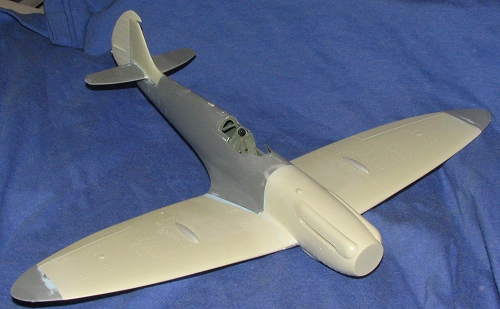 to get going again.
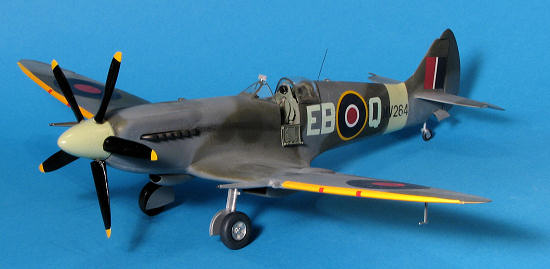 I then drilled out the area for the cannon and glued in the barrels. I also
installed the prop blades in the spinner, but found, to my horror, that they
were all inclined a great deal forward. No recourse but to cut them off at the
spinner. The next step was to drill out the stubs left in the spinner and the
blades themselves to accept sections of rod. Meanwhile, I went looking for
markings and was totally unable to find anything even close to what I needed.
I then drilled out the area for the cannon and glued in the barrels. I also
installed the prop blades in the spinner, but found, to my horror, that they
were all inclined a great deal forward. No recourse but to cut them off at the
spinner. The next step was to drill out the stubs left in the spinner and the
blades themselves to accept sections of rod. Meanwhile, I went looking for
markings and was totally unable to find anything even close to what I needed.
|
PAINT & DECALS |
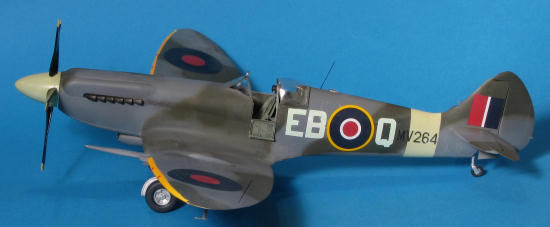
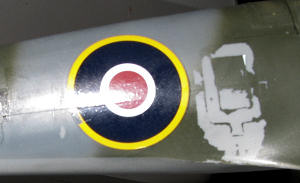
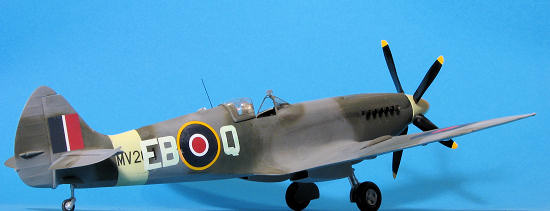
The leading edges of the wings, spinner and rear fuselage in front of the tail were painted with gloss white using Model Master enamels. I then sprayed a yellow acrylic on the leading edges and for the spinner and tail band, I used Agama acrylic Sky. These were given a protective clear coat once they had dried and when that had cured, the areas on the fuselage were masked. I then went over the rest of the airframe with the usual suspects in terms of color; Medium Sea Grey on the underside and Ocean Grey and Dark Green on the upper surfaces.
 With all that pretty
well dry, I had to start looking around for markings. Finding Spit XIV code
letters was not going to be an easy task, that is for sure as no one seems to
make them. I did find insignia from a Techmod Typhoon sheet and so dutifully
applied these on the plane. They are not very susceptible to setting solutions,
though several applications of Solvaset seemed to work after a fashion. They are
also a bit on the brittle side and when I pressed down on an under-wing roundel
to cover some lumps, the lumps cracked the decal. This after much Solvaset had
been applied.
With all that pretty
well dry, I had to start looking around for markings. Finding Spit XIV code
letters was not going to be an easy task, that is for sure as no one seems to
make them. I did find insignia from a Techmod Typhoon sheet and so dutifully
applied these on the plane. They are not very susceptible to setting solutions,
though several applications of Solvaset seemed to work after a fashion. They are
also a bit on the brittle side and when I pressed down on an under-wing roundel
to cover some lumps, the lumps cracked the decal. This after much Solvaset had
been applied.
With the insignia save the upper wing roundels in place, I decided it would be good to install the landing gear. These fit fairly well, though I did have to hold them in place while the super glue dried (plastic gear, resin wells).
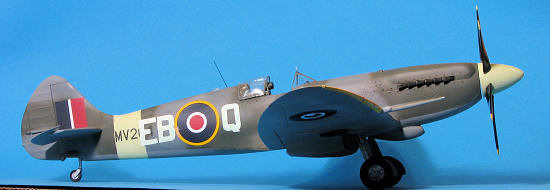
I then went hunting the proper code letters. The closest I could
find were on a profile drawing of a 41 Squadron aircraft. Fortunately, it also
solved my upper wing insignia problem as this plane had a mid-war roundel
without the thin white ring. The
 colors in the profile weren't perfect, but
close enough for this kit (If you recall, I just wanted to finish it as it had
been sitting around for years). I scanned the markings and scaled them to fit on
the kit. Then using white decal paper, printed the code area onto the paper. A
couple of coats of Testors Metallizer Sealer took care of fixing them in place.
As I had to scan the background camo as well, I used a new blade in my scalpel
and cut out each individual letter. While working on this, I searched for the
proper font stencil numbers and letters with no luck. So I found a proper font
and did them as solids instead.
colors in the profile weren't perfect, but
close enough for this kit (If you recall, I just wanted to finish it as it had
been sitting around for years). I scanned the markings and scaled them to fit on
the kit. Then using white decal paper, printed the code area onto the paper. A
couple of coats of Testors Metallizer Sealer took care of fixing them in place.
As I had to scan the background camo as well, I used a new blade in my scalpel
and cut out each individual letter. While working on this, I searched for the
proper font stencil numbers and letters with no luck. So I found a proper font
and did them as solids instead.
Application of these decals is pretty standard, though they do have a
tendancy to curl under so need to be put flat as soon as possible. I've probably
botched the right side codes by having them read the same as on the left but so
be it. I can change that if need be as I always make twice as many decals as I
need "just in case".
|
CONSTRUCTION CONTINUES |
Now seemed like a good time to spray on a semi-matte clear coat as all
the decals were on. Before doing that, I did the usual touch up painting where
I'd scratched the paint or spilled glue on it or something. You know how it
goes.
After looking at the decals, I became less and less pleased with the
codes. They were too large and I didn't like the color. So realizing that in the
scheme of things, another few days shouldn't be a major problem on a kit that
has taken half a decade. Grabbing the Scotch tape, I started removing the code
letters. Of course, this not only took off the decal, but in many cases, the
paint behind it as well. It is resin, you know.
With the new paint in place and drying, I went about making smaller and
better colored codes. This wasn't hard, just time consuming. Interestingly,
though I printed the same colors on both white and clear decal paper, the shades
are different. Not grossly so, but you can tell. I should have guessed that the
ones printed on clear paper would be basically transparent, but the ones on
white paper turned out well, though a bit lighter than I'd have wanted. Still,
they look a lot better than what I had there before.
Next disaster was with the next application of clear matte. For some
reason, it got too concentrated and turned everything white. A coat of Future
helped, but even a highly thinned clear matte still didn't remain totally
un-'frosty'. Tried it again with the Future and then matte clear with the same
results. Decided to basically say 'screw it' as I'd already put a lot of time
into things and was now even more determined to just finish it and move on.
That was it.
 During the painting evolution, I went back to work on the prop. Having
already drilled holes in the spinner and blades, I glued short sections of
plastic rod into the hub, making sure that these were even with the spinner back
plate. Then they were trimmed to length and the blades were carefully cemented
onto the rod, one at a time to be sure they were not jutting forward as before.
Naturally one broke off so I used a paper clip section when repairing it.
Really, should have done that from the start. Once that was done, I drilled out
the center of the backing plate to insert a section of paper clip. Same was done
on the nose where it fits. The exhaust were painted using Alclad II and glued in
place. The opening in the nose seems a bit loose for these, but it looks fine.
During the painting evolution, I went back to work on the prop. Having
already drilled holes in the spinner and blades, I glued short sections of
plastic rod into the hub, making sure that these were even with the spinner back
plate. Then they were trimmed to length and the blades were carefully cemented
onto the rod, one at a time to be sure they were not jutting forward as before.
Naturally one broke off so I used a paper clip section when repairing it.
Really, should have done that from the start. Once that was done, I drilled out
the center of the backing plate to insert a section of paper clip. Same was done
on the nose where it fits. The exhaust were painted using Alclad II and glued in
place. The opening in the nose seems a bit loose for these, but it looks fine.
 I
also glued on the main wheels and gear doors. In the back, the resin tail wheel
assembly was glued in after some additional grinding was done to provide a good
attachment. It may be jutting down a bit far, but if so, I can easily remove it
and put it in lower, The tail wheel doors were eyeball cut out of thin brass
sheet, molded over the rear fuselage and glued in place. Then they were painted
to match. The gun recoil stubs were made from sprue and shaped in a drill with
the sprue held against a section of sandpaper. The opening in the wing was
drilled out using a bit that matched the diameter of the part plus one and the
stub glued in place.
I
also glued on the main wheels and gear doors. In the back, the resin tail wheel
assembly was glued in after some additional grinding was done to provide a good
attachment. It may be jutting down a bit far, but if so, I can easily remove it
and put it in lower, The tail wheel doors were eyeball cut out of thin brass
sheet, molded over the rear fuselage and glued in place. Then they were painted
to match. The gun recoil stubs were made from sprue and shaped in a drill with
the sprue held against a section of sandpaper. The opening in the wing was
drilled out using a bit that matched the diameter of the part plus one and the
stub glued in place.
 Much to my chagrin, I had run out of the Dark Green Agama paint. The
only other RAF Dark Green I had was Testors. Grabbing a soft brush, I lightly
applied the Testors. Naturally, the Agama paint was more brown than the Testors
so the shades are not identical. I'll have to mark that off to areas that were
repainted or something. I also had to touch up the Ocean Grey, but that matched
much better.
Much to my chagrin, I had run out of the Dark Green Agama paint. The
only other RAF Dark Green I had was Testors. Grabbing a soft brush, I lightly
applied the Testors. Naturally, the Agama paint was more brown than the Testors
so the shades are not identical. I'll have to mark that off to areas that were
repainted or something. I also had to touch up the Ocean Grey, but that matched
much better.
 I
applied a coat of matte clear and realized that I just wasn't pleased with the
size of the code letters. So I grabbed some scotch tape and started removing
them. Naturally, this took away some of the paint as well as a bit of insignia.
This was being the kit where nothing goes as planned. Resorting to a font that
looked good, I fattened the letters by adding several borders to them in the
same shade. I printed four sets on both white and clear decal paper. Again,
using a sharp scalpel, I cut around all the letters on the white paper items and
applied them. I then took a set of those printed on clear and started to apply
them atop the first set. These were nearly transparent as I'd thought and also
made the color far too dark, so I left them off. Using a section from a
previously printed set to fill in the torn roundel, I had the codes and
everything in place.
I
applied a coat of matte clear and realized that I just wasn't pleased with the
size of the code letters. So I grabbed some scotch tape and started removing
them. Naturally, this took away some of the paint as well as a bit of insignia.
This was being the kit where nothing goes as planned. Resorting to a font that
looked good, I fattened the letters by adding several borders to them in the
same shade. I printed four sets on both white and clear decal paper. Again,
using a sharp scalpel, I cut around all the letters on the white paper items and
applied them. I then took a set of those printed on clear and started to apply
them atop the first set. These were nearly transparent as I'd thought and also
made the color far too dark, so I left them off. Using a section from a
previously printed set to fill in the torn roundel, I had the codes and
everything in place.
 The last few steps were to paint some intakes and exhaust with matte
black, then attach the small upper fuselage light and the pitot tube. I used
clear paint for those. The masking was removed from the canopy parts and any
leakage scraped away with a tooth pick. The door was glued open and given a bit
of a wash to bring out some detail. The crow bar was not red in most cases,
though most people paint them that color just to add some interest. A hole was
drilled for a small piece of wire to represent the new VHF radio set used by
this and later Spits, the rear view mirror glued in place and painted and the
spinner pushed on.
The last few steps were to paint some intakes and exhaust with matte
black, then attach the small upper fuselage light and the pitot tube. I used
clear paint for those. The masking was removed from the canopy parts and any
leakage scraped away with a tooth pick. The door was glued open and given a bit
of a wash to bring out some detail. The crow bar was not red in most cases,
though most people paint them that color just to add some interest. A hole was
drilled for a small piece of wire to represent the new VHF radio set used by
this and later Spits, the rear view mirror glued in place and painted and the
spinner pushed on.
|
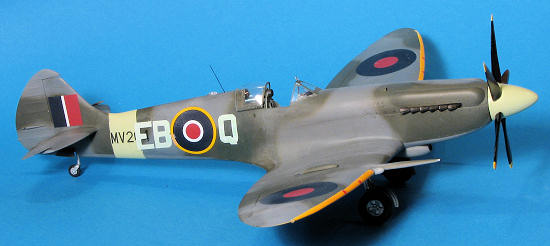
CONCLUSIONS |
REFERENCES
Spitfire: the History by Morgan and Shacklady, 1987 November 2009
Acrabond was
being marketed by Dave Reed, who can be contacted about it at
dave37167@hotmail.com
Late note: It is quite possible that the Acrabond
products are no longer available. It has been that long since the project was
started. Copyright ModelingMadness.com. All rights reserved. No reproduction in any form without express permission from the editor. If you would like your product reviewed fairly and quickly , please
contact the editor or see other details in the
Note to
Contributors.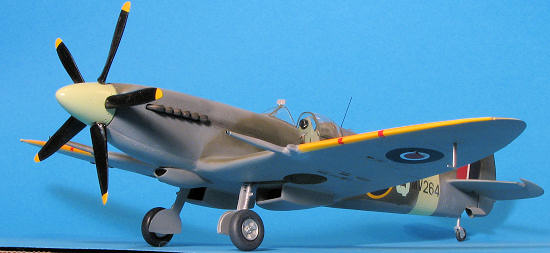 Years in the making and I thought I'd NEVER get it done. Was it worth
it? Well, I do now have a 1/32 Spitfire to add to my collection and it is
somewhat different from what you'd normally find. It did reinforce that I'm not
that great at conversions as I get bogged down in the process. Same goes for
adding extensive aftermarket to a standard kit as I find those tend to get set
aside 'for awhile' and that turns into years. I can't fault the castings as they
are superb and the whole process is, for most, very straightforward and can be
handled by any intermediate level builder.
Years in the making and I thought I'd NEVER get it done. Was it worth
it? Well, I do now have a 1/32 Spitfire to add to my collection and it is
somewhat different from what you'd normally find. It did reinforce that I'm not
that great at conversions as I get bogged down in the process. Same goes for
adding extensive aftermarket to a standard kit as I find those tend to get set
aside 'for awhile' and that turns into years. I can't fault the castings as they
are superb and the whole process is, for most, very straightforward and can be
handled by any intermediate level builder.
 Warbirds Productions sets courtesy of Dinosaur
Studios, Inc,
http://loru1588.tripod.com/warbirds/index.html
.
Warbirds Productions sets courtesy of Dinosaur
Studios, Inc,
http://loru1588.tripod.com/warbirds/index.html
.