
Battle Axe 1/48 Caudron C.714
| KIT #: | 48BA05 |
| PRICE: | $49.00 MSRP |
| DECALS: | Three options |
| REVIEWER: | Scott Van Aken |
| NOTES: | Short run with vacuformed canopies. |
| HISTORY |
The original specification that led to the C.710 series was offered in 1936 in order to quickly raise the number of modern aircraft in French service, by supplying a "light fighter" of wooden construction that could be built rapidly in large numbers without upsetting the production of existing types. The contract resulted in three designs, the Arsenal VG-30, the Bloch MB-700, and the C.710. Prototypes of all three were ordered.
The original C.710 model was an angular looking design developed from an earlier racing design series. One common feature to all of the Caudron line was an extremely long nose that set the cockpit far back on the aircraft. The profile was the result of using the 450 hp (336 kW) Renault 12R-01 12-cylinder inline engine, which had a small cross section and was fairly easy to streamline, but very long. The gear were fixed and spatted, and the vertical stabilizer was a seemingly WWI-era semi-circle instead of a more common triangular design. Armament consisted of a Hispano-Suiza 20 mm HS-9 cannon under each wing in a small pod, with an option for a third firing through the propeller spinner.
 The C.710 prototype first flew on July 18th, 1936.
Despite its small size, it showed great potential and was able to reach 470 km/h
in testing. Further development continued with the C.711 and C.712 with more
powerful engines, while the C.713 which flew in December 1937 introduced
retractable landing gear and a more conventional triangular vertical stabilizer.
The C.710 prototype first flew on July 18th, 1936.
Despite its small size, it showed great potential and was able to reach 470 km/h
in testing. Further development continued with the C.711 and C.712 with more
powerful engines, while the C.713 which flew in December 1937 introduced
retractable landing gear and a more conventional triangular vertical stabilizer.
The final evolution of the 710 series was the C.714 Cyclone, a variation on the C.713 which first flew in April 1938. The primary changes were a new wing airfoil profile, a strengthened fuselage, and instead of two cannons the fighter had four 7.5 mm MAC 1934 machine guns in the wing gondolas. It was powered by the newer 12R-03 version of the engine, which introduced a new carburetor that could operate in negative gee.
The Armee de l'Air ordered 20 C.714s on November 5, 1938, with options for a further 180. Deliveries did not start until January of 1940. After a series of tests with the first planes it became apparent that the plane was seriously outdated. Although light and fast, its wooden construction did not permit for a better engine to be mounted, which seriously limited its vertical speed and maneuverability. Because of that the following month the Caudron was withdrawn from active service in February of 1940. In March the order was reduced to 90, as the performance wasn't considered great enough to continue production. Fifty were diverted to Finland to fight in the Winter War. Six were on their way and a further ten on the docks when the war ended and further shipments were halted. While six aircraft were delivered and assembled, they were soon found to be unreliable and dangerous to use in Finnish conditions, and were never used in combat.
On May 18, 35 of Caudrons were handed over to the Polish
Warsaw Squadron - the Groupe de Chasse polonaise I/145, stationed
at the Mions airfield. After 23 sorties the bad opinion of the plane was
confirmed by the front-line pilots. It was seriously underpowered and was no
match for the enemy fighters of the epoch . Because of that, on May 25, only a
week after it was introduced in active service, French minister of war Guy la Chambre ordered all of C.710's to be withdrawn from active service. However,
since the French authorities had no other planes to offer, the Polish pilots
ignored the order and continued to use the planes. Although the plane was
hopelessly outdated compared to the Messerschmitt Me 109E's it faced, the
Polish pilots nevertheless scored 12 confirmed and 3 unconfirmed kills in three
battles between June 8 and June 11, losing 9 in the air and 9 more on the
ground. Among the planes shot down were four Dornier Do 17
bombers, but also three Messerschmitt Bf 109 and five Messerschmitt Bf 110
fighters.
. Because of that, on May 25, only a
week after it was introduced in active service, French minister of war Guy la Chambre ordered all of C.710's to be withdrawn from active service. However,
since the French authorities had no other planes to offer, the Polish pilots
ignored the order and continued to use the planes. Although the plane was
hopelessly outdated compared to the Messerschmitt Me 109E's it faced, the
Polish pilots nevertheless scored 12 confirmed and 3 unconfirmed kills in three
battles between June 8 and June 11, losing 9 in the air and 9 more on the
ground. Among the planes shot down were four Dornier Do 17
bombers, but also three Messerschmitt Bf 109 and five Messerschmitt Bf 110
fighters.
The plane was also used by the Polish training squadron based in Bron near Lyon. Although the pilots managed to disperse several bombing raids, they did not score any kills nor did they lose any machines. By the end of June when France fell, only 53 production machines had been delivered (although the number varies, 98 is another common figure).
Other projected versions were the C.720 trainer with a 100 or 220 hp (75 or 164 kW) engine, the C.760 fighter with a 750 hp Isotta-Faschini inline engine, and the C.770 fighter with an 800 hp (597 kW) Renault V-engine.
| THE KIT |
 If you have ever seen a French short run kit, then this
one is pretty typical. It is molded in a greenish plastic and all comes on a
single sprue. There is no photo etch or resin included and the two canopies are
vacuformed plastic and superbly molded. The surface texture of the plastic
itself is not as rough as I've seen on previous kits, in fact, it is pretty
smooth. There are the usual plethora of ejector pin marks and towers that will
have to be cleaned up. The sprue attachment points are also rather large, though
not overly so. The lower wing section had detached itself from the sprue and
while I'd expected a few chunks from the attachment points, there were none.
If you have ever seen a French short run kit, then this
one is pretty typical. It is molded in a greenish plastic and all comes on a
single sprue. There is no photo etch or resin included and the two canopies are
vacuformed plastic and superbly molded. The surface texture of the plastic
itself is not as rough as I've seen on previous kits, in fact, it is pretty
smooth. There are the usual plethora of ejector pin marks and towers that will
have to be cleaned up. The sprue attachment points are also rather large, though
not overly so. The lower wing section had detached itself from the sprue and
while I'd expected a few chunks from the attachment points, there were none.
In order to not have the problems with mold shift that have plagued other Battle Axe kits, the thicker bits such as wheels, rudder, horizontal stabs and such are molded in two halves. General detail level is rather soft, as you'd expect from a low pressure injection molding, and the panel lines also exhibit a more 'rounded' appearance than you'd find on major manufacturer's kits. But really, it isn't bad at all and better than previous kits. Many of the parts exhibit some flash that will need to be removed as well.
The cockpit comes with a floor, seat, rudder bar, control column and side panels. There is full wheel well detail and the insides of the main gear doors also have good detail. I didn't see any problems with sink areas, even on the rather thick one-piece wing. The prop blades and spinner are separate and there is no positive alignment pin to get the blade angle right.
Instructions are two sheets of paper. On the cover is a
 large profile drawing in full
color of a Polish version while on the back are the construction steps with some
detail drawings. The other sheet contains the other two markings options and on
the back is an English translation of the construction sequence. This is very
well done and easy to follow. Apparently quite a bit of trimming of various
parts will be needed to build the kit and these are all spelled out in the
write-up.
large profile drawing in full
color of a Polish version while on the back are the construction steps with some
detail drawings. The other sheet contains the other two markings options and on
the back is an English translation of the construction sequence. This is very
well done and easy to follow. Apparently quite a bit of trimming of various
parts will be needed to build the kit and these are all spelled out in the
write-up.
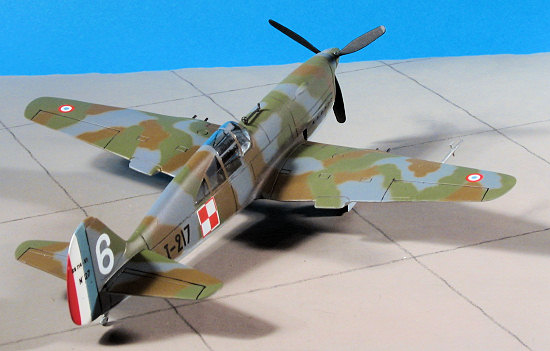
Markings are for two French/Polish aircraft and one Finnish version. The decals are well done and it will be interesting to see how these turn out. The French roundels have separate centers to prevent registration problems. Standard French camo in a camouflage scheme that was different every time it was applied. If doing the version with the tricolor rudder, those colors will need to be painted on and for that reason, the rudder is separate.
| CONSTRUCTION |
First thing to do with kits like this is to clean up the parts. Battle Axe uses a green plastic and while the sprues themselves feel as if they have rough grit sandpaper over them, the plastic parts are devoid of this surface. I did find several sink areas on the lower wing where the plastic was rather thick. This is common with low pressure molding. I started off by gluing sub-assemblies such as the rudder, tail planes and wheels. I found that one wheel half was larger than the other, but that will be equalized during sanding. A small bit of one tail plane was short shot; easy to repair with filler.
I actually started to follow the instructions on this
one. There is a full English supplement and it provides guidance for the build.
For instance, unless one severely sands down and trims th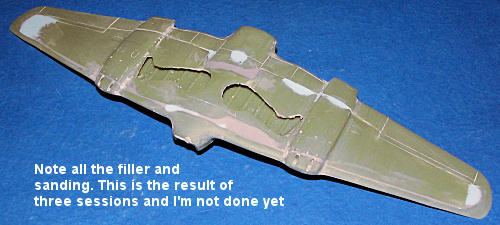 e
lower wing insert, it won't fit. This is brought out in the instructions as are
the need to trim a couple of bulkheads.
e
lower wing insert, it won't fit. This is brought out in the instructions as are
the need to trim a couple of bulkheads.
Once the wing was sanded to death, I glued it in place. Fit is still horrendous and I eventually put in several sessions with filler and rough grade sanding sticks to get things to an acceptable level.
Meanwhile, I started assembling the cockpit bits. The
seat was a no brainer, but finding the control column took a bit of deduction.
It is not that well molded and even after clean-up, looks decidedly odd. I also
glued on the rudder pedals. All of the parts have considerable mold seams to
clean up and that takes a bit of time. I then installed the forward bulkhead
behind the engine opening. Once in and dry, I painted that area matte black and
dry brushed the detail in there. Next, the side consoles were painted dark blue
 (the
instructions say grey, but as the standard French interior color of the time was
dark blue, that is what I went with) and detailed, with the instrument panel
done in black and also detailed.
(the
instructions say grey, but as the standard French interior color of the time was
dark blue, that is what I went with) and detailed, with the instrument panel
done in black and also detailed.
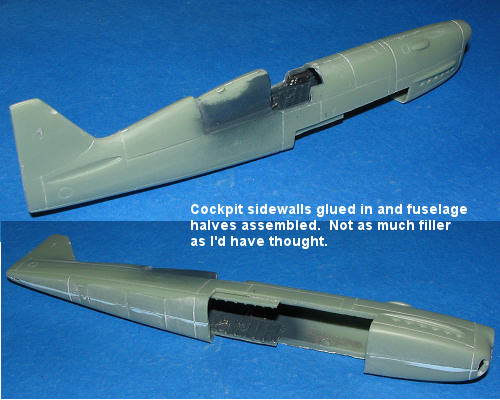
The instructions then told me to close the fuselage halves, which I did. I was quite pleased that I only needed one application of filler along the seam on this one. Fit is actually quite good. I then glued in the two side panels. The instructions tell you which goes in which side, but not which side is up. It is quite difficult to tell and as my reference was of a gutted plane, I just had to guess.
Then it was time to mate the wings with the fuselage.
Test fitting showed that the fuselage was wider than the wing mating surface, at
least in the back. Things were also skewed to the right. I took out my motor
tool and ground away at as much stuff as possible to shift the wing back to
center. I was pretty successful at this and so glued the dickens out of it. The
rear wing/fuselage join was still a mess as the wing was still narrower than the
fuselage at that point. I used epoxy filler to take care
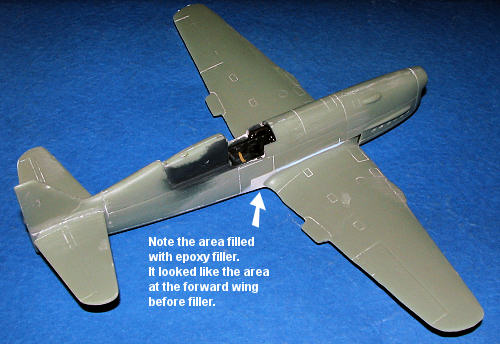 of
the large gaps. This stuff is perfect for large openings as it doesn't shrink
and gives you time to play around with it.
of
the large gaps. This stuff is perfect for large openings as it doesn't shrink
and gives you time to play around with it.
Once the wing was in place, I attached the tail planes.
These gave no problem, one of the few items in the kit to be so nice! The
interior colors were finally touched up and I cut the canopy. This is really way
too large for the aircraft so I had to trim into the transparencies to get it to
fit. Even then, for some reason, when the front was in place, the rear end stuck
up and vice versa. Everything seemed straight on the bottom portion of the
canopy, so I'm not sure what the problem was. I also found that the front of the
transparency was devoid of any framework, though clearly there is some according
to the images. Mea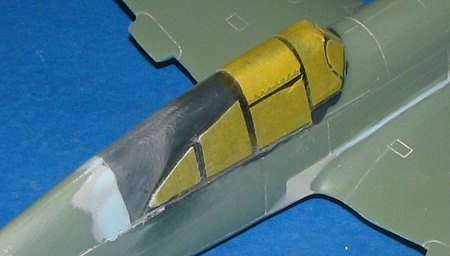 nt
that I probably got things skewed in this area when it was masked.
nt
that I probably got things skewed in this area when it was masked.
After masking, it was attached with white glue. I used superglue to help reinforce things and fill in some gaps. At the upper rear of the canopy, I sanded it as much as I could. Thanks to the rather thick plastic and some addition of super glue, I was able to get it pretty close to matching the rear fuselage. The addition of more filler allowed me to smooth things out. Now it was time to paint.
| COLORS AND MARKINGS |
 First
step was to paint the area around the cockpit with the same color as the
interior. Then the underside was painted with some left-over Aeromaster Light
Blue Grey enamel. When dry, the underside of the horizontal stabs was masked and
the upper surface painted with Aeromaster Dark Blue Grey (the last of it,
unfortunately). Then, using my excellent
Skybow AB 100 detail airbrush (an airbrush for
which I've been unable to get replacement tips). I used some paints I'd mixed for other
projects for the brown and green. I'm not sure if they are accurate, but they
certainly look like it. I used water thin paint and sprayed this at about 5-7
PSI. To me, this was one of the fun parts of the build. I like to do these
complex camouflage schemes and with French WWII aircraft, one can do some pretty
neat stuff. Once all the upper surface pattern was done, I went back and
free-handed the demarcation line between the upper and lower colors. After
a day of drying, the whole model was given a clear gloss coat using Future.
First
step was to paint the area around the cockpit with the same color as the
interior. Then the underside was painted with some left-over Aeromaster Light
Blue Grey enamel. When dry, the underside of the horizontal stabs was masked and
the upper surface painted with Aeromaster Dark Blue Grey (the last of it,
unfortunately). Then, using my excellent
Skybow AB 100 detail airbrush (an airbrush for
which I've been unable to get replacement tips). I used some paints I'd mixed for other
projects for the brown and green. I'm not sure if they are accurate, but they
certainly look like it. I used water thin paint and sprayed this at about 5-7
PSI. To me, this was one of the fun parts of the build. I like to do these
complex camouflage schemes and with French WWII aircraft, one can do some pretty
neat stuff. Once all the upper surface pattern was done, I went back and
free-handed the demarcation line between the upper and lower colors. After
a day of drying, the whole model was given a clear gloss coat using Future.
During this time, I also painted the rudder in red, white and blue using various paints I had pre-mixed. All are enamels.
Before applying the decals, I decided to put the model on its landing gear. As with the rest of the kit, these parts are somewhat lumpy and soft in terms of detail and require quite a bit of clean-up prior to use. The main gear attachment points were also hidden under the wing so they had to be redrilled. The main gear also seem terribly short, but then, the C.714 was a low slung aircraft.
 At this
time, I went to work with the decals. The decals are a bit off register, quite
brittle and refuse to accept any sort of setting solution. In fact, even on
their own they have a tendency to curl when drying. In other words, they are not
the best. However, they are all there is for a subject like this. After ruining
the upper wing roundels and fin logos by applying setting solution, I had to
come up with an alternate plane.
At this
time, I went to work with the decals. The decals are a bit off register, quite
brittle and refuse to accept any sort of setting solution. In fact, even on
their own they have a tendency to curl when drying. In other words, they are not
the best. However, they are all there is for a subject like this. After ruining
the upper wing roundels and fin logos by applying setting solution, I had to
come up with an alternate plane.
Fortunately, I have some 1/72 French Roundels by Carpena (old sheet with the French addy), that I could use for the upper wing roundels. The rest were applied by first putting down some clear acrylic paint (I used Vallejo's but you could use Future), and then setting the decal in it. I also brushed more Vallejo clear gloss on top of it. It seems to have done the trick, though I won't know about silvering until the very end when I seal everything in.
| FINAL BITS |
There are a lot more 'final bits' to this kit than some others. First, I cut the main gear doors as directed and glued those in place. Fit is only fair for the upper door, though the other two fit fine. I also glued on the wheels (which seem a bit wide, but not by much). Then I had to attend to the cannon. I'm given three very short pieces for these. In fact, they wouldn't stick out past the housings if used. Instead, I delved into my pack of Contrail rod for the right diameter. These were glued in place, leveled out and had the ends drilled.
 The prop
had a HUGE sink area in it that took several applications of filler to get
smoothed out. It was then painted and I tackled the prop blades. These seemed
far too long so I snipped about 1/8 inch or so off the end of each one and
reshaped the blade. Then the attachment holes in the spinner were enlarged to
accept each of the blades. With the blades attached, this was then glued n
place. Looking at photos, I think I could have cut off more as the prop still
looks too large. The tips should also be a lot more pointy. I also glued
on the rather large pitot tube. I used the one from the kit as it is an odd
design that I didn't think I could make. The ring and bead assembly was cleaned
up with the solid 'ring' removed and replaced with a photo-etch one from an
unknown kit source (this is why many of us don't toss spare parts). This then
had mounting holes drilled and was glued in place.
The prop
had a HUGE sink area in it that took several applications of filler to get
smoothed out. It was then painted and I tackled the prop blades. These seemed
far too long so I snipped about 1/8 inch or so off the end of each one and
reshaped the blade. Then the attachment holes in the spinner were enlarged to
accept each of the blades. With the blades attached, this was then glued n
place. Looking at photos, I think I could have cut off more as the prop still
looks too large. The tips should also be a lot more pointy. I also glued
on the rather large pitot tube. I used the one from the kit as it is an odd
design that I didn't think I could make. The ring and bead assembly was cleaned
up with the solid 'ring' removed and replaced with a photo-etch one from an
unknown kit source (this is why many of us don't toss spare parts). This then
had mounting holes drilled and was glued in place.
I then glued on the main wheels and the retraction struts. Then the rudder was glued in place. The mass balance on it is too short so if you are building this kit, I suggest lengthening this feature.
I then sprayed the model with clear flat to seal in the decals and provide a uniform finish. As I'd feared, there was some silvering. I then removed the masking to see what sort of additional touchup around the clear parts would be needed. Well, I did discover a few areas that had fogged from the super glue reinforcement. The rear ones I covered by applying the interior blue to it and then coating it with clear gloss. OK, not elegant, but worked pretty well. Front one I just left. I added some pastels and that was it. No radio masts were installed as most photos I've seen of these planes are without them. It would be an easy task to tack them on if one wanted; at least the upper one as there is no hinge provided for the lower mast.
| CONCLUSIONS |
 Not a kit
for everyone. Sure, it is pretty simple looking on the sprues, but then comes
the real work, and work you will, though not as much as with earlier Battleaxe
kits. Actually, I'm pretty proud of myself for finishing this. It wasn't the
nightmare that I envisioned, probably due the extra experience I've had over the
years with working on short run kits. The subject is what sells and that is why
I picked this one to build. Would resin and photo-etched helped? Probably not as
that would have just added another degree of difficulty to things. This kit is
fine the way it is.
Not a kit
for everyone. Sure, it is pretty simple looking on the sprues, but then comes
the real work, and work you will, though not as much as with earlier Battleaxe
kits. Actually, I'm pretty proud of myself for finishing this. It wasn't the
nightmare that I envisioned, probably due the extra experience I've had over the
years with working on short run kits. The subject is what sells and that is why
I picked this one to build. Would resin and photo-etched helped? Probably not as
that would have just added another degree of difficulty to things. This kit is
fine the way it is.
Would I change anything? Yep, two things need to be addressed, and these are things that cannot be fixed by the builder. One is the vac canopy situation. It is bad enough that it is too large, but to not have framework in the most difficult portion of the canopy is inexcusable. Second, something needs to be done with the decals. They are not good and really need to be done by someone who produces a quality product. The other things are not beyond the ability of most of us to fix if we wish to do so. In that regard they are not really an issue.
Would I recommend this kit to anyone? Sure I would. You have to realize what you are getting into with kits like this. If you have the skills or want to develop them, then a rather basic kit like this would be perfect.
| REFERENCES |
The internet and Wikipedia
December 2006
# 1442 in a series
Copyright ModelingMadness.com. All rights reserved.
Thanks to me and my love for the different for bringing this to you.
If you would like your product reviewed fairly and fairly quickly, please contact the editor or see other details in the Note to Contributors.