Meng 1/48 F-18F Super Hornet
| KIT #: | LS-013 |
| PRICE: | $65.00 delivered from China |
| DECALS: | Four options |
| REVIEWER: | Scott Van Aken |
| NOTES: | 2021 release |
| HISTORY |
The Boeing F/A-18E and F/A-18F Super Hornet are twin-engine, carrier-capable, multirole fighter aircraft variants based on the McDonnell Douglas F/A-18 Hornet. The F/A-18E single-seat and F/A-18F tandem-seat variants are larger and more advanced derivatives of the F/A-18C and D Hornet.
 The Super Hornet has an internal 20 mm M61 rotary cannon and can
carry air-to-air missiles and air-to-surface weapons. Additional fuel can be
carried in up to five external fuel tanks and the aircraft can be configured
as an airborne tanker by adding an external air-to-air refueling system.
The Super Hornet has an internal 20 mm M61 rotary cannon and can
carry air-to-air missiles and air-to-surface weapons. Additional fuel can be
carried in up to five external fuel tanks and the aircraft can be configured
as an airborne tanker by adding an external air-to-air refueling system.
Designed and initially produced by McDonnell Douglas, the Super Hornet first flew in 1995. Low-rate production began in early 1997 with full-rate production starting in September 1997, after the merger of McDonnell Douglas and Boeing the previous month. The Super Hornet entered fleet service with the United States Navy in 1999, replacing the Grumman F-14 Tomcat, which was retired in 2006; the Super Hornet has served alongside the original Hornet. The Royal Australian Air Force (RAAF), which has operated the F/A-18A as its main fighter since 1984, ordered the F/A-18F in 2007 to replace its aging General Dynamics F-111C fleet. RAAF Super Hornets entered service in December 2010.
| THE KIT |
This Meng kit is not the first two seat Super Hornet kit offered in this scale. Both Revell/Monogram (I believe) and Hasegawa have provided this prior to the Meng option. These earlier kits are around 20 years old and Meng figured it was time for a new tooling. What they have produced is a super looking kit that provides a considerable number of options. It is not inexpensive, but, like the Tamiya 1/48 F-14 kits, has gotten a lot of positive feedback from those who have to have the latest and greatest as soon as it is released. One nice option is that there are metal pins for the weapon pylons, something that is very helpful.
It is obvious from the parts breakdown that the two seater was planned for release and indeed, this is that kit. Naturally, this kit has a different cockpit tub that includes room for both seats, instrument panels, etc. As with many kits, this one provides decals to spruce up the instrument panels. The fuselage has an upper section that includes the upper inner wings. The lower fuselage goes up to near the nose gear well with the rest of the fuselage including the nose gear well and cockpit section. The radome is separate.
 Intakes are connected to the multi-piece main gear
wells. As with the Hasegawa kit, this one includes separate slats and flaps
which can be posed lower. One of the nice things about this kit is that the
upper rear fuselage vents are optional in regards to the earlier or later
versions. The outer wings can be modeled folded and you have inserts for the
inner wings to accommodate
this feature. There are two pieces of photo-etch included. These fit into the exhaust. I should also mention before I
forget, that Meng offers canopy masks for this kit, something I wish all kit
makers provided. These are most unusual in that only the mask parts are provided
on a plastic sheet backing.
Intakes are connected to the multi-piece main gear
wells. As with the Hasegawa kit, this one includes separate slats and flaps
which can be posed lower. One of the nice things about this kit is that the
upper rear fuselage vents are optional in regards to the earlier or later
versions. The outer wings can be modeled folded and you have inserts for the
inner wings to accommodate
this feature. There are two pieces of photo-etch included. These fit into the exhaust. I should also mention before I
forget, that Meng offers canopy masks for this kit, something I wish all kit
makers provided. These are most unusual in that only the mask parts are provided
on a plastic sheet backing.
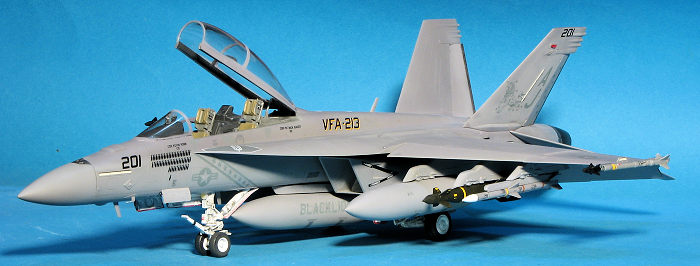
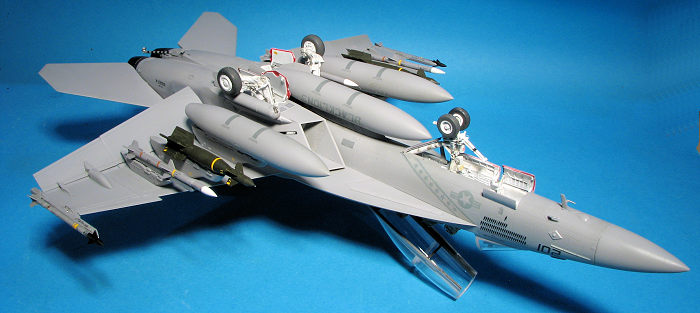
Landing gear are nicely done and one can pose the launch bar raised or lowered. Another neat option is that the horizontal stabs fit into polycaps installed during the fuselage building. This allows some more dynamic positioning. Holes for the wing pylons are already opened up and that is fine as the plane rarely flies without a full set. You have enough weapons and such to fill all the pylons. Though the box art shows only weapons on the wing pylons, the range of the Super Bug so equipped would be very short so you should use the fuel tanks for the inner pylons. The rest of the pylons hold either guided munitions, iron bombs or Sidewinder missiles.
The instruction booklet is nicely done and provides both AK and Acrysion paint references along with generic color names. Those of us who have built a lot of USN aircraft will pretty much know which FS 595 shades to use on this. Markings are for four aircraft. One is the box art CAG bird with VFA-103, which has one of the more popular USN unit schemes. Other options are the CAG bird and a standard line bird with VFA-41. The fourth is a striking bird with Top Gun. This latter option and the CAG bird will need some dedicated masking to paint the large black areas. The large decal sheet is nicely printed and not shown is a smaller sheet with weapons markings. There are a lot of aftermarket sheets if you want something different.
| CONSTRUCTION |
Many years ago, I built the Hasegawa 1/48 F-18F and was pleased with the result. During the intervening years, the technology of kits has improved and so when the Meng kit was released, I ordered one from a vendor in China. It took a while to reduce the pile of 'in work' kits to where I could start this one, but finally that day arrived.
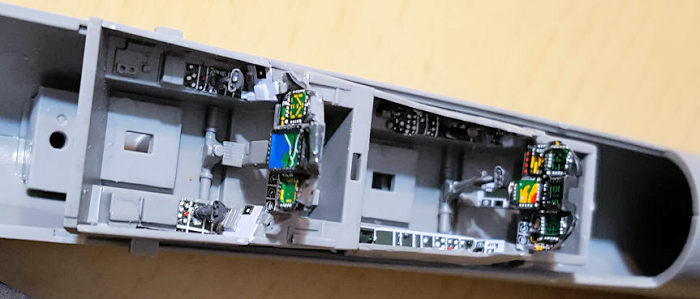 In the now very standard method of kit building, one starts
with the cockpit. In this case I painted those areas in FS 36231 dark gull grey
and a dark black-grey shade. The control column pieces were installed and then
began the fairly laborious task of installing all the decals. Meng has chosen to
not use a single decal for the instrument panels but a medley of individual
decals to accomplish this. It results in a fairly lengthy decalling process as
one really has to let each marking dry before moving on to the one next to it.
Some of these are little more than slivers. Of course, I could have painted
every instrument and button/knob, but went with the decals instead.
In the now very standard method of kit building, one starts
with the cockpit. In this case I painted those areas in FS 36231 dark gull grey
and a dark black-grey shade. The control column pieces were installed and then
began the fairly laborious task of installing all the decals. Meng has chosen to
not use a single decal for the instrument panels but a medley of individual
decals to accomplish this. It results in a fairly lengthy decalling process as
one really has to let each marking dry before moving on to the one next to it.
Some of these are little more than slivers. Of course, I could have painted
every instrument and button/knob, but went with the decals instead.
With the cockpit done, it was installed in the fuselage section along with the nose gear well. The rear fuselage was then built up. I'd lost/misplaced the polycaps so robbed a pair from a Hasegawa kit as they fit the slot. The gear wells were built and installed, followed by the intakes. I actually found the intakes to be a bit tricky, but not the frustrating part of the assembly I'd found on other Hornet kits. The fuselage was connected.
 In the
meantime, I'd been building up the fuel tanks, pylons and weapons. The large
inner pylons have pins that just from them. These fit into either the fuel tanks
or large weapons. I chose the LGBs for this task. A great deal of time was spent
decalling weapons after they were painted. Some, like the AIM-120s have a fairly
ridiculous number to attach. The pylons also have their share of decals. I also
built up the landing gear as these are also multi-piece constructs. The kit
provides paint masks for the wheels as well as the canopy, but you don't really
need them for the wheels as the wheel/tire demarcation is very positive.
In the
meantime, I'd been building up the fuel tanks, pylons and weapons. The large
inner pylons have pins that just from them. These fit into either the fuel tanks
or large weapons. I chose the LGBs for this task. A great deal of time was spent
decalling weapons after they were painted. Some, like the AIM-120s have a fairly
ridiculous number to attach. The pylons also have their share of decals. I also
built up the landing gear as these are also multi-piece constructs. The kit
provides paint masks for the wheels as well as the canopy, but you don't really
need them for the wheels as the wheel/tire demarcation is very positive.
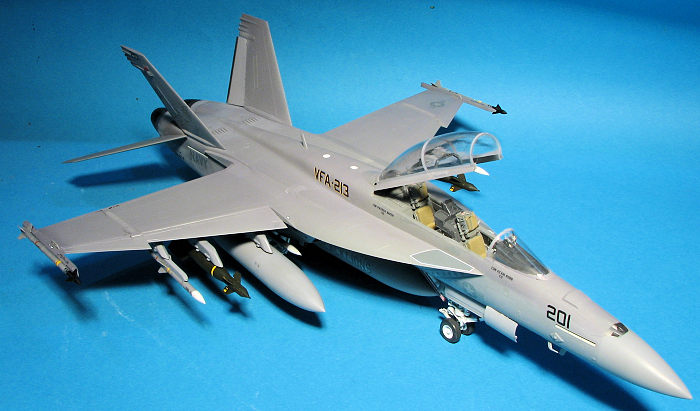
The wings have the options of having the tips folded or not. I chose the extended option. This area is very well engineered. One also has the choice of raised or lowered flaps or slats. This was a bit of a fussy part of the build on the Hasegawa 1/48 F-18F, but on the Meng kit it was quite straightforward. One snips one of the two sets of tabs on these parts depending on the raised/lowered option. F-18s are almost always seen with them lowered on the ground. The fins were built up with their movable rudders and installed. I left off the stabs until after painting. I installed the windscreen, masked off the interior and the clear bits, filled the gear wells with Silly Putty, then went to do painting. As a note, there is a seam on the main canopy that will have to be sanded away and cleared up. Time consuming, but not impossible.
| COLORS & MARKINGS |
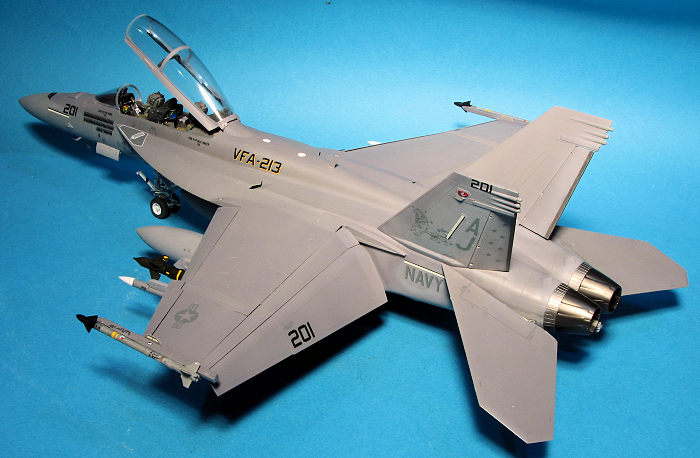
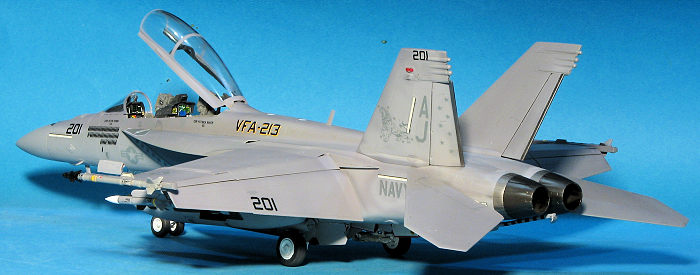
 Modern Navy
jets are two greys; FS 36320 upper and FS 36375 underside. The kit instructions
show the outer surface of the fins to be the darker FS 36320, but that is not
always the case. The set of markings I chose from a Furball sheet has this area
in the lighter grey. Painting was done freehand and the Hataka paints went on
without issue. The airframe was then returned to the bench where the landing
gear were installed before returning for a gloss clear. Installing some of the
smaller struts took a bit of thought, but keep at it and you'll get them all in
place. As usual, pulling the Silly Putty out of the gear wells was a piece of
cake.
Modern Navy
jets are two greys; FS 36320 upper and FS 36375 underside. The kit instructions
show the outer surface of the fins to be the darker FS 36320, but that is not
always the case. The set of markings I chose from a Furball sheet has this area
in the lighter grey. Painting was done freehand and the Hataka paints went on
without issue. The airframe was then returned to the bench where the landing
gear were installed before returning for a gloss clear. Installing some of the
smaller struts took a bit of thought, but keep at it and you'll get them all in
place. As usual, pulling the Silly Putty out of the gear wells was a piece of
cake.
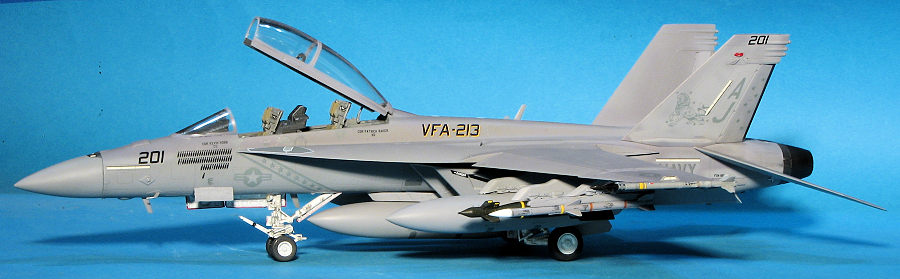
With the clear in place, I started adding decals. I chose to attach the data and common decals from the Meng sheet. The upper surface stencils are so close to the upper paint color that they practically disappeared once applied. I chose a VFA-213 plane from the decal sheet for the unique markings. I made the huge mistake of applying some 'bottom of the bottle' setting solution to the first set of fin markings and they caused the decal ink to smear. Fortunately, the sheet has multiple markings for this unit so I picked another set to apply. Generally the decals went on well, but I did have some issues with silvering with both the aftermarket and kit decals. Decals were then provided a coat of clear semi-matte.
 The final
steps were the installation of the wheels, gear doors, antennas and so forth.
The gear doors fit very well and have positive attachment points so no butt
joins on this one. The missiles were a bit tricky to install, but generally fit
well. The bombs and drop tanks just slid onto the metal pits with no issues.
When it came to the main canopy, the part shown to hold the canopy open is far
too long. Use the shorter one. Masking was removed, the antennas and other small
bits were installed and the stabs installed. This latter item caused some grief.
Apparently the Hasegawa openings are smaller than the Meng ones so the usual
twisting to get the stabs installed resulted in one breaking. Out came the paper
clip and a replacement pin was made, which fits quite well.
The final
steps were the installation of the wheels, gear doors, antennas and so forth.
The gear doors fit very well and have positive attachment points so no butt
joins on this one. The missiles were a bit tricky to install, but generally fit
well. The bombs and drop tanks just slid onto the metal pits with no issues.
When it came to the main canopy, the part shown to hold the canopy open is far
too long. Use the shorter one. Masking was removed, the antennas and other small
bits were installed and the stabs installed. This latter item caused some grief.
Apparently the Hasegawa openings are smaller than the Meng ones so the usual
twisting to get the stabs installed resulted in one breaking. Out came the paper
clip and a replacement pin was made, which fits quite well.
| CONCLUSIONS |
So there you have it. The latest darling of the modern jet fraternity. This build seemed to go a lot smoother than when I did the Hasegawa kit, but it was still a fairly long evolution. This is due to the large number parts and the myriad of stencil decals as it was anything else. The kit is solid, looks very good when done and is well worth the effort put into it. If you are a fan of this type of aircraft in this scale, then this is the one to get. The Hasegawa kit is still quite nice, but the Meng kit has options and features that make it a bit better.
| REFERENCES |
https://en.wikipedia.org/wiki/Boeing_F/A-18E/F_Super_Hornet#Airframe_changes
23 February 2023
Copyright ModelingMadness.com. All rights reserved. No reproduction in part or in whole without express permission from the editor.
If you would like your product reviewed fairly and fairly quickly, please contact the editor or see other details in the Note to Contributors.