Roden 1/72 SE.5A
|
KIT # |
045 |
|
PRICE: |
$9.98 MSRP ($8.96 at Squadron) |
|
DECALS: |
Four options: RFC Aces Beauchamp-Proctor, Claxton, Mannock, and Bishop |
|
REVIEWER: |
Clarence Wentzel |
|
NOTES: |
|
HISTORY |
History: April of 1917 was called Bloody
April. During that month, the RFC attempted to fly head to head with the
German Jastas despite inferior equipment and poor pilot training. The
results were that the RFC lost a third of its fighter force and the
flying life expectancy of an English pilot was 17½ hours. "Bloody April"
forced the British to revise their approach to aerial combat, as the
Germans had done the year before. It had now been proven that
well-trained pilots flying the best
 planes were more important than
numerical superiority. Britain rushed to organize pilot training schools
with experienced veterans as instructors. The students were taught using
James McCudden’s “Notes on Aeroplane Fighting in Single-Seated Scouts”
and “Fighting in the Air”. Newer and better aircraft were also in the
pipeline including the Sopwith Camel and the Royal Aircraft Factory
designed S.E.5.
planes were more important than
numerical superiority. Britain rushed to organize pilot training schools
with experienced veterans as instructors. The students were taught using
James McCudden’s “Notes on Aeroplane Fighting in Single-Seated Scouts”
and “Fighting in the Air”. Newer and better aircraft were also in the
pipeline including the Sopwith Camel and the Royal Aircraft Factory
designed S.E.5.
The S.E.5a proved to be one of the most successful aircraft used by the RFC. It was designed for functional instead of aesthetic purposes. It was angular looking but was fast, strong, easy to fly and a study gun platform. The initial model S.E.5 was powered by the 150 hp Hispano Suiza engine that was unreliable and made the aircraft under powered. With the installation of the 200 hp Wolseley Viper, an upgraded license built version of the Hispano, the S.E.5a came into it’s full potential. The S.E.5a eventually served with twenty-five RFC/RAF Squadrons; Fifteen on the Western Front, three in Macedonia, two in Palestine, one in Mesopotamia and four Home Defense Squadrons. It’s greatest achievements were in France where it was the mount for many of the well-known aces.
|
THE KIT |
 Revell, Renwal and ESCI among others have
offered the S.E.5a in 1/72 scale in the past. The Revell kit was
generally accurate but many of the important features such as the exhaust
pipes were molded in place. It is time for a new, modern kit of this
important aircraft. Following their successes with a number of
significant WW I aircraft such as the Albatros and D.VII series, Roden
have added a modern kit of the S.E.5a. The kit consists of two main
sprues, a third smaller sprue with the nose/engine parts unique to the
Wolseley Viper, a clear sheet with different windshields and the decal
sheet. An eight-page instruction sheet is included. The kit really does
a great job of depicting the canvas-covered surfaces of the S.E.5a. The
key word here is subtle. No troughs between the wing ribs, no heavy
pseudo-fabric patterns on the surfaces, just a smooth, subtle portrayal
of the underlying structures.
Revell, Renwal and ESCI among others have
offered the S.E.5a in 1/72 scale in the past. The Revell kit was
generally accurate but many of the important features such as the exhaust
pipes were molded in place. It is time for a new, modern kit of this
important aircraft. Following their successes with a number of
significant WW I aircraft such as the Albatros and D.VII series, Roden
have added a modern kit of the S.E.5a. The kit consists of two main
sprues, a third smaller sprue with the nose/engine parts unique to the
Wolseley Viper, a clear sheet with different windshields and the decal
sheet. An eight-page instruction sheet is included. The kit really does
a great job of depicting the canvas-covered surfaces of the S.E.5a. The
key word here is subtle. No troughs between the wing ribs, no heavy
pseudo-fabric patterns on the surfaces, just a smooth, subtle portrayal
of the underlying structures.
|
CONSTRUCTION |
As with their other lines, Roden have
engineered the S.E.5a kit so that a number of different versions can
eventually be provided. For example, three different fuselage top covers
are provided, two different landing struts and two different
 horizontal
stabilizers. Also, the headrest is provided as a separate part.
Starting assembly with the fuselage, care must be taken because the
fuselage sides are very thin and not too rigid until the nose parts are
assembled. Be careful to get them aligned properly. The cockpit
interior is well done except that the seat looked pretty basic. I
substituted a PE seat and some lead foil belts to improve the appearance.
As I got to the nose of the fuselage, I had some trouble with part 1D,
the nose underside and with part 5D, the radiator. The underside part is
difficult to position because it mounts to the sides with beveled
surfaces. Use care with these parts. The nose part required the removal
of the four mounting bumps from the backside to make the part fit in
place. I also drilled out the intake hole in the Nose Radiator. The
other modification that I made to the fuselage relates to part 6A. You
need to remove the breech cover from the top of this part. It is only
used on American planes (see photo on page 41 of the Squadron Signal
book). It appears that the shape of the radiator is slightly wrong. The
slats on the radiators appear to be too narrow and set too deep. I
didn’t bother trying to fix this item.
horizontal
stabilizers. Also, the headrest is provided as a separate part.
Starting assembly with the fuselage, care must be taken because the
fuselage sides are very thin and not too rigid until the nose parts are
assembled. Be careful to get them aligned properly. The cockpit
interior is well done except that the seat looked pretty basic. I
substituted a PE seat and some lead foil belts to improve the appearance.
As I got to the nose of the fuselage, I had some trouble with part 1D,
the nose underside and with part 5D, the radiator. The underside part is
difficult to position because it mounts to the sides with beveled
surfaces. Use care with these parts. The nose part required the removal
of the four mounting bumps from the backside to make the part fit in
place. I also drilled out the intake hole in the Nose Radiator. The
other modification that I made to the fuselage relates to part 6A. You
need to remove the breech cover from the top of this part. It is only
used on American planes (see photo on page 41 of the Squadron Signal
book). It appears that the shape of the radiator is slightly wrong. The
slats on the radiators appear to be too narrow and set too deep. I
didn’t bother trying to fix this item.
 Wings: The upper and lower wings are
one-piece. Unfortunately, the top wing of my kit featured a different
amount of dihedral on each side. I lightly bent the offending panel to
get the angles right. I had the hardest time figuring out how to mount
the top wing. Many biplanes have some sort of a triangular structure to
locate the top wing relative to the fuselage and lower wing or else the
manufacturer provides some built-in assistance. With the S.E.5, both the
interplane and cabane struts are parallelograms. I tried two or three
methods to mount the top wing that didn’t work. Finally, I made small
templates that could be used to set the interplane struts at the proper
angle relative to the bottom of the fuselage. Once the four struts were
dry, the top wing could be mounted in the proper location. When this was
complete, the interplane struts were added.
Wings: The upper and lower wings are
one-piece. Unfortunately, the top wing of my kit featured a different
amount of dihedral on each side. I lightly bent the offending panel to
get the angles right. I had the hardest time figuring out how to mount
the top wing. Many biplanes have some sort of a triangular structure to
locate the top wing relative to the fuselage and lower wing or else the
manufacturer provides some built-in assistance. With the S.E.5, both the
interplane and cabane struts are parallelograms. I tried two or three
methods to mount the top wing that didn’t work. Finally, I made small
templates that could be used to set the interplane struts at the proper
angle relative to the bottom of the fuselage. Once the four struts were
dry, the top wing could be mounted in the proper location. When this was
complete, the interplane struts were added.
|
CAMOUFLAGE & MARKINGS |
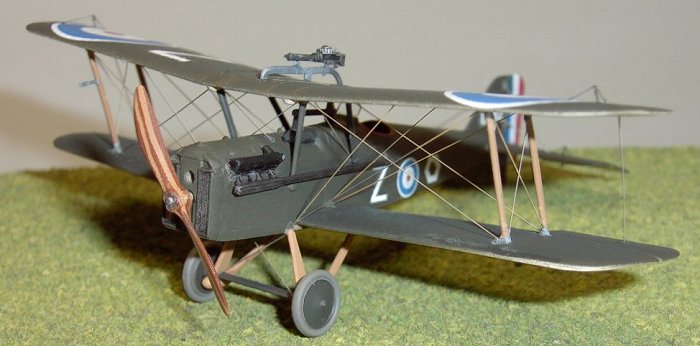
I used Testors Model Master 2709, light Ivory
for the undersurfaces and 1787 Green Drab for the upper surfaces. This
seemed similar to the dark PC-10E color that would have been used on the
SE-5 at this time. The Roden kit provides the markings of four of
 the
leading RFC aces. I chose to model the airplane of Billie Bishop, the
RFC leading ace, while he was with the 85 squadron. A good photo of the
aircraft is shown on page 33 of the Squadron Signal “S.E.5a in Action”.
It is one of the few photos showing upper wing markings. The Roundels on
the upper surface of the top wing and on the fuselage side featured a
thin white surround. The Roden decal sheet includes these markings but
the outer surround was too narrow and was out of register. I substituted
the kit decals in these areas with decals from Americal/Gryphon sheet
number 143 – “No. 56 Squadron RFC/RAF, 1917-18”. This sheet featured the
correct white outer surround and was in register. I used the kit decals
for the rest of the markings. I painted the tires with a mixture of gray
and brown in order to reproduce the slightly brownish tinge of rubber
from that era. I painted the prop with a base coat of 1735 Wood, cut
strips of tape to mask the different laminas and then sprayed 1736
leather. I then finished the prop with a coat of Future.
the
leading RFC aces. I chose to model the airplane of Billie Bishop, the
RFC leading ace, while he was with the 85 squadron. A good photo of the
aircraft is shown on page 33 of the Squadron Signal “S.E.5a in Action”.
It is one of the few photos showing upper wing markings. The Roundels on
the upper surface of the top wing and on the fuselage side featured a
thin white surround. The Roden decal sheet includes these markings but
the outer surround was too narrow and was out of register. I substituted
the kit decals in these areas with decals from Americal/Gryphon sheet
number 143 – “No. 56 Squadron RFC/RAF, 1917-18”. This sheet featured the
correct white outer surround and was in register. I used the kit decals
for the rest of the markings. I painted the tires with a mixture of gray
and brown in order to reproduce the slightly brownish tinge of rubber
from that era. I painted the prop with a base coat of 1735 Wood, cut
strips of tape to mask the different laminas and then sprayed 1736
leather. I then finished the prop with a coat of Future.
|
FINAL CONSTRUCTION |
With most biplanes, the modeler has to make
some decisions regarding the sequence of the assembly process. I
assembled the fuselage-lower wing-stabilizer and then completely painted
the model and  applied the decals before the assembly of the top wing. I
also added some wash to the control surfaces that I had set at slight
angles. In retrospect, I should also have mounted the exhaust pipes,
fuselage gun and telescope at this time. Once the tip wing was mounted,
I added the landing gear and then started the rigging. I use .006 dia.
stainless steel wire for rigging. I cut each piece to the proper length,
apply a small drop of CA glue to the mounting locations and then
carefully position the wire in place while holding my breath. The S.E.5
featured very prominent control horns on each of the flying controls.
These are not included with the kit so PE parts were added and the
control actuation wires installed. Once all of the rigging was complete,
a final coat of transparent flat acrylic paint was sprayed over the
model. This makes the model look more realistic and covers any shiny
spots from the CA glue. Finally, the windshield and the window over the
instrument panel are added.
applied the decals before the assembly of the top wing. I
also added some wash to the control surfaces that I had set at slight
angles. In retrospect, I should also have mounted the exhaust pipes,
fuselage gun and telescope at this time. Once the tip wing was mounted,
I added the landing gear and then started the rigging. I use .006 dia.
stainless steel wire for rigging. I cut each piece to the proper length,
apply a small drop of CA glue to the mounting locations and then
carefully position the wire in place while holding my breath. The S.E.5
featured very prominent control horns on each of the flying controls.
These are not included with the kit so PE parts were added and the
control actuation wires installed. Once all of the rigging was complete,
a final coat of transparent flat acrylic paint was sprayed over the
model. This makes the model look more realistic and covers any shiny
spots from the CA glue. Finally, the windshield and the window over the
instrument panel are added.
|
CONCLUSIONS |
I am pleased with the final results. I believe that the model accurately reflects the angular looks of the S.E.5. The kit would be better if the various mounting locations were better defined and more mounting pins were included but it can be built by most slightly experienced modelers. A big thanks to Scott for letting me build this interesting new kit and I apologize for procrastinating so long (it was the top wing).
November 2003
|
REFERENCES |
S.E.5a in Action by John F. Connors – Squadron Signal Publications Number 69.
S.E.5a by J. M. Bruce – Profile Publications Number 1
High in the Empty Blue – History of 56 Squadron by Alex Revell – Flying Machines Press – lots of good photos..
Copyright ModelingMadness.com. All rights reserved. No reproduction in any form without express permission from the editor.