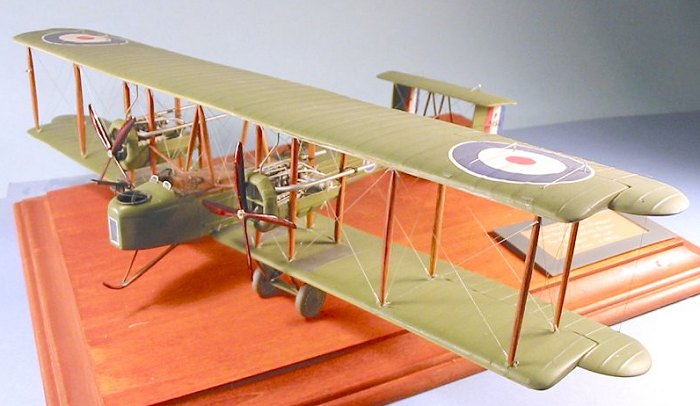
TC Models 1/48 Vickers Vimy
|
KIT # |
? |
|
PRICE: |
$Out of Production |
|
DECALS: |
home made |
|
REVIEWER: |
Candice Uhlir |
|
NOTES: |
resin kit |
|
HISTORY |
The Vimy was developed to answer the needs of the R.F.C. for a long range heavy bomber. In June 1917, a specification was released for a three seat night bomber, to be powered by two or three engines, capable of carrying a payload of 3,000 lbs at a speed of 80 to 85 mph. The prototype nomenclature was FB27, later to be officially named “Vimy” in March 1918.
The first
flight took place in November 1917 but problems with the prototype
delayed the flight test program until late April
 1918. This aircraft was
powered by two 200 h.p. Hispano-Suiza engines but the aircraft was
designed to accept numerous power plants to include the Salmson, Maori,
Fiat, Eagle, Puma, and Jaguar engines. The RAF also anticipated using
American-built 12 cylinder Liberty engines; however, the United States
decided to produce the Liberty engines for American use and consequently
the British were forced to use other engines.
1918. This aircraft was
powered by two 200 h.p. Hispano-Suiza engines but the aircraft was
designed to accept numerous power plants to include the Salmson, Maori,
Fiat, Eagle, Puma, and Jaguar engines. The RAF also anticipated using
American-built 12 cylinder Liberty engines; however, the United States
decided to produce the Liberty engines for American use and consequently
the British were forced to use other engines.
Only one Liberty powered Vimy was built and was expected to make its’ maiden flight in January 1919; however, it was damaged in a fire and was never flown.
No Vimy was used operationally in the First World War, however the aircraft did gain a claim to fame by making the first non-stop trans-Atlantic flight in June of 1919. In the next couple of years a Vimy was to make the first flight between Great Britain and Australia in less than 30 days. Numerous variants of Vimy were constructed for use as an airliner, an air ambulance, and as a transport aircraft for paratroopers.
|
THE KIT |
As with everything there is usually something good to say about a kit and some things not so good. The good in this case is that this is the only 1/48 Vimy kit that I know of. The bad was that the quality of the kit, otherwise being pretty much to scale, was poor. Knowing this is a resin kit tends to prepare me for some deficiencies in quality. This one was fairly nasty and one look is all it took to conclude that this monster was going to take a boatload of tender loving care.
 The kit
consists of 37 resin parts, 17 white metal parts, 68 photo-etch pieces
(all the struts are photo-etch) , thick rigging wire and a very sparse
instruction sheet. The resin parts are molded well to scale when
compared against the DataFile but they were full of pinholes and
blemishes. The photo-etch was good but thick. For some strange reason
even the struts are photo-etch, just big flat pieces that best serve as
templates for making your own struts instead of trying to use them.
The white metal parts are ugly, with lots of flash and warping,
especially the white metal props. The resin pieces all fit together very
poorly, especially the big tabs for the 3 piece wings. It was necessary
to perform a lot of cleanup to get the pieces into some kind of suitable
shape to work with.
The kit
consists of 37 resin parts, 17 white metal parts, 68 photo-etch pieces
(all the struts are photo-etch) , thick rigging wire and a very sparse
instruction sheet. The resin parts are molded well to scale when
compared against the DataFile but they were full of pinholes and
blemishes. The photo-etch was good but thick. For some strange reason
even the struts are photo-etch, just big flat pieces that best serve as
templates for making your own struts instead of trying to use them.
The white metal parts are ugly, with lots of flash and warping,
especially the white metal props. The resin pieces all fit together very
poorly, especially the big tabs for the 3 piece wings. It was necessary
to perform a lot of cleanup to get the pieces into some kind of suitable
shape to work with.
Decals were not supplied with the kit. The instructions were very poor, just barely serving to help in the proper identification of the parts. All in all - unless you are a glutton for punishment, or mildly deranged as I am sometimes accused of being - this is not a kit for you!
|
CONSTRUCTION |
So the kit is a mess, but by being so bad it does allow the builder to indulge their creative side to hopefully obtain something worthwhile in the end? If it turns out to be a total failure then it can easily tossed into the trash.
 My approach on
this project was to only use the wings and flying surfaces, the fuselage,
and kit wheels. Everything else was either scratchbuilt or modified
extensively. I started to refer to this build as my “technology
platform”. Tom Cleaver called it “Candi’s Sandbox”. I decided I would
use this project as an opportunity to experiment with new techniques and
see how well things would work out. I extensively modified the kit and
the result is that this took me the better part of almost 2 years to
complete.
My approach on
this project was to only use the wings and flying surfaces, the fuselage,
and kit wheels. Everything else was either scratchbuilt or modified
extensively. I started to refer to this build as my “technology
platform”. Tom Cleaver called it “Candi’s Sandbox”. I decided I would
use this project as an opportunity to experiment with new techniques and
see how well things would work out. I extensively modified the kit and
the result is that this took me the better part of almost 2 years to
complete.
 First, all the
resin parts were sanded to expose all defects in the castings. I sanded
all the wing ribs off and also what little fuselage surface detail was
available other than cockpit padding and the wood planking on the top of
the fuselage. Once everything was smooth I then filled the holes with
Squadron white putty and Mr. Surfacer 500 and then resanded numerous
times.
First, all the
resin parts were sanded to expose all defects in the castings. I sanded
all the wing ribs off and also what little fuselage surface detail was
available other than cockpit padding and the wood planking on the top of
the fuselage. Once everything was smooth I then filled the holes with
Squadron white putty and Mr. Surfacer 500 and then resanded numerous
times.
Fuselage detail and wing ribs were then replaced or enhanced using strips of vellum covered with numerous coats of auto primer as depicted in John Alcorn’s book, “Secrets of the Master ScratchBuilders”.
 I had decided
to build this Vimy as a model of the only Liberty-engined Vimy ever built
and I wanted to expose the engines to view. The kit engine nacelles were
just large solid resin casts representing a totally enclosed engine. The
Liberty powered Vimy was very different from the standard Vimy. The kit
radiator louvers run horizontally to represent a standard Vimy but the
Liberty powered Vimy had its louvers running vertically.
I had decided
to build this Vimy as a model of the only Liberty-engined Vimy ever built
and I wanted to expose the engines to view. The kit engine nacelles were
just large solid resin casts representing a totally enclosed engine. The
Liberty powered Vimy was very different from the standard Vimy. The kit
radiator louvers run horizontally to represent a standard Vimy but the
Liberty powered Vimy had its louvers running vertically.
My engine nacelles were vacuformed using a rig I purchased from Kingston Vacuum Works. I cut down the kit engine nacelle to a shape that would result if the engine cover panels were removed and used those as my mold. I used Aeroclub Liberty engines and scratchbuilt the nacelle framing as well as the horizontal radiator louvers and exhaust manifolds. The props are hand carved by Marty Digmayer. (I guess having Marty do my props indicates that I can be a pretty spoiled girl at times.)
 The Lewis guns
and the scarf rings are Aeroclub white metal, while the seat belts are
Aeroclub photo etch.
The Lewis guns
and the scarf rings are Aeroclub white metal, while the seat belts are
Aeroclub photo etch.
 As I noted,
the wing struts and landing gear assemblies are all photo-etch. I
laminated the photo-etch parts with basswood and sanded them to shape to
obtain pretty good looking “wooden” struts. This approach allowed me to
get struts that were the proper length and shape by just sanding off wood
until the photo-etch came through.
As I noted,
the wing struts and landing gear assemblies are all photo-etch. I
laminated the photo-etch parts with basswood and sanded them to shape to
obtain pretty good looking “wooden” struts. This approach allowed me to
get struts that were the proper length and shape by just sanding off wood
until the photo-etch came through.
The bomb racks were scratchbuilt using Evergreen stock, while the bombs are taken from an old Aurora Gotha kit. I now know that Aeroclub sells white metal Cooper bombs but I know nothing of the quality. If somebody has first-hand knowledge of any British WW1 bombs in 1/48 they can recommend please let me know.
|
COLORS & MARKINGS |
 RAF aircraft
are pretty boring color wise. I used Pollyscale acrylics throughout.
Upper surfaces are PC10 (# 505032) and undersides are doped linen
(#505029). The wood stain on the laminated struts was done with water
based stain coated with Future.
RAF aircraft
are pretty boring color wise. I used Pollyscale acrylics throughout.
Upper surfaces are PC10 (# 505032) and undersides are doped linen
(#505029). The wood stain on the laminated struts was done with water
based stain coated with Future.
Decals were not provided in the kit. I painted most of the markings - the wing roundels were masked using Frisket mask cut to size with a circle cutter. The rudder tri-color was hand masked and airbrushed. The fuselage roundels were taken from my spare decal box.
I printed the serial numbers with my ink jet printer, using Bell decal paper. I had some problems with the Bell paper. It seems that no matter how much clear acrylic I sprayed onto the decal, a sufficient amount of setting solution would cause the decal ink to run. The result was I could not easily remove some silvering and had to resort to the X-acto knife scoring trick. They aren’t perfect but it worked.
|
RIGGING |
 There is lots of rigging on this
model. I did all the rigging using .007 stiff wire with Teflon tubing
turnbuckles that are secured in place using white glue. I ended up using
something like 30 feet of wire when I was finally finished. One of the
most difficult parts of this was running the aft control wires down the
outside length of the fuselage. I needed small rings to
thread the wire through and these are not provided in the kit. I
made guide rings using my Waldron
Micro Punch, first
making a small diameter hole in thin plastic, then centering that hole
under a larger die and pressing out a ring. I had to make six or so
attempts to obtain one useable ring. Twelve rings are needed on the
aircraft. To say this was tedious is an understatement.
There is lots of rigging on this
model. I did all the rigging using .007 stiff wire with Teflon tubing
turnbuckles that are secured in place using white glue. I ended up using
something like 30 feet of wire when I was finally finished. One of the
most difficult parts of this was running the aft control wires down the
outside length of the fuselage. I needed small rings to
thread the wire through and these are not provided in the kit. I
made guide rings using my Waldron
Micro Punch, first
making a small diameter hole in thin plastic, then centering that hole
under a larger die and pressing out a ring. I had to make six or so
attempts to obtain one useable ring. Twelve rings are needed on the
aircraft. To say this was tedious is an understatement.
|
CONCLUSIONS |
This kit is not for the novice and will take quite a bit of time to build into a suitable model. All of my detail is the result of either a lot of scratchbuilding or extensive modifications. If I had to guess, I would say I spent about 500+ hours on this kit over the last 2 years. With all that work I am pretty satisfied with the result. Is it perfect? Absolutely not! But it is presentable and definitely unique. The best part of it all is that I really expanded my techniques on this build. I have lots of kits waiting in my stash to do and I am looking forward to using some of what I learned here on those! All in all, I now have a one-of-a-kind model of a prototype Vickers Vimy
(Editor’s note: to add insult to injury, this is the 28th model ever built by Candice Uhlir.)
|
REFERENCES |
Vickers Vimy DataFile - close up shots and 1/72 scale drawings.
Jane’s Fighting Aircraft of World War 1 - Liberty engine details.
Alcorn, Lee, and Cooke: “Scratch Built”; First Edition, 1993; ISBN: 0-88740-417-0
Alcorn, John: “The Master Scratch Builders;” 1999, ISBN: 0-7643-0795-9
September 2004
Copyright ModelingMadness.com
If you would like your product reviewed fairly and fairly quickly, please contact the editor or see other details in the Note to Contributors.