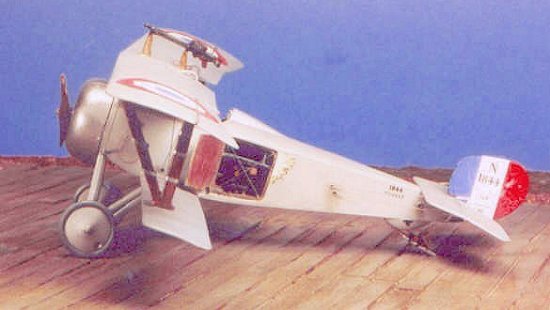
Eduard 1/48 Nieuport 17
|
KIT # |
|
|
PRICE: |
$29.95 |
|
DECALS: |
See review |
|
REVIEW & |
Candice Uhlir |
|
NOTES: |
'Profipack' |
|
INTRO & HISTORY |
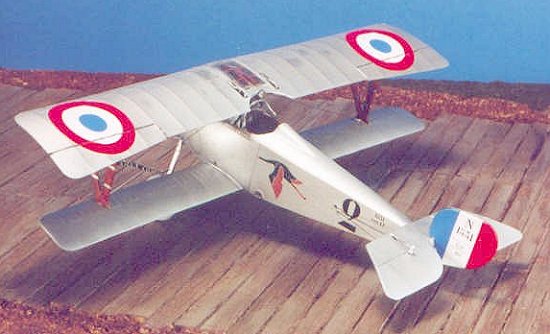
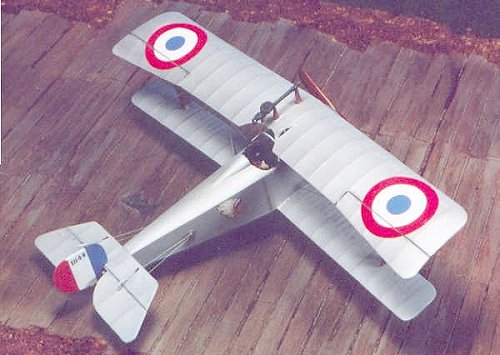
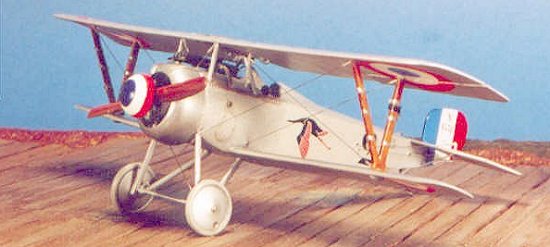
I have a lot of kits stashed in my pile of "to be built" kits. All of them are World War 1 airplanes, all are 1/48, and most are unique except for this stash of Eduard Nieuports that I had somehow collected. I had 4 Nie.17s, 2 Nie.11s, a Nie.21, and Nie.23, not to mention the Tom’s ModelWorks Nie.24 conversion kit and Glencoe's Nieuport 28. I had Nieuports coming out of my ears! So I decided the only way to get rid of them was to build a whole bunch simultaneously. As a mass-build project, I did a the Nie. 21, three of the Nie.17s, and the two Nie.11s. This is how two of the 17s came out - one being almost straight out of the box and painted in the colors of the French Ace Charles Nungesser, the other a "Recon" Nieuport conversion that I modeled after a picture I happened to stumble upon in the Nieuport 17 Data-File.
A bit of Nieuport History.
 The Nieuport series are among the most famous of all World War fighter
aircraft. These aircraft were flown at one time or another by some of the most
famous aces of the Allied air forces including Guynemer, Nungesser, Albert Ball,
Belgium’s Willy Coppens, and the famous American volunteer squadron, the
Escadrille Lafayette.
The Nieuport series are among the most famous of all World War fighter
aircraft. These aircraft were flown at one time or another by some of the most
famous aces of the Allied air forces including Guynemer, Nungesser, Albert Ball,
Belgium’s Willy Coppens, and the famous American volunteer squadron, the
Escadrille Lafayette.
The Nieuport 17 was actually a new design which followed the successful Nieuport 11 "Bebe" series, which had been instrumental in ending the air supremacy of the German Air Service on the Western Front in early 1916, popularly known as the "Fokker Scourge." Although the Nie.17 resembled its Nie.11 ancestor, it sported a larger engine at 110 h.p., a larger wing area, and was better armed than its predecessor. Nieuports were known to be quick in their maneuverability, fast, and deadly to opponents when flown by a skilled pilot.
The success of the Nieuport 17 design can be measured by the amount of variations made to it to fulfill many different roles including fighter, bomber escort, trainer, and reconnaissance aircraft. The Nieuport 17bis sported a faired fuselage along with a 130 hp. Clerget engine. The basic Nie.17 airframe was used as an experimental base for a Nieuport triplane that proved to be a dismal failure. The Nie.17 was retrofitted with a 80 hp. Le Rhone of the very early Nieuport 10, to serve as the Nie. 21, a long range bomber escort and training aircraft. The Nie. 23 was essentially a Nie.17 with a 120 hp. Le Rhone engine. All in all, the Nieuports contributed well to the allied war effort well into late 1917.
|
THE KIT |
 Eduard has come a long way from their limited production days and, in my
opinion, rival the best offerings of "Tamigawa." Good plastic, crisp moldings,
excellent photo etch, excellent decals; everything I have come to expect of
Eduard. The Nieuport 17 ProfiPak kit is composed of two sprues of
approximately 45 parts, a set of approximately 30 photoetch parts, and film for
two variations of windscreen. Decals are by Aeromaster. The kit comes with two
versions of upper wing, one for the clear panels used to improve upward
visibility and one without. It also includes two complete engine cowlings and 10
plastic control horns in addition to those supplied as photo-etch.
Eduard has come a long way from their limited production days and, in my
opinion, rival the best offerings of "Tamigawa." Good plastic, crisp moldings,
excellent photo etch, excellent decals; everything I have come to expect of
Eduard. The Nieuport 17 ProfiPak kit is composed of two sprues of
approximately 45 parts, a set of approximately 30 photoetch parts, and film for
two variations of windscreen. Decals are by Aeromaster. The kit comes with two
versions of upper wing, one for the clear panels used to improve upward
visibility and one without. It also includes two complete engine cowlings and 10
plastic control horns in addition to those supplied as photo-etch.
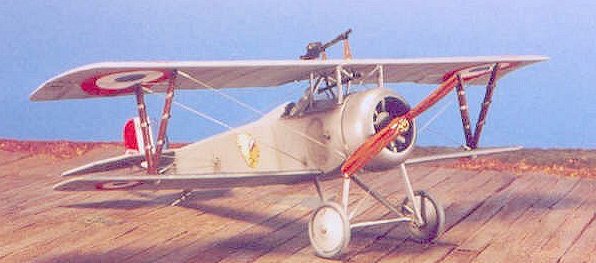
Decals are included for 5 aircraft, including two for Charles Nungesser in either cammo or silver dope, one for Raoul Lufbery of the Escadrille Lafayette, one flown by the Italian ace Baracca, and one flown by the Russian Ace Krutyenyl. I also had a non-ProfiPak kit (no photo etch) in my stash featuring the markings of Guynemer. My Guynemer aircraft is a ProfiPak kit that I switched decals with the non-profiPak Guynemer kit.
|
GENERAL CONSTRUCTION STUFF |
There have been other reviews of this airplane and there isn’t much more praise I can heap on top of that already given. This kit is superb. Everything fits. The moldings are excellent, the photo etch is wonderful, the decals are easy to apply. This kit is pretty much a slammer if you want a WW1 airplane without all the pain usually associated with such offerings by non-biplane aficionados. I hardly used any putty for seams at all...the kit is just that tight.
 Since I built so many of these things simultaneously, I will point out
some things to watch out for. The few problems I did run into were due to my
own stupidity and there is no good reason to hide my findings just because they
are embarrassing! First off, really look at the decal layout. The Nieuports
have a big fat roundel on the underside of the top wing. I have built so many
WW1 biplanes that I didn’t notice that, even though I must have seen it in the
instructions a million times. It is good to apply those two roundels before
you attach the ‘Vee” struts to the upper wing, since it makes it much easier to
place the decals. In my case, I had to cut and fit the decals the first time
around. The next issue was the opening of holes into the rear stabilizer to run
the elevator control rigging into the fuselage. On my first Nie.17, I opened
those holes exactly as they are molded in the plastic. This turned out to be a
problem because my rigging wire had a very pronounced bend to it when installed
between the fuselage through this hole and then to the upper control horn. I
highly recommend you test fit early in the build when you mount the stabilizer.
See how the control line runs and open the hole a bit more if you must until you
achieve a nice straight wire run. Opening the holes here took 15 just minutes
using a drill bit and my riffler files. It is a lot better to do this step early
rather than at the last stage of rigging and running the risk of marring a
beautiful paint job.
Since I built so many of these things simultaneously, I will point out
some things to watch out for. The few problems I did run into were due to my
own stupidity and there is no good reason to hide my findings just because they
are embarrassing! First off, really look at the decal layout. The Nieuports
have a big fat roundel on the underside of the top wing. I have built so many
WW1 biplanes that I didn’t notice that, even though I must have seen it in the
instructions a million times. It is good to apply those two roundels before
you attach the ‘Vee” struts to the upper wing, since it makes it much easier to
place the decals. In my case, I had to cut and fit the decals the first time
around. The next issue was the opening of holes into the rear stabilizer to run
the elevator control rigging into the fuselage. On my first Nie.17, I opened
those holes exactly as they are molded in the plastic. This turned out to be a
problem because my rigging wire had a very pronounced bend to it when installed
between the fuselage through this hole and then to the upper control horn. I
highly recommend you test fit early in the build when you mount the stabilizer.
See how the control line runs and open the hole a bit more if you must until you
achieve a nice straight wire run. Opening the holes here took 15 just minutes
using a drill bit and my riffler files. It is a lot better to do this step early
rather than at the last stage of rigging and running the risk of marring a
beautiful paint job.
The "Out of the Box" Build - ProfiPak With Guynemer Decals:
This model is an out of the box profi-kit with the decals switched. I just didn’t have a Guynemer airplane in my collection and I wanted one now along with the details provided in the profiPak kit. The ProfiPak details are superb and a wonderful-looking kit can be obtained with just a bit of extra work in drilling out the appropriate holes to run rigging lines and such.
|
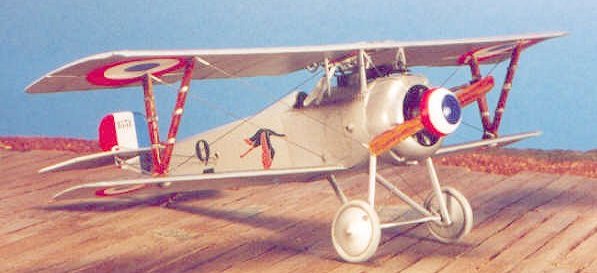
THE RECON NIEUPORT BUILD |
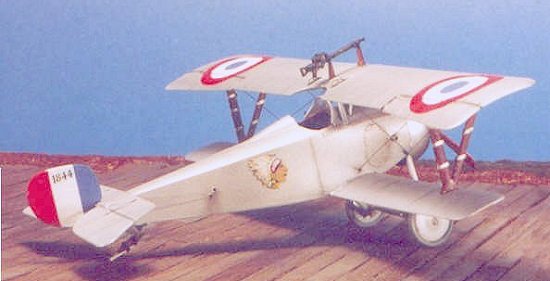 Most of us have run across a picture of a novel modification to a common
airplane in the course of doing our research. I first stumbled across this
neat picture of a recon Nieuport 17 in the Nie.17 Data-File. First off, I had
never even thought of using such a small airplane for recon work, especially
given the size of aerial cameras in 1916-1917. But doing so makes sense. Like
the World War II Mosquito, the Nieuport was among the fastest airplanes of its
time. It could maneuver, it was small. In other words, stealth ala World War
1. In addition, it had sting because it could still carry the light weight
Lewis gun in spite of the additional weight of the camera while fighter versions
commonly sported both the Lewis and a cowl mounted weapon. Better yet, since I
am the self appointed queen of the off-beat, I had never seen one before. When
I mentioned it to some people at the Planes of Fame Museum at Chino, CA they
remarked that they had never heard of one either. That sold me on the idea. I
promised it to Chino for their collection of recon aircraft models.
Most of us have run across a picture of a novel modification to a common
airplane in the course of doing our research. I first stumbled across this
neat picture of a recon Nieuport 17 in the Nie.17 Data-File. First off, I had
never even thought of using such a small airplane for recon work, especially
given the size of aerial cameras in 1916-1917. But doing so makes sense. Like
the World War II Mosquito, the Nieuport was among the fastest airplanes of its
time. It could maneuver, it was small. In other words, stealth ala World War
1. In addition, it had sting because it could still carry the light weight
Lewis gun in spite of the additional weight of the camera while fighter versions
commonly sported both the Lewis and a cowl mounted weapon. Better yet, since I
am the self appointed queen of the off-beat, I had never seen one before. When
I mentioned it to some people at the Planes of Fame Museum at Chino, CA they
remarked that they had never heard of one either. That sold me on the idea. I
promised it to Chino for their collection of recon aircraft models.
|
MODIFICATIONS |
This airplane is a basic Nieuport 17 with a camera hatch cut aft of the cockpit on the port side. Ok...the first question would be to find a suitable aerial camera. None are available in after market parts as far as I know, so I scratchbuilt this one using the general dimensions available in my picture and details from other aerial cameras used by the RAF at the time. My camera is made of basswood stock, covered with smooth plastic "flash" from a sprue to give that smooth look, with known details of aerial cameras of the era such as knobs and shutter arms made with my Waldron punch set. After about 4 hours of work and three attempts, I achieved a camera that looked OK and was about the right size. I didn’t see how the camera was triggered so I rigged a shutter arm out of some old flash and put a pull cord into the cockpit. You can barely see something like that in the picture but creativity is the spice of life! The camera mounting is a four legged stool type structure with a hole in it for the camera lens. This mounting stool is made of evergreen .020 rod and flat stock.
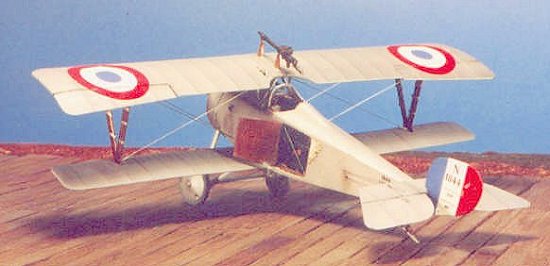 The camera hatch was cut using a drill and some sewing thread to melt a
fine line out of the plastic. This technique was easier than using a razor saw
because the thread would go through the smallest drilled hole at the hatch
corner. Just insert, and pull through like you would when flossing your teeth.
A jeweler’s vice helps to hold the part while dong this. Clean up the cut with
a emery board and riffler files around the corners and you have a nice hatch
opening. I put a bit more detail into the hatch opening by facing it with very
thin pieces of basswood I carved off with my X-Acto knife. The actual airplane
was wood and fabric so I just took this extra step. My hatch door is made from
evergreen sheet that I fit once I had the opening finished up. If you do this,
you should insure that the door fits flush to the rest of the fuselage.
The camera hatch was cut using a drill and some sewing thread to melt a
fine line out of the plastic. This technique was easier than using a razor saw
because the thread would go through the smallest drilled hole at the hatch
corner. Just insert, and pull through like you would when flossing your teeth.
A jeweler’s vice helps to hold the part while dong this. Clean up the cut with
a emery board and riffler files around the corners and you have a nice hatch
opening. I put a bit more detail into the hatch opening by facing it with very
thin pieces of basswood I carved off with my X-Acto knife. The actual airplane
was wood and fabric so I just took this extra step. My hatch door is made from
evergreen sheet that I fit once I had the opening finished up. If you do this,
you should insure that the door fits flush to the rest of the fuselage.
Once you open up the fuselage for inspection, you leave yourself open for a lot of detail inside the airplane. Sure, the camera will obscure a bunch of it, but you can still see a lot. First off, I used the Tom’s Modelworks Nieuport detail set to obtain the proper pilot seat mountings. The Eduard kit just gives you a plastic mount point since you can’t see it in the sealed fuselage of the standard build, but with my hatch opened the actual seat mounting can be seen as a rounded support with lightening holes and a rigging point to run the aft control cables through to the rudder and joystick.
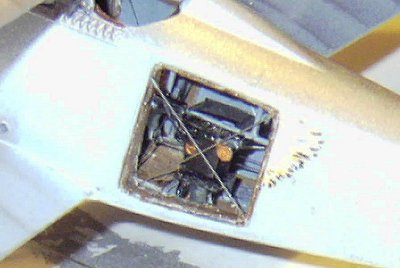 I hid the fuselage interior seams by making a basswood floor, since I
figured a camera mounting needed a reinforced structure to hold the weight
during the stress of flight. A small hole was opened in the lower fuselage for
the camera lens to look through. The floor is thick and some purists may would
object to this, but I did not think that thinning the flooring to canvas
thickness was worthwhile. I ran control wire from the seat mount to the rear of
the aircraft, and used wire to simulate the internal bracing of the fuselage.
I hid the fuselage interior seams by making a basswood floor, since I
figured a camera mounting needed a reinforced structure to hold the weight
during the stress of flight. A small hole was opened in the lower fuselage for
the camera lens to look through. The floor is thick and some purists may would
object to this, but I did not think that thinning the flooring to canvas
thickness was worthwhile. I ran control wire from the seat mount to the rear of
the aircraft, and used wire to simulate the internal bracing of the fuselage.
Putting this all together was a pain and was done in two steps. Anything that could be self contained in one half of the fuselage was done that way. Control wires running to the seat mounting had to be done as I put the fuselage halves together. Bracing wires aft of the pilot seat running across the fuselage were done after the fuselage was sealed via the hatch opening. The control wires running aft were placed in their proper angle by forcing some tissue paper aft through my hatch and then "combing" them out with a toothpick to get the proper lay.
I mounted the camera after all that interior work was done. I did a dry fit of the camera in my mounting stool more than a few times to insure I could fit it through the hatch. It would have been very frustrating if that nice camera wouldn’t fit through the hatch into the mount after all the work I did.
|
PAINTING |
 I used Gunze and Tamiya acrylics overall on both these airplanes. I find
the Tamiya Flat Aluminum paint is a bit grainy for my taste, so I tried to rub
it out with a bit of fine steel wool. If I do another Nieuport in silver I just
might stick to enamel. Besides that, the acrylics are fine. The engine cowlings
are done with SnJ Metalizer Powder and buffed out to a nice polish along with
some realistic dull spots. SnJ is just a superb product. It goes on easy,
polishes well, and won’t pull off with masking tape.
I used Gunze and Tamiya acrylics overall on both these airplanes. I find
the Tamiya Flat Aluminum paint is a bit grainy for my taste, so I tried to rub
it out with a bit of fine steel wool. If I do another Nieuport in silver I just
might stick to enamel. Besides that, the acrylics are fine. The engine cowlings
are done with SnJ Metalizer Powder and buffed out to a nice polish along with
some realistic dull spots. SnJ is just a superb product. It goes on easy,
polishes well, and won’t pull off with masking tape.
I used artist pastel chalk (non-oil based) for my detail. A bit of this rubbed on some paper and sparingly applied with a dry brush around rivet heads, engine panels, and lacing does wonders. I also used a brownish/purplish pastel chalk to ever so slightly highlight my wing ribs. It helps a lot if they stand out just a bit from the uniformly painted wing surface.
|
RIGGING |
My rigging is done using straight stainless steel wire in .007" diameter that I buy from Small Parts, Inc. Each is cut to length and installed with white glue. Control wires that enter the fuselage from the aft control surfaces are given a 90 degree bend so they appear to just “enter” the fuselage naturally. If you just put them in straight you may get a bit of an unnatural “arc” effect.
Turnbuckles are simulated using Teflon spaghetti tubing, also available from Small Parts. This stuff is great because it also acts as a length adjustment. I always cut my rigging lengths a bit short now because my turnbuckles can easily slide to achieve a perfect fit every time.
|
CONCLUSIONS |
 Two very different models from the same
basic kit! OOB and you get a good looking Nieuport for your collection. A bit
of work and you get a one of a kind Nieuport that will turn some heads and
hopefully garner some flattering comments. Eduard has a great product that with
a bit of creativity can be adapted into something very special. I highly
recommend this kit for both the beginner and experienced biplane model builder.
Two very different models from the same
basic kit! OOB and you get a good looking Nieuport for your collection. A bit
of work and you get a one of a kind Nieuport that will turn some heads and
hopefully garner some flattering comments. Eduard has a great product that with
a bit of creativity can be adapted into something very special. I highly
recommend this kit for both the beginner and experienced biplane model builder.
Copyright ModelingMadness.com
If you would like your product reviewed fairly and fairly quickly, please contact the editor or see other details in the Note to Contributors.
Back to Reviews Page 2016