Wingnut Wings 1/32 Roland D.VIa
Roland, originally known as
Luft-Fartzeug-Gesellschaft (L.F.G.), was established in
1908 to manufacture Parseval airships under license, with aircraft production
starting in 1912.
The name was changed to Roland at about the same time,
to avoid confusion with the L.V.G. aircraft company. Following the outbreak of
war in 1914, Roland began the license production of Sablatnig & Friedrichshafen
seaplanes, followed by a production contract for Albatros fighters.
On its own, the company was responsible for some of the
best‑looking, most aerodynamically‑advanced aircraft used by the
Luftfarttruppen during the Great War. The C.II,
known as the Walfisch, served on the
Western Front during 1915‑16 as a two‑seat reconnaissance/bombing aircraft and
had the ability to outrun its single‑seat opponents.
In 1916, the D.II Haifisch
entered production.
The lackluster Argus engine lowered the performance of
what was a clever and aesthetically pleasing design, resulting in its banishment
to use as a fighter trainer.
Learning from the mistake of the D.II, the D.VI series was
designed to use the 185 h.p. Benz Bz.IIIa, the best German aero engine
available.
This engine flew in the third prototype (the first two being
powered by the venerable Daimler-Mercedes D.III
with 160 h.p.).
First flying in October 1917, the three prototypes were under
evaluation for three months before being ordered into production in February
1918, as a backup to the outstanding Fokker D.VII.
Unfortunately, the Bz.IIIa was in short supply, with the result that the D.VI
was produced as the D.VIa, powered by the 200 h.p. Daimler-Mercedes D.IIIau, and
the D.VIb, powered by the Bz.IIIa engine.
Due to lack of availability, approximately half of D.VIa
aircraft delivered were produced wit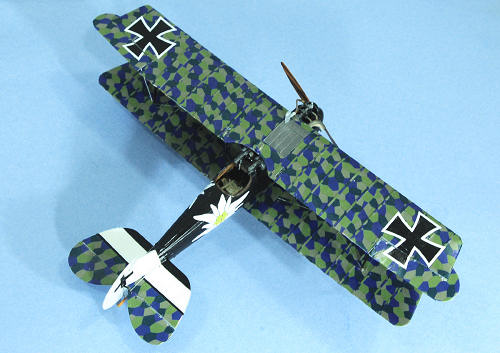 h
the venerable Daimler-Mercedes 160 h.p. D.III.,
which was also installed in aircraft originally produced with the 200 h.p.
engine due to lack of spare parts for the newer engine.
The D.VIb with the Bz.IIIa had somewhat better
performance but was completely eclipsed by the Fokker D.VII
with the 185 h.p. BMW IIIa engine. The D.VIa was considered to handle better
than the Pfalz D.IIIa or the Albatros D.Va.
h
the venerable Daimler-Mercedes 160 h.p. D.III.,
which was also installed in aircraft originally produced with the 200 h.p.
engine due to lack of spare parts for the newer engine.
The D.VIb with the Bz.IIIa had somewhat better
performance but was completely eclipsed by the Fokker D.VII
with the 185 h.p. BMW IIIa engine. The D.VIa was considered to handle better
than the Pfalz D.IIIa or the Albatros D.Va.
The "clinker" style of fuselage construction created a
light yet strong structure that required little maintenance since it did not
require the fabric covering of the previous Roland method of fuselage
construction, making it easier to manufacture and repair.
The D.VI entered service in the Spring of 1918,
primarily with Jastas on the French
sector of the Western Front, but by the summer they were mostly used as "fighter
trainers" on the squadron level, preparing newly‑trained pilots in combat
tactics as more Fokker D.VIIs became available.
Otto Kissenberth:
Otto Kissenberth was born in
Landshut,
Bavaria
on February 26, 1893.
He attended
Grenoble
University
and was awarded an engineering degree, after which he went to work for the
Gustav Otto aircraft works as a mechanical engineer.
Kissenberth joined the German Air Force in 1914 and
completed his training as a reconnaissance pilot that November, when he was sent
to Flieger Abteilung 8b as a
Vizefeldwebel. On
March 21, 1915,
he was wounded in action over the
Vosges
Mountains.
Following his recovery that summer, he joined FA 9b
on July 8, and served first on the
Vosges
front and then in
Italy.
Kissenberth was one only three German pilots who would
later become aces who flew wearing glasses, which was the original reason why he
was assigned to two-seaters; it was only due to his persistence and demonstrated
ability as a pilot (even with glasses)that he was finally given an assignment to
single-seaters. Returning to the Western Front in the summer of 1916, he was
assigned to KEK Einsisheim.
On October 12, 1916 an Anglo‑French bombing raid
composed of three French squadrons, 26 aircraft from the Royal Naval Air
Service, and an escort of four from the Lafayette Escadrille
attacked the Mauser Rifle Works at Oberndorf am Neckar. KEK Einsisheim
intercepted the raid, and Kissenberth shot down two on his first sortie and a
third on his second.
For this, he was awarded Württemberg's
Friedrich Order,
Baden's
Order of the Zähringer Lion, and the
Bavarian Military Merit Order.
Mauser Rifle Works at Oberndorf am Neckar. KEK Einsisheim
intercepted the raid, and Kissenberth shot down two on his first sortie and a
third on his second.
For this, he was awarded Württemberg's
Friedrich Order,
Baden's
Order of the Zähringer Lion, and the
Bavarian Military Merit Order.
Following this, he was assigned in the spring of 1917 to
Jasta 16b on the French sector of the
Western Front, where he downed two SPADs and flamed a balloon. On
August 4, 1917,
with 12 victories, he was made commanding officer of Jasta
23b and promoted to Oberleutnant.
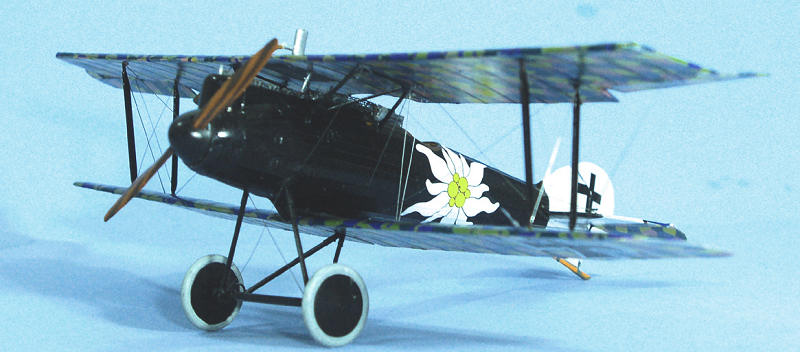
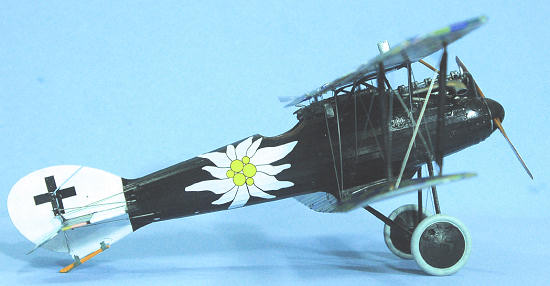
In Jasta 23b,
Kissenberth flew an Albatros D.V with a yellow and white
Edelweiss painted on its black fuselage, the same markings
he carried on a Roland D.VIa when the unit re-equipped with these aircraft in
March and April 1918.
Kissenberth scored a total of 20 victories, including a
final victory scored while flying a captured Sopwith Camel on
May 18, 1918,
for which he was awarded the “Blue Max” - the Pour le Mérite.
Ten days later, on the evening of May 29, 1918,
he was seriously injured when he crashed the Camel. Returning to duty in late
August 1918, he served as commanding officer of the Schliessheim flying school
until the end of the war. Kissenberth was killed in a climbing accident in 1919
while mountaineering in the
Bavarian Alps.
Wingnut Wings has over the past year released a number
of kits of World War I aircraft that have (mostly) never been done before as
injection-molded kits, and never in 1/32 scale.
The Roland D.VIa has only been done once before that I
am aware of, as a limited-released 1/48 kit by Blue Max.
While there are
to date only 12 kits that have been released, the fact that this one is kit
number 22 gives one a good idea of just how expansive Wingnut's plans are.
As with their other releases, this kit is designed to
interest both the dyed-in-the-wool World War I modeler, and the modeler who has
yet to get into the genre.
This kit, like the others, is fully and completely
detailed, and requires no other aftermarket items.
(At this point, I do want to mention that Pheon Decals
has announced they will release a sheet of lozenge that is fully pre-printed
with rib tapes, and cut to fit the parts without
 further
effort, which many modelers who now avoid doing models with lozenge will
appreciate).
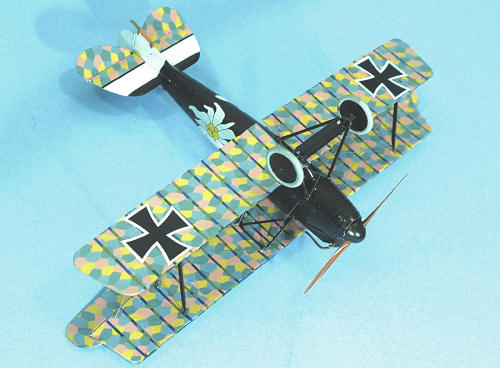
Markings are provided for five different aircraft, three of which
have fuselages that are painted, rather than left in natural wood (all use
lozenge on the wings).
Given the “clinker” construction of the Roland, painting
a natural wood finish will present more problems than the job usually involves,
so these markings options are appreciated.
The decals are beautifully printed by Cartograf, and
include lozenge rib tapes already printed to size.
There is enough lozenge decal provided to do everything
necessary and still have enough left over to re-do any mistakes.
These decals are supplied in strips and applied in the
way World War I modelers have grown accustomed to when doing a model with
lozenge.
further
effort, which many modelers who now avoid doing models with lozenge will
appreciate).
Markings are provided for five different aircraft, three of which
have fuselages that are painted, rather than left in natural wood (all use
lozenge on the wings).
Given the “clinker” construction of the Roland, painting
a natural wood finish will present more problems than the job usually involves,
so these markings options are appreciated.
The decals are beautifully printed by Cartograf, and
include lozenge rib tapes already printed to size.
There is enough lozenge decal provided to do everything
necessary and still have enough left over to re-do any mistakes.
These decals are supplied in strips and applied in the
way World War I modelers have grown accustomed to when doing a model with
lozenge.
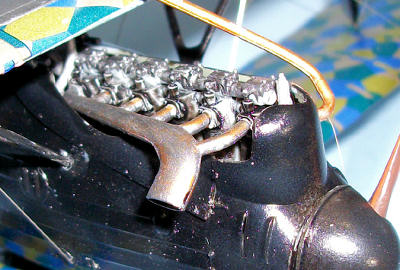
The kit provides both the 160 h.p. and 200 h.p.
Daimler-Mercedes engines used on the D.VIa.
The cockpit is fully detailed and includes photo-etch
seat belts. The two Spandau machine guns are provided with either an all-plastic
choice or a basic gun to which a photoetch cooling jacket can be attached.
Wingnut Wings provides the best instruction books
available, and it is highly recommended that a modeler commit the revolutionary
act of actually reading and
following the instruction as provided. (I say
this since many American males refuse to read either maps or instructions and
then wonder how it is they got lost).
It is also a good idea at the outset to decide which of
the five aircraft you wa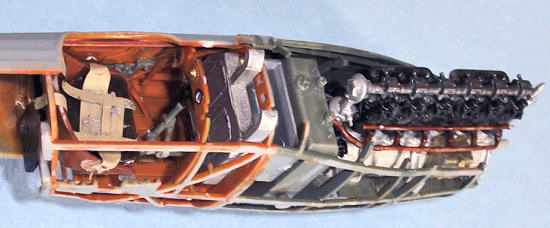 nt
to do, because they are from different production batches, and there are detail
differences between them, which are pointed out in the instructions; you won't
want to be un-doing something because you failed to pay attention.
nt
to do, because they are from different production batches, and there are detail
differences between them, which are pointed out in the instructions; you won't
want to be un-doing something because you failed to pay attention.
I found that it was possible to pre-paint all the detail
before removing any parts from the sprues, which considerably eased things.
I did the cockpit area in natural wood, using several
different shades of brown that approximated the colors shown in the color photos
in the instructions of the only surviving Roland D.VI.
I applied a light coat of Tamiya “Smoke” to pop out the
detail and give the impression of a used cockpit.
The engine area was painted with Xtracrylix RLM 02
Grau.
Following all this painting, I then assembled the
engine, and then proceeded to assemble the interior structure, again
 following
the instructions, which made everything easy.
When all was assembled and the engine installed, I glued
the structure into the left fuselage half, and then closed up the fuselage.
Everything fit so well that all I had to do was scrape
down the centerline seam to get rid of excess glue.
following
the instructions, which made everything easy.
When all was assembled and the engine installed, I glued
the structure into the left fuselage half, and then closed up the fuselage.
Everything fit so well that all I had to do was scrape
down the centerline seam to get rid of excess glue.
As an example of what I meant above about choosing at
the outset which airplane I was going to do and following the instructions, the
Kissenberth airplane has a very different cooling pipe from the engine to the
radiator than the others, and you need to pay attention to the fact you have to
cut out a section of the nose fairing to cater to that.
It is also a good idea to attach the pipe
before attaching the nose fairing. I didn't do
that, and as a result when it came to final assembly I had to cut the pipe and
just fit it in, which looks OK in the end but could have been done better as the
instructions would have one do it.
I painted the wings and tail surfaces with Xtracrylix
Clear Gloss to provide a surface for the lozenge decals to “grab.”
I then painted the tail surfaces white, masked them off,
and painted the rest of the fuselage, the cabane and interplane struts, and the
l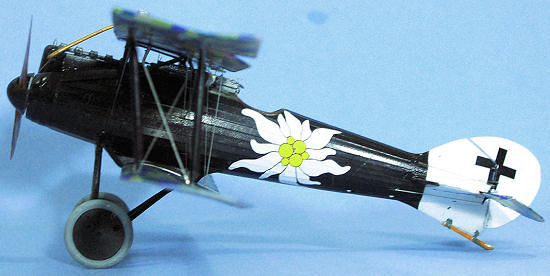 anding
gear with Tamiya Semi-Gloss Black.”
I put a brushful of light grey into the paint cup to
lighten the black, and went over various areas of the fuselage to give a
slightly different shade to the otherwise all-black monotone.
I then unmasked the tail, gave the fuselage an overall
coat of Xtracrylix Clear Gloss, and it was time to proceed to do the decals.
anding
gear with Tamiya Semi-Gloss Black.”
I put a brushful of light grey into the paint cup to
lighten the black, and went over various areas of the fuselage to give a
slightly different shade to the otherwise all-black monotone.
I then unmasked the tail, gave the fuselage an overall
coat of Xtracrylix Clear Gloss, and it was time to proceed to do the decals.
Applying lozenge is mostly time-consuming. I pre-cut the
pieces and marked the wings for location, then applied the lozenge, using lots
of Micro-Sol.
Everything went down easily and after about an hour or so the
wings and tail had their cover and were set aside to dry overnight.
I applied the Edelweiss
to the fuselage.
Beware that it is different on each side, and just work to get
the blossoms close around the open cockpit as shown in the decal profile.
I do wish they had shown the right side (for which there
does not appear to be any photographic evidence, or at least none provided), so
I could be sure I had that positioned correctly.
Once the lozenge was dry, I applied the rib tapes. When
they were dry, the insignia was applied.
No problems were encountered with any of this.
The really good thing about Wingnut Wings kits is their
positive fit.
When you hear a part “click” it's where it should be.
This is particularly helpful with assembly of a biplane.
I attached the lower wing.
I then attached the cabane struts, using cyanoacrylate
glue.
I then attached the upper wing to
 the cabane
struts, then attached the outer interplane struts, using Tenax glue.
With the cyanoacrylate glue at the cabane struts hit
with “Zipkicker,” the wing was properly aligned.
After letting this set up, I assembled and attached the
landing gear, then attached the ailerons, elevators and rudder, positioning them
dynamically in accordance with the way I had positioned the control stick and
rudder pedals during the assembly of the cockpit.
the cabane
struts, then attached the outer interplane struts, using Tenax glue.
With the cyanoacrylate glue at the cabane struts hit
with “Zipkicker,” the wing was properly aligned.
After letting this set up, I assembled and attached the
landing gear, then attached the ailerons, elevators and rudder, positioning them
dynamically in accordance with the way I had positioned the control stick and
rudder pedals during the assembly of the cockpit.
I painted the prop to look as though it had been carved
from layered wood, then attached it.
I finished off with the exhaust pipe.
The fairly simple rigging was done with Radu Brinzan's
4BA photoetch wire.
While this wire is specifically for the control wires on
British airplanes, it is the correct shape to also work for German rigging
wires.
This is the best rigging wire I have found for 1/32 World War I models,
particularly since it comes in the correct silver color to begin with and is of
scale fineness, unlike the brass wire I have used previously.
I look forward to using the 2BA wires, which has the
correct cross section for “raf wires” used on English aircraft, for the Wingnut
Bristol fighter that is nearing completion.
It's a Wingnut Wings kit - the best World War I kits
there are.
Follow the instructions, use your modeling skill, and the result
is as close to a guaranteed beautiful model as it gets.
If you have never done a rigged World War I airplane,
this Roland D.VIa would be a good place to start.
Aesthetically, the Roland is one of the prettiest German
fighters of the Great War, and this kit does full justice to the original.
With all the detail and the many markings provided in
the kit, these Wingnut Wings kits are the best bargain in scale modeling. Highly
recommended.
Tom Cleaver
January 2011
Thanks
to Wingnut Wings for the review kit.
Order yours exclusively at
www.wingnutwings.com
- shipping is free!
Rigging
wire thanks to RB Productions.
Order yours direct at
www.radub.com
If you would like your product reviewed fairly and quickly, please
contact
me or see other details in the
Note to
Contributors.
Back to the Main Page
Back to the Review
Index Page