Wingnut Wings 1/32 Bristol F.2B
|
KIT #: |
5555 |
|
PRICE: |
$59.95 MSRP from Wingnut Wings |
|
DECALS: |
Five options |
|
REVIEWER: |
Tom Cleaver |
|
NOTES: |
Pheon Decals used |
The
Bristol
Fighter is easily one of the most outstanding aircraft to have seen combat
during the First World War.
It was so good that it formed the backbone of the RAF in
overseas service policing for the far‑flung frontier territories of the Empire
throughout the interwar period until it was finally retired from service in
1934.
The versatile Brisfit ‑ as it came to be known ‑ was a
maneuverable, heavily armed two‑seater biplane designed by Frank S. Barnwell,
who would later design the Blenheim, Beaufort and Beaufighter of the Second
World War.
Design began in mid‑1916, and took into account combat
reports from the Western Front of the wretched B.E.2 series.
Barnwell's design was for a 2‑seater that could survive
in a hostile sky.
Pilot and gunner were placed back to back, where they
could coordinate their efforts.
The strange design, with the lower wing attached to the
fuselage by struts, was done so that the upper wing could be lowered
sufficiently to give the pilot excellent visibility and to allow the gunner to
fire his weapons in a full 360 degrees, while maintaining sufficient separation
of the biplane wings to maximize lift without increasing drag.
Barnwell also chose the powerful and reliable new
Rolls‑Royce Falcon as the aircraft's powerplant, providing it with both good
speed and lifting ability.
The prototype F.2A flew in late 1916 and was soon
ordered into production.
The definitive F.2B differed from the
 original Fighter
in having a smaller horizontal tail with larger elevators, thus improving
maneuverability.
original Fighter
in having a smaller horizontal tail with larger elevators, thus improving
maneuverability.
At first, the pilots of the Royal Flying Corps didn't
understand that the name
Bristol
Fighter meant just that.
The airplane was originally seen as just another 2‑seat
Corps Reconnaissance aircraft, and when it was handled the way one handled a
B.E.2 or R.E.8, losses were severe. The inexperienced pilots and observers of 48
Squadron ‑ the first unit to take the airplane on operations ‑ mistakenly
believed from looking at it that the
Bristol
Fighter was structurally weak. Squadron C.O. Leefe‑Robinson ‑ who wore the dull
red ribbon of the Victoria Cross as the first pilot to down a Zeppelin ‑
instructed his pilots to avoid violent maneuvers during combat.
Leefe‑Robinson perished following his own advice, when
he and the pilots of six Bristol F.2A Fighters encountered Manfred von
Richthofen and his flight of five Albatros D.IIIs near Douai in late April,
1917. In a fight that lasted almost 30 minutes, four of the British aircraft
were shot down, including that of the commander. The disastrous fight with
Jasta 11 almost convinced the British
to withdraw the aircraft from service.
The pilots of 11 Squadron, the second unit to go on
operations, fortunately did not make the mistake their compatriots had in 48
Squadron, basing their view of the airplane on their experience flying it. They
soon discovered that this was not just another 2‑seater, but really was instead
a 2‑seat fighter, one that was fully capable of mixing it with German
single‑seaters successfully, with the additional advantage of not having a
“blind spot” to the rear. By the late summer of 1917, the
Jastaflieger had decided that attacking more than two
Bristol
Fighters with less than a full Jasta
was harmful to their continued good health. Several pilots, including Major
Keith Parks of 48 Squadron, achieved high scores with the
Bristol
Fighter.
Keith
Park:
Keith Park was born in
Thames,
New Zealand
on
June 15, 1892,
the son of a Scottish geologist for a mining company.
He had an undistinguished youth, but was keen on guns
and riding, where he showed great skill.
In 1911, at 19, he joined the merchant marine as a
purser, gaining the family nickname “Skipper.”
Upon the outbreak of the First World War, Park left the
merchant marine and joined his Territorial Army artillery battalion.
As a Sergeant, he took part in the landings at Gallipoli
in April 1915, seeing combat at Anzac Cove.
Park's record in combat was recognized by a battlefield
commission as a 2nd Lieutenant in
July 1915.
He commanded an artillery battalion during attack at Suvla Bay in
August 1915.
After several mor months of squalid combat, he made the unusual
decision of transferring to the British Army, where he joined the Royal Horse
and Field Artillery.
Park was finally evacuated from Gallipoli in January
1916.
His battalion was sent to
France
to take part in the
Battle
of the
 Somme.
It was here that he became aware of air combat,
receiving a taste of flight when he was taken aloft to check his unit's
camouflage.
Somme.
It was here that he became aware of air combat,
receiving a taste of flight when he was taken aloft to check his unit's
camouflage.
Park was wounded on
October 21, 1916,
when he was blown off his horse by a German shell.
Evacuated to
England,
he was medically certified "unfit for active service," which actually meant he
was unfit to ride a horse.
With that, he volunteered for the Royal Flying Corps and
entered flight training that December.
He proved such a good pilot that after graduation from
training, he was posted as an instructor from March, 1917, to
June 30, when he was sent to
France
where he managed a posting to 48 Squadron, based at La
Bellevue
near
Arras.
Arriving there on
July 7, 1917,
he quickly learned to fly the
Bristol
Fighter, which the squadron had finally learned the hard way was indeed what it
claimed to be - a fighter.
On July 12, the squadron moved to Frontier Aerodrome
just east of
Dunkirk.
Park quickly achieved success against German fighters, being awarded the
Military Cross on August 17 for shooting down two German fighters
"out of control" and damaging a third and fourth one
sortie.
Following this, he was promoted temporary captain on September 11, 1917.
In November, he took an extended leave from combat,
returning to France in January 1918 as a Major, assigned as Officer Commanding
48 Squadron. In this post, he demonstrated
his ability as a tough but fair commander, providing
discipline and leadership, with an understanding of the technical aspects of air
warfare.
By November 1918, the strain of command had all but
exhausted Park.
He was credited with 5 individual victories “destroyed” and 14
“out of control,” with one shared, for a total of 20, which made him the New
Zealand Ace of Aces for the First World War.
He was awarded a bar to the Military Cross, the
Distinguished Flying Cross, and the French Croix de Guerre.
His 13th "victory, recorded , September 5, 1917 was
Leutnant Franz Pernet of Jasta Boelcke,
the stepson of General Erich Ludendorff.
Park was also shot down twice during the war.
Of course, Sir Keith Park is far better known to history
as the man who won both the Battle of Britain and the Battle of Malta.
Having stopped the Luftwaffe
over Southern England with tactics that the “traditionalists” in the RAF
disapproved of, and demonstrating by so doing that the people like Air Vice
Marshal Sir Trafford Leigh-Mallor y or Air Vice Marshal Sir Sholto Douglas didn't
really know what they were talking about in terms of useful strategy, he was
naturally rewarded for his success by being summarily relieved of his command
that December.
After building up the air defenses of Egypt, he was sent to Malta
in July 1942, where he demonstrated a tenacity and use of aerial warfare that
was sufficient to save the island during its darkest hour, and going on to make
substantial contributions to final victory in North Africa with his use of
maritime strike aircraft to cripple the Afrika Korps' logistic support.
y or Air Vice Marshal Sir Sholto Douglas didn't
really know what they were talking about in terms of useful strategy, he was
naturally rewarded for his success by being summarily relieved of his command
that December.
After building up the air defenses of Egypt, he was sent to Malta
in July 1942, where he demonstrated a tenacity and use of aerial warfare that
was sufficient to save the island during its darkest hour, and going on to make
substantial contributions to final victory in North Africa with his use of
maritime strike aircraft to cripple the Afrika Korps' logistic support.
Today, Air Marshal Sir Keith Park has been finally
honored by a statue in Waterloo Place in London, which was publicly unveiled on
Battle of Britain Day, September 15, 2010, officially recognizing his
achievement of having saved Britain, and the world, from Adolf Hitler.
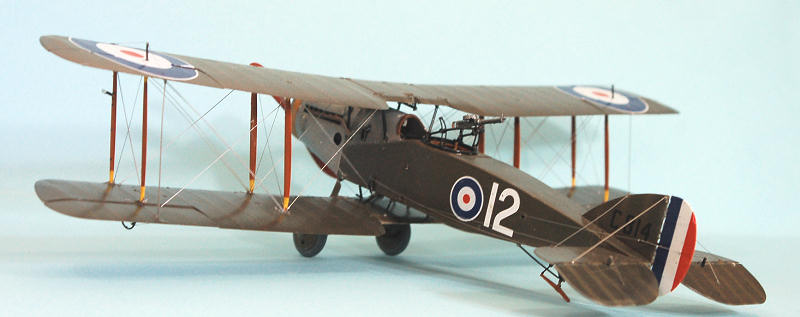
This kit of the Bristol F.2B Fighter is the first
mainstream injection molded model of this famous airplane to appear in 1/32
scale, and was among the first kits released in 2010 by the remarkable Wingnut
Wings company, the labor of love of World War I afficionado Sir Peter Jackson.
 The kit, like the others in the series, is designed to
be buildable by modelers who have not previously built World War I models.
As such, the design is as close to “idiot proof” as a
World War I airplane model can get (this does not mean it is a “shake and bake”
kit by any means).
All parts are crisply molded, and the 12 page
instruction booklet provides some of the best drawings and instructions ever put
in a kit, with photographs of the real thing to assist construction at every
stage.
The kit, like the others in the series, is designed to
be buildable by modelers who have not previously built World War I models.
As such, the design is as close to “idiot proof” as a
World War I airplane model can get (this does not mean it is a “shake and bake”
kit by any means).
All parts are crisply molded, and the 12 page
instruction booklet provides some of the best drawings and instructions ever put
in a kit, with photographs of the real thing to assist construction at every
stage.
Decals are provided for five aircraft, including one of
the Bristol Fighters flown by Keith Park with 48 Squadron.
Pheon Decals has also released a sheet of decals for
this kit, providing markings for eight different aircraft.
For the purposes of this review, I used the Wingnut
decals for the individual markings of Park's airplane, and the Pheon Decals for
the national markings.
 This is a kit where, if you follow the instructions
step by step, you will achieve a very accurate model with little or no
difficulty in the process.
I did find it practical to differ from the
instructions by assembling and attaching the mid-sections of the upper and
lower wings to the completed fuselage, then attaching the landing gear,
before attaching the outer wings, as the result of reading Bud Highleyman's
review in Scale Aircraft Modeling.
This did make things easier, since the center
sections were firmly in place, making it easier to attach the outer wings
with their interplane struts.
This is a kit where, if you follow the instructions
step by step, you will achieve a very accurate model with little or no
difficulty in the process.
I did find it practical to differ from the
instructions by assembling and attaching the mid-sections of the upper and
lower wings to the completed fuselage, then attaching the landing gear,
before attaching the outer wings, as the result of reading Bud Highleyman's
review in Scale Aircraft Modeling.
This did make things easier, since the center
sections were firmly in place, making it easier to attach the outer wings
with their interplane struts.
Another good idea is to pre-paint as many of the parts
as you can while they are on the sprues.
It's also real useful to look at the color photos of the
real thing that are provided, so you get the right color shades and any “wear
and tear” you want to show.
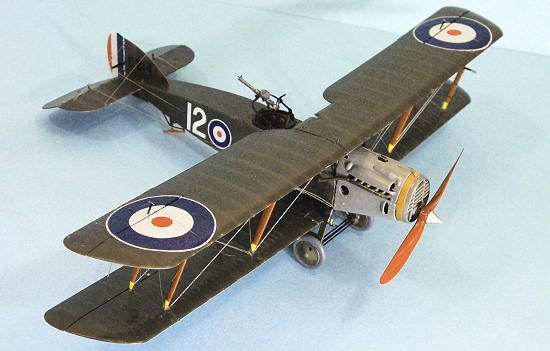
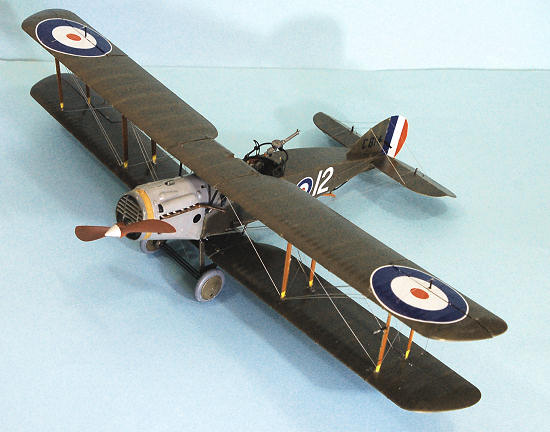
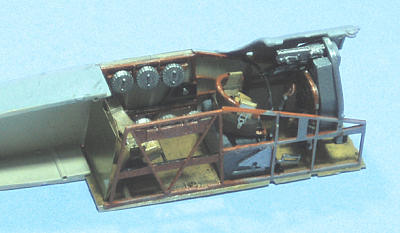
Once everything was painted, I started by assembling the
very well detailed cockpit interior, which is nearly a model in and of itself.
I then attached the completed assembly to the right
fuselage half and glued the fuselage together.
I also assembled the wings and tail surfaces, after
painting them.
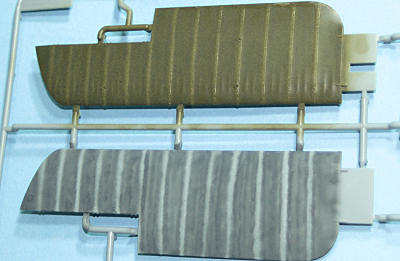 I “pre-shaded” the fuselage, wings and tail surfaces
by painting the areas around the internal structure with Tamiya “NATO
Black,” then painted the lower surfaces with Gunze-Sangyo “Sail Color” and
the upper surfaces with Tamiya “Dark Khaki.”
The end result gives a feeling of a “hollow”
airframe.
The Cowling parts were painted with Xtracrylix “RAF Ocean
Grey,” which is a close approximation to the “Battleship Grey” color used on
the real thing.
I then applied a coat of Xtracrylix Gloss Varnish to
everything.
I “pre-shaded” the fuselage, wings and tail surfaces
by painting the areas around the internal structure with Tamiya “NATO
Black,” then painted the lower surfaces with Gunze-Sangyo “Sail Color” and
the upper surfaces with Tamiya “Dark Khaki.”
The end result gives a feeling of a “hollow”
airframe.
The Cowling parts were painted with Xtracrylix “RAF Ocean
Grey,” which is a close approximation to the “Battleship Grey” color used on
the real thing.
I then applied a coat of Xtracrylix Gloss Varnish to
everything.
I finished this process by applying the decals, which
went on without difficulty, and gave the semi-assembled model another coat of
Xtracrylix Gloss.
After looking at the pictures of the actual engine, I
decided I did not want to go to the length of doing all the wiring that would be
necessary to make that installation look accurate, so I assembled the essentials
of the engine and then closed up the cowling.
I have seen photos of this kit down with the engine
fully exposed, and it is well worth the effort of anyone who undertakes that
part of the project.
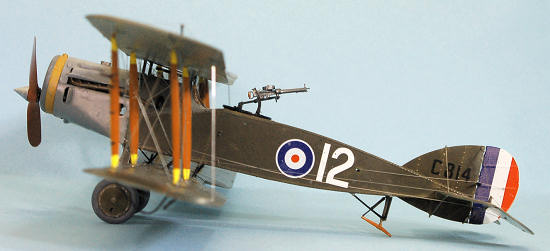
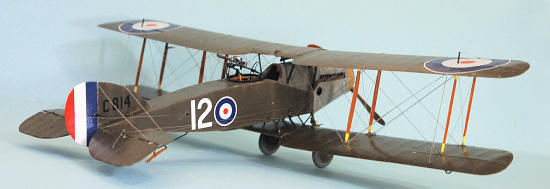 The wings and tail surfaces went on without difficulty.
I posed the rudder and elevators “dynamically,” having
set the controls in the cockpit to the correct positions for this.
The wings and tail surfaces went on without difficulty.
I posed the rudder and elevators “dynamically,” having
set the controls in the cockpit to the correct positions for this.
Rigging:
The rigging for the Bristol Fighter is complex, which is
why I would not recommend this model to a first-time World War I modeler.
After attempting to do the double flying wires with the
RB productions photoetch “raf wire,” I could not get them to line up properly
attaching them separately.
I reluctantly pulled them all out, and then used .010
brass wire, painted silver, which I was able to bend in a “U” so that the wires
were properly lined up, then attached them with cyanoacrylate glue, then slipped
the single wires into position.
I used the RB productions BA4 wire for the inter-strut
bracing, and the BA2 wire for the control wires.
I have to say that in this size model, doing something
like what I finally did is about the only way to represent the double wires with
any kind of accurate look in the end.
The Bristol Fighter is one of my all-time favorite
aircraft of the First World War, and this kit by Wingnuts is definitely the best
kit of this airplane in any scale.
The fabric surface detail is both beautiful and accurate
in its representation.
The design of the kit makes what is a difficult model
with any of the other kits (and I have built them all) quite easy.
If you've got a few successful World War One projects
completed, then you are quite likely to have a great result with one of the best
World War One models ever released.
Take your time, follow the instructions, and you will be
very happy with the result.
Tom Cleaver
February 2011
Thanks to Wingnut
Wings for the review kit.
If you would like your product reviewed fairly and quickly, please
contact
me or see other details in the
Note to
Contributors.
Back to the Main Page
Back to the Review
Index Page