
| KIT: | Hobbycraft 1/32 Sopwith Camel "Le Rhone" |
| KIT #: | 1693 |
| PRICE: | $19.96 MSRP |
| DECALS: | Three options |
| REVIEWER: | Tom Cleaver |
| NOTES: | Kit completely redesigned from the original release |
| HISTORY |
The Sopwith Camel is perhaps the most famous World War I fighter plane alongside the Fokker Triplane, primarily due to a thirty-year battle between Snoopy and the Red Baron in the comic strip “Peanuts.” The Camel is deservedly famous, since it was the most successful Allied fighter of the world’s first air war in terms of enemy aircraft shot down, and the number of pilots who became aces flying it in combat during the last year of the war.
Whereas the Camel’s ancestors - the Sopwith “Strutter,” “Pup” and “Triplane” - each had a reputation as a beautiful flying machine that was easy for a pilot to master, the Camel had a reputation for killing more of its pilots than the enemy did. This was due to a design that grouped a powerful rotary engine, pilot, weapons and gasoline close together in the forward part of the fuselage. While this configuration incurred superb maneuverability, the powerful gyroscopic force created by the spinning rotary engine with most of the weight close to the center of gravity meant the Camel was inherently unstable and could spin easily if not handled carefully. Today’s fighters are built with the same sort of instability, but onboard computers give the pilot an ease of control that would not be possible if he was flying manually the way his Camel-borne predecessors did.
Donald MacLaren - The Top Camel Ace:
 While there were many aces who flew the Camel, most of them - such as fellow
Canadian aces Raymond Collishaw or William Barker - had flown other aircraft and
scored with them earlier in their careers. The top-scoring Camel pilot of the
First World War who only ever flew the Camel in combat was a young Canadian,
Donald MacLaren, whose score of 54 victories during the last 8 months of the war
is an impressive feat, indicative of the fact that 1918 was the toughest year of
the Great War.
While there were many aces who flew the Camel, most of them - such as fellow
Canadian aces Raymond Collishaw or William Barker - had flown other aircraft and
scored with them earlier in their careers. The top-scoring Camel pilot of the
First World War who only ever flew the Camel in combat was a young Canadian,
Donald MacLaren, whose score of 54 victories during the last 8 months of the war
is an impressive feat, indicative of the fact that 1918 was the toughest year of
the Great War.
Donald MacLaren was born in Ottawa on May 8, 1893, but spent most of his formative years on the Canadian frontier, as the family moved to the then-small town of Calgary, Alberta, when he was 6. As a youth, his father taught him to shoot, and he put it to good practice hunting game on the Alberta prairie, in the process giving himself an “eye” that would lead to his later success. Donald attended public school before entering Western Canada College. He and one of his brothers later traveled back east to Montreal where they entered McGill University. Due to illness, Donald left school after two years. When he was recovered, he, his father, and brother Roy moved to Keg River Prairie, 200 miles north of the closest railroad and went into the fur trading business, where the young man thrived, joining a government exploration party which surveyed the 6th Meridian in the summer of 1916. On his return, he found his brother had gone to enlist; he did the same in Vancouver, and was accepted into the Royal Flying Corps.
Fortunately, by the fall of 1916, flying training was more comprehensive than it had been in earlier years. Training at Long Branch, just outside Toronto, MacLaren soloed in the Curtiss JN-4 “Canuck” after three and a half hours of dual instruction. After intermediate and advanced flying training and aerial gunnery training, he received his pilot’s wings on August 19, 1917. Even then his training wasn’t over. Arriving in England in September, he was given aerobatics training on the Avro 504, graduating on to the deHavilland D.H.5, then the Bristol Scout and finally the Sopwith Camel, on which he was given 9 hours of flight training during which he received instruction on the most recent RFC and German tactics. By the time he was declared ready to enter combat in November 1917, MacLaren had nearly 100 hours of flight training, far more than would have been the case only a year previously, and - most importantly - nearly double that of the German pilots he would meet in the coming months.
Following his graduation, MacLaren was assigned to 46 Squadron on the Western Front, equipped with the Sopwith Camel. His timing was fortunate, since there was not a lot of action at this point. With Russia now out of the war following the Bolshevik Revolution, the Germans were conserving their forces as they planned for what they expected would by the final offensive of the war in the coming Spring. Because of this, the young 2nd Lieutenant had the luxury of learning about combat flying from reconnaissance and ground strafing sorties before he finally entered aerial combat on March 6, 1918.
 That morning, on patrol between Arras and Cambrai with four other Camels,
MacLaren’s flight leader spotted three Germans to the east. With the sun behind
them, the Camels gained altitude without being spotted. As he dove into the
attack, MacLaren recognized the Germans as Hannover Cl.IIIs. Latching onto one
that attempted to dive away, MacLaren followed the Hannover down. Just as he
lined up for his first shot, the German banked sharply. MacLaren followed,
closing to 100 feet before opening fire. As he came around for a second pass, he
found the Hannover spinning down out of control. He followed it till it crashed
and exploded, to confirm the victory.
That morning, on patrol between Arras and Cambrai with four other Camels,
MacLaren’s flight leader spotted three Germans to the east. With the sun behind
them, the Camels gained altitude without being spotted. As he dove into the
attack, MacLaren recognized the Germans as Hannover Cl.IIIs. Latching onto one
that attempted to dive away, MacLaren followed the Hannover down. Just as he
lined up for his first shot, the German banked sharply. MacLaren followed,
closing to 100 feet before opening fire. As he came around for a second pass, he
found the Hannover spinning down out of control. He followed it till it crashed
and exploded, to confirm the victory.
Within a matter of days, Operation Michael - the great German Spring Offensive of 1918, designed to knock the French and British out of the War before the newly-arrived Americans could make their presence felt - opened across the Western Front. With reinforcement from these units on the Eastern Front, the Germans sent 100 divisions against 60 Allied divisions and came within an ace of breaking through the Allied front in desperate fighting through March and April. Despite rainy weather, aerial activity also increased, and MacLaren scored his second victory on March 10 when he shot the tail off an Albatros D.V.
The Germans had brought forward several enormous railway artillery guns to support their offensive. One was shelling the British rear from a railway junction at St. Pol. On March 21, MacLaren and six other pilots from 46 Squadron made a low-level attack, each dropping four 20-pound Cooper Bombs. MacLaren scored two direct hits on the mountings and tracks, and the gun was put out of action.
Now separated from the others, he spotted an LVG C.VI, which he attacked and shot down. While climbing away to avoid anti-aircraft fire, he nearly collided with a German observation balloon, which he turned and attacked. Setting it afire, he turned for home, when he spotted another LVG just behind the German lines at Graincourt. This German put up a good fight, scoring hits with both the nose gun and the observer’s gun, ripping the wings of MacLaren’s Camel. He then dove on the LVG and shot it out with the observer, killing him. The pilot nearly evaded further attacks, but was now so low he had to straighten out to head for safety. As he did so, MacLaren bored in again and shot the plane into the ground where it exploded. Now an ace, MacLaren received the Military Cross and promotion to 1st Lieutenant for this action.
 From this point to the end of the war, combat was close to a daily experience.
Jagdgeschwader 1, led by Baron Manfred von Richtofen, had moved into the area
where 46 Squadron operated, and the British pilots came up against numerous
large German formations, which soon led to the various British squadrons
operating together. Air battles over the front could now include over 100
airplanes in a single fight. By the end of March, MacLaren had shot down six
more German aircraft, including a heavily armored Junkers J.1 ground attack
plane.
From this point to the end of the war, combat was close to a daily experience.
Jagdgeschwader 1, led by Baron Manfred von Richtofen, had moved into the area
where 46 Squadron operated, and the British pilots came up against numerous
large German formations, which soon led to the various British squadrons
operating together. Air battles over the front could now include over 100
airplanes in a single fight. By the end of March, MacLaren had shot down six
more German aircraft, including a heavily armored Junkers J.1 ground attack
plane.
On April 1, 1918, the Royal Flying Corps and Royal Naval Air Service became the Royal Air Force, and MacLaren received a promotion to Captain in recognition of his achievements in the previous month of combat, with his score now 11 aircraft and two balloons.
A few days later, MacLaren’s career almost came to an untimely end. Leading a flight, he attacked a gaggle of German fighters and shot down two. German “Archie” found his range and a shell smashed two of his Camel’s cabane struts and ripped away several bracing wires, with a second close burst damaging his wing. With careful flying, he was able to return to his field at Baupaume and land. On inspection, the ground crews found the leading edge of the upper right wing had been separated - it was a miracle it hadn’t failed during the flight home.
On April 7th, MacLaren spotted an enemy two-seater and dove on it. When he pulled the trigger, the guns didn’t fire. Pulling off, he discovered both belts of bullets were broken. In the meantime, the German made no attempt to fire on him. When he approached, the observer stood up in his cockpit and pointed at his weapon, indicating it was jammed. With neither able to shoot the other, MacLaren waggled his wings and went home, in one of the rare displays of World War I aerial chivalry in 1918.
During heavy fighting throughout the month of May, MacLaren increased his score by 17 aircraft and two more balloons. During three fights, he scored multiple victories, clearly demonstrating he had “found his eye” as an aerial gunner. He then went through a “dry spell” for nearly the whole of the month of June, during which he only shot down two enemy aircraft, though his Squadron Leader commended him officially for his daring in leading attacks against the enemy even when outnumbered.
The month of June saw the superb Fokker D.VII - which had first appeared over the front the previous month - start showing up in larger numbers as Jagdgeschwader 1 was almost completely re-equipped with this outstanding fighter that outclassed anything the Allies had. For the rest of the war, MacLaren would be fighting enemies who had better equipment.
 In
July, he shot down eight airplanes - including two new D.VIIs in one fight - and
two balloons, bringing him out of his slump and leading to a second award of the
Military Cross.
In
July, he shot down eight airplanes - including two new D.VIIs in one fight - and
two balloons, bringing him out of his slump and leading to a second award of the
Military Cross.
The defensive battle waged by the Allies since the beginning of the German offensive ended with containment of the Germans in July. On August 8, 1918 the great Allied counteroffensive that would lead to final victory began at Amiens with the Canadian Corps in the lead. The German Jastas fought with a fury born of desperation and confidence in the D.VII, as they strove to protect the German troops in the trenches below.
On the opening day of the offensive, MacLaren was leading seven Camels on a dawn patrol between Albert and Baupaume when he sighted twenty German fighters in the misty morning. Leading the others into the clouds, he maneuvered into position to surprise four Fokkers. He dove on one and shot it down, when five more joined the two survivors out of the mist, and MacLaren’s Camel had its tail well-ventilated before he lost his pursuers in the clouds. He rejoined his flight just in time to be attacked by another 20 Fokkers. Recognizing a bad situation, the Camels dove for their lines and escaped.
Bad weather intervened for the next two weeks, but late August saw the weather improve and 46 Squadron went back to work as ground strafers, going after supply and troop columns moving to the front. This was dangerous work and several Camels were lost to ground fire. Despite the main mission being that of ground attack, MacLaren still found opportunity to score. At dawn on August 26, 46 Squadron encountered a large formation of Fokker D.VIIs around Peronne. The Germans were above the Camels, but had neglected to see the S.E.5a’s flying high escort to the Camels. As the S.E.5s dove on the Germans, 46 Squadron turned and trapped the enemy between the two British units. In the ensuing fight, five Fokkers went down, including one by MacLaren. The victory was made all the better by the fact that both British squadrons returned without loss.
The last two full months of the war saw some of the most intense fighting of the entire four years, as the American Army opened the Meuse-Argonne Offensive, while the British and French maintained their offensives against the Hindenburg Line.
 While flying alone on September 15, 1918, MacLaren saw a British observation
balloon in flames west of Havrincourt Wood. He dove and found six Fokkers around
it. Pulling the trigger, he found he only had one working gun. He continued his
attack and shot down one D.VII out of control, after which the others then
attacked him and he had all he could do to escape. The next day he led two other
Camels on a patrol behind German lines. Spotting four Fokkers, MacLaren led the
attack and forced the Germans to dive to escape. During fight all four D.VIIs
were destroyed, with two falling to MacLaren. The attack brought his score to
37, and he was awarded the DFC.
While flying alone on September 15, 1918, MacLaren saw a British observation
balloon in flames west of Havrincourt Wood. He dove and found six Fokkers around
it. Pulling the trigger, he found he only had one working gun. He continued his
attack and shot down one D.VII out of control, after which the others then
attacked him and he had all he could do to escape. The next day he led two other
Camels on a patrol behind German lines. Spotting four Fokkers, MacLaren led the
attack and forced the Germans to dive to escape. During fight all four D.VIIs
were destroyed, with two falling to MacLaren. The attack brought his score to
37, and he was awarded the DFC.
A few days later, 46 lost their Squadron Leader to a collision with a new pilot in the squadron during a dogfight and MacLaren was given command of the squadron, ten and a half months after having joined the unit as a junior Lieutenant, and only a bit longer than six months after his first promotion to 1st Lieutenant. On October 2, 1918, he led 15 Camels over the front in three flights of five, each at a different altitude. Over the German lines, eight D.VIIs attacked from out of the sun. MacLaren became involved in an intense dogfight with the leader, each exchanging bursts of machine gun fire. He used the Camel’s superb turning capability yo get on the enemy’s tail, sending the Fokker down in flames. Just at this moment, 20 more D.VIIs dove into the fight. Attempting to get away, MacLaren turned into the pursuing enemy and shot down the leading aircraft just as the two high flights of Camels dove to the rescue.
A week later, MacLaren entered combat for what would prove to be the last time, when he shot down another LVG two-seater. The next day, while wrestling with a squadron mate, he managed to break his leg and was put out of action. He returned to England on November 6, and spent the Armistice in the Royal Flying Corps Hospital in London. His score of 48 aircraft and 6 balloons was only bettered by his countrymen Raymond Collishaw and William Barker as regards Canadians fighting in the First World War.
 MacLaren’s combat career only used up four Camels, which was surprising given
the level of operations in the final months of the war. He scored 19 victories
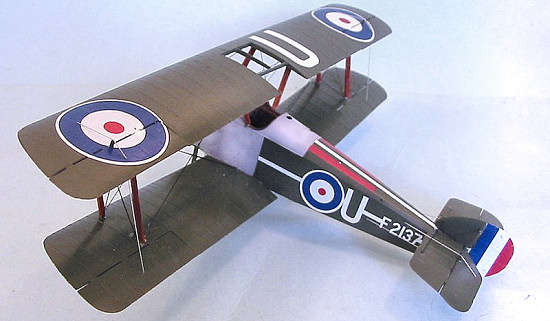
in Camel B9153, 18 in D6418, 8 in D6603 and his final 9 in F2137.
MacLaren’s combat career only used up four Camels, which was surprising given
the level of operations in the final months of the war. He scored 19 victories
in Camel B9153, 18 in D6418, 8 in D6603 and his final 9 in F2137.
After the Armistice, MacLaren was awarded the DSO. His final score of 54 left him tied as sixth-ranking Allied ace with the South African Allan Beauchamp-Proctor and legendary Frenchman Georges Guynemer. Overall, he is ranked 8th behind Manfred von Richthofen, Rene Fonck, Edward Mannock, William Bishop, Ernst Udet, Raymond Collishaw, and James McCudden. His victory score, all accomplished in a bit less than eight months of the heaviest fighting of the war, during which he rose from junior Lieutenant to Major commanding the squadron, is outstanding.
After the war, Donald MacLaren remained in the service and participated in the creation of the Royal Canadian Air Force, becoming commander of Fighter Squadron 1 in 1920. After resigning his commission in 1921, he returned to Vancouver and started Pacific Airways Ltd., with one Curtiss HS-2L flying boat. In 1926, he led the effort to reorganize the RCAF to take it out of further civil aviation development through the Aeronautics Act of 1927, and led the effort to organize private flying clubs throughout the country to provide trained pilots in the event of emergency. He merged his company with Western Canada Airways in 1928 and expanded operations into the Yukon and Arctic. In 1929, he and H. Hollick-Kenyon flew the first airmail service for WCA between Regina, Moose Jaw, Medicine Hat, Lethbridge and Calgary.
Donald MacLaren eventually became a senior executive in Trans-Canada Airlines and retired from that company in 1958. Having participated in the development of Canadian aviation from its earliest days, he died in his sleep on July 4, 1989, at age 96.
| THE KIT |
Hobbycraft is frequently known among modelers as “Hobbycrap,” due to the
cheapness of their designs, which frequently cut too many corners and loose too
much detail in attempting to lower kit prices. Accuracy has also been an issue
with many of their kits. The 1/32 Sopwith Camel was one of the first World War
I kits to appear in this scale, back in the late 1980s. Unfortunately, it
suffered from overdone wing fabric detail, and so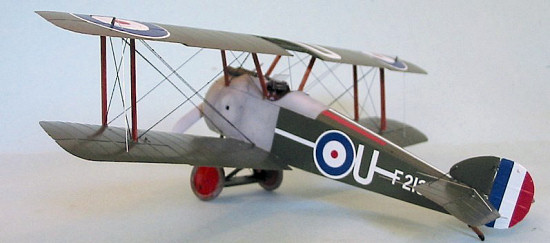 me unfixably-wrong outline
errors, not to mention poor decals. I have seen a few of these kits built up
over the years, but no matter how much talent was applied by the modeler, the
kit still came out “wrong.”
me unfixably-wrong outline
errors, not to mention poor decals. I have seen a few of these kits built up
over the years, but no matter how much talent was applied by the modeler, the
kit still came out “wrong.”
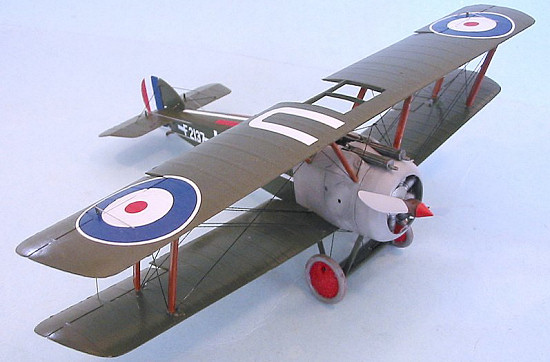
This past year, Hobbycraft released a redesigned kit of the Camel in two versions - one with a Clerget and one with a Le Rhone engine. These kits are head and shoulders above the first release, with accurate outlines and vastly improved detail for the wings and tail surfaces that looks far more like what a fabric-covered airplane is really like. The different engines are also accurate, and the decals are useful.
Unfortunately, the kit skimps on cockpit detail, which is really important in this scale. While it’s true that with the upper wing in place, there’s not much to be seen in a Camel cockpit, making an accurate model of either the MacLaren Camel in the “Le Rhone” kit or the William Barker Camel in the “Clerget” kit involves cutting out the center section of the upper wing - thus making the cockpit very visible - which means a modeler will have to resort to some additional scratchbuilding to do the model justice. I ended up making a gas tank, and adding seat belts made from lead foil. I would have done more, had I realized at that point that I was going to have to open up the wing, but I didn’t find that photo until after I had closed up the fuselage.
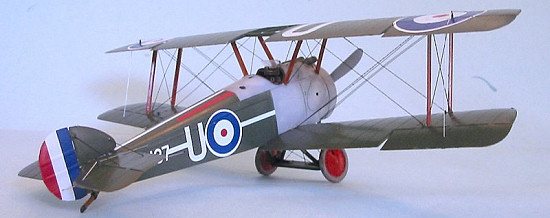
The decals are good, and are opaque enough to go over the dark upper colors of the Camel without the color bleeding through the white parts of the decals. Markings for three aircraft are provided: MacLaren’s F2137, his last Camel of the war; a 3 Squadron Camel flown by Lt. A.T. Partridge; and a Camel night fighter flown by 50 Squadron on Home Defense.
| CONSTRUCTION |
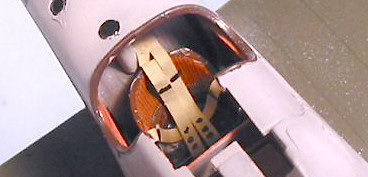 Construction overall is pretty simple for a World War I airplane. As I said, I
added in a scratchbuilt gas tank behind the pilot’s seat, and scratchbuilt
seat belts from lead foil. I also used some 1/32 scale instrument decals on the
panel. The fuselage came together nicely and only needed a bit of Mr. Surfacer
500 on the centerline seam.
Construction overall is pretty simple for a World War I airplane. As I said, I
added in a scratchbuilt gas tank behind the pilot’s seat, and scratchbuilt
seat belts from lead foil. I also used some 1/32 scale instrument decals on the
panel. The fuselage came together nicely and only needed a bit of Mr. Surfacer
500 on the centerline seam.
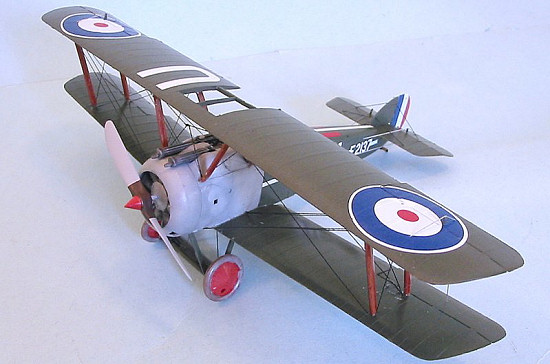
I assembled and painted the engine, then attached it and the cowling to the fuselage. The cowling does not exactly fit to the fuselage, and I ended up applying a thick coat of Mr. Surfacer to get a good fit after sanding it down. Having to do this, I was glad that the airplane did not have any polished metal on the cowling. I also cut away the front section of the cockpit coaming that separated it from the area where the guns are mounted, since that was incorrect.
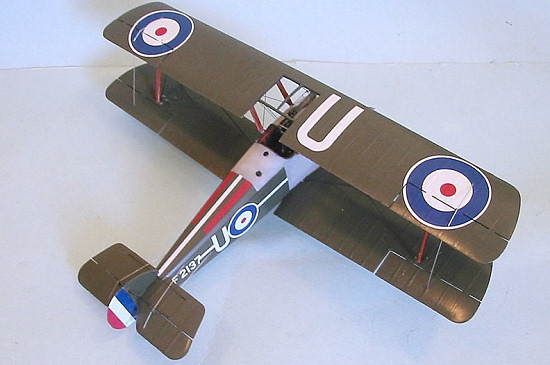
I attached the lower wing and the tail surfaces. The control surfaces are molded almost separate, so it was not difficult to pose them in a more dynamic position. At this point, I took a look at the photos of MacLaren’s Camel in the Osprey “Sopwith Camel Aces” book and realized the center section had been stripped and opened up, so I cut that area out of the upper wing and scratchbuilt the rear spar and the centerline rib that were exposed. I was glad to note MacLaren’s airplane did not carry the little propeller-driven generator on the cabane strut, since the kit does not provide this. The kit does provide the conical prop cap MacLaren used on F2137.
| COLORS & MARKINGS |
Painting:
I
first pre-shaded the model with flat black, then painted the lower surfaces with
Tamiya “Buff.” The cowling and forward fuselage were painted with Tamiya “Sky
Grey.” The upper surfaces were painted with Xtracrylix “RAF Dark Green,” since
World War I P.C.10 was a “color” that ranged from chocolate brown to green,
depending on the m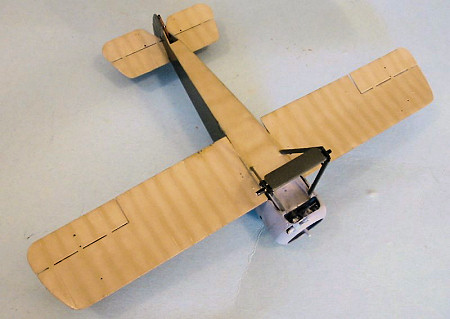 anufacturer and the paint lot. I painted the struts with a
hand-mixed “Yew” color, over which I applied a thinned coat of “Chocolate Brown”
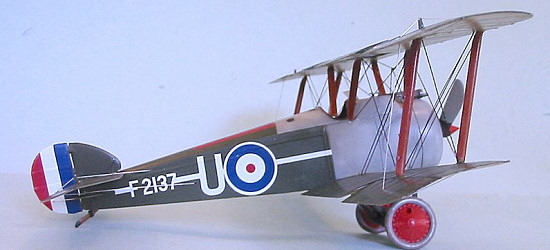
to simulate the wood grain. I also painted the nose cap and the wheels with Xtracrylix “Red Arrows Red,” since it is considered that MacLaren’s last Camel
had these colors when he was “A” Flight Commander and he kept them on becoming
Squadron CO. When all was dry, I applied an overall coat of Future.
anufacturer and the paint lot. I painted the struts with a
hand-mixed “Yew” color, over which I applied a thinned coat of “Chocolate Brown”
to simulate the wood grain. I also painted the nose cap and the wheels with Xtracrylix “Red Arrows Red,” since it is considered that MacLaren’s last Camel
had these colors when he was “A” Flight Commander and he kept them on becoming
Squadron CO. When all was dry, I applied an overall coat of Future.
Decals:
While there are at least two photos of F2137, the Camel MacLaren flew for his last nine victories in September to October 9, 1918, which do document the cutaway upper wing center section, the photo which shows the placement of the identification letter as just outboard of the center section may not be “U” - the field of focus is unclear and it could be “G”, indicating an earlier airplane carrying the fuselage centerline white stripe and the two red stripes to either side. However, there is no final proof, since the two photos that document F2137are from the side and you cannot see the stripes on the upper rear fuselage. I went with using the kit decals to do F2137 “U” in accordance with these few photos, considering them all to be of one airplane - and no one can definitively prove that wrong. Also, the Osprey book notes there was a black “U” on the lower right wing, halfway from the fuselage to the national insignia; from the photo of another 46 Squadron Camel, it is not a large letter, so I used the “U” from a USAF decal in the decal dungeon. As noted above, the decals were sufficiently opaque and went on easily, snuggling right down under a coat of Micro-Sol. Interestingly, the profile of this airplane incorrectly shows the white stripe down the side extending to the end of the fuselage, though at least one photo clearly shows this not to be the case. The decal exactly follows the photo.
| FINAL CONSTRUCTION |
I had cut away the axles from the spreader bar, and modified the gear struts, so that I would be able to attach separate axles that were at the correct “up” angle for a Camel sitting on the ground when I attached the landing gear. Before attaching the upper wing, I glued a windscreen made from clear plastic in position, since this is not included in the kit.
After attaching the cabane struts, I attached the upper wing, and then the interplane struts. In attaching the upper wing, I found the lower wings needed additional dihedral, so I scored them on the lower surface and bent them upwards until the upper wing would be flat. I also had a little problem keeping the wings properly aligned to each other, so I applied some cyanoacrylate glue to the various strut attachment points and hit these with accelerator to get a solid assembly.
Rigging was done with .008 steel wire, with the interplane bracing wires painted gloss black to simulate the “japanned” steel flying wires used in 1918.
| CONCLUSIONS |
 I
am really of the opinion that 1/32 is the “perfect scale” for World War I
models. The model is not that big, comparatively, while being large enough to
allow those who want to super-detail their model lots of opportunity.
I
am really of the opinion that 1/32 is the “perfect scale” for World War I
models. The model is not that big, comparatively, while being large enough to
allow those who want to super-detail their model lots of opportunity.
While this kit is not as well-detailed as the Roden Fokker Triplane, it certainly looks good sitting next to that model on the shelf. Hobbycraft is to be commended for taking a bad kit and turning it into a far superior kit, one that can result in a very good-looking model of one of the most famous airplanes in history, if one is willing to put forward that bit of “extra effort” to make up for what the kit lacks in the box.
February 2006
Review kit courtesy of Da Boss’ wallet.
If you would like your product reviewed fairly and quickly by a site that has over 300,000 visitors a month, please contact me or see other details in the Note to Contributors.