|
KIT # |
|
|
PRICE: |
DM 50 |
|
DECALS: |
See Review |
|
REVIEW: |
|
|
NOTES: |
|
HISTORY |
Dragon 1/48 Fokker D.VII
|
KIT # |
|
|
PRICE: |
DM 50 |
|
DECALS: |
See Review |
|
REVIEW: |
|
|
NOTES: |
|
HISTORY |
Since a good description of the Fokker D VII history is already be given in the review of Tom Cleaver, I will restrict my remarks to the pilot whose plane is represented in my model.
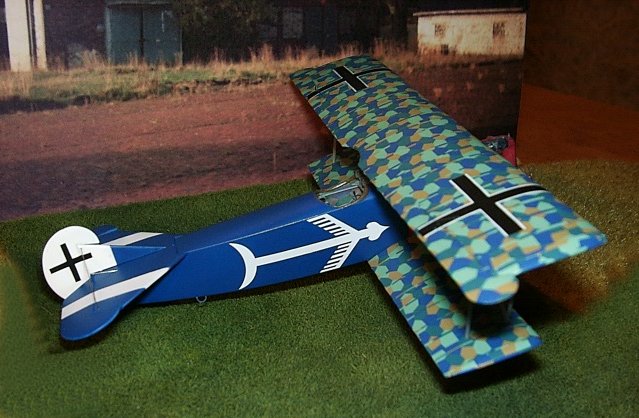
Born on June, 2nd 1894 Josef Veltjens joined the Prussian army with the beginning of the war in August 1914. At the end of 1915 he was transferred to the German air service. His career as a pilot started in Fliegerabteilung 23, where he was flying reconnaissance missions. From march 1917 on he was flying single seat fighters. Five months later he was assigned to Jasta 18. At this time he had already 5 victories. In may 1918 Veltjens became commander of Jasta 15. He was awarded the the Knight's Cross with Swords of the Order of the House of Hohenzollern and the Orden Pour le Mérite. When the war ended, Veltjens had shot down 35 enemy planes. Like other German aces of the great war Veltjens became active supporter of the Nazi movement in the late twenties. Being personal emissary of Göring, he died on October, 6th 1943 in an airplane crash near Piacenza in northern Italy.
|
THE KIT |
 The DML kits are considered to be
among the best kits of WW I airplanes available in this scale. The first look
seems to confirm this. The plastic parts (about 40) are highly detailed and
almost flash free with good representation of the fabric covered areas. The
photoetched parts (two steel frets with 16 parts) look also good and even fine
steel wire is provided for rigging.
The DML kits are considered to be
among the best kits of WW I airplanes available in this scale. The first look
seems to confirm this. The plastic parts (about 40) are highly detailed and
almost flash free with good representation of the fabric covered areas. The
photoetched parts (two steel frets with 16 parts) look also good and even fine
steel wire is provided for rigging.
Closer inspection of my kit revealed some problems. Both wings in my kit were badly warped. In fact the height difference between tips and center section of the upper wing was 5 mm where it should have been 0. On the fuselage side were prominent sink marks which had to be filled. The undercarriage and interplane (N-) struts are supplied as PE parts. The advantage is, that with this the assemblies will be almost "unkaputtbar" (indestructible) but the disadvantage is, that PE is a two dimensional medium. And if you ever had the opportunity to see a D VII, you will know that these struts are not flat. So I tried to solve this problem by shaping the struts with a file and some layers of paint.
The PE material is rather difficult to work with (to hard and to elastic) especially with the machine guns and seat belts. Decals are given for one aircraft – the mount of von Raben in overall red with a white tail. I wanted to have something different so I used the markings for the plane of Lt. Veltjens from the Superscale sheet No. 48-478 (BTW the decals are good but the instructions are vague). Since lozenge was required for this scheme I purchased two sheets Lozenge decals (upper and lower 4-colour) as well. The choice fell on Aeromaster for the upper surfaces and Superscale for the lower. This makes the model quite expansive – in fact I paid more for the decals than for the kit.
|
CONSTRUCTION |
 Like with most aircraft kits
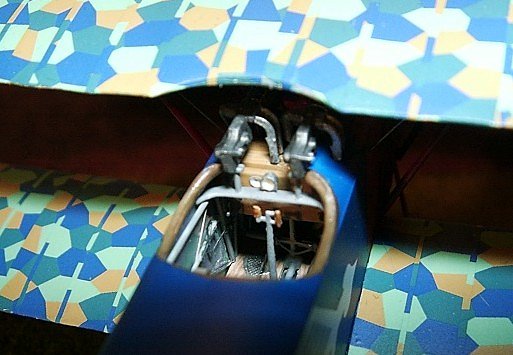
construction starts with the cockpit. The detailing of the cockpit is good (at
least better than with their Dr. I kit) but I wanted a more realistic
representation of the fuselage steel framework and so I sanded away the
detailing on the fuselage sides. Since the lozenge pattern was printed on the
fabric, it showed through and was visible on the cockpit walls in lighter shade
and mirrored pattern. To represent this I used lozenge decals covered with a
coat of a mixture of light gray and clear on the inside of the fuselage (this
gives no mirror pattern but was close enough for me).
Like with most aircraft kits
construction starts with the cockpit. The detailing of the cockpit is good (at
least better than with their Dr. I kit) but I wanted a more realistic
representation of the fuselage steel framework and so I sanded away the
detailing on the fuselage sides. Since the lozenge pattern was printed on the
fabric, it showed through and was visible on the cockpit walls in lighter shade
and mirrored pattern. To represent this I used lozenge decals covered with a
coat of a mixture of light gray and clear on the inside of the fuselage (this
gives no mirror pattern but was close enough for me).
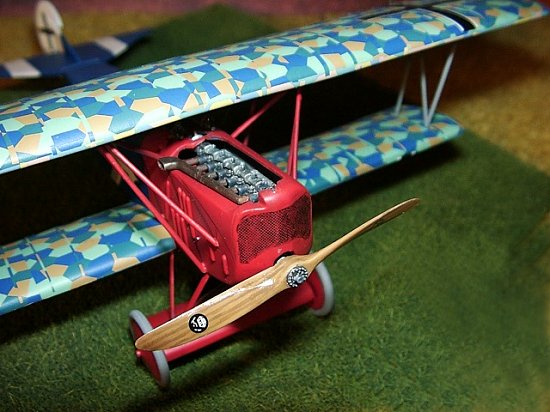
The rear cockpit „bulkhead" (in fact also lozenge fabric) was represented with normal lozenge decal. The fuselage framing was scratchbuilt from stretched sprue, painted medium gray and glued to the fuselage sides. Throttle quadrant and bracing wires were added. For the woodgrain on the cockpit floor I used a decal. The remaining parts were painted and installed. The rudder control wires were represented by fine aluminum wires. Before gluing the fuselage halves together the engine bay was airbrushed in dark gray and the engine was assembled and painted grey (crankcase, valve covers), black (cylinders) and silver (details). A wash with black and drybrushing with pastel chalk dusts gave it a realistic appearance.
With the fuselage completed the lower wing was attached. Before this, the wings had to be straightened by taping them down to a flat surface and heating with steam. In the front region there was a small gap between wing and fuselage which was filled with sheet styrene. For a model of this type (on most WW I aircraft there are normally small gaps between fuselage and wings/stabilizers) the amount of filling and sanding was rather large - especially the wing fuselage joint on the underside and the engine panel inserts needed filling and sanding. Before installing the horizontal stabilizer, the elevators were cut off and repositioned in dropped position. The only fault of the model which is really apparent is the to small rudder, so I cut it away and replaced it with a new one scratchbuilt from sheet styrene. After installing the cabane and undercarriage struts the model was ready for painting.
|
PAINT & DECALS |
 First the model was airbrushed
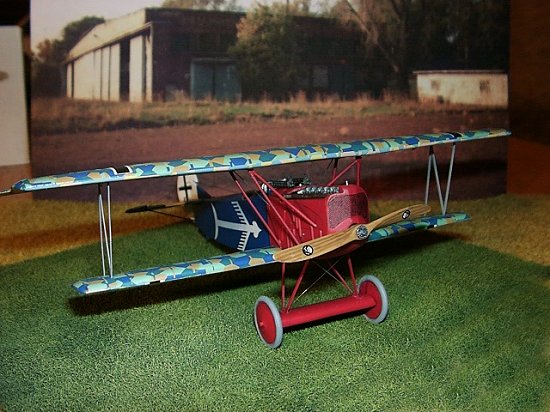
with a coat of light gray. Then the fuselage and tailplanes were airbrushed with
blue, red and white. I chose this rather unusual sequence because it was easier
to mask. Weathering was done with a light wash and some careful drybrushing in
the cowl area. For WW I planes this should not be overdone since these planes
were (usually) kept in good conditions. With a little more heavier wash the
grating of the radiator was accentuated. On the real plane a wire mesh was
attached to the cowling (and in most cases painted in the same color) to protect
the actual radiator which was mounted some centimeters behind that mesh. So this
washing gives a reasonable representation of the cowling face.
First the model was airbrushed
with a coat of light gray. Then the fuselage and tailplanes were airbrushed with
blue, red and white. I chose this rather unusual sequence because it was easier
to mask. Weathering was done with a light wash and some careful drybrushing in
the cowl area. For WW I planes this should not be overdone since these planes
were (usually) kept in good conditions. With a little more heavier wash the
grating of the radiator was accentuated. On the real plane a wire mesh was
attached to the cowling (and in most cases painted in the same color) to protect
the actual radiator which was mounted some centimeters behind that mesh. So this
washing gives a reasonable representation of the cowling face.
Decaling started with 4-colour underside lozenge (Superscale). There is no special trick here - you need only a lot of time, patience (each strip of decal has to dry, before the next can be applied) and loads of setting solution. A good description how this can be done, you can find in the reviews by Tom Cleaver. Then the upper surfaces were done with 4-colour upper Lozenge decals (Aeromaster). For the rib tape I used Lozenge decals cut with a hobby scalpel to strips of the correct width.
The Supercale sheet provides the fuselage arrow markings and crosses for the upper wing (separate black and white parts) and rudder but only one (!) underside cross. So I had to use the DML decals here. The quality of these DML decals is not as good as Superscale – the decals are thick and the white is yellowish and translucent. After decaling was completed, the model was airbrusched with Revell glosscoat followed by a layer of Revell matte varnish. Details (tires, exhaust stacks, machine guns, ammo feeds, propeller) were hand painted and installed.
|
CONSTRUCTION CONTINUES |
The last step was to attach the upper wing (dryfitting for perfect alignment is mandatory here) and to insert the interplane (N-) struts. Rigging was done with fine aluminum wire. Due to the construction of the Fokker only a minimum amount of rigging (undercarriage and tail) is necessary. To make handling easier the completed model was attached to a base which I built from a 3 mm styrene sheet covered with model railroad grass mat.
|
CONCLUSIONS |
Was it not for the warped wings and mediocre decals, this would be the perfect kit to begin with WW I modeling. But for every modeler with some experience, this model can be made into an outstanding representation of this plane. The downside is that you will have to purchase aftermarket decals which can be expansive if you want to use Lozenge decals. But there are also some interesting schemes which can be done without Lozenge (for instance Russian, U.S. and Dutch post WW I). Buy one (if you can get it)!
|
REFERENCES |
For more information about Josef Veltjens (and other WW I aces) look at: The Aerodrome (http://www.theaerodrome.com)
|
ACKNOWLEDGEMENTS |
Special thanks to Detlef Hoffmann for the digital photography and to Shane Weier and the folks from the WW I modeling mailing list for the help with the color scheme.
If you would like your product reviewed fairly and fairly quickly, please contact the editor or see other details in the Note to Contributors.