Eastern Express 1/72 Sikorsky S-16
| KIT #: | 72218 |
| PRICE: | £5 here in the UK |
| DECALS: | One option |
| REVIEWER: | Chris Peachment |
| NOTES: | Injection molded kit |
| HISTORY |
 The
Sikorsky S-16
(designed by Igor Sikorsky) was also known as the RBVZ
S-16 (its
manufacturer). It was a Russian single-bay biplane designed in 1914-15, and
conceived in response to demand for an escort fighter of Sikorsky's giant
Ilya Muromets bombers. It was one of the first aircraft to have
synchronisation gear for the single machine gun. It was completed on 6
February 1915 with an 80hp engine instead of the intended 100hp, because of
supply problems. On 17 December 1915, the Russian government placed an order
for 18, and they were delivered in early 1916.
The
Sikorsky S-16
(designed by Igor Sikorsky) was also known as the RBVZ
S-16 (its
manufacturer). It was a Russian single-bay biplane designed in 1914-15, and
conceived in response to demand for an escort fighter of Sikorsky's giant
Ilya Muromets bombers. It was one of the first aircraft to have
synchronisation gear for the single machine gun. It was completed on 6
February 1915 with an 80hp engine instead of the intended 100hp, because of
supply problems. On 17 December 1915, the Russian government placed an order
for 18, and they were delivered in early 1916.
Although highly manoeuverable, which is something you would guess from it appearance, the S-XVI was dogged by poor performance due to the low horsepower engine. A further batch were completed in 1917, and the aircraft was used during the Revolution, staying in service until 1923.
| THE KIT |
made this kit after completing Sikorsky's Le Grand Vityaz, a forerunner of his Ilya Muromets bombers, for two reason. Firstly it would make a nice companion, its dainty shape and size complementing the Russian giant nicely. And secondly to restore my sanity after spending four months scratch building the bomber. We have become used to kits from Russia, with their crude struts of two by four timber and the poor fit of the parts. But this kit is very well moulded, and reproduces the delicacy of the original. It also falls together with few problems.
| CONSTRUCTION |
 Construction
began as usual with the interior, and this is all nicely moulded with a floor
that fits well for once, a seat, a control column with a wheel, whose spokes
need opening up a little, and an instrument panel, with no dials or decals for
it. But photos on websites listed below show that it only had one dial. I
imagine this was the airspeed indicator, since most pilots would opt to save
this out of all the instruments. No matter, it was painted with a large blob of
black paint, and a smaller white one inside it, and that will do since it can
hardly be sen. The rest of the cockpit is a medium brown.
Construction
began as usual with the interior, and this is all nicely moulded with a floor
that fits well for once, a seat, a control column with a wheel, whose spokes
need opening up a little, and an instrument panel, with no dials or decals for
it. But photos on websites listed below show that it only had one dial. I
imagine this was the airspeed indicator, since most pilots would opt to save
this out of all the instruments. No matter, it was painted with a large blob of
black paint, and a smaller white one inside it, and that will do since it can
hardly be sen. The rest of the cockpit is a medium brown.
Once the fuselage is closed, I did what I usually do with biplanes and apply
paint to the wings and fuselage separately. The cowl and forward part of the
fuselage need a quick blast of silver, Humbrol 11 in a rattle can in this case,
masked off once dry and all of the rest is clear doped linen. I usually use
Vallejo buff or beige. The rib detailing is good enough to stand out on
its own.
The only fit problem now occurs which is the lower wing, which is one piece,
joined by a large square, which fits below the fuselage. Why they didn't have
the wings separate I do not know, because the fit is not good. After much
cutting and filing, the gaps were still evident, and I was faced with a task
which I hate, which is sanding wing root joints. Instead I put a fairly thick
layer of filler all around the inside butt edges of the fuselage, then squashed
the lower wing into place. What then happens is that you get a sausage of filler
oozing out from the joints. Leave this dry for while, though not to set. It can
then be sliced off cleanly with a
 scalpel
blade, leaving a filled and level joint. A few swipes with a rat tailed file,
and then some fine sanding finished the job.
scalpel
blade, leaving a filled and level joint. A few swipes with a rat tailed file,
and then some fine sanding finished the job.
The struts are a good shape and size, and I painted them medium brown, and
didn't this time use Tamiya clear orange on them, as pictures suggest they were
weren't varnished. They do have
pale grey bandages around them, and these are best painted by hand.
I tried masking them, but it proved impossible, with paint bleed
occurring all of the place. And so I did them free hand with a very fine brush,
of only a few hairs, which I had cut down from an already small brush. Notice
that the pictures show struts to have varying numbers of the bandages, some two,
some three. The choice is yours.
The struts were duly glued to the lower wing, then offered up to the upper
wings, and there were no problems with length. Once all dried, rigging can
commence, with my usual method of elastic thread, coloured silver with a gel
felt tip pen, then anchored with small drops of superglue gel applied with a
fine toothpick. Not that there is not rigging in between the cabane struts,
which makes life that little bit easier. After rigging the Sikorsky Le Grand,
this one was a day at the beach.
Aside from the lower wing joint, the other feature which lets this kit down are
the four wheels, which are moulded in clear plastic, with the struts showing on
the clear disc in the centre.
I never know what to do about this abomination. Clear discs just won't do. And
any etched wheels I have encountered have two problems. One, like all etch they
are two dimensional, and so the spokes are flat rather than tubular. And two, it
is impossible to dish them properly, without getting a wavy rim. If any reader
has a solution I would dearly love to hear it.
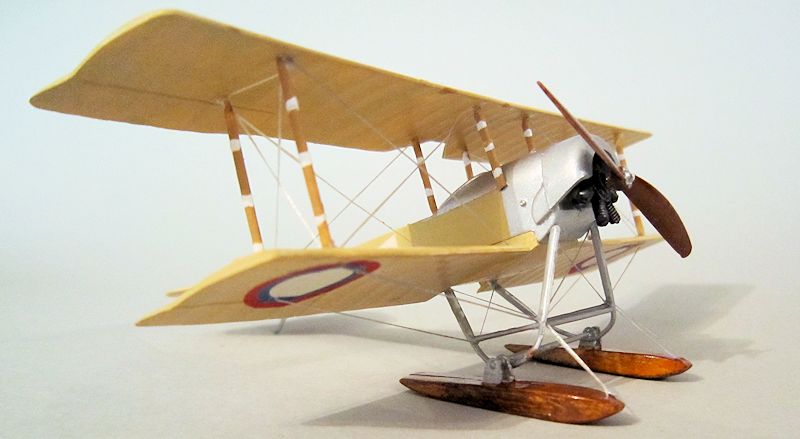
There was a get-out-of-jail card here though, in the shape of some skis.
I always like aircraft on skis, for the same reason as I like floats. They ring
the changes a little and have a good aesthetic appeal.
The undercarriage struts are very delicate and need careful handling,
especially when it comes to removing the sprue attachments. But they all fit
nicely and once dried presented no problems for
 further
rigging. I painted them first with gunmetal, since the pictures suggest they
were left unpainted. Note too, that there are a couple of wires running from the
front of the skis upwards to an attachment point on the struts. These would be
to secure the skis in flight and stop them undulating. When on the ground, they
seem to be loose rather than taut.
further
rigging. I painted them first with gunmetal, since the pictures suggest they
were left unpainted. Note too, that there are a couple of wires running from the
front of the skis upwards to an attachment point on the struts. These would be
to secure the skis in flight and stop them undulating. When on the ground, they
seem to be loose rather than taut.
The engine was painted matt black with gunmetal dry brushing, then slid into
place under the cowl. Tail struts, all of them admirably thin with hardly any
seams, and tail skid were then glued in place.
Just to add a little finesse, I cut four control horns from scrap plastic, glued
them to the elevators, painted them dark brown and attached wires from points on
the fuselage. It is fiddly and I needed two pairs of reading glasses and a
steady hand.
The single machine gun was painted black with gunmetal dry brushing again. It
was poked and prodded into place next to the port cabane, and glued. Then the
spent cartridge collection tube was added after being painted gunmetal.
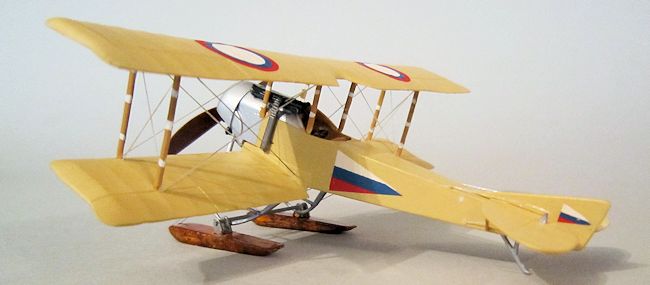
Decals are the usual Russian effort, and need careful trimming to get rid of
carrier film first. They went on without trouble however, which was a surprise.
Finally the propeller, which out of habit, I always leave till last. Like the
skis I painted it a darker shade of brown, with a few grains done in even darker
brown, and a final coat of Tamiya Clear Orange. The boss was gunmetal and once
glued in place...
| CONCLUSIONS |
…
you have a very neat little Russian fighter of compact size with nice lines,
which looks small but pugnacious. I will always bet on the good little'un in a
fight. It is cheap, good value for money, a perfect biplane for those who fear
rigging, because there is so little of it, and a nice addition to any fighter
collection.
 As to
rigging fear, there is no need for it. Like diving off the high board, you only
have to do a lot of it, before it becomes easy. Any fear can be overcome by
confronting it. Except for crocodiles and snakes, and there are good reasons to
be afraid of those. So get cracking, practice on something cheap and easy, and
in less than six months you will wonder why it ever bothered you. You can then
beat your chest and embark on that Pemberton-Billing Nighthawk you have always
wanted to scratch build.
Visit this link
if you have never heard of it.
As to
rigging fear, there is no need for it. Like diving off the high board, you only
have to do a lot of it, before it becomes easy. Any fear can be overcome by
confronting it. Except for crocodiles and snakes, and there are good reasons to
be afraid of those. So get cracking, practice on something cheap and easy, and
in less than six months you will wonder why it ever bothered you. You can then
beat your chest and embark on that Pemberton-Billing Nighthawk you have always
wanted to scratch build.
Visit this link
if you have never heard of it.
I liked this little beast so much, I went back to the shop and bought two Red
Star kits of the Anatra Anasal, another Russian WWI fighter. And I now have a
narrow-eyed plan to combine them into one aircraft no one has ever heard of. And
that is a story for another time.
| REFERENCES |
There are no surviving aircraft but there is a very nice non-flying replica
listed below, at the New England Air Museum, whose skin seems to be a creamier
colour, less yellow than mine.
http://commons.wikimedia.org/wiki/File:Sikorsky_S-16_(2835372050).jpg
http://www.wwi-models.org/1/Photos/Ira/S16/index.html
The detail on the above is excellent, especially the cockpit.
http://www.aviastar.org/air/russia/sik_s-16.php
March 2014
Copyright ModelingMadness.com. All rights reserved. No reproduction in any form without express permission from the editor.
If you would like your product reviewed fairly and fairly quickly, please contact the editor or see other details in the Note to Contributors.
Back to the Review Index Page 2025
.jpg)