| KIT #: | RS 201 |
| PRICE: | $About £5 each |
| DECALS: | Two options |
| REVIEWER: | Chris Peachment |
| NOTES: | Conversion using two kits |
| HISTORY |
The
Anatra DS
or
Anasal
was a two-seat reconnaissance aircraft developed from the Anatra D (or Anade),
built in Odessa, part of the Russian Empire and flown first during WWI and later
by both sides during the Civil War.
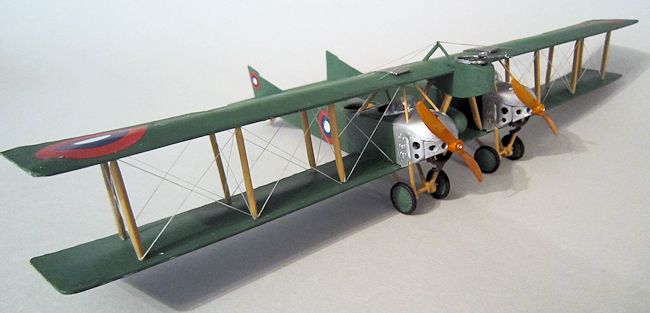
What makes the Salmson unusual is that it was a water cooled radial engine,
which common sense would suggest combines the disadvantages of both types in
that it has a large frontal area along with the
 complexity and vulnerability of
water cooling, while enjoying the benefits of neither type. Nonetheless it
proved a good engine, with markedly increased power over most units. The
aircraft took its unusual name, not from anything Russian, but from the names Anatra and Salmson.
complexity and vulnerability of
water cooling, while enjoying the benefits of neither type. Nonetheless it
proved a good engine, with markedly increased power over most units. The
aircraft took its unusual name, not from anything Russian, but from the names Anatra and Salmson.
The forward fuselage has a distinctive partial engine cowling, open at the
bottom, with cooling holes, which make it look like something armoured.
It had a synchronised forward-firing machine gun in addition to the
observer's weapon.
The construction of the Anadwa used two Anatra fuselages, joined by a new set of wings. The aircraft's gunner was located in a nacelle attached to the centre of the upper wing providing an excellent defence. Test flights started on July 9, 1916, and were were very favourable, but aircraft did not go into production.
| THE KIT |
This conversion came about because one of the few model shops left in London at
West Drayton, near Heathrow, was holding a closing down sale, and I noticed the
two A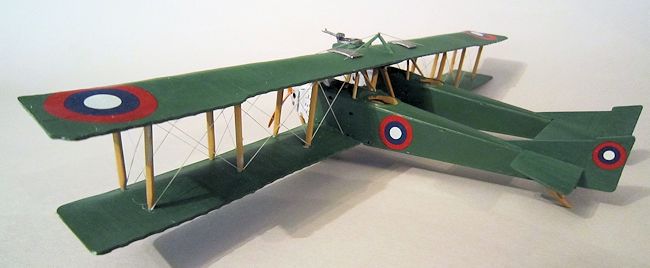 nasals together, hanging on a hook, just like the old
Airfix kits used to
in my local newsagent 50 years ago. I bought them both, then, being truly
afflicted, I started looking around on the internet for how I might alter them.
By one of those happy serendipitous events which often happens in modeling life,
there on a couple of Russian aviation sites was the Anatra Anadwa (don't ask me
what the name means), a bomber and reconnaissance machine which used two of the
Anasal fuselages joined together by long straight wings, with a machine gunners
cockpit, attached like a pulpit to the upper wing.
nasals together, hanging on a hook, just like the old
Airfix kits used to
in my local newsagent 50 years ago. I bought them both, then, being truly
afflicted, I started looking around on the internet for how I might alter them.
By one of those happy serendipitous events which often happens in modeling life,
there on a couple of Russian aviation sites was the Anatra Anadwa (don't ask me
what the name means), a bomber and reconnaissance machine which used two of the
Anasal fuselages joined together by long straight wings, with a machine gunners
cockpit, attached like a pulpit to the upper wing.
| CONSTRUCTION |
The basic construction of the fuselages followed the usual pattern.
I didn't bother with any extra stringer detail, as the pilot's cockpit is
unseen beneath the wing, and the observers' two cockpits have enough furniture
in them. All that was necessary was
to paint the inner walls a suitable primer colour. I chose a dark brown,
reasoning that the exterior dark green would result in something like that. The
seats were brown leather, and the observers' map tables wood.
Alas, the wings of the Anasla kits had to be sent to the spares box, as they are
slightly swept back. Any attempt to
straighten them would have left the ribs canted at the wrong angle. So it was
out with the plastic card and two long wings were constructed by my usual
method. The lower skin was cut from 20 thou card and the scalloped rear edge cut
carefully using a sharp scalpel. The upper wings were 10 thou card cut with a
slightly larger chord. First, the leading edges were glued, and then a length of
plastic rod was cut, slightly shorter than the span and glued to the lower wing
about 1/3 of the way back from the leading edge. The upper skin is then folded
over the rod and glued at the trailing edge, and tips. Once dry, the scallops
can be repeated for the upper skin.
I followed my usual practice with biplanes of building and painting fuselage and
wings separately. I couldn't find any information as to the Anadwa's colour, and
the Red Star suggestion for the Anasa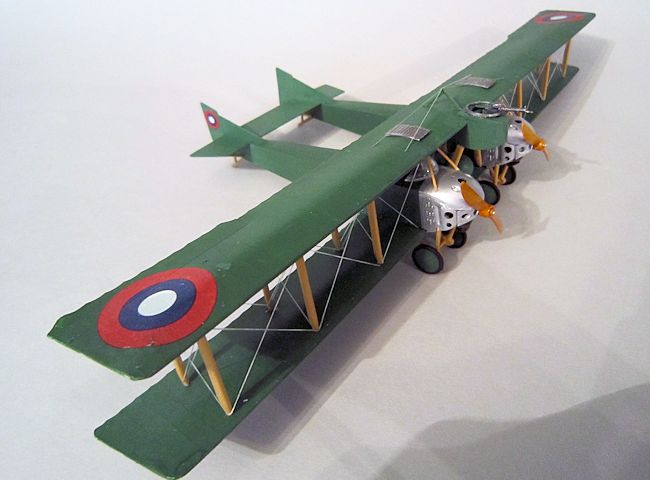 l was either the usual doped linen or
something called “Bright Green”,
with a box art rendition in a bilious, acid shade of green. I went with overall
green and chose a colour from the Lifecolour range of acrylics which is LC40 or
Matt Napoleonic Dragon Green. It is unusual, and has a nice irony to it, in that
Napoleon met his doom when he ignored the First Rule on the First Page of the
“Warfare Instruction Manual”, which goes: 1. Do not invade Russia.
l was either the usual doped linen or
something called “Bright Green”,
with a box art rendition in a bilious, acid shade of green. I went with overall
green and chose a colour from the Lifecolour range of acrylics which is LC40 or
Matt Napoleonic Dragon Green. It is unusual, and has a nice irony to it, in that
Napoleon met his doom when he ignored the First Rule on the First Page of the
“Warfare Instruction Manual”, which goes: 1. Do not invade Russia.
I then married up the fuselages to the lower wing, marked where they should be
with a pencil, and cut away the upper skin with a sharp scalpel. You are still
going to have to cut away a lot from the mounting area in the lower fuselage,
but once down they can be glued.
The struts in the kit look roughly like off-cuts from railway sleepers, but I
decided to use them, rather than cut new ones since I find that when making 12
struts, then even the slightest difference in length with drive you insane when
joining the upper wing. I thinned them as best I could, then drilled holes in
the lower wing, using the plans and a small steel rule. Fix the cabanes first to
the fuselages, then the wing struts to the lower wing. I joined the upper wing
when the struts were almost dry but not quite set, so they were manoeuvrable.
Alignment is everything here, so be prepared to jostle the struts a little with
a cocktail stick. Leave overnight to dry, and sleep the sleep of the just,
knowing that you are well over half way to making something rare.
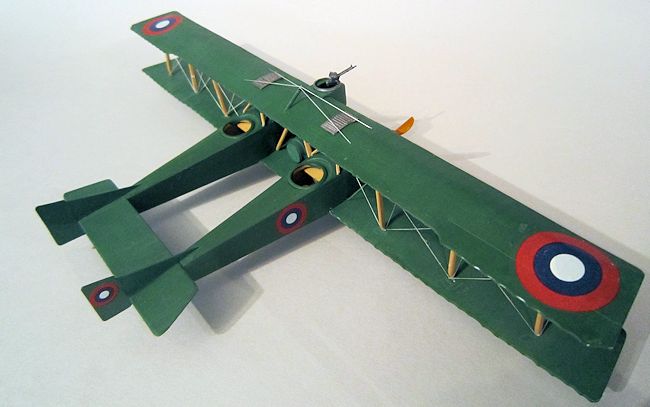
One scale side view of the aircraft shows the gunner's gondola on the upper wing
as a streamlined, rounded torpedo sort of shape. Close analysis of the photos
however show a different story. It is in fact more like a flat bottomed boat,
with vertical sides, a flat upper and lower deck, but all converging to a
streamlined nose. This is in fact quite easy to put together from plastic card.
Make the sidewalls and nose from one piece, traced from the plan, curve it
around a brush handle to make the nose, then use it as a template to cut upper
and lower decks from card, which can then be glued in place. You will need to
cut into the mid section so that it will fit around the upper wing. And don't
forget to cut out the cockpit for the gunner, leaving an edge. I gave him a
little seat inside, though I suspect he would have to clear that out of the way
when aiming for any marauding fighters.
T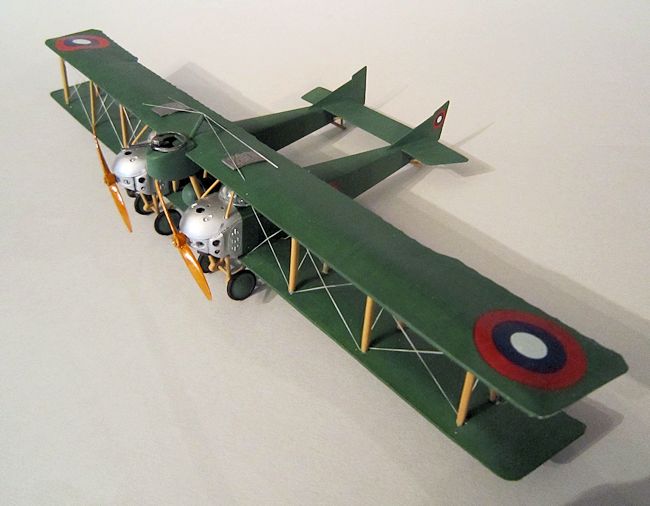 he gondola is also supported by four diagonal struts, and I used the remaining
ones from the kits, cut to size and nudged in with tweezers.
he gondola is also supported by four diagonal struts, and I used the remaining
ones from the kits, cut to size and nudged in with tweezers.
The frontal plans show a round object resting on the lower wing beneath the
gondola, and I can only surmise that this was a fuel tank for long range. Alas,
its length cannot be seen, in either plans not photos, so I took an old 1/48
torpedo from the spares box, and cut it to roughly 2/3 of the chord, added a
couple of securing straps from thin card, and glued it between the gondola
struts.
The tail planes are nothing like the Anasal's and it was but the work of a
moment to cut them from card, score ribs and elevator on the horizontal planes,
and ribs and rudders on the two vertical. The rear decking on the fuselages
needs some fettling work with a heavy sanding stick to let them fit.
For markings, I used only the roundels from the kit, reasoning that so few ere
built, they would not have been allotted serial or unit numbers. They went on
fine. Mask off the noses, which you will have already painted a nice shiny
silver, and give the whole thing a blast of matt or satin varnish
And now you can settle down to many evenings' work of rigging. I think I hear
piteous sighs from readers, strong enough to power sailboats across the
Atlantic. So I will adopt a bracing
tone and say that the only way you are going to get good at something is by
doing it many times. It is all well and fine to want to be a
 Don Bradman or a
Babe Ruth, but you are not going to be either of them just by sitting around and
wishing. I don't know how much either of those heroic sportsmen practised, but I
have been rigging for about 10 years now, and it has become not just a challenge
but a pleasure. And done properly it can be the crowning glory of a biplane.
I
used elastic
thread, coloured silver with a gel pen, glued in place by superglue gel, applied
with a sharpened toothpick.
Don Bradman or a
Babe Ruth, but you are not going to be either of them just by sitting around and
wishing. I don't know how much either of those heroic sportsmen practised, but I
have been rigging for about 10 years now, and it has become not just a challenge
but a pleasure. And done properly it can be the crowning glory of a biplane.
I
used elastic
thread, coloured silver with a gel pen, glued in place by superglue gel, applied
with a sharpened toothpick.
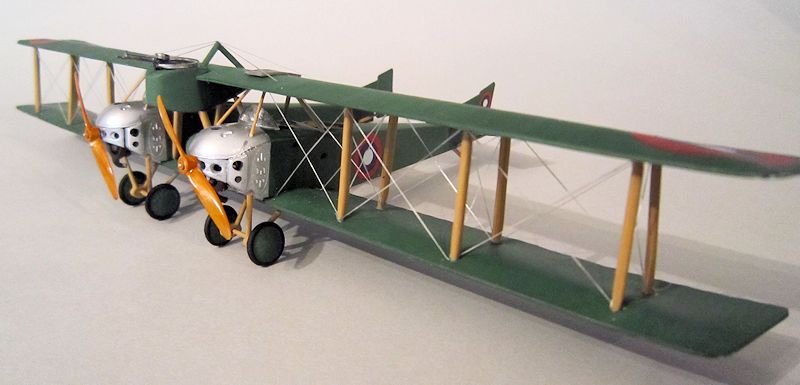
Once all was ship-shape, then the engines can be slid in place, painted black
with a gunmetal wash. Two windscreen also slid in place using Clearfix glue. Two
radiators made from plastic card, with scored slats, glued to the upper wing. A
vee strut placed between them and a couple of rigging brace wires.
A mounting ring and machine gun from the spares box for upper gondola and
a passing thought for the poor gunner who much have felt cold, lonely and
vulnerable up there all on his own.
Mount the four undercarriage struts from the Anasals, but reverse them so they
cant inwards. Shorten the axles appropriately, and then you are faced with the
wheels, which are an abomination.
It is the only thing wrong with the kit, and they are clear plastic discs, with
spokes on them. Fortunately the Anadwa had wheel covers, and so erase as much of
the struts as possible by scalpel and sanding, then paint the covers green. And
allow that some of the struts would have been visible though the covering linen
anyway.
My finishing touch is always the propellers, and, once sanded, painted brown
with a clear orange top coat, they can be glued in place and you can sit back
with a happy sigh, a foolish grin, and a glass of Islay Single Malt to hand as a
reward.
| CONCLUSIONS |
| REFERENCES |
http://flyingmachines.ru/Site2/Crafts/Craft28203.htm
http://www.ctrl-c.liu.se/misc/ram/anatra-vk.html
http://ram-home.com/ram-old/eng_salmson.html
March 2014
If you would like your product reviewed fairly and quickly, please contact the editor or see other details in the Note to Contributors.