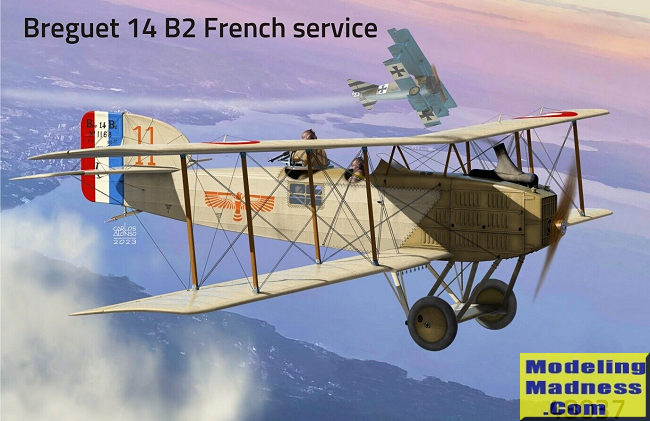
Fly 1/48 Breguet 14B2
| KIT #: | 48037 |
| PRICE: | $52.95 |
| DECALS: | Two options |
| REVIEWER: | Rob Hart |
| NOTES: |
| HISTORY |
The Breguet 14 was a French biplane bomber and reconnaissance aircraft from the First World War. It was unique at the time for being the first mass produced aircraft to use large amounts of metal instead of wood in the construction of its airframe. The resulting airframe was lighter while retaining the same strength had it been constructed of wood. This caused the Breguet 14 to be fast and agile for an aircraft of its size.
The prototype Breguet 14 first flew on November 21, 1916 and production versions began taking to the sky in March, 1917. By mid 1917, the French had enough confidence in the Breguet 14 that they ordered four different aircraft manufacturers to begin producing it. Eventually more than 7800 would be produced and equipping 71 French escadrilles with more than 600 supplied to the USAS with another 40 going to the Belgian Army. Postwar, the Breguet 14 served with 29 different air forces. Many would be used for record setting flights and Breguet would continue to manufacture dedicated civil versions for use as airliners and air ambulances.
The Breguet 14 would see extensive combat in both the bombing and reconnaissance roles. It quickly gained a reputation as a capable platform that was able to absorb considerable battle damage and remain airborne. It could also outrun most contemporary fighters and has been credited with dropping 1,854 tons of bombs on enemy targets during the war. The Breguet 14 is widely considered to be one of World War One's best aircraft.
| THE KIT |
1/48 scale kits of the Breguet 14B2 have been previously released by Aurora, K&B, H-Tech, and MustHave!. The Aurora kit was released in 1964 and is a typical product of its time. It is probably best relegated to nostalgia builds. The K & B kit is a 1972 re-boxing of the Aurora kit with some minor enhancements. The Hi Tech kit was released in 1999 and is a limited run injection molded plastic kit with white metal, resin, and photo-etched parts. The kit was not state of the art when it was new with some aspects being decidedly crude, but it could be built into an impressive model by a skilled modeler (the oldest unfinished project on this reviewer's shelf of doom is a Hi Tech Breguet 14 kit). The MustHave! kit is a re-boxing of the Hi Tech kit with all of the injection molded parts replaced by resin parts.
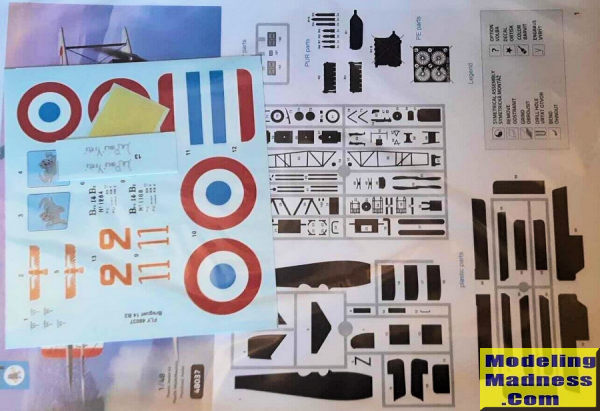
The Fly 1/48 Breguet 14 B2 is, to borrow a phrase from Tom Cleaver, a high end limited run kit. The kit has 105 plastic parts (including a set of upper and lower wings, 3 radiator shrouds, a nose section, a propeller, a pair of skis, 2 radiator grills, and 2 underside nose panels all marked “not for use”), resin parts for the engine and bomb load, clear parts for the windshield and backseater's side windows, kabuki tape masks for the clear parts, decals for two aircraft, and an eight page, full color instruction booklet. The plastic parts are crisply molded with no flash and minimal injection pin divots. The resin parts are cast to a similar high standard. The only thing giving away the kit's limited run origin are the thick sprue attachment points. The plastic, resin, and clear parts are all in their own resealable clear plastic bags as are the instructions and decals.
 Construction
starts with the assembly of the cockpit. The pilots seat mount , front and rear
control columns and front and rear rudder bars are attached to the forward
cockpit floor. This sub-assembly along with the rear cockpit floor, the
firewall, and a Z shaped cross member are then attached to both sides of the
tubular interior frame. This sub-assembly is completed when the instrument panel
and gunner's seats are joined with the tubular side frames and the pilots seat
is attached to its mount. The next step requires cutting out the locations of
the gunner's side windows (heavily scribed lines mark where to cut) and thinning
the insides of the forward fuselage where the widest part of the engine is
located. After the the side windows are installed, the completed cockpit
assembly is located in the right fuselage half. Grooves on the interior of the
fuselage halves matching the locations of the tubular interior frame structure
provide positive location and alignment points. The four part engine is
assembled, attached to two vertical bearers, and the lower edges of the bearers
are fitted into grooves in the appropriate lower nose panel. Although the
instructions indicate that the exhaust pipe should be attached to the engine at
this step, I recommend leaving it off until later in the construction as it
could complicate attaching the upper wing and the rigging. Very little of the
engine will be visible after the fuselage is closed, but it cannot be omitted
because it provides the mounting points for the exhaust pipe. A pity as the kit
engine is very nicely detailed. The lower nose panel with the attached engine is
joined to the right fuselage and the the fuselage halves are glued together. The
next step would have the builder attaching the windshield and forward firing
machine gun to the fuselage, but I recommend leaving them off until later in the
construction process. All of the control surfaces are molded separately and the
next four steps show the fin being attached to the rudder, the elevators being
attached to the horizontal stabilizer, the flaps being attached to the lower
wings, and the lower wings being attached to the fuselage. The same steps also
show the control horns being attached to the elevators and rudder along with the
tail skid being joined to the fuselage, but, again, I recommend leaving these
off until near the end of the assembly process. At this point, I recommend
painting and decaling the model. With the model painted and decaled, the
ailerons are attached to the upper wing and the upper wing is attached to the
fuselage. A diagram is printed on the instructions showing the dihedral angles
of the upper wing. Then the radiator grill and propeller is attached to the
radiator shroud before the sub-assembly is glued to front of the fuselage. Here,
the builder needs to make a decision on how many of the ancillary details are to
be added before the model is rigged. I recommend only attaching the landing gear
minus the wheels and tires.. With the rigging complete (the instructions include
a rigging diagram), the bomb racks are attached to the lower wings and the bombs
are attached to the bomb racks, the wheels/tires are attached to the landing
gear axle (the wheel hubs are separate from the tires making them easy to
paint), and the gunner's twin Lewis guns and swiveling gun mount are assembled
and attached to the fuselage. Finally, all of the ancillary details that were
previously left off are attached.
Construction
starts with the assembly of the cockpit. The pilots seat mount , front and rear
control columns and front and rear rudder bars are attached to the forward
cockpit floor. This sub-assembly along with the rear cockpit floor, the
firewall, and a Z shaped cross member are then attached to both sides of the
tubular interior frame. This sub-assembly is completed when the instrument panel
and gunner's seats are joined with the tubular side frames and the pilots seat
is attached to its mount. The next step requires cutting out the locations of
the gunner's side windows (heavily scribed lines mark where to cut) and thinning
the insides of the forward fuselage where the widest part of the engine is
located. After the the side windows are installed, the completed cockpit
assembly is located in the right fuselage half. Grooves on the interior of the
fuselage halves matching the locations of the tubular interior frame structure
provide positive location and alignment points. The four part engine is
assembled, attached to two vertical bearers, and the lower edges of the bearers
are fitted into grooves in the appropriate lower nose panel. Although the
instructions indicate that the exhaust pipe should be attached to the engine at
this step, I recommend leaving it off until later in the construction as it
could complicate attaching the upper wing and the rigging. Very little of the
engine will be visible after the fuselage is closed, but it cannot be omitted
because it provides the mounting points for the exhaust pipe. A pity as the kit
engine is very nicely detailed. The lower nose panel with the attached engine is
joined to the right fuselage and the the fuselage halves are glued together. The
next step would have the builder attaching the windshield and forward firing
machine gun to the fuselage, but I recommend leaving them off until later in the
construction process. All of the control surfaces are molded separately and the
next four steps show the fin being attached to the rudder, the elevators being
attached to the horizontal stabilizer, the flaps being attached to the lower
wings, and the lower wings being attached to the fuselage. The same steps also
show the control horns being attached to the elevators and rudder along with the
tail skid being joined to the fuselage, but, again, I recommend leaving these
off until near the end of the assembly process. At this point, I recommend
painting and decaling the model. With the model painted and decaled, the
ailerons are attached to the upper wing and the upper wing is attached to the
fuselage. A diagram is printed on the instructions showing the dihedral angles
of the upper wing. Then the radiator grill and propeller is attached to the
radiator shroud before the sub-assembly is glued to front of the fuselage. Here,
the builder needs to make a decision on how many of the ancillary details are to
be added before the model is rigged. I recommend only attaching the landing gear
minus the wheels and tires.. With the rigging complete (the instructions include
a rigging diagram), the bomb racks are attached to the lower wings and the bombs
are attached to the bomb racks, the wheels/tires are attached to the landing
gear axle (the wheel hubs are separate from the tires making them easy to
paint), and the gunner's twin Lewis guns and swiveling gun mount are assembled
and attached to the fuselage. Finally, all of the ancillary details that were
previously left off are attached.
The decals provide markings for two color schemes; one in clear doped linen overall and the other in the five color French camoflage. Both schemes have colorful unit insignia and one has personal markings. The decals are crisply printed and in register. The blue on the roundels and fin flashes look a little bright to my eyes, but the color has so many variations that I am reluctant to say that it is wrong.
| CONCLUSIONS |
The Fly 1/48 Breguet 14 B2 is the best kit available of the type in any scale. However, it is not a kit for beginners. I recommend that potential builders have a few biplane models under their belts before taking it on. That being said, I have no doubt that experienced modelers will turn the kit into a dazzling miniature replicas.
Rob Hart
October 2023 Copyright ModelingMadness.com. All rights reserved. No
reproduction in part or in whole without express permission from the editor.
If you would like your product reviewed fairly and fairly quickly, please
contact
the editor or see other details in the
Note to
Contributors.