Battle Axe 1/32 Fokker E.III
|
KIT # |
32BA02 |
|
PRICE: |
$99.98 |
|
DECALS: |
basic markings |
|
REVIEWER: |
|
|
NOTES: |
Short run with etched brass and resin parts |
|
HISTORY |
 performance and used it to
design a totally new Fokker monoplane. It is this new design based on the Morane Saulnier H that became the Eindeker and progressed from the E.I
through the E.IV. He used a welded steel frame fuselage truss instead of
a wire braced wooden one. He also strengthened the spars and used
compression struts instead of compression ribs in the wings. The rudder
was enlarged and changed in shape from the MoS style to the now famous
Fokker comma shaped rudder. He set these changes on a wider wheel base to
aid in ground handling. The most successful and numerous of these
Eindekers was the E.III.
performance and used it to
design a totally new Fokker monoplane. It is this new design based on the Morane Saulnier H that became the Eindeker and progressed from the E.I
through the E.IV. He used a welded steel frame fuselage truss instead of
a wire braced wooden one. He also strengthened the spars and used
compression struts instead of compression ribs in the wings. The rudder
was enlarged and changed in shape from the MoS style to the now famous
Fokker comma shaped rudder. He set these changes on a wider wheel base to
aid in ground handling. The most successful and numerous of these
Eindekers was the E.III.
Never what could be described as a nimble fighter, the Eindekers were a mediocre aircraft that would never have amounted to much had A.H.F. not equipped one with a synchronized machine gun firing through the propeller disc. The tremendous combat advantage conferred to the Eindeker pilots by the ability to aim their gun by aiming their airplane so eclipsed the poor performance, that the type was responsible for what became known as "The Fokker Scourge". It was not until the appearance of the more maneuverable DH.2 and Nieuport 11 over the front that Fokker's scourge was broken and the see-saw battle for superior fighter performance that characterized the rest of aviation development during the Great War began.
|
THE KIT |
Let me begin the discussion of the kit by stating
that I am a fan of short run kits. The Battle Axe Fokker E.III is a short
run kit and as such it is better than average. The parts will require
cleanup and the many larger, low pressure injection gates require some
careful dressing to remove all traces. It will build into an impressive
model straight out of the box, though it will require some work to finish
well. On the other hand it will also make an exc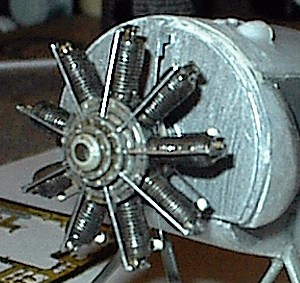 ellent starting point for
a full blown super-detail project. The styrene is not brittle and very
workable. All the Styrene parts come on one large sprue. Additionally
there is a nice fret of PE parts. All these seem to be pieces well suited
to the photo etch medium. There is also a beautiful resin engine and gun.
The decals provide basic national markings as well as some pieces to
represent the fabric openings along the longerons characteristic of this
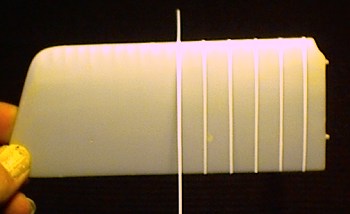
type. The only shortcoming I have found so far are wing panels which have
12 instead of 13 wing ribs each. One final word about short run injected
parts. They often have pronounced mold lines and a few suffer from slight
misalignment of the molds resulting in a "step" along the mold line.
These must be dealt with. I don't view it as a total negative though. It
forces you to thoroughly clean up every part. I have built more than one
"shake the box" kit where the mold lines on smaller parts were invisible
... until the first coat of paint.
ellent starting point for
a full blown super-detail project. The styrene is not brittle and very
workable. All the Styrene parts come on one large sprue. Additionally
there is a nice fret of PE parts. All these seem to be pieces well suited
to the photo etch medium. There is also a beautiful resin engine and gun.
The decals provide basic national markings as well as some pieces to
represent the fabric openings along the longerons characteristic of this
type. The only shortcoming I have found so far are wing panels which have
12 instead of 13 wing ribs each. One final word about short run injected
parts. They often have pronounced mold lines and a few suffer from slight
misalignment of the molds resulting in a "step" along the mold line.
These must be dealt with. I don't view it as a total negative though. It
forces you to thoroughly clean up every part. I have built more than one
"shake the box" kit where the mold lines on smaller parts were invisible
... until the first coat of paint.
I was going to begin construction with the fuselage interior and engine, but when I checked the wing panels against the drawings I noticed there were 12 instead of 13 ribs. Well that just wouldn't do for me. I knew that I would never even see the finished model, I'd only see 12 ribs. Personal problem, I admit. The rib detail on the wings is some of the finest I have ever seen in any styrene and many modelers will choose to leave it as it is. Not many folks will call you on the number of ribs, especially ones as nicely done as these. Like I said, a personal problem.
|
CONSTRUCTION |
 If you leave the rib detail as it is, you will have
to deal with quite a few small injector pin "towers" on the lower
surface. Fortunately the plastic is pretty soft and workable, so the
little pins disappear quickly without much effort and only a little care
to preserve the underside rib detail. On the other hand, if you can't
live with 12 ribs, then the conversion to 13 ribs is not all that
difficult. I did it this way: Looking at a set of drawings that show 13
ribs, (including the root rib), and the kit part with 12 ribs, it is
apparent that if the false ribs were full ribs and the full ribs false,
the locations would match the drawings, lacking only a shorter full rib
located on the tapered tip. I used this observation to advantage by
sanding off all rib detail from the trailing edge forward to a line
defined by the end of the false ribs. This leaves all ribs the length of
the false ribs. I added 5 thou card strips at
If you leave the rib detail as it is, you will have
to deal with quite a few small injector pin "towers" on the lower
surface. Fortunately the plastic is pretty soft and workable, so the
little pins disappear quickly without much effort and only a little care
to preserve the underside rib detail. On the other hand, if you can't
live with 12 ribs, then the conversion to 13 ribs is not all that
difficult. I did it this way: Looking at a set of drawings that show 13
ribs, (including the root rib), and the kit part with 12 ribs, it is
apparent that if the false ribs were full ribs and the full ribs false,
the locations would match the drawings, lacking only a shorter full rib
located on the tapered tip. I used this observation to advantage by
sanding off all rib detail from the trailing edge forward to a line
defined by the end of the false ribs. This leaves all ribs the length of
the false ribs. I added 5 thou card strips at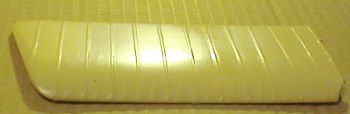 the location of each false
rib. The result was a wing panel matching the drawings with 13 ribs.
These card rib tapes were sanded down a bit. Decal material painted with
several coats of paint might work well and avoid the sanding of the card
ribs. It's a little work, but a lot easier than it sounds and it sure
beats looking at the wrong number of ribs in my book. With the wings
corrected and primed, I set them aside and continued with the
construction where I had intended to start it.
the location of each false
rib. The result was a wing panel matching the drawings with 13 ribs.
These card rib tapes were sanded down a bit. Decal material painted with
several coats of paint might work well and avoid the sanding of the card
ribs. It's a little work, but a lot easier than it sounds and it sure
beats looking at the wrong number of ribs in my book. With the wings
corrected and primed, I set them aside and continued with the
construction where I had intended to start it.
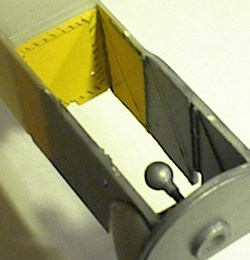 There is a bulkhead piece that sits right behind the
pilot's seat. In the real machine, this was a fabric panel stitched to
the frame members behind the seat to seal off the rear of the fuselage
from the wind blast through the open cockpit. Well anything be
There is a bulkhead piece that sits right behind the
pilot's seat. In the real machine, this was a fabric panel stitched to
the frame members behind the seat to seal off the rear of the fuselage
from the wind blast through the open cockpit. Well anything be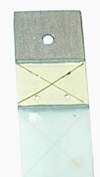 hind this
panel is invisible when the fuselage is assembled. Fortunately this means
that the majority of the injector pins on the inside of the fuselage
sides can be ignored. You only have to worry about the first three bays
of the fuselage. There are molded in bracing wires in all the fuselage
bays. I am not skilled enough to paint these without making a mess, so I
sanded these off along with a few injector pins in the first three bays,
leaving the molded in frame members intact. After painting the interior
fabric a clear doped linen color, the frame members a gray-green primer
color (similar to RLM 02), and the sheet metal panels aluminum, (swirled
like the outside), I added the bracing wires out of stainless steel wire
with the turnbuckles represented by a couple of layers of brass paint.
After this concession to AMS, I built the interior pretty much as called
out on the instruction sheet. The E.III has a very sparse cockpit and
Battle Ax
hind this
panel is invisible when the fuselage is assembled. Fortunately this means
that the majority of the injector pins on the inside of the fuselage
sides can be ignored. You only have to worry about the first three bays
of the fuselage. There are molded in bracing wires in all the fuselage
bays. I am not skilled enough to paint these without making a mess, so I
sanded these off along with a few injector pins in the first three bays,
leaving the molded in frame members intact. After painting the interior
fabric a clear doped linen color, the frame members a gray-green primer
color (similar to RLM 02), and the sheet metal panels aluminum, (swirled
like the outside), I added the bracing wires out of stainless steel wire
with the turnbuckles represented by a couple of layers of brass paint.
After this concession to AMS, I built the interior pretty much as called
out on the instruction sheet. The E.III has a very sparse cockpit and
Battle Ax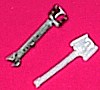 e has provided all the main components. I did find the joystick
to be poorly molded and decided it was less work to scratch a new one. I
also dispensed with the fuel tank because it is located behind the rear
cockpit bulkhead and completely invisible on the finished model. I added
control cables of SS wire and some fuel line out of bent brass wire.
e has provided all the main components. I did find the joystick
to be poorly molded and decided it was less work to scratch a new one. I
also dispensed with the fuel tank because it is located behind the rear
cockpit bulkhead and completely invisible on the finished model. I added
control cables of SS wire and some fuel line out of bent brass wire.
 The front decking piece, which gets several
interior parts attached to it's underside, has to be sanded down in order
to fit. They even make a point of mentioning it in the instructions. To
get it right you need to have the front end of the fuselage assembled. I
used the cockpit rear bulkhead, the "chin" piece and the firewall piece
to align the two fuselage sides. Take come care here and get everything
aligned and true or you will build a warp into the fuselage. I left off
the bottom and the upper decking until all the interior details were
added. In closing up the fuselage you need to take care to keep it all
true and fix any gaps or misfits that have occurred. I do suggest priming
all the seams, there are over 2 feet of them and you are guaranteed to
miss a centimeter or two that won't show up until the paint goes on.
The front decking piece, which gets several
interior parts attached to it's underside, has to be sanded down in order
to fit. They even make a point of mentioning it in the instructions. To
get it right you need to have the front end of the fuselage assembled. I
used the cockpit rear bulkhead, the "chin" piece and the firewall piece
to align the two fuselage sides. Take come care here and get everything
aligned and true or you will build a warp into the fuselage. I left off
the bottom and the upper decking until all the interior details were
added. In closing up the fuselage you need to take care to keep it all
true and fix any gaps or misfits that have occurred. I do suggest priming
all the seams, there are over 2 feet of them and you are guaranteed to
miss a centimeter or two that won't show up until the paint goes on.
|
CAMOUFLAGE & MARKINGS |
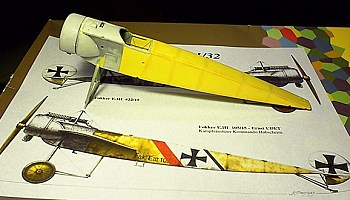 I painted the model a base coat of CDL, (cream to
biege representing Clear Doped Linen). I use artist's acrylics mixed with
Future unless otherwise mentioned. Next I used a watercolor pencil to
shade the rib stations and the places where fuselage framework would
shadow a bit under clear doped linen. The pencil marks can be made with a
straight edge or free handed giving slightly different effects. After the
marks are made it is necessary to buff them a bit with a Q-tip. Use it
dry or ever so slightly moist. At this point you are wondering, "Why did
I mess up this perfectly nice model." That's OK, the watercolor pencil
marks look like crud. The magic happens when you begin misting light
coats of CDL over the piece. Do this without building up so much paint
that you wet the surface. You will see the marks blur and begin to
disappear. Keep misting until you get the effect you are pleased with.
Take care to mist evenly and compare the work in hand with already
finished portions to keep the effect the same. I painted solid
I painted the model a base coat of CDL, (cream to
biege representing Clear Doped Linen). I use artist's acrylics mixed with
Future unless otherwise mentioned. Next I used a watercolor pencil to
shade the rib stations and the places where fuselage framework would
shadow a bit under clear doped linen. The pencil marks can be made with a
straight edge or free handed giving slightly different effects. After the
marks are made it is necessary to buff them a bit with a Q-tip. Use it
dry or ever so slightly moist. At this point you are wondering, "Why did
I mess up this perfectly nice model." That's OK, the watercolor pencil
marks look like crud. The magic happens when you begin misting light
coats of CDL over the piece. Do this without building up so much paint
that you wet the surface. You will see the marks blur and begin to
disappear. Keep misting until you get the effect you are pleased with.
Take care to mist evenly and compare the work in hand with already
finished portions to keep the effect the same. I painted solid
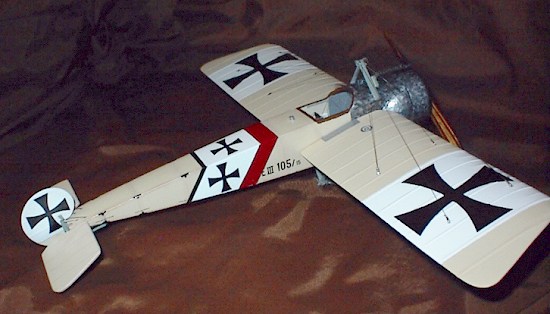
 white
fields for the wing, rudder and fuselage markings. I masked with Parafilm
and sprayed a coat of Future over the mask before applying the white. No
runs or paint creepies. The red and black stripes on the fuselage are
decal material.
white
fields for the wing, rudder and fuselage markings. I masked with Parafilm
and sprayed a coat of Future over the mask before applying the white. No
runs or paint creepies. The red and black stripes on the fuselage are
decal material.
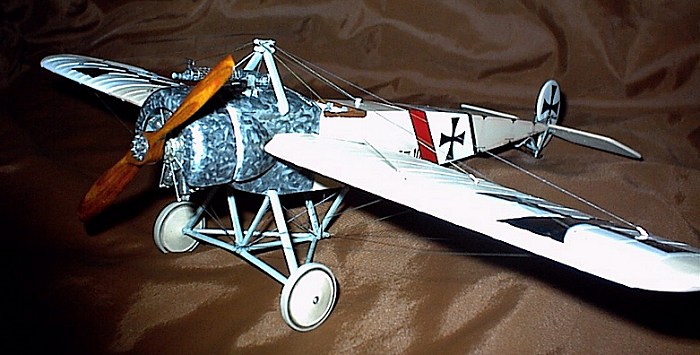
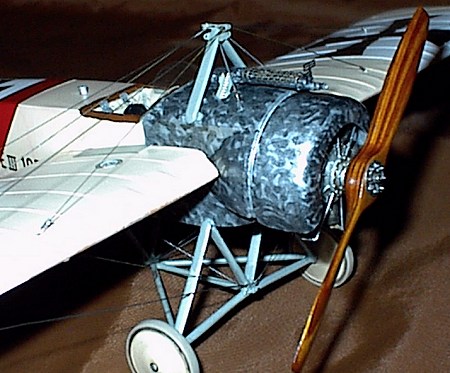
Now for the reason I have not built an E.III since the 1960s. Fokker cowl squiggles. I tried something I had been thinking about for a while. I painted the aluminum parts a coat of Testor's small bottle aluminum. When this had gotten dry enough to handle, I painted the squiggles with a pointed brush. I used Testos Metalizer, gunmetal flavor, and it turned out to be a bit dark. I recommend titanium or steel. The lacquer based Metalizer flows on and bites into the enamel. This helps in keeping the squiggles from running where they weren't put. Use a half loaded brush or the thin lacquer will run too much onto the surface. The hardest part is to keep the squiggles fairly random. Try not to repeat the same shaped squiggle too much. A couple of coats of Future to seal it and it looks pretty much like the photos.
|
FINAL CONSTRUCTION |
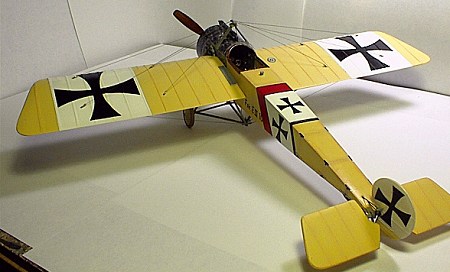 Attachment of the wings will drive the faint of
heart up the wall. I did it the scary way. I whittled the pins molded
into the roots of the wing panels and wallered the holes until I got a
decent fit. I put a drop of CA on each pin and stuck the wing right on
and eyeballed it straight. After the CA set, I ran a tiny bead along the
entire joint. This supported the wings well enough until they were
rigged. I rig with heat stretched sprue prepainted with Metalizer. On a
kingpost braced monoplane like the E.III, I use one wire passing through
each wing all the way around for each station. When tightened with heat
and secured with a drop of CA at each hole, the wing becomes quite
secure. I slipped on Grant Line model RR turnbuckles, four per wire.
These I painted a brass color. Try as I might, I cannot paint a
light/dark laminated prop, so I stole a Martin Digmayer hand carved prop
from a broken model awaiting repair and used that.
Attachment of the wings will drive the faint of
heart up the wall. I did it the scary way. I whittled the pins molded
into the roots of the wing panels and wallered the holes until I got a
decent fit. I put a drop of CA on each pin and stuck the wing right on
and eyeballed it straight. After the CA set, I ran a tiny bead along the
entire joint. This supported the wings well enough until they were
rigged. I rig with heat stretched sprue prepainted with Metalizer. On a
kingpost braced monoplane like the E.III, I use one wire passing through
each wing all the way around for each station. When tightened with heat
and secured with a drop of CA at each hole, the wing becomes quite
secure. I slipped on Grant Line model RR turnbuckles, four per wire.
These I painted a brass color. Try as I might, I cannot paint a
light/dark laminated prop, so I stole a Martin Digmayer hand carved prop
from a broken model awaiting repair and used that.
|
CONCLUSIONS |
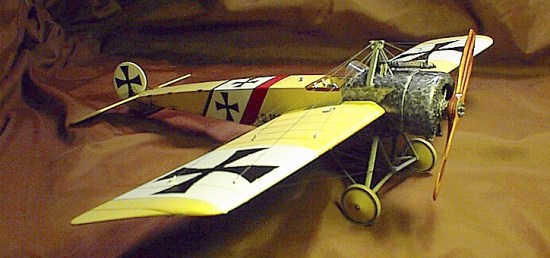 The Battle Axe Fokker E.III is a better than average
example of a short run, multi-media kit. It also happens to be the only
E.III show in 1/32 town. It takes some work and a little determination,
but an attractive model can be built from it. The resin engine is a real
jewel and the nicest feature of the kit. The decals are top quality and
apply very well. While it takes a bit of cleanup, the installation of the
main U/C struts makes a strong and stable base for the model. On the down
side are the twelve rib wing panels. Since it represents one more little
clump of grass in the barren wasteland of 1/32 WWI Aircraft, we are
fortunate that this kit builds into an impressive model of the airplane
that changed fighter tactics forever.
The Battle Axe Fokker E.III is a better than average
example of a short run, multi-media kit. It also happens to be the only
E.III show in 1/32 town. It takes some work and a little determination,
but an attractive model can be built from it. The resin engine is a real
jewel and the nicest feature of the kit. The decals are top quality and
apply very well. While it takes a bit of cleanup, the installation of the
main U/C struts makes a strong and stable base for the model. On the down
side are the twelve rib wing panels. Since it represents one more little
clump of grass in the barren wasteland of 1/32 WWI Aircraft, we are
fortunate that this kit builds into an impressive model of the airplane
that changed fighter tactics forever.
September 2003
|
REFERENCES |
Squadron Fokker Eindeker In Action. # 158
Profile Publications #38
Timely photos from Brad Gossen and Robert Karr of the WWI Modeling List.
Moral support and appropriate heckling from Shane Weier and Ernest Thomas, also of the WWI Modeling List.
If you would like your product reviewed fairly and fairly quickly, please contact the editor or see other details in the Note to Contributors.