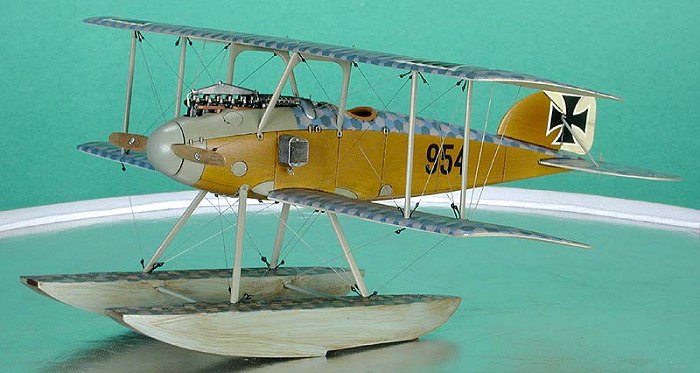
Eduard 1/48 Albatros W.4
|
KIT # |
8084 |
|
PRICE: |
$36.99 |
|
DECALS: |
Three options |
|
REVIEWER: |
|
|
NOTES: |
Profipack version: Americal Kreigsmarine lozenge decals |
|
HISTORY |
 For a more detailed description of the development
of the Albatros fighters, please refer to the many articles found at
Modeling Madness. The Albatros W.4 seaplane was a direct descendent of
the Albatros D.I fighter and was developed in the same approximate time
frame. Responding to a German Admiralty specification for a seaplane
based fighter aircraft to provide air defense and reconnaissance duties
protecting their important naval bases along the Baltic and North Sea
coasts, Albatros Flugzeugwerke GmbH built an initial prototype at its
Johannistahl factory in September 1916. This aircraft was basically
derived from the D.I fighter also in production at Johannistahl, but
featured larger wings with increased space between the top and bottom
wing, and a different tail plane configuration (along with floats!).
After the initial prototype, construction was then transferred to the
seaplane works at Friedrichshafen where a total of 118 aircraft were
built between September 1916 and December 1917, in eight production
batches. To confuse the modeler, each of these eight batches featured
slightly different configurations of floats, struts, radiators, and
ailerons, so I’m not even going to comment on the accuracy of the
specific aircraft in the kit! As the old modeling saying goes, check
photo references if you are the type that cares!
For a more detailed description of the development
of the Albatros fighters, please refer to the many articles found at
Modeling Madness. The Albatros W.4 seaplane was a direct descendent of
the Albatros D.I fighter and was developed in the same approximate time
frame. Responding to a German Admiralty specification for a seaplane
based fighter aircraft to provide air defense and reconnaissance duties
protecting their important naval bases along the Baltic and North Sea
coasts, Albatros Flugzeugwerke GmbH built an initial prototype at its
Johannistahl factory in September 1916. This aircraft was basically
derived from the D.I fighter also in production at Johannistahl, but
featured larger wings with increased space between the top and bottom
wing, and a different tail plane configuration (along with floats!).
After the initial prototype, construction was then transferred to the
seaplane works at Friedrichshafen where a total of 118 aircraft were
built between September 1916 and December 1917, in eight production
batches. To confuse the modeler, each of these eight batches featured
slightly different configurations of floats, struts, radiators, and
ailerons, so I’m not even going to comment on the accuracy of the
specific aircraft in the kit! As the old modeling saying goes, check
photo references if you are the type that cares!
|
THE KIT |
The kit is Eduard’s Albatros W4 Profipack kit (8084). It is a mixed media kit and consists of injected molded plastic (54 parts), one sheet of photo-etch detail parts (29 items), Express Masks to help out with the painting duties, and the usual Czech printed decal sheet with options for three aircraft (including lozenge decals). The plastic parts are high quality injected molded pieces that rivals Tamiya/Hasegawa in quality. Much has been made about the inaccuracy of the kit provided lozenge decals with the hexagons being too large and the wrong color, but I will not state that these are “wrong” as I did not do any research. I did substitute Americal Kriegsmarine lozenge decals, since I am highly trusting of their research and products. The instruction sheet is the usual twelve page diagram assembly with marked color painting guidelines, and a cross reference to Tamiya, Humbrol, Revell, Gunze, and Testor paints.
|
CONSTRUCTION |
 I started by pre-painting all the parts as indicated
in the instructions, with the exception of the fuselage walls, bulkheads,
floors, and engine mount floor, which I painted with my “faux” wood grain
method (described later). The stringer detail on the fuselage sidewalls
were then hand painted Testor Model Master (TMM) French Chestnut and
given a light wash of burnt umber.
I started by pre-painting all the parts as indicated
in the instructions, with the exception of the fuselage walls, bulkheads,
floors, and engine mount floor, which I painted with my “faux” wood grain
method (described later). The stringer detail on the fuselage sidewalls
were then hand painted Testor Model Master (TMM) French Chestnut and
given a light wash of burnt umber.
Assembly of the fuselage components was accomplished using super-thin superglue. Assembly proceeded as described in the instructions, with no major problems. The engine components were next as I painted them, assembled them together, and then gave the whole assembly a heavy wash of black. I installed the engine floorboard to the fuselage side, wrapped the top half of the engine (exhaust stack was not installed yet) in parafilm, and installed the engine into the fuselage with superglue.
I then closed up the fuselage with liquid cement. Next, I glued with liquid cement the horizontal stabilizer, and lower wing to the fuselage. The lower wing did not fit very well, creating a significant step that had to be sanded away. Fortunately, there is no detail in this area so it was a very easy task. All joins were then sanded smooth, and no putty was required for gap filling. Then I drilled all of the rigging, strut, and landing gear mounting holes as described in the instructions. Next stop was the paint shop.
The model was painted, decaled, and weathered as described in the following subsections and then final assembly took place.
|
CAMOUFLAGE & MARKINGS |
As mentioned above, all painting was done after
completion of the fuselage and attachment of the lower wing fairly early
in the construction process. I started first by airbrushing the entire
fuselage, wings, and tail section Polly Scale (PS) Acrylic Dirty White.
The white also served as the base color for my wood grain f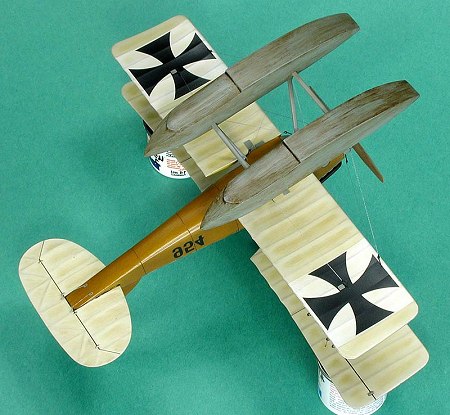 inish. Next I
replicated the wood grain finish on the fuselage. Previously, I had good
success using a dry brushing technique with a rake brush that I used for
smaller pieces. Starting with the white finish, I lightly dry brushed
successive colors of TMM Raw Umber, Raw Sienna, Burnt Sienna, and Sand
atop each other in a random pattern. After letting this cure overnight I
shot many coats of Tamiya Clear Yellow (mixed with 10 drops of Tamiya
Smoke) to get that Albatros wood grain yellow look. A word of caution,
you must apply many, many, many coats of clear yellow (I probably did
about 10-12) to get that nice rich honey amber hue. After letting the
yellow coat cure for a week, I then masked the forward fuselage using the
provided Express Masks and shot Testors RLM Gray 02. After a day of
drying time, I sprayed a light coat of Future in preparation for
decaling.
inish. Next I
replicated the wood grain finish on the fuselage. Previously, I had good
success using a dry brushing technique with a rake brush that I used for
smaller pieces. Starting with the white finish, I lightly dry brushed
successive colors of TMM Raw Umber, Raw Sienna, Burnt Sienna, and Sand
atop each other in a random pattern. After letting this cure overnight I
shot many coats of Tamiya Clear Yellow (mixed with 10 drops of Tamiya
Smoke) to get that Albatros wood grain yellow look. A word of caution,
you must apply many, many, many coats of clear yellow (I probably did
about 10-12) to get that nice rich honey amber hue. After letting the
yellow coat cure for a week, I then masked the forward fuselage using the
provided Express Masks and shot Testors RLM Gray 02. After a day of
drying time, I sprayed a light coat of Future in preparation for
decaling.
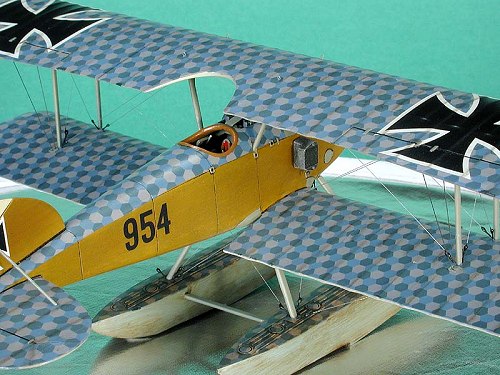
The decals supplied with the kit are very nice being super thin and well printed. As mentioned earlier I substituted Americal Kriegsmarine lozenge decals for the kit-supplied decals. After a short drying period of about an hour, I applied MicroSol setting solution to get the decals to melt into the surface and the control surfaces. I repeated with a second coat of setting solution to get all the decals fully down. After drying overnight, I wiped the decals off with a moist cloth with a bit of soap to remove any residue and after drying I shot a very light coat of Future thinned with rubbing alcohol (50-50 mix) over the decals to seal them. For weathering, I chose to accentuate the engraved panel lines and surface detail with a light burnt umber oil wash.
I then sealed everything with a light coat of PS Flat Finish to provide a surface for pastel application. I then used a pastel pencil to lightly highlight the rib detail on the wings/tail surfaces. I then randomly applied some ground up burnt umber pastels with a soft brush to simulate dirt staining on the lower surfaces. Lastly, I applied a heavy burnt umber oil wash to the wheels and control surface joins.
|
FINAL CONSTRUCTION |
Now it was time to assemble the guns as shown in the instructions. Make sure you anneal (heat in a flame until red-hot) the jackets and you will be rewarded with a truly circular jacket. Roll the jackets around the correct size circular rod (styrene rod works). Place the jacket seam to the bottom and no one will even see it! I painted the machine guns in Testor Metalizer Gun Metal and dry brushed with Floquil Gun Metal.
 I installed the interplane and cabane struts into
place on the top wing using Tamiya Liquid Cement. I also drilled small
holes in the radiator header tank to fit short sections of corresponding
diameter wire for the tank to engine piping since mine had broken off
during shipping.
I installed the interplane and cabane struts into
place on the top wing using Tamiya Liquid Cement. I also drilled small
holes in the radiator header tank to fit short sections of corresponding
diameter wire for the tank to engine piping since mine had broken off
during shipping.
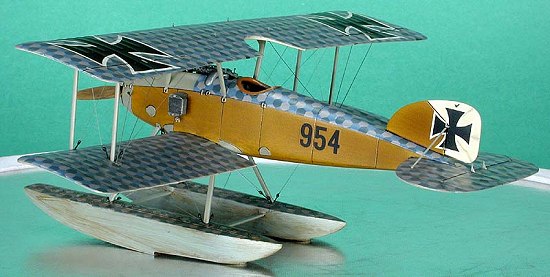
Now onto the fun part, putting on the top wing! Actually, this task went smoothly with no problems. Since the cabane struts are already fixed in the correct position on the fuselage (using a caliper to set the actual distance) the top wing snapped into place in the correct position. I used small rubber bands to help hold both wings in place and then checked alignment of the top to bottom wing. When all was to my liking, I used Tamiya Liquid Cement to firmly affix the struts to the wing.
Now on to the next challenge, installing the floats! I installed metal pins into the ends to help ease this task. Push the pinned legs of the struts into the fuselage and set the approximate width of the floats. Then place the floats into place on the struts, and after carefully aligning everything, I glued them in place with Tamiya Liquid Cement.
Carefully install the exhaust stack, propeller, and propeller spinner with superglue. I drilled out the exhaust stacks, painted them Testor Metalizer Burnt Iron and then applied a heavy wash of Rustall. The propeller was painted by using a base coat of dark yellow, and successive light dry brushing using a rake brush of TMM raw sienna, raw umber, burnt sienna, and burnt umber to replicate the wood grain.
Install all the remaining P/E pieces as indicated in the instructions and rig the model as indicated on the instruction sheet.
RIGGING
 Replicating the turnbuckles on the rigging wires has
always been a problem for me. I don’t like the looks (or cost!) of P/E
turnbuckles and forming them out of white glue has always been a failed
challenge. I tried a different technique on this model, fabricating the
turnbuckles from fine black fly tying wire by twisting them around a
section of .005 wire to form an eyelet that will allow attachment of the
monofilament rigging wire. The added bonus of this method is you don’t
have any holes to fill after you are done with the rigging.
Replicating the turnbuckles on the rigging wires has
always been a problem for me. I don’t like the looks (or cost!) of P/E
turnbuckles and forming them out of white glue has always been a failed
challenge. I tried a different technique on this model, fabricating the
turnbuckles from fine black fly tying wire by twisting them around a
section of .005 wire to form an eyelet that will allow attachment of the
monofilament rigging wire. The added bonus of this method is you don’t
have any holes to fill after you are done with the rigging.
Before I attached the upper wing, I superglued a turnbuckle into a predrilled hole and attached a short section of monofilament fishing line (.004 diameter) painted silver. I then superglued the opposite end turnbuckles to their respective places to the lower wing, floats, and fuselage. After I completely finished the model I then attached the rigging wires by threading them through their respective turnbuckle, pulling the wire tight by letting a pair of hemostats hang, and then secured the wire to the eyelet with a drop of accelerated superglue. After letting the wires cure for at least an hour, I trimmed the ends free with sharp scissors and then burned the resulting stub off with a heated soldering iron. I then applied a “blob” of white glue to the eyelet to hide the burnt end and I then painted the turnbuckles flat black.
|
CONCLUSIONS |
This is an excellent model of an important WW I aircraft. Overall the quality and accuracy are exceptional. The level of detail engraved in the kit is a great improvement over previous generation Eduard models, and no after-market sets are really needed for a beautiful build. I highly recommend this kit for all levels of builders.
I would like to take this time to give a heartfelt thanks to Lance (“Curmudgeon”) Krieg for his kind words of encouragement and the help with the Kriegsmarine lozenge decals. Lance is a world-class modeler and one of the many members of the WWI Modeling List who are always available to help out on WWI modeling topics. Surf on over to: http://www.wwi-models.org/ and check out the list and all its resources.
|
REFERENCES |
Squadron/Signal Publications, Albatros Fighters In Action, SS1046
Grub Street, Under The Guns Of The German Aces
Albatros Productions LTD, Windsock Datafile, Albatros Fighters
Albatros Productions LTD, Windsock Datafile, Albatros W.4
October 2001
Copyright Modelingmadness.com
If you would like your product reviewed fairly and fairly quickly, please
contact
the editor or see other details in the Note to
Contributors.