|
KIT # |
8033 |
|
PRICE: |
$30.00 |
|
DECALS: |
5 versions: see text |
|
REVIEW & |
Bob Laskodi |
|
NOTES: |
|
|
HISTORY |
My teenage son flies a WWI on-line flight simulation called Red Baron as a member of the Lafayette Escadrille (LE). He had been bugging me for a while to build him an airplane from that famous French squadron that was staffed by American pilots so when I saw that the Eduard Nieuport 17 came with decals for the most famous LE ace, Raoul Lufbery I purchased the kit.
Born Gervais Raoul Lufbery in Chamalieres France on 14 March 1885, Lufbery emigrated with his family to the United States at 6 years of age. When WW I broke out, he quickly volunteered to serve in the French Air Service to defend his honored homeland. His first posting was as an airplane mechanic, but he yearned to fly in the sky to personally defeat the Germans who invaded his homeland. He quickly completed pilot school and started flying as a two seat reconnasissance pilot for VB106 and then transferred to the fledgling Escadrille Americane N124 as a fighter pilot. The Escadrille Americane was the precurser to the LE and formed of American pilots led by French officers. After complaints by the German Government to the US who at that time was officially neutral in the war, the French renamed the squadron to the soon to be famous LE. Lufbery earned his first kill in July 1916 and quickly became an ace, downing his sixth aircraft by December 1916.
Lufbery received numerous decorations, including the Legion d’ Honneur, Medaille Miltaire, Croix de Guerre with 10 Palms, and the Military Medal. He flew for the French for almost four years until the LE was transferred to the U.S. Air Service upon entry of the US in the war. He served in the famous 94th Aero Squadron, the highest scoring American squadron in the war made famous by ace Eddie Rickenbacker. Lufbery was killed in action on19 May 1918 while attacking a German Rumpler reconnaissance aircraft that managed to hit his gas tank and ignite his Nieuport 28 in flames. He leapt to his death rather than burn. At the time, he was the highest scoring American pilot with 16 kills earned mostly while flying for the LE. Lufbery was a highly respected and admired aviator and was buried in an elaborate funeral ceremony with full French military honors the following day.
|
THE KIT |
 This kit
represents Eduard’s evolution from a small, limited run modeling company to a
major player in the business, and the only modern modeling company who places an
emphasis on my favorite subject; WW I aircraft. Those familiar with Eduard’s
earlier products remember poorly molded limited run injection molding with
little (if any) engraved detail and extremely poor fitting parts (better start
with a fresh tube of putty was my motto!). Well, not any more! This kit is the
"Profipack" version and contains two finely molded sprues of injected
plastic (54 items) that rivals any Japanese kit in quality and detail, a fret of
the usual Eduard photo-etch parts (30 items), an acetate sheet for the
windscreen (2 items), and a high quality decal sheet printed by Aeromaster that
provides for five different aircraft. The instruction sheet consists of 12 pages
and clearly indicates which parts and decals are needed for the specific
aircraft you are building. It includes a color selection chart with cross
references for five paint manufacturers and a parts map for the kit.
This kit
represents Eduard’s evolution from a small, limited run modeling company to a
major player in the business, and the only modern modeling company who places an
emphasis on my favorite subject; WW I aircraft. Those familiar with Eduard’s
earlier products remember poorly molded limited run injection molding with
little (if any) engraved detail and extremely poor fitting parts (better start
with a fresh tube of putty was my motto!). Well, not any more! This kit is the
"Profipack" version and contains two finely molded sprues of injected
plastic (54 items) that rivals any Japanese kit in quality and detail, a fret of
the usual Eduard photo-etch parts (30 items), an acetate sheet for the
windscreen (2 items), and a high quality decal sheet printed by Aeromaster that
provides for five different aircraft. The instruction sheet consists of 12 pages
and clearly indicates which parts and decals are needed for the specific
aircraft you are building. It includes a color selection chart with cross
references for five paint manufacturers and a parts map for the kit.
|
CONSTRUCTION |
This was a straight out-of-the-box build (OOB) of the kit since it is highly accurate and no additional parts are really necessary to produce a quality model. I started with my usual warm, dish soap water wash of the plastic and photo-etch components and followed with a cold water rinse. Pat dry with a paper towel and let dry overnight. The wash does really help on Eduard kits, especially on the photo-etch parts. I then pre-painted all the parts as indicated in the instructions, with the exception of propeller, fuselage walls, bulkheads, floors, and struts which I covered with Tauro wood grain decal (the only wood grain decal still in production). The stringer detail on the fuselage sidewalls were then hand painted Testors Model Master (TMM) French Chestnut and given a light wash of burnt umber.
 Assembly
of the fuselage components was accomplished using super-thin superglue. Assembly
proceeded as described in the instructions, with no major problems. A tip is to
anneal (heat in a flame until red hot) the photo-etch seat and seat belts to
make bending easy prior to painting. I then closed up the fuselage with liquid
cement and started on the engine components. The only problem here was assembly
of the cowling (make sure you get the right parts for your variant) which
required a heavy dose of gap filling superglue (GFS) to fill in the gaps. Next,
I glued with liquid cement the tail fin, the horizontal stabilizer, and lower
wing to the fuselage. All joins were then sanded smooth, and putty was used to
fill some minor gaps in the lower wing to fuselage join. Then I drilled all of
the rigging holes as described in the instructions. Next stop was the paint shop
after stuffing the cockpit opening and cowl with tissue paper to prevent
overspray.
Assembly
of the fuselage components was accomplished using super-thin superglue. Assembly
proceeded as described in the instructions, with no major problems. A tip is to
anneal (heat in a flame until red hot) the photo-etch seat and seat belts to
make bending easy prior to painting. I then closed up the fuselage with liquid
cement and started on the engine components. The only problem here was assembly
of the cowling (make sure you get the right parts for your variant) which
required a heavy dose of gap filling superglue (GFS) to fill in the gaps. Next,
I glued with liquid cement the tail fin, the horizontal stabilizer, and lower
wing to the fuselage. All joins were then sanded smooth, and putty was used to
fill some minor gaps in the lower wing to fuselage join. Then I drilled all of
the rigging holes as described in the instructions. Next stop was the paint shop
after stuffing the cockpit opening and cowl with tissue paper to prevent
overspray.
The model was painted, decaled, and weathered as described in the following subsections and then final assembly took place.
I installed the interplane and cabane struts into place using relatively large amounts of super-thin superglue. This is done to insure a relatively fragile model does not explode in later life! The cabane struts were glued to the fuselage body in correct spacing for the upper wing using a caliper to exactly set the distance and the interplane struts were glued to the bottom of the top wing. Basically, by applying small drops of super-thin superglue carefully around the strut to form a small bead around the strut base you can make the model much stronger. Do not use an excessive amount, just enough for a thin bead. If you use super-thin superglue carefully applied, you can form a perfect bead around the strut base. This will be later painted over in touch up and my "secret" hiding technique discussed later will help hide the superglue.
Now it was time to work on the machine guns. Assemble the guns as shown in the instructions. I painted the machine guns in Testors Metalizer Gun Metal and dry brushed with Floquil Gun Metal.
 Now onto
the fun part, putting on the top wing! Actually, this task went smoothly with no
problems. Since the cabane struts are already fixed in the correct position on
the fuselage (using a caliper to set the actual distance) the top wing snapped
into place in the correct position. I placed the upper wing on the work bench
and turned the fuselage upside down to mount it. First set the interplane struts
into place in their correct holes, then flex the cabane struts into their
respective holes and bingo, the wing is in place. I used small rubber bands to
help hold both wings in place and then checked alignment of the top to bottom
wing. When all was to my liking, superglue the struts to wing using the bead
technique described above. A word of caution, let the glue cure fully before
moving the model and you will be rewarded with a relatively strong top wing
join. I do not use an accelerant for the superglue as it discolors and sometimes
pits the surface.
Now onto
the fun part, putting on the top wing! Actually, this task went smoothly with no
problems. Since the cabane struts are already fixed in the correct position on
the fuselage (using a caliper to set the actual distance) the top wing snapped
into place in the correct position. I placed the upper wing on the work bench
and turned the fuselage upside down to mount it. First set the interplane struts
into place in their correct holes, then flex the cabane struts into their
respective holes and bingo, the wing is in place. I used small rubber bands to
help hold both wings in place and then checked alignment of the top to bottom
wing. When all was to my liking, superglue the struts to wing using the bead
technique described above. A word of caution, let the glue cure fully before
moving the model and you will be rewarded with a relatively strong top wing
join. I do not use an accelerant for the superglue as it discolors and sometimes
pits the surface.
Now on to the next challenge, installing the landing gear! Installing landing gear on Eduard WW I models is a challenge at best and extremely frustrating at worst. I use a simple method in that I build a jig. My jig is nothing but a small block of styrofoam packing material that comes in protective packaging of electronics goods. One TV and you are set for life! Take a small block of styrofoam and mark the width of the landing gear on it. Carefully measure all dimensions and mark them on the block to maintain the correct angles. Push the legs of the landing gear into the block and set the approximate width of the landing gear axle. Then place the axle into place on the legs and after carefully aligning everything glue it in place. Let the glue fully cure then paint the assembly, let dry, and remove it from the block. Glue one leg into place with superglue, let set, then glue the remaining legs into place. Use the superglue bead technique described for the struts and you will be rewarded with a relatively strong set of landing gear. Lastly install the painted wheels into place on the axle with superglue, and the tail skid.
I substituted hard metal wire for the horizontal stabilzer bracing as cleaning the mold lines and sprue points of the provided plastic pieces would have been much harder. Carefully install the propeller with superglue and prepare for the next fun job of rigging a WWI biplane! Truthfully, rigging an airplane is not difficult. It is time consuming and tedious. First you need a plan. You should have a rigging plan in place before you even start construction of the model so you can pre-drill holes and plan for obstruction problems. Study the instructions carefully and figure out where every rigging wire needs to go. Each kit will be different and will have a different plan. I no longer drill holes through struts for rigging as it may pull out in time. I wrap the end of the wire completely around the strut and secure it with a tiny drop of extra thin superglue using the bead technique described for struts. Rig the rest of the model as indicated on the instruction sheet.
For rigging wire I use a product sold in sewing shops called invisible thread (which is the same as monofilament fishing line) that is .004 inches in diameter (which is the correct scale size). It is easy to use, just paint it whatever color you like (I finally found a use for those Testors paint markers that I bought! Flat black is best for appearance, silver is the more realistic color but doesn’t show up well on pictures), is easy to pull taut (use a hemostat as that vital third hand to keep the wire taut), is easy to thread around/through stuff, and more importantly, you can trim it flush easily with a new XACTO blade. No more metal wire or stretched sprue for me!
Finally, the model is almost done. The last step is to install the remaining parts to the upper wing (pull-up device and Lewis machine gun and its components if used on your version).
|
PAINT & DECALS |
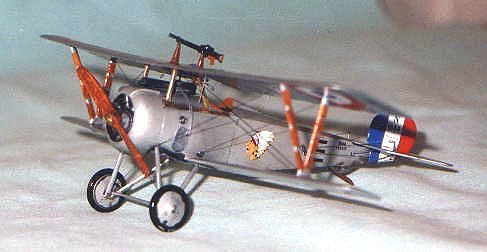
 The model
was very easy to paint since the entire scheme is in silver. I airbrushed an
80:20 mix of Humbrol Metal Cote Gloss Silver (#27002) and Lt. Aircraft Grey
(#166) to achieve a silver doped look. The kit comes with decals for five
different versions of aircraft flown by Charles Nungesser (2 variants), Raoul
Lufbery, Italian Ace Francesco Baracca, and Russian Ace Jevgraf Krutryenyi.
After a short drying period of about an hour, I applied MicroSol setting
solution to get the decals to melt into the surface. I repeated with a second
coat of setting solution to get all the decals fully down. They responded very
well to the setting solution with no permanent wrinkling. After drying
overnight, I wiped the decals off with a moist cloth with a bit of soap to
remove any residue and after drying I shot a very light coat of Future thinned
with rubbing alcohol (50:50 mix) over the decals to seal them.
The model
was very easy to paint since the entire scheme is in silver. I airbrushed an
80:20 mix of Humbrol Metal Cote Gloss Silver (#27002) and Lt. Aircraft Grey
(#166) to achieve a silver doped look. The kit comes with decals for five
different versions of aircraft flown by Charles Nungesser (2 variants), Raoul
Lufbery, Italian Ace Francesco Baracca, and Russian Ace Jevgraf Krutryenyi.
After a short drying period of about an hour, I applied MicroSol setting
solution to get the decals to melt into the surface. I repeated with a second
coat of setting solution to get all the decals fully down. They responded very
well to the setting solution with no permanent wrinkling. After drying
overnight, I wiped the decals off with a moist cloth with a bit of soap to
remove any residue and after drying I shot a very light coat of Future thinned
with rubbing alcohol (50:50 mix) over the decals to seal them.
For weathering, I chose to accentuate the engraved panel lines and surface detail with a light black oil wash. I then used a pastel pencil to lightly highlight the rib detail on the wings/tail surfaces using a very light gray pastel pencil. I use Derwent pastel pencils and they are quite easy to use, just lightly draw on the surface to be highlighted and blend with artists blending stump. A very nice, subtle effect can be achieved with these pencils that is much easier for me than dry brushing. I then randomly applied some ground up burnt umber pastels with a soft brush to simulate dirt staining on the lower surfaces. Lastly, I applied a heavy burnt umber oil wash to the wheels and control surface joins.
I then finished final assembly of the models as described above. Lastly, I lightly touched up by hand painting with the appropriate colored paints all flaws and the areas that were covered in superglue including strut/rigging attachment points. Next was a technique I learned that helps hide minor flaws in a model finish caused by superglue and painting successive coats. It is very simple, just spray the entire model with several coats of a mix of equal parts Future, Tamiya Flat Base (X21), and rubbing alcohol. This will hide almost all minor flaws in the finish, but will not cover major flaws so it is not a substitute for poor modeling technique. Finally, several coats of straight Future was shot to achieve the final glossy finish common to most WWI aircraft. Now, drink a favorite beverage and admire your good work!
|
CONCLUSIONS |
This is an excellent model of an important WW I aircraft. Overall the quality and accuracy are exceptional. The level of detail engraved in the kit is a great improvement over previous generation Eduard models, and no after-market sets are really needed for a beautiful build. I highly recommend this kit for all levels of builders including beginners and I enjoyed the building of this model. For those modelers that have built Eduard kits in the past and swore them off due to the poor fit and construction problems, this model will definitely change your opinion. If you are reluctant to try this model due to the small photo-etch parts, I would recommend the Vieux Charles version of the Ni 17 (Kit #8023) as it is basically the same kit minus the photo-etch. That would be an excellent kit for beginners or first time WW I modelers.
|
REFERENCES |
Squadron/Signal Publications, Nieuport Fighters In Action, SS1167, $8.95
Flying Machines Press, French Aircraft of the First World War, $90.00
Albatros Productions LTD, Windsock Datafile, Nieuport Fighters, $23.00