Dragon/DML 1/48 Fokker Dr.I
|
KIT # |
5901 |
|
PRICE: |
$19.98 |
|
DECALS: |
One version: Kempf's aircraft |
|
REVIEW : |
|
|
NOTES: |
|
|
HISTORY |
The Fokker Dr. I had gained a significant amount of notoriety as an Allied plane killer from its brief appearance during WW I, due in large part to the famous Red Baron, Manfred von Richtofen. Mention one plane from the WW I era and the triple winged, bright scarlet machine of the Red Baron instantly comes to mind. While it was certainly an effective aircraft, it’s reputation for being deadly to the enemy was also shared by being deadly to those brave men who first flew it into combat. In fact, von Richtofen was very lucky to survive the early days of the Dr. I at the front.
In August 1917, the first pre-production machines, Fokker F.I 102/17 and 103/17 were given to von Richtofen and Werner Voss to test their ability in combat. Both aces were quick to score kills in this highly maneuverable aircraft with Richtofen scoring his first Dr. I kill on 7 September and Voss scoring his first kill on 28 August, during his very first combat flight in the Dr. I. Initial results were very impressive with Voss racking up seven kills before meeting his death on 23 September.
 Voss’
luck ran out on 23 September when he happened upon a group of 56 Squadron SE5
fighters led by British ace CAPT James McCudden. Although badly outnumbered,
Voss engaged the British scoring hits on each British plane and probably forcing
down two aircraft. Unfortunately, Voss was shot down and killed after a long
fight by Arthur Rhys Davids.
Voss’
luck ran out on 23 September when he happened upon a group of 56 Squadron SE5
fighters led by British ace CAPT James McCudden. Although badly outnumbered,
Voss engaged the British scoring hits on each British plane and probably forcing
down two aircraft. Unfortunately, Voss was shot down and killed after a long
fight by Arthur Rhys Davids.
Fortunately for the Red Baron, he departed on an extended leave after scoring on 7 September and lent his aircraft to LT Kurt Wolff who was KIA in the aircraft in mid-September. Thus by 23 September, both pre-production F.I’s had been destroyed. The bad luck continued with the arrival of the first batch of six production Dr. I’s in mid-October 1917. A leading German ace, LT Heinrich Gontermann was killed while performing aerobatics over his home field when his Dr. I broke up on 30 October. On the same day, Manfred von Richtofen crashed in his Dr. I but fortunately escaped with his life. The following day, LT Pastor from Jasta 11, crashed and was killed in his Dr. I. All of the crashes were caused by failure of the upper wing aileron, which led to a total failure of the upper wing.
Anthony Fokker was a brilliant aircraft designer, but unfortunately, his aircraft company had previously tarnished his reputation with reports of shoddy construction. After the rash of crashes in October, the Dr. I was grounded until a fix could be found. Twelve modifications to the upper wing were specified and on 28 November, the Dr. I was cleared for combat. Dr. I’s with the modified wing were shipped to the front in December and the aircraft enjoyed an amazing success rate until it was retired from combat in June 1918. Only about 320 aircraft were produced, far less than the competing Albatros DV/DVa series.
|
THE KIT |
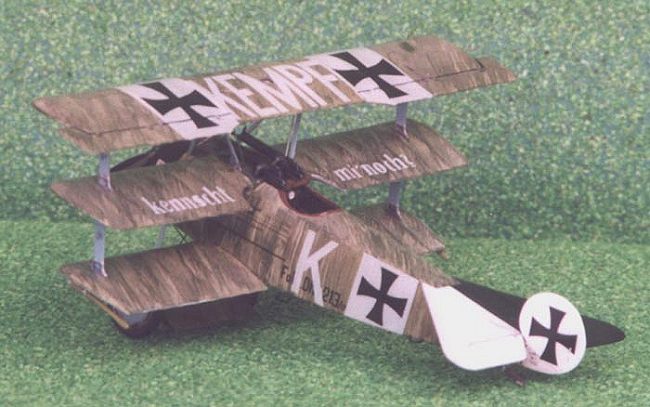
The kit is Shanghai Dragon’s Dr. I kit (5901). It is a mixed media kit and consists of injected molded plastic (45 parts), two frets of photo-etch detail parts (19 items), and a decal sheet for building LT Fritz Kempf’s Jasta Boelcke (Jasta 2) aircraft. The plastic parts have exceptional detail engraving and are of high quality with only minor amounts of flash/mold lines that require clean up. The instruction sheet is an eight-page diagram assembly with marked color painting guidelines with a cross-reference to Gunze Sangyo and Italeri paints.
|
CONSTRUCTION |
 This was a
straight out-of-the-box build (OOB) of the kit since it is highly accurate and
no additional parts are really necessary to produce a quality model. I started
with my usual warm, dish soap water wash of the plastic and photo-etch
components and followed with a cold water rinse. Pat dry with a paper towel and
let dry overnight. I then pre-painted all the parts as indicated in the
instructions
This was a
straight out-of-the-box build (OOB) of the kit since it is highly accurate and
no additional parts are really necessary to produce a quality model. I started
with my usual warm, dish soap water wash of the plastic and photo-etch
components and followed with a cold water rinse. Pat dry with a paper towel and
let dry overnight. I then pre-painted all the parts as indicated in the
instructions
Assembly of the fuselage components was accomplished using super-thin superglue. Assembly proceeded as described in the instructions, with no major problems. A tip is to anneal (heat in a flame until red-hot) the photo-etch parts that require bending prior to painting. I then closed up the fuselage with liquid cement. Next, I glued with liquid cement the tail fin, the horizontal stabilizer, and lower wing to the fuselage. All joins were then sanded smooth. Fit was very good and no putty was needed. Next stop was the paint shop after stuffing the cockpit opening with tissue paper to prevent overspray.
The model was painted, decaled, and weathered as described in the following subsections and then final assembly took place.
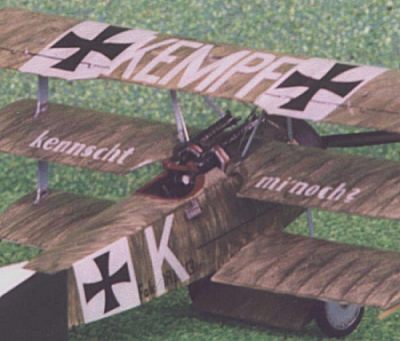
Now it was time to work on the machine guns. Assemble the guns as shown in the instructions. I painted the machine guns in Testors Metalizer Gun Metal and dry brushed with Floquil Gun Metal. Do not install the gun sight (A19), as Kempf’s plane did not carry it. Check photo references for your particular model; most Dr. I’s did not use it.
 I then
glued the interplane struts in place on lower wing into place using super-thin
superglue. The middle wing was then installed using the lower wing and
interplane struts as a guide. The cabane struts were glued to the fuselage body
in correct spacing for the upper wing using a caliper to exactly set the
distance and the remaining interplane struts were glued to the middle wing.
I then
glued the interplane struts in place on lower wing into place using super-thin
superglue. The middle wing was then installed using the lower wing and
interplane struts as a guide. The cabane struts were glued to the fuselage body
in correct spacing for the upper wing using a caliper to exactly set the
distance and the remaining interplane struts were glued to the middle wing.
I placed the upper wing on the workbench and turned the fuselage upside down to mount it. First set the interplane struts into place in their correct holes, then flex the cabane struts into their respective holes and bingo, the wing is in place. I used small rubber bands to help hold both wings in place and then checked alignment of the top to middle wing. When all was to my liking, superglue the struts to wing. A word of caution, let the glue cure fully before moving the model and you will be rewarded with a relatively strong top wing join. I do not use an accelerant for the superglue as it discolors and sometimes pits the surface.
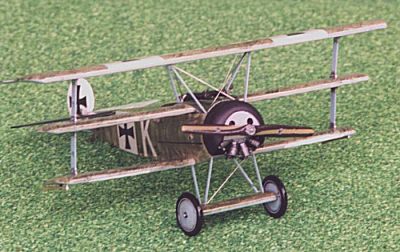
I then installed the landing gear and wheels as indicated and the engine assembly, front cowl and propeller. Install all the remaining fiddly bits and the rigging. I used the kit supplied stainless steel wire for the landing gear and cabane rigging.
|
PAINT & DECALS |
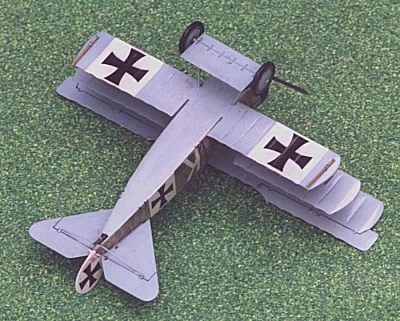
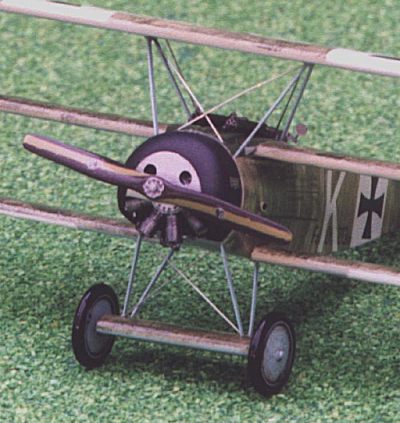 The paint
scheme is an interesting mix of streaky dark green paint applied over doped
linen. I used Polly Scale French/Fokker Dark Green applied with a rake brush
over Gunze Sangyo Sail (H85). Undersides were painted with a home brewed Humbrol
enamel mix. After the paint scheme cured for a day, I shot a light coat of
Future to prepare the surface for decaling.
The paint
scheme is an interesting mix of streaky dark green paint applied over doped
linen. I used Polly Scale French/Fokker Dark Green applied with a rake brush
over Gunze Sangyo Sail (H85). Undersides were painted with a home brewed Humbrol
enamel mix. After the paint scheme cured for a day, I shot a light coat of
Future to prepare the surface for decaling.
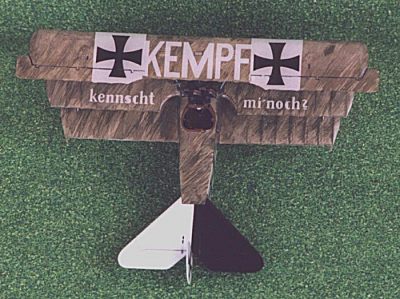
I used the kit-supplied decals listed above. The decals are of high quality, but are a bit on the thick side. After a short drying period of about an hour, I applied MicroSol setting solution to get the decals to melt into the surface. I repeated with a second coat of setting solution to get all the decals fully down. They responded very well to the setting solution with no permanent wrinkling. After drying overnight, I wiped the decals off with a moist cloth with a bit of soap to remove any residue and after drying I shot a very light coat of Future thinned with rubbing alcohol (50:50 mix) over the decals to seal them. For weathering, I chose to accentuate the engraved panel lines and surface detail with a light burnt umber oil wash.
I then finished final assembly of the models as described above. Lastly, I lightly touched up by hand painting with the appropriate colored paints all flaws and the areas that were covered in superglue including strut/rigging attachment points. Next was a technique that helps hide minor flaws in a model finish caused by superglue and painting successive coats. It is very simple, just spray the entire model with several coats of a mix of equal parts Future, Tamiya Flat Base (X21), and rubbing alcohol. This will hide almost all minor flaws in the finish, but will not cover major flaws so it is not a substitute for poor modeling technique. Finally, several coats of straight Future was shot to achieve the final glossy finish common to most WWI aircraft.
|
CONCLUSIONS |
 I have
built many models of Shanghai Dragon WW II aircraft and have been generally
disappointed in their accuracy and quality of fit. However, the WW I Knights of
the Sky Series are in my opinion, the best detailed WW I model kits available
today without the fit problems experienced in their WW 2 series. They represent
a very good value for approximately $20 and build up into an impressive model
with their highly detailed engraving and photo-etch parts. A minor drawback is
that they are currently difficult to find; a situation that will hopefully
become better with an announcement by Shanghai Dragon to commit to production of
this series during 2000.
I have
built many models of Shanghai Dragon WW II aircraft and have been generally
disappointed in their accuracy and quality of fit. However, the WW I Knights of
the Sky Series are in my opinion, the best detailed WW I model kits available
today without the fit problems experienced in their WW 2 series. They represent
a very good value for approximately $20 and build up into an impressive model
with their highly detailed engraving and photo-etch parts. A minor drawback is
that they are currently difficult to find; a situation that will hopefully
become better with an announcement by Shanghai Dragon to commit to production of
this series during 2000.
This is an excellent model of an important WW I aircraft. The accuracy and level of detail engraved in the kit is outstanding and no after-market sets are really needed for a beautiful build. I highly recommend this kit for all levels of builders including beginners and I enjoyed the building of this model. The kit is easy to build, and in my opinion, is the easiest kit to build of a WWI biplane.
|
REFERENCES |
Squadron/Signal Publications, Fokker Dr. I In Action, SS1098, $8.95
Grub Street, Under The Guns Of The German Aces, $35.00
If you would like your product reviewed fairly and fairly quickly, please contact the editor or see other details in the Note to Contributors.
Back to Reviews Page 2022