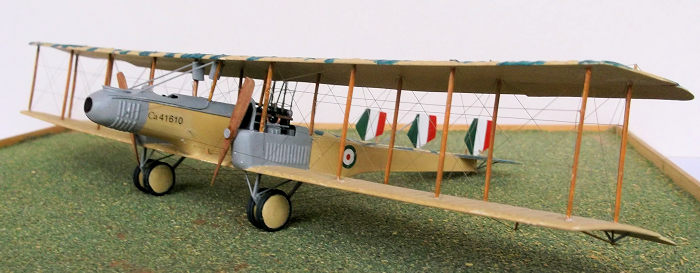
The Caproni Ca 5 was designed in 1917 as a replacement for the earlier
successful Ca 3 series of aircraft.The Ca 5 was slightly larger than its
predecessor and the early versions were powered by Fiat A 12 engines
developing between 200 and 300 horse power. Radiators were fitted in front
of the engine on the booms, but in the nose of the fuselage for the middle
engine which was in a pusher configuration. Three engines were used because
of the nature of the terrain (most of the bombing raids had to pass over the
Alps) and distances involved: a third engine gave both increased power and a
better chance for the crew to return in the event of an engine malfunction.
Later variants of the basic design were powered by Fiat, Isotta or Liberty
engines which meant slight redesign of the nacelles, and in the case of the
Liberty engin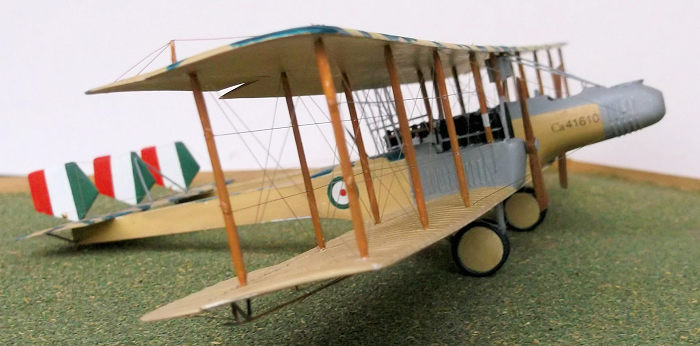 ed variants, the nose radiator was replaced by one mounted in
front of the engine at the rear of the fuselage. Defensive armament
consisted of a machine gun in the nose and one mounted on a platform above
the engine in the fuselage and behind the top wing. Most of these machines
were operated by the italian Air Force but a small number was also supplied
to the American Air Service where they were deployed over the Western Front.
Plans to build 1500 machines of this type in the US were cancelled when
peace resumed in 1918. The type was used with some success as a bomber from
late 1917 and through 1918 and after the war it continued in service with
the Italian air force until the mid 1920's. At least one machine was fitted
with floats and Liberty engines but this was not delivered until 1919 and so
did not see wartime service. Some machines were converted to air ambulances
in the post war period - they could carry two stretcher cases, one in each
nacelle behind the engines, and up to 4 sitting cases in the fuselage: the
fuel tanks were reduced in size to accommodate the seats. In terms of
overall performance the design was a little disappointing as it suffered
from constant engine problems. The fuselage engine was difficult to cool,
and all of the engines tended to have a low reliability because of the poor
quality control in the engine factories in Italy. Production was also
hampered by the lack of skilled workers to make these complex aircraft in
Italy at that time, but the type earned respect from its crews for its
rugged qualities and powers of endurance which made them well suited to the
conditions in which they had to operate.
ed variants, the nose radiator was replaced by one mounted in
front of the engine at the rear of the fuselage. Defensive armament
consisted of a machine gun in the nose and one mounted on a platform above
the engine in the fuselage and behind the top wing. Most of these machines
were operated by the italian Air Force but a small number was also supplied
to the American Air Service where they were deployed over the Western Front.
Plans to build 1500 machines of this type in the US were cancelled when
peace resumed in 1918. The type was used with some success as a bomber from
late 1917 and through 1918 and after the war it continued in service with
the Italian air force until the mid 1920's. At least one machine was fitted
with floats and Liberty engines but this was not delivered until 1919 and so
did not see wartime service. Some machines were converted to air ambulances
in the post war period - they could carry two stretcher cases, one in each
nacelle behind the engines, and up to 4 sitting cases in the fuselage: the
fuel tanks were reduced in size to accommodate the seats. In terms of
overall performance the design was a little disappointing as it suffered
from constant engine problems. The fuselage engine was difficult to cool,
and all of the engines tended to have a low reliability because of the poor
quality control in the engine factories in Italy. Production was also
hampered by the lack of skilled workers to make these complex aircraft in
Italy at that time, but the type earned respect from its crews for its
rugged qualities and powers of endurance which made them well suited to the
conditions in which they had to operate.
The use of three engines seemed to have established a trend for larger
Italian and some German interwar designs as a large number of trimotors were
built and used in this period and during WW2, making use of the advantages
of this particular engine layout.
 The engines were made from 2 strips of 60 thou card sandwiching a strip
of 20 thou card. This was then filed and sanded to shape. The cylinders were
from 100 thou rod. Only the engine in the fuselage nacelle needs the magneto
because these cannot be seen on the engines in the booms. The cam shaft was
from 20 thou rod and the valve springs from short pieces of rod. The
carburettor was from card and rod. The exhausts were 25 thou rod cut to
length. The radiators were cut and shaped from 40 you card with the front
and rear scribed to represent the radiator grilles. Remember in this scale
much fine detail cannot be seen without a hand lens, so that the modeller
needs to give an impression of what things look like rather than trying to
replicate every fine detail.
The engines were made from 2 strips of 60 thou card sandwiching a strip
of 20 thou card. This was then filed and sanded to shape. The cylinders were
from 100 thou rod. Only the engine in the fuselage nacelle needs the magneto
because these cannot be seen on the engines in the booms. The cam shaft was
from 20 thou rod and the valve springs from short pieces of rod. The
carburettor was from card and rod. The exhausts were 25 thou rod cut to
length. The radiators were cut and shaped from 40 you card with the front
and rear scribed to represent the radiator grilles. Remember in this scale
much fine detail cannot be seen without a hand lens, so that the modeller
needs to give an impression of what things look like rather than trying to
replicate every fine detail.
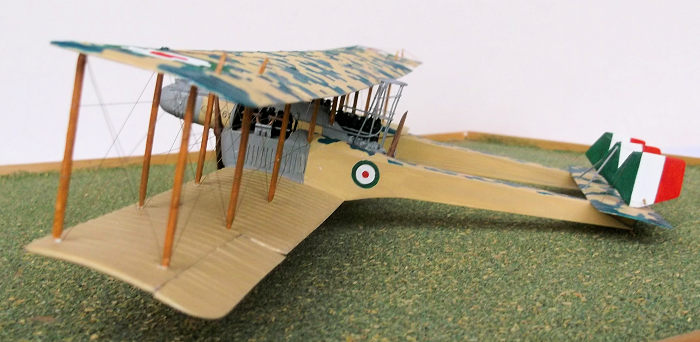
The wings were made by laminating a strip of 30 thou card which had been
bent in boiling water with a strip of 20 thou card laid over the top. The 30
thou strip was wide enough to extend to the rear spar, and then a strip of
20 thou card and 10 thou card was laid along the trailing edge of the 30
thou card. The edges of the card on the undersides was then sanded until a
smooth aerofoil section was achieved and the trailing edge was as thin as
possible. The leading edge was rounded off to give the correct profile. Ribs
were 10 x 20 thou strip glued into place and then sanded to shape. Holes
were drilled in the wings for the struts, and undercarriage and wing skids
under the lower wing.
 The booms were simple box structures with sides, top and bottom of 20
thou card. Strips were placed on the inside edges of the sides to provide
support for the corners and help to get them square. Formers were also made
from scrap card, three per boom, and the rear ends from 20 thou card. The
curved lower surface of the booms was achieved by sliding the card between
tweezers 3 - 5 times. The tops of the booms were moulded in the normal way
from 30 thou card with filler used to fair in the rear ends. Two 30 x 40
thou strips were glued on to the top of the lower wing to hold the booms in
place. The louvres on the sides of the booms were made from 10 x 20 thou
strip cut to length and glued in place and when dry they were filed and
sanded to shape.
The booms were simple box structures with sides, top and bottom of 20
thou card. Strips were placed on the inside edges of the sides to provide
support for the corners and help to get them square. Formers were also made
from scrap card, three per boom, and the rear ends from 20 thou card. The
curved lower surface of the booms was achieved by sliding the card between
tweezers 3 - 5 times. The tops of the booms were moulded in the normal way
from 30 thou card with filler used to fair in the rear ends. Two 30 x 40
thou strips were glued on to the top of the lower wing to hold the booms in
place. The louvres on the sides of the booms were made from 10 x 20 thou
strip cut to length and glued in place and when dry they were filed and
sanded to shape.
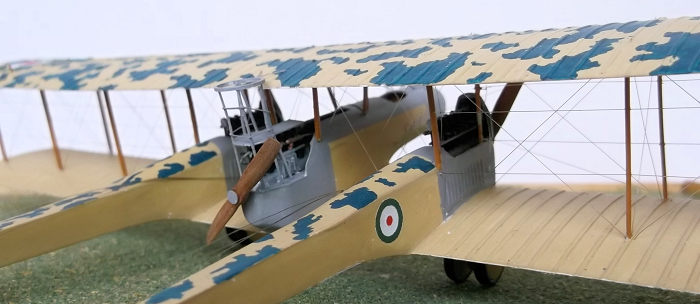
The nacelle was moulded from 30 thou card. The interior consisted of a
floor which I assume was an open frame so I used thin strip to make one each
for the three cockpits, control panel with two sets of throttles, instrument
panel, seats for the pilots and front and rear gunners, and control wheels.
Fuel tanks were made from card bent to shape and the ends were simple
blanks.Some interior framing was added from thin strip.The gun rings were
made from 20 thou card which had been scribed with a pair of dividers. The
radiator louvres on the nose were made from 10 x 20 thou strip as per the
booms. The fronts of the nacelles were moulded from 30 thou card which were
glued into place after the engines had been fitted into the nacelles.
The tail surfaces were cut from 20 thou card and sanded to section. The
ribs were from 10 x 20 thou strip.
Wheels were made from discs of 60 thou card.. First I scribed a circle of
the correct diameter into the card with a pair of dividers. Then the card
was cut into squares and finally rounded to shape with a file and sand paper
using the scribed circles as a guide. One side of each disc was then filed
to give a curved face. The tyres were made by bending 60 thou rod around a
paintbrush handle and immersing it in boiling water for 10 seconds. I
removed the rod and let it cool while still holding it under tension while
it did so. Lengths of rod could then be cut to fit around each disc. By
making the rod spiral smaller than the discs the rod sat tightly around the
edges of the discs and could be held in place with liquid glue.
 The struts were cut from 30 x 60 thou strip and filed to shape. The main
wing struts needed holes drilled into them to take the lateral bracing wires
later. The undercarriage was made from strip for the legs and 30 thou card
for the axle supports between the vertical legs. The bracing booms on the
nose and rudder struts were 20 thou rod.
The struts were cut from 30 x 60 thou strip and filed to shape. The main
wing struts needed holes drilled into them to take the lateral bracing wires
later. The undercarriage was made from strip for the legs and 30 thou card
for the axle supports between the vertical legs. The bracing booms on the
nose and rudder struts were 20 thou rod.
The propellors were carved from some thick wood laminate - I am not sure
which wood but your local DIY store will have a selection. The bosses were
from 20 thou card.
Having made all of the major components I could start assembly as per
any kit. The booms and fuselage nacelles were assembled in the usual manner
and the fuselage nacelle glued to the lower wing first. This needed careful
alignment and a jig to support it while it dried out so they the horizontal
centre line was at the correct angle to the wing surface. When this was
complete one boom was added at a time to the lower wing, again using the
drawing to help get the correct alignment. The engines were put into the
booms using scrap plastic to provide the necessary supports. The moulded
nacelle fronts and radiators completed the booms. The main struts were glued
into the inside edges of the nacelles and allowed to set hard. The
horizontal tail surface was glued to the rear of the booms.
 The wings, booms, tail, struts and wheels were now painted. Markings were
hand painted but the serial was printed on to transfer paper and applied
when the painting was complete.
The wings, booms, tail, struts and wheels were now painted. Markings were
hand painted but the serial was printed on to transfer paper and applied
when the painting was complete.
Now the outer struts could be cemented to the lower wing and while these
were still flexible the top wing could be lowered on to the struts and held
in place with support while it dried out. This structure was not very strong
but it allowed the addition of the remainder of the wing and nacelle struts
and cabanas to be carefully inserted. The small radiators on the forward
cabane struts were made from 30 thou card and the pipes from thin copper
wire. The pipes on the fuselage sides were 30 thou rod. Next the ailerons,
undercarriage legs and wing skids were fixed into place. The model was
rigged using dark monofilament thread. Finally the rear gun position was
made and glued into place, followed by the rudders which were held with thin
pins of 5 amp fuse wire, the propellors, (also held with wire), and the
wheels which have wire axles. The tail was rigged and the front bracing
struts added. The last task was to add the drag wires from the nose to the
leading edges of the wings.
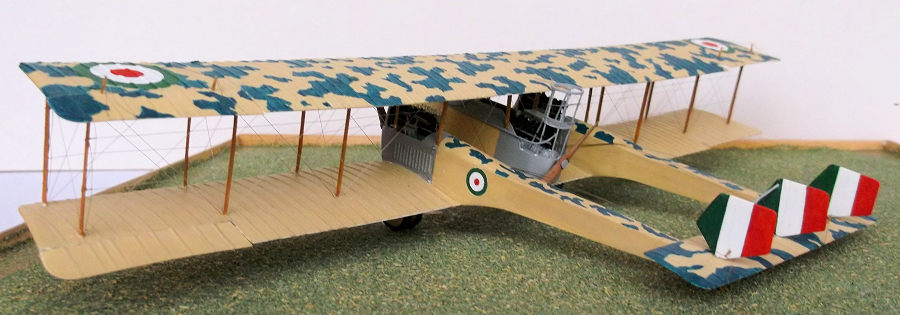
There are occasions when I wish to add a model to my collection which is not
available as a kit in any form. The Caproni Ca5 is an example of this. It
was not a particularly important or successful aeroplane, but I found it to
be of interest because of the exposed rear gunner position and I wanted to
see if I could replicate that. It is also a multi-bay biplane which offers
distinct challengers to the modeller. The camouflage pattern is also unusual
and that too attracted my attention. Unfortunately there is little
information available on this type published in English and researching the
type took a long time. From a modelling view there were many processes which
had to be used, so it was a good type to practice or refresh a number of
different skills and made for an interesting project.
Stephen Foster
12 October 2020
Copyright ModelingMadness.com
If you would like your product reviewed fairly and fairly quickly, please
contact
the editor
or see other details in the
Note to
Contributors.
Back to the Main Page
Back to the Review
Index Page
Back to the Previews Index Page