Eduard 1/48 Siemens-Schuckert D.III
|
KIT # |
8001 |
|
PRICE: |
$24.98 |
|
DECALS: |
6 aircraft |
|
REVIEW : |
|
|
NOTES: |
Short Run |
|
HISTORY |
The success of the Nieuport series of fighters led the German Idflieg in 1916 to seek proposals from various German aircraft manufacturers for the development of a comparable sesquiplane fighter for the German air corps. The Siemens-Schuckert Werke (SSW), a German electrical and aeronautics concern, submitted a prototype known as the SSW D.I, which was a direct copy of the Nieuport 11. They promptly received an order for 150 aircraft; however, production was canceled after only 65 had been delivered because the type had already been eclipsed by better German and Allied fighters. Development continued, however, based around the ever-improving performance of the Siemens-Haske engine, an overcompressed counter rotary engine. This engine offered increased cooling efficiency, better fuel economy, reduced drag, lower weight and near elimination of gyroscopic effect.
 By December 1917, Idflieg had ordered a batch of 20 D.III fighters for front-line evaluation, flight investigation and for participation in the First Fighter Competition scheduled for January 20, 1918. Despite impressive performance, especially a rapid rate of climb, the aircraft proved difficult for many of the pilots to handle. Among its problems were very sensitive controls and a high undercarriage necessitated by its large two-bladed propeller, both of which contributed to numerous landing difficulties. These problems were resolved by modifying the ailerons and tail surfaces, and replacing the prop with the distinctive four blade version. Although somewhat faster, the SSW lost out in the competition to the now famous Fokker DVII, primarily due to handling difficulties. Nevertheless, Idflieg ordered 80 D.III fighters in March 1918.
Further modifications led to the development of the D.IV, which proved to be a faster, more maneuverable, and stronger version of the D.III. Unfortunately, continued problems with the fighters led to both D.III and D.IV versions being returned to the factory for further modifications. However, by July 1918, the problems were sufficiently resolved to allow production to resume, and an additional 310 fighters were ordered through October 1918, although only 136 were ever delivered.
The SSW fighters found strong acceptance among a number of well-known German pilots. For example, Rudolph Berthold urged continued development of the type, arguing that “it is likely to become one of our most useful fighter aircraft.” Later, Lt. Lenz of Jasta 22 stated that the SSW D.IV was “superior to all aircraft at the Front in climb, maneuverability and speed above 4000 meters.” The D.III version was primarily used in home defense units (“Kestas”) where its high rate of climb made it a formidable interceptor. After the war, only a few were turned over to the Allies, among them being number 3025/18, the subject of this article. The rest were stored at Reichswar depots before eventually being destroyed in accordance with the Treaty of Versailles.
|
THE KIT |
 The kit used in this review is the 1/48th scale Eduard Siemens-Schuckert (SSW) D.III kit produced in the early 1990’s. It is one of the first model kits produced by Eduard, and was manufactured long before their production techniques reached the advanced state they occupy today. By today's standards, the kit is crude, with thick moldings, considerable flash, and poor fit in a number of places. However, it does carry with it the trademark Eduard photo-etch pieces, allowing for extensive detailing of the cockpit, engine and machine guns. In the early days of Eduard kits, they obviously relied heavily upon their photo-etch expertise to make up for what they lacked in the quality of their plastic pieces. These days, their plastic quality is second to none, and consequently they rely less on photo-etch to boost kit quality.
The kit contains markings for six different aircraft, and also includes a full set of 4-color lozenge camouflage decals. Unfortunately, the color of the lozenge is somewhat questionable, and since most SSW used 5-color lozenge, a more accurate kit can be built using aftermarket lozenge decals.
|
CONSTRUCTION |
Prior to assembly, I cleaned up a lot of flash and pre-drilled holes for rigging. As with most aircraft kits, construction begins in the cockpit, and this one was no exception. I began by smoothing out the inside of the fuselage halves, as they were extremely thick and contained some injection molding protrusions that would interfere with the cockpit parts. The Eduard SSW cockpit is almost exclusively photo-etch, containing a frame, bulkhead, dashboard, control stick, seat, seatbelts, and various gauges. It is a model in itself, and comparing it with Datafile photos of the interior, is virtually 100% complete. The floorboard, rear bulkhead, and frame are all one piece, and assembly of it consisted of folding, bending and gluing the flat photo-etch until it is transformed into a three-dimensional frame. From there, I simply glued the various cockpit components to their respective positions on the frame, taking care to insure that I had them in their correct positions.
 The instructions are a bit difficult to follow at some points in the process, so reference to the Datafile photos were invaluable to insure the correct placement of the parts. The SSW cockpit was a combination of wood and metal, and the fuselage interior and respective parts were painted as such. I used Model Master Acrylic RLM 02 for most of the metal parts. The wood was painted using Polly Scale Deck Tan that, when dry, was given a thinned wash of Testor’s Brown for wood grain. The completed effect is quite convincing, especially in this scale. I supplemented the kit compass and gauges with the Copper State Models German gauge kit. The seat assembly and seat belts were painted and set aside for insertion in the cockpit later.
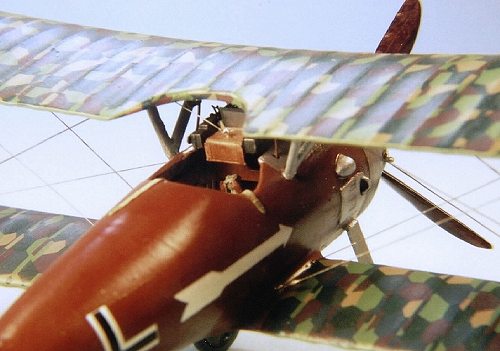
Once the cockpit assembly was complete, I glued the two fuselage halves together to create a receptacle for the cockpit. The fuselage comes in two halves; however, the bottom of the fuselage is contained in the lower wing assembly, so the two fuselage halves glued together only represent about two-thirds of the total fuselage area, with the front and bottom to be added later. I inserted the cockpit assembly into the fuselage and secured it with Zap-a-Gap. I then glued the fuselage bottom with the attached lower wings to the fuselage assembly. Here, quite a bit of grinding, sanding and puttying was required to obtain a decent fit. To finish off the fuselage assembly, the upper forward fuselage panel was added, as was the engine firewall, which I painted Gunze Burnt Iron. The kit comes with a white metal Siemens-Haske engine and some photo-etch pushrods. These were assembled and painted a combination of Steel, Burnt Iron, and highlighted with a thinned wash of Leather to convey the effect of burnt oil. I then mounted the engine to the firewall, and added the cowling. Again, I ran into fit problems. The engine is a bit large for the cowling so I had to thin down the inside of the cowling considerably, as well as “lengthen” the cowling by gluing some strip styrene along the back edge. Once glued, considerable filling was done with Zap-a-Gap and stretched sprue. I was now ready to paint the fuselage assembly, which will be discussed in the Painting section of this review.
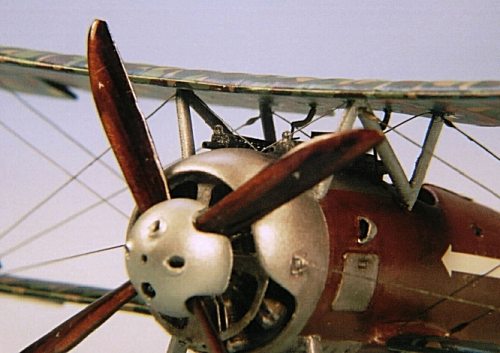 The Spandau guns are made of plastic, to which are added steel tube barrels and bits of photo-etch, including the cooling jackets. Heating the jackets in a flame prior to rolling them helps them to bend easily and maintain their shape. I roll the cooling jackets with the jacket rolling tool provided in the DML Fokker DVII kit. It’s almost a perfect fit. The assembled guns were painted Model Master Gun Metal, drybrushed slightly with Burnt Iron and set aside. I really like the MM Gun Metal because it captures that “blue steel” look, unlike other gunmetal paints which tend toward gray instead of blue.
The wheels and struts were cleaned up and set aside for painting and final assembly.
To add realism, I typically remove the various flaps and reposition them. In this case, I also wanted to represent the hinge attachments, so after removing the ailerons, stabilizer and rudder flaps, I cut notches in each hinge location and glued pieces of strip styrene to represent the hinges. I then applied the lozenge camouflage to the flaps as described in the Painting and Decaling section below before reattaching them.
 Final assembly of the kit was relatively easy. I glued the interplane and cabane struts in place, and allowed them to dry overnight. I also “pre-rigged” the aircraft by attaching one end of the rigging at various points on the fuselage and wings. I use invisible monofilament thread and attach it with Zap-a-Gap. If left to dry overnight, it can be pulled taut without fear of it pulling loose from its attachment point.
The top wing attached to the cabane and interplane struts with little trouble. I also added the stabilizer and rudder that were separated previously. Once dry, I then proceeded to complete the rigging by attaching the other end of the various lines to their respective attachment points. The key to a neat rigging job is not to use too much glue. I like gap-filling glue because it dries slowly enough to work with, but quickly enough so that you can keep going with the process. The SSW has a relatively simple rigging scheme so it was accomplished fairly quickly and without much difficulty.
Once the rigging was finished, I attached the wheels and the propeller. The 4-blade prop I used is a wooden one made by Martin Digmayer of the Czech Republic and supplied by Copper State Models. Finally, the seat and seat belts were inserted into the cockpit, and the seat belts positioned as thrown over the fuselage upon the pilot’s exit from the cockpit.
|
PAINT & MARKINGS |
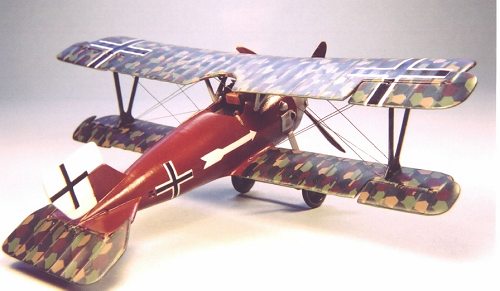
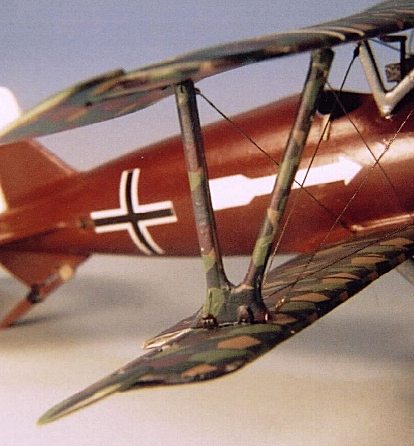
Since an accurate model of the SSW requires the application of lozenge camouflage, painting and decaling consumed a large portion of the time and effort on this kit. I chose Copper State 5-color lozenge for this kit because (1) I liked the colors, and (2) they were printed at the 45-degree angle of application generally used on these aircraft. The upper wings of SSW were typically covered at a 45-degree angle while the narrower lower wings were usually covered spanwise. The 45-degree angle added strength to the larger upper wing, while the lower wings were amply protected with the one-piece spanwise application. Prior to applying the lozenge, I painted the wings, ailerons, and stabilizer flap with Polly Scale RLM 25 Green on the undersides and Polly Scale RLM 24 Dark Blue on the upper surfaces. I then applied a light coat of Future to both surfaces to prepare for the lozenge decals. The lozenge was then applied to the wings in the previously mentioned fashion, while all flaps were covered spanwise (horizontally). The lozenge decals generally went on pretty well with the aid of Micro-Sol and Solvaset. Once dry, I trimmed off the excess, “Futured” again, and then added the rib tapes.
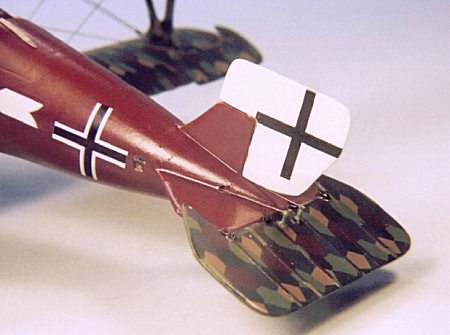
 I had to decide if the rib tapes should be the normal pink and blue or whether they should be of the same lozenge material as used on the wings. Research was inconclusive as photos indicate both types were used. However, I needed another challenge for this kit, so I opted to go with the lozenge material for the rib tapes. Besides, I had never finished a kit like that before and I wanted to see if I could do it. The rib tapes were fashioned by cutting thin slices from the existing lozenge decal with a sharp razor blade. Of course, it’s nearly impossible to get all the rib tapes the same width, but it’s hard to tell once they are applied. Besides, I was aiming more for “effect” than absolute perfection. It’s a bit tedious cutting and applying the rib tapes but the end result was satisfying to me. After finishing the rib tapes, I added the wing crosses and sealed it all with Polly Scale Satin finish. I then went back over the wing crosses with a light coat of Future applied by hand. German lozenge fabric received a final coat of flat over which the insignia were applied with gloss paint, so this step was necessary to convey that gloss over flat finish.
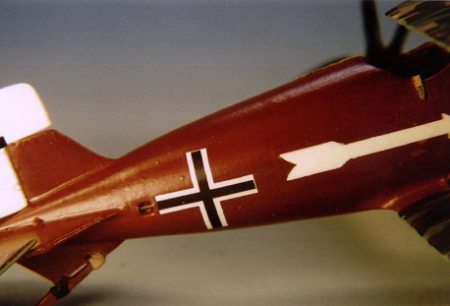
SSW fuselages were covered with plywood panels that were usually stained a dark color and then varnished with a high gloss varnish. I generally just hand paint all my wood fuselages, but I wanted to try a slightly different technique on this one. I first airbrushed the fuselage with Gunze Wood Brown. When dry, it was “Futured” to give it a glossy surface. I then applied SuperScale Medium Wood decals over the painted surface. (I think these SuperScale decals are the most accurate wood grain decals ever made, and it’s a shame they are not produced anymore.) I cut the decals into separate pieces to represent the different panels used to cover the fuselage. As I discovered later, this step was probably unnecessary, because the dark varnish hid more detail of the wood grain than I expected. Once the decals had set, I then applied several thin coats of Gunze Red Brown and Cocoa Brown to darken and blend the decals into a unified finish. Once dry, I applied
 some more Future to achieve the glossy finish and to prepare the surface for the remaining decals. The metal panels were then painted using Testor’s Model Master Acrylic Aluminum.
The wheels were finished by first painting them Tamiya Light Gray. Once dry, the tires were weathered slightly with various shades of gray. The wheel hubs were then Futured and the lozenge decals applied and trimmed.
The interplane struts were covered in lozenge decals. I realize this may not be entirely accurate as it is thought that many SSW had these struts hand painted to look like lozenge fabric instead of actually applying the fabric. In many cases the hand painted “lozenges” were larger than on the actual fabric so the difference would be noticeable. I didn't feel that I could accurately match the colors of the lozenge decals with paint so I decided to just use decals on the interplane struts instead of painting them by hand. Again, I was satisfied with the overall effect.
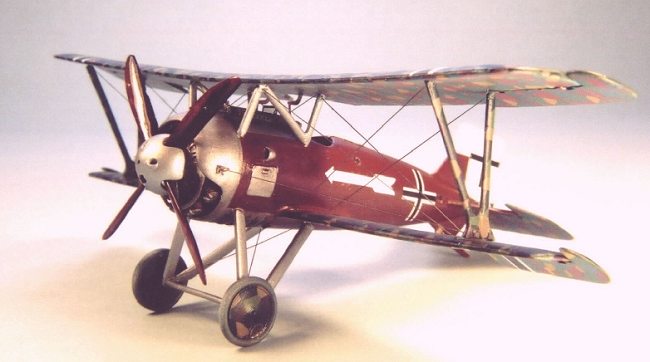
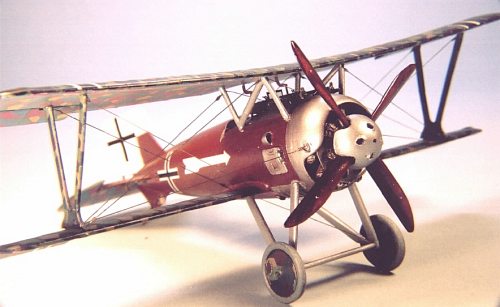
After attaching the rigging, I went back over the monofilament thread with Polly Scale Graphite to give it a metallic look. I also added white glue “turnbuckles” and painted them Polly Scale Copper. I used a combination of kit decals and Aeromaster decals from their SSW sheet for all but the lozenge camouflage. The model here represents SSW number 3025/18 of Kesta 8 as it appeared in 1918.
|
CONCLUSIONS |
The Siemens-Schuckert is a must for the serious WWI aviation buff, and there are a limited number of kits available in 1/48th scale. This Eduard kit is not for beginners, but experienced modelers can, with a little extra effort, produce an excellent representation of this important, but less well-known German fighter of WWI.
|
REFERENCES |
Windsock Datafile 29 “SSW DIII-DIV,” by P. M. Grosz, Albatros Productions, 1991, 2nd Edition 1998.
Copyright ModelingMadness.com. All rights reserved. No reproduction in any form without express permission from the editor.
If you would like your product reviewed fairly and fairly quickly, please contact the editor or see other details in the Note to Contributors.
Back to Reviews Page 2025