Airfix 1/72 Hannover CL.III
| KIT #: | A010703 |
| PRICE: | AU$1-00 or it woulda' been binned |
| DECALS: | One out-of-register option |
| REVIEWER: | George Oh |
| NOTES: | An ancient kit that I rescued. Yay me!!! |
| HISTORY |
 The Hannover Light-C (or
CL) was an aircraft built by Hannoversche Waggonfabrik. It was a single-bay
biplane with a standard configuration. Their class III (or CL.III), an upgrade
of the CL.II, first flew in 1917. Both were two-seaters in that they had a pilot
and a rear gunner in a back-to-back configuration for voice communication
reasons. And both featured a narrow-span biplane tail that increased the
field-of-fire of the rear-gunner. The CL.III featured redesigned ailerons to
increase its manoeuvrability (especially at low altitudes) because it was a
ground-attacker in a Schlachtstaffeln (battle squadron) of the reshaped
Luftstreitkrafte. The pilot fired a fixed gun, while the gunner had a swivelling
gun and small hand-released bombs.
The Hannover Light-C (or
CL) was an aircraft built by Hannoversche Waggonfabrik. It was a single-bay
biplane with a standard configuration. Their class III (or CL.III), an upgrade
of the CL.II, first flew in 1917. Both were two-seaters in that they had a pilot
and a rear gunner in a back-to-back configuration for voice communication
reasons. And both featured a narrow-span biplane tail that increased the
field-of-fire of the rear-gunner. The CL.III featured redesigned ailerons to
increase its manoeuvrability (especially at low altitudes) because it was a
ground-attacker in a Schlachtstaffeln (battle squadron) of the reshaped
Luftstreitkrafte. The pilot fired a fixed gun, while the gunner had a swivelling
gun and small hand-released bombs.
| THE KIT |
This is a 40+ year-old kit - unchanged from when my brother built one when we were young boys. Its detail is a child of its vintage. I find it acceptable externally, though there is only a pilot's seat for internal detail. The carbanes are single-piece N-shapes. The struts are also single pieces with a single bar that both joins and separates their upper tips.
 I reckon that this is a
neat-looking aircraft because of that unusual tailplane. So it is not surprising
that I have one in-progress. Currently, it is about 60% complete with a 100%
coverage of small-font lozenge decal (but THAT is another story). But my kit's
decals (lean crosses) are out of register. Rats!!!
I reckon that this is a
neat-looking aircraft because of that unusual tailplane. So it is not surprising
that I have one in-progress. Currently, it is about 60% complete with a 100%
coverage of small-font lozenge decal (but THAT is another story). But my kit's
decals (lean crosses) are out of register. Rats!!!
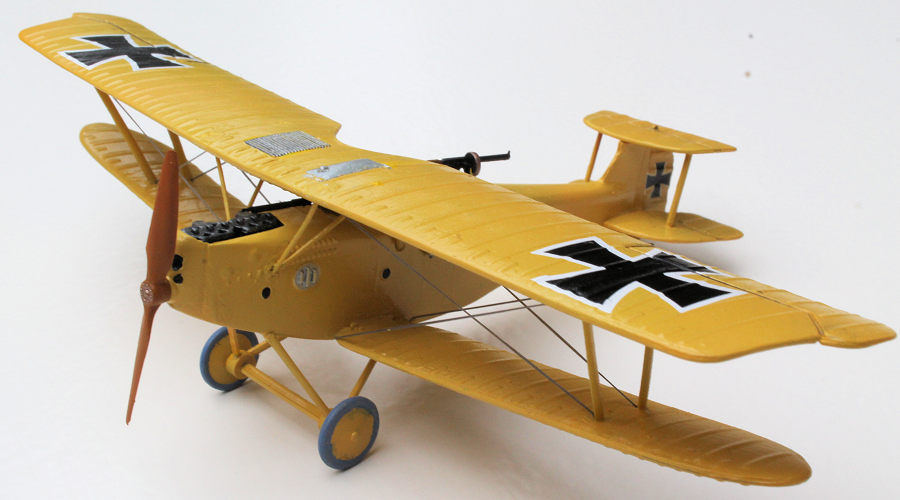
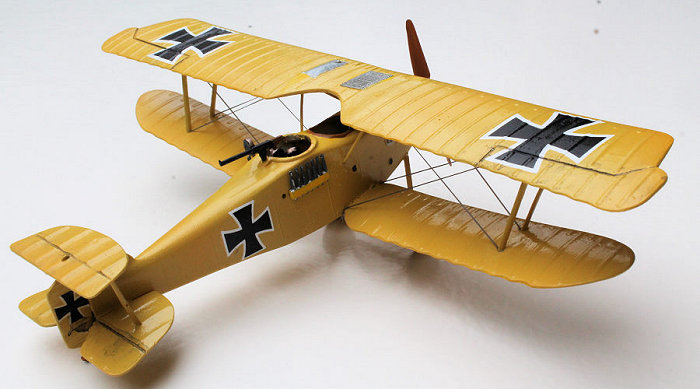
I saw this kit going for a dollar at a swap meet. It was partially-built with the fuselage closed, the lower wing in place, and all tailplane parts attached. As well, the struts were poorly-attached to the upper wing by their connecting bar. So I bought this one because I wanted the decals (which are out of register as well. Double Rats!!!). In close examination, I discovered that this kit was missing the pilot, a set of bombs, it had a broken carbane, and one of the wing struts & one of the wheel struts was broken-off and missing.
While trawling through the Internet to research this aircraft, I chanced on a publicity poster by Hannoversche Waggonfabrik. I immediately realized that I could use my spare Hannover CL.III to replicate the one on the poster. While the all-over yellow coat should be easy, the Maltese Cross markings will have to be found. So recovered this kit (from its place beside mine on the Shelf of Doom) to complete the build.
| CONSTRUCTION |
 To resume the build, I
snapped-off all of the struts and noticed that they all showed a
slipped-mould ridge. The connecting bars were left in-place, and needed to
be sanded-down level with the wing surface. The strut location points were
drilled-out to re-establish them. I decided to replace ALL of the struts
with lengths of Contrail aerofoil strut from my dwindling stock. And, I'd
have to find a way to rig her.
To resume the build, I
snapped-off all of the struts and noticed that they all showed a
slipped-mould ridge. The connecting bars were left in-place, and needed to
be sanded-down level with the wing surface. The strut location points were
drilled-out to re-establish them. I decided to replace ALL of the struts
with lengths of Contrail aerofoil strut from my dwindling stock. And, I'd
have to find a way to rig her.
The big problem was to support that upper wing in-place without a full suite of struts. My solution was to clamp the wingtips together with a small block of wood between them - blocks as thick as the struts were long. I drilled the strut location holes completely through the top wings, clamped the wings together, then dry-fit the struts. Problem - the struts are to be angled backwards, so the holes needed to be enlarged and angled accordingly.
The vertical carbanes received similar treatment, except that they were fabricated from thin plastic rod. The angled connecting piece was attached (with great difficulty) while the upper wing was still in-place so that it would keep the vertical carbanes in their relative positions.
| COLORS & MARKINGS |
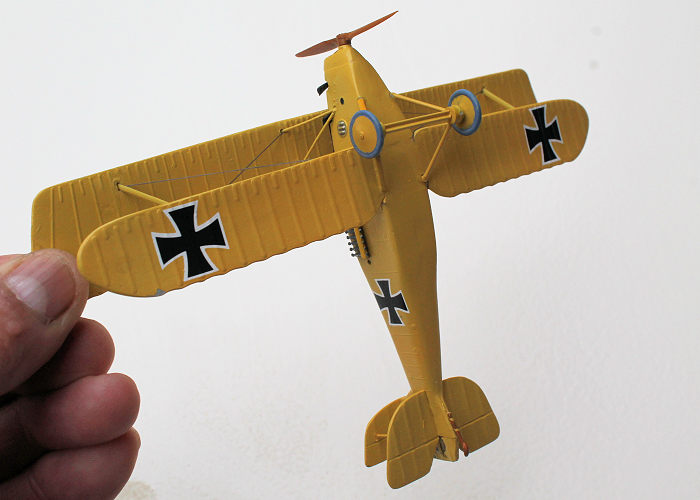
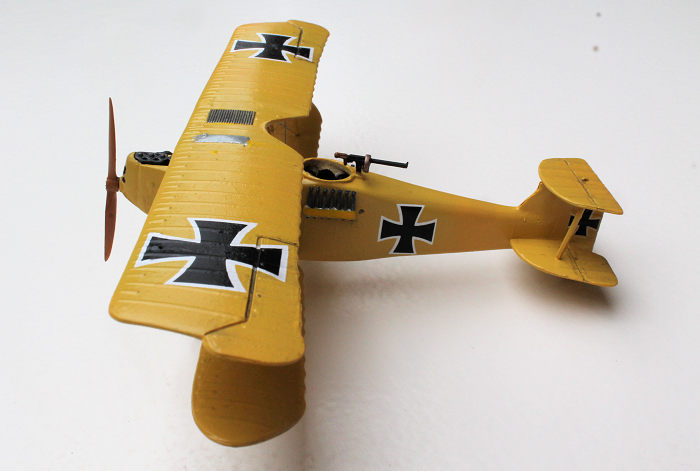
At this point, all of the loose parts and sub-assemblies were painted yellow. This wasn't as easy as I'd predicted because I couldn't find, or mix, a yellow with a slight orange tint, like the colour in the poster. Triple Rats!!! Not all of the model was painted yellow. Logic dictates that the engine, guns, drum magazines and tires retain their normal colours. To break-up the plain yellow coat, I masked then brush-painted the tank(?) and radiator(?) on the upper wing.
 It suddenly occurred to me
that, when I filled the holes in the upper wings, I'd have to remix the same
colour to cover the filling. In a panic, I preserved what little mix I had left,
and rushed to attach that upper wing, and the rigging.
It suddenly occurred to me
that, when I filled the holes in the upper wings, I'd have to remix the same
colour to cover the filling. In a panic, I preserved what little mix I had left,
and rushed to attach that upper wing, and the rigging.
At the moment, I use elastic EZ-Line to rig my models, because, after it is tensioned by 3-5%, it remains tight (and looking good). As usual, I ran the lines (black this time, for visibility) from the bottom wing sockets to the tops of the carbanes, and from the lower wing roots to the tops of the struts. In my haste, I forgot to string lines from the bottom of a strut, to the top of the adjacent strut. Rats, Rats and Double Rats!!!
For strength, I used superglue to attach the struts to the lower wings, and superglue gel to attach the struts to the top wing - and to fill the holes. With the last of my mixed paint, I painted over the filling.
So I needed a set of different-sized Maltese Crosses. An internet inquiry pointed me to a set available in the UK, for only $4-50 - and $25-00 postage, so I said "No thanks". I found four decals on a sheet for a 48-scale Albatross, and the little ones for the tail, from a 72-scale F.104G Starfighter sheet. These went on without a hitch, aided by the usual liquid sandwich of MicroSet/Sol.
| FINAL BITS |
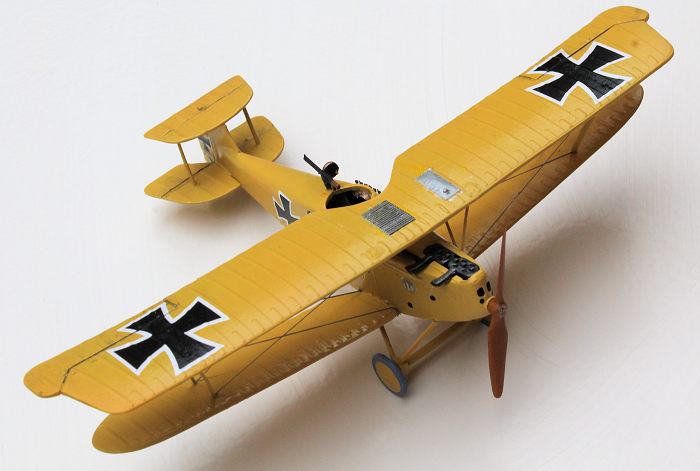
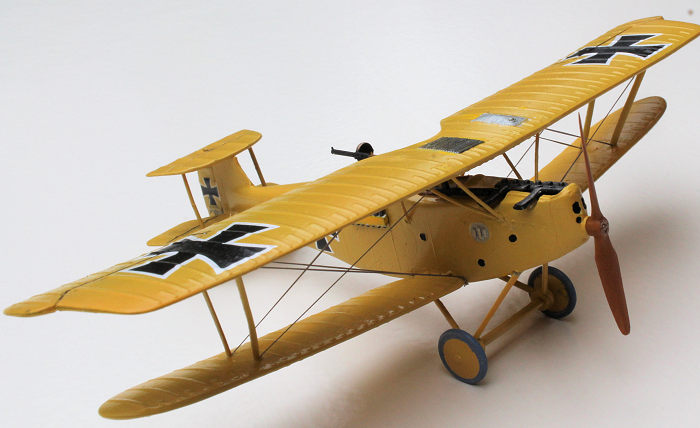 The kit provides two racks
of small elongate bombs that sit on the outside of the fuselage just below the
gunner's position. My rescue-model had only one of these. Fortunately, I had a
set of Aeroclub white metal bombs that looked exactly like the kit ones - even
down to the knock-out pin scar. These were brush-painted a dark grey, attached
with superglue, and their holding racks were painted with a Citadel Miniatures
yellow. I broke with tradition by ignoring the fact that the plane in the poster
(my reference) doesn't have the bomb racks or the flare rack. I can do that
because it is MY model.
The kit provides two racks
of small elongate bombs that sit on the outside of the fuselage just below the
gunner's position. My rescue-model had only one of these. Fortunately, I had a
set of Aeroclub white metal bombs that looked exactly like the kit ones - even
down to the knock-out pin scar. These were brush-painted a dark grey, attached
with superglue, and their holding racks were painted with a Citadel Miniatures
yellow. I broke with tradition by ignoring the fact that the plane in the poster
(my reference) doesn't have the bomb racks or the flare rack. I can do that
because it is MY model.
All of the last parts - undercarriage (with a replacement leg fashioned from a wing strut), engine, guns, tailskid and flare rack (after the photos) - were attached to complete the build. Then, for the heck of it (and because the position is absolutely bare), I added a plank/seat for the gunner, and a few spare drum magazines for his gun.
| CONCLUSIONS |
If I didn't buy this model, it's former owner would probably have binned it. If I'd not found the poster, I would probably have binned it too - instead of completing it. This is not the first started model I have ever obtained and completed, but it was different for me because I had to come-up with a plan to replace the kit struts. But I did it, and I have a different model - with a reference - to present to fellow modellers. It 'aint a show-stopper, but the build, and the finished product, pleases me a lot.
7 October 2019
Copyright ModelingMadness.com
If you would like your product reviewed fairly and fairly quickly, please contact the editor or see other details in the Note to Contributors.