
Revell 1/72 Fokker D.VII
| KIT #: | 4177 |
| PRICE: | $5.35 MSRP |
| DECALS: | Two options |
| REVIEWER: | Bill Michaels |
| NOTES: | A late 1960s mold |
| HISTORY |
 The Fokker D-VII was arguably one of
World War One’s best fighters, so there is little need to repeat the history of
this famous aircraft, when so much has already been here on MM and elsewhere.
The Fokker D-VII was arguably one of
World War One’s best fighters, so there is little need to repeat the history of
this famous aircraft, when so much has already been here on MM and elsewhere.
About Rudolph Berthold: Berthold was one of Germany’s higher-scoring aces, with 44 victories to his credit. Like many fighter pilots, he started out as an observer, and became a fighter pilot in 1916. He eventually rose to command, serving as commander of Jasta 4, Jasta 14, and Jagdgeschwader 2. Rudolph had a reputation for “playing hurt”, in that he was injured multiple times, and had a tendency to return to combat before his wounds were fully healed. Despite this, he survived the war, only to be killed in a riot in 1920. (Source: http://www.firstworldwar.com/bio/berthold.htm )
| THE KIT |
This is a re-pop of the old Revell kit from the late 1960s. My kit was produced in the early-mid 1990s—I picked it up at a swap meet for $2. It is still in Revell-Germany’s catalog (2008) —and is currently available from a variety of sources.
Molded in white, the kit consists of xx parts. This is a typical kit of the era— the detail is a bit limited, and heavy in execution. Most of the small parts had significant mold seams that need to be cleaned up.
The flying surfaces have that fabric
detail that was popular with kits of the era, though in this case, I’m happy to
report that it is rather subdued. The wing ribs are really overdone though,
molded as raised strips. If you really care about this sort of thing, you’d
want to sand them down. (Or just build a Roden D-VII kit.)

The kit also features ‘pilot figure on a shelf” cockpit detail, and a couple of clunky, though passable, machine guns. The top of the engine is also simply molded, but will look OK after cleanup and careful painting.
The kit includes decals and painting instructions for two aircraft from 1918:
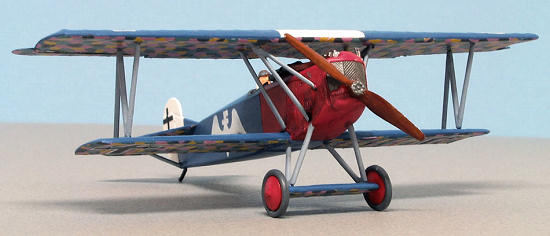
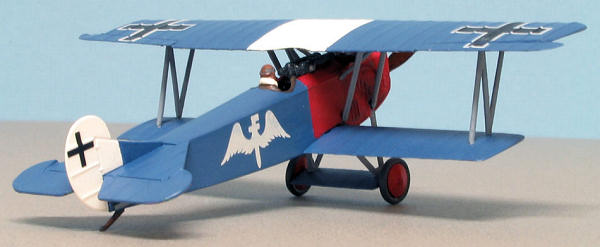
(1) Jasta 11, Oblt Rudolph Berthold. This is the aircraft on the box art, in red and blue, with lozenge on the underside of all the flying surfaces.
(2) Hermann Goering’s all-white aircraft from Jasta 27.
The decals in my kit were disappointing. Printed in black and white, there is no lozenge for the underside of the wings and stab. Instead, you get decals with lozenge patterns- black outlines of the lozenge shapes, with instructions to paint each lozenge a different color. I can’t imagine anyone doing that, so if you want to build the kit without using aftermarket decals, you’re limited to Goering’s all-white D-VII. (Feedback on the forum says that the current kits have the same B&W decal sheet.)
| CONSTRUCTION |
Assembly of the kit is pretty straight forward, as the parts count is so low. If it wasn’t for the lozenge decals, you could have the model assembled in an hour or two. I followed the usual practice for a biplane—assemble the fuselage, tail surfaces, and lower wing, leaving the detail parts, and the struts and top wing until after painting and decaling is complete. (I left the rudder off until later—it was easier to paint the white with the part off the model.)
The fit of the parts was generally pretty good. The only problem area, as is common on these old kits, is the joint between the lower wing and the fuselage—some filler will definitely be needed there! I don’t have a lot else to say here—after all, the kit only has 29 parts total!
| COLORS & MARKINGS |
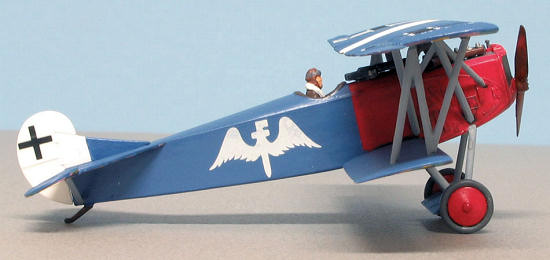 I wanted something more colorful
than Goering’s all white plane, so I decided to do Berthold’s mount. I checked
the decal stash, and found I had enough lower surface lozenge to do the model.
I wanted something more colorful
than Goering’s all white plane, so I decided to do Berthold’s mount. I checked
the decal stash, and found I had enough lower surface lozenge to do the model.
Applying the lozenge decals took longer than any other part of the model’s construction. My resources said that lozenge was applied either parallel to the ribs or at a 45 degree angle, so that meant I had to cover the wings in small pieces. Starting at the center, I would apply one piece to each side, and then set it aside to dry.
At this point, the model became a back burner project—I would add a piece of lozenge decal every now and again, when I got to points where I had to wait for something to dry on my main project. Work on the D-VII slowed to a crawl, but eventually, over a period of several weeks, the lozenge decals were finally finished.
The kit decals were rather thick, and when first applied, they didn’t look like they’d settle down very well at all. However, they responded well to Micro-sol, and snuggled down very well after only one application of the magic liquid.
| FINAL CONSTRUCTION |
Once the decaling was done it was time to finish the model.
The wing struts are all a little chunky, with fairly big mold lines. I cleaned them up as best I could, but there’s only so much you can do. The way the parts are molded, it is hard to tell in places where the part ends and the sprue starts. I’d recommend cutting the parts as long as possible, and then trimming later as needed.
 I find it easier to install the top
wing before the landing gear. I’ve built one of these before, and the cabane
struts are clunky and hard to fit. I find that the easiest way to mount the top
wing is to glue the wing struts in the lower wing and let them dry. I then
attached the top wing and let it dry. This ensures that the top wing is
parallel to the bottom wing, and in the right position.
I find it easier to install the top
wing before the landing gear. I’ve built one of these before, and the cabane
struts are clunky and hard to fit. I find that the easiest way to mount the top
wing is to glue the wing struts in the lower wing and let them dry. I then
attached the top wing and let it dry. This ensures that the top wing is
parallel to the bottom wing, and in the right position.
At this point, the forward cabane struts won’t fit— if you put them in the holes in the fuselage, the top end won’t land in the provided hole on the underside of the top wing. In this case, I’d say “don’t fight it”—I just cut the locating pin off the top of the cabane, and attached it to the top wing with some super glue where ever it landed on the top wing. A little drop of super glue filled in the hole that should have been used.
The rear cabane (a single strut) does fit fine, and the resulting location of the top wing matches the 3-view in the instructions pretty well. So it looks to me that using the wings struts to locate the top wing is the right thing to do. I’ve built two of these kits now, and both had the same problem—I’m pretty sure that if you mounted the wing using the forward cabanes first, that the rear cabanes and the wing struts wouldn’t fit correctly.
Once the wing is mounted, adding the landing gear is pretty straightforward. All the parts needed some cleanup of the mold seams. The wheels have separate hubcaps, which makes painting easier.
I don’t normally do a lot of weathering for my “in flight” models. In this case, weathering was limited to applying a dark wash around the engine panels, to highlight the detail there a little.
The final step was to airbrush the model with a coat of satin clear, to even out the finish.
| CONCLUSIONS |
I built this model to add to my collection of WW1 models that hang from the ceiling over my desk. As such, this model was perfect for the task. It was a quick build—something easy to work on as a side project while I waited for parts on my main project to dry.
 If it wasn’t for the problem with the
cabane struts, I’d call it an easy build.
If it wasn’t for the problem with the
cabane struts, I’d call it an easy build.
This is an OK kit for a quick OOB build, but serious modelers will want the much finer detail and better decals found in one of the many Roden kits of the D-VII that are available. There are a lot of things you could do to improve the model—you could add some cockpit detail, replace the guns, thin down or replace the struts, etc.—but why bother when the Roden kit has all that (and more) for only $5 more?
Build it OOB and enjoy it for what it is, I say!
Review kit courtesy of a swap meet find and my $2. Special thanks to Pip Moss for the great pictures he took.
Postscript: It wasn’t until the model was finished and hanging from the ceiling as part of my WW1 mobile that I realized I completely forgot to apply the rib tapes! Oh well….! (Because the ribs are molded so prominently, this would be a good subject to use one of the paint pens instead of decals, as described in one of Tom Cleaver’s Albatros D.V articles here on MM.)
March 2008
Copyright ModelingMadness.com. All rights reserved. No reproduction in part or in whole without express permission.
If you would like your product reviewed fairly and fairly quickly, please contact the editor or see other details in the Note to Contributors.
Back to the Review Index Page2015