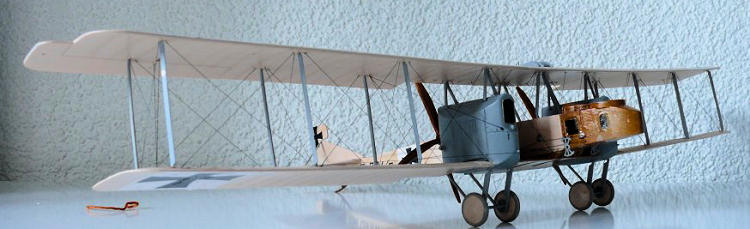
Roden 1/72 Gotha G.II/III
| KIT #: | Ro-002 |
| PRICE: | €19,95 @ www.plasticmodelbouw.nl |
| DECALS: | Three options |
| REVIEWER: | Jeroen Koen |
| NOTES: |
| HISTORY |
The Gotha G-series were designed by Hans Burkhard. Gotha acquired a license
to build the rather ungainly looking Friedel-Ursinus “Battle plane” as the Gotha
G.I. The G.I had the fuselage on top of both wings. With it's high and forward
centre of gravity, nose-overs were common and only a few were built. Hans
Burkhard was able to rebuild a crashed G.I to a more conventional layout, with
the fuselage mounted on a wooden centre section of the lower wing, and the
Mercedes DIV straight-eight engines providing 220hp, being fitting with the oil-
and fuel tanks in large, tightly cowled nacelles.
Because, even though it was redesigned from a design prone to
nosing-over on landing, the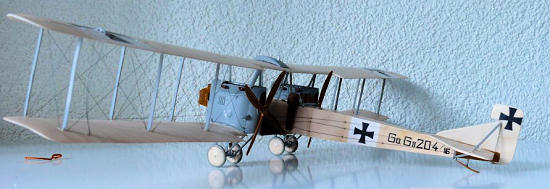 G.II prototype inherited the same unpleasant characteristic, a four-wheeled
undercarriage was attached to the nacelles, a tail skid only being fitted 'just
in case'. This also had the advantage of the nacelles being separate units that
could be rolled from and to the air plane. The whole plane was designed to fit
on three flatbed railroad cars.
G.II prototype inherited the same unpleasant characteristic, a four-wheeled
undercarriage was attached to the nacelles, a tail skid only being fitted 'just
in case'. This also had the advantage of the nacelles being separate units that
could be rolled from and to the air plane. The whole plane was designed to fit
on three flatbed railroad cars.
The design looked very promising, as the Zeppelin losses began to mount and cost
in both material and human lives began to rise. Something new had to be tried.
However, while promising, all was not well. The undercarriage, while preventing
nose-overs, of course had no brakes, and, without a tail skid acting as one, the
landing runs were too long and, worse, could not be controlled.
The biggest problem was that it did not meet the required bomb load. This was
solved by stretching the wings from 2 to 3 bays. The fuselage, which was fabric
with a plywood nose and tail part, was also altered. Now the required strength
and bomb load capacities were met, and among other smaller design changes such
as a different fin and horn-balanced ailerons, the design was accepted by
IDFLIEG and went into production as Gotha G.II in April 1916.
Eventually, 8 of the 10 G.IIs built went to war Staffel 20, Kagohl 4, on the
Balkan front. Not much is known about their war careers, let alone markings or
feats that make history. What is known, is that by early 1917 most were gone
from the inventory. It is known that the straight-eight geared Mercedes DIV was
prone to crankshaft fractures due to the flexing of the long unit. That could
have cut short it's career, as the newer and more reliable G.IIIs were by now
arriving with Kagohl 4 on the Balkan front. The G.II was early enough to
pre-date the camouflage requirements and on most photo's appear to be in clear
doped linen over varnished wood.
The G.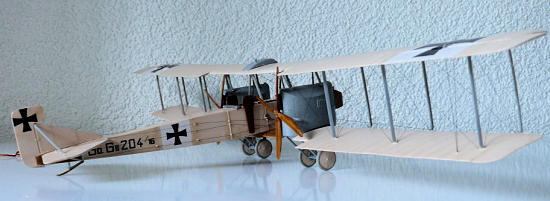 addition
to the internal bomb racks, external racks were fitted to allow it to carry
larger bombs. This also gave some extra stability in flight, although it was
still a handful once the bombs were dropped. The G.
addition
to the internal bomb racks, external racks were fitted to allow it to carry
larger bombs. This also gave some extra stability in flight, although it was
still a handful once the bombs were dropped. The G.
The G.IVs main differences from the G.
(if I ever get to building a box-tailed lozenge-covered G.Va or b, that is...)
| THE KIT |
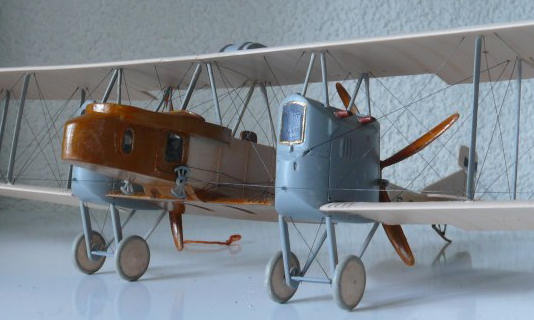
Roden has to be commended for bringing out this kit. It definitely looks
impressive in the box... lots of struts, a three part top and bottom wing that
has both dihedral and sweep and to top it off a daunting rigging diagram... most
of the plastic is actually the same as in Scott's preview here:
http://www.modelingmadness.com/scotts/w1/g5preview.htm
The main differences are the plywood/fabric fuselage and lower wings without
ailerons. There is quite some flash on several parts, especially on the wings
and rudder, the latter seems to h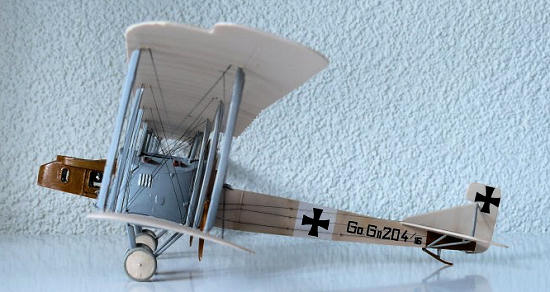 ave
grown twice as big as a result! It's not too difficult to clean up, though, and
fortunately the 4 sprues with the really small, fragile stuff are mostly looking
good, only one suffering from a very slight mould shift.
ave
grown twice as big as a result! It's not too difficult to clean up, though, and
fortunately the 4 sprues with the really small, fragile stuff are mostly looking
good, only one suffering from a very slight mould shift.
A decal sheet is included for three options, one G.II and two G.IIIs, both come
straight from from the Windsock Datafile, that is a must have weapon when
attacking this kit. The decals are mostly serials and crosses; but for one
option a nice death's head is included.
Speaking of the Datafile, the kit matches the outlines of Ian Stair's drawings
in that book quite perfectly as I found out during construction, if you're into
these sort of accuracy-things. (which I'm not)
I got mine as a result of a group-build of the Dutch Modelbrouwers-forum that I tend to hang out. This gave me not only the kit, but also the motivation and support from more experienced modellers to tackle what was essentially my second biplane kit! If you're interested in viewing the other builds there, look here: http://forum.modelbrouwers.nl/phpBB2/viewforum.php?f=103
| CONSTRUCTION |
Construction started with... well, thinking how to sub-assemble this beast so
that I could do painting and rigging at the proper stages. Planning ahead is the
key with this thing.
What very few on-line reviews I could find pointed out the main area
of concern was the fit of the engines inside the nacelles. Well, they were
right, that's for sure! So I removed the attachment points inside the nacelles,
thinned the Panzer steel thickness nacelle insides and left off the intake
manifolds. Not much can be seen in there anyway. For the G.II you need to do
some surgery, as the G.II had the eight-cylinder engines with a different
exhaust from the later six-cylinder types. The proper eight-cylinder engines are
not provided, but I could live with that. With some careful scribing and
sanding, fitting the insert is not too difficult. At
that time I also drilled out the exhaust pipes. Before glueing it all
together I also scraped off the louvres that were not needed for the G.II. Of
course I was too eager and had to fill and rescribe my mess-ups.
Note that Roden will tell you to leave only the forward four louvres, but the
G.II reference photo in the Datafile shows five. Of course I found out after I
did one side, so now I have 2 different nacelles. Well, they were easily
changeable, remember?
All these louvres seem different and Roden provide you as many as possible so
check your references. This is quite smart of them, as you simply sand away the
ones you don't need. It appears there were no louvres on the insides of the
nacelles, but it's difficult to tell. I left them only on the outsides. At this
point I also should have test-fitted the radiators but I didn't and came to
regret that later, as the fit is horrible. Finally I brush-painted the engines
and nacelle insides Revell Aqua Steel and glued the engine to one nacelle half.
Before doing this, check the horizontal position to make sure the propeller does
not stick out too much. When I had 2 completed nacelles there was the inevitable
sanding and filling, and rescribing lost screw and panel detail.
 For
the G.II the top cover should be cut in half as well, since the side photo in
the Datafile shows an opening and glueing as-is will result in an completely
enclosed engine.
For
the G.II the top cover should be cut in half as well, since the side photo in
the Datafile shows an opening and glueing as-is will result in an completely
enclosed engine.
Finally I fitted the radiators, they leave rather large gaps and should be flush
with the nacelle. By default they are too far forward so I just glued them in
and filed them flush. Gave a nice texture as well, since that is quite faint on
the original parts.
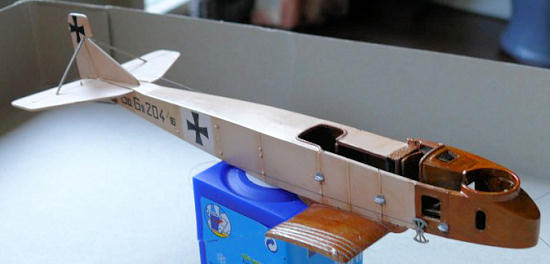
With the nacelles primed and out of the way, the fuselage was attacked. It'd be
quicker to name the parts that DID fit, than those that did not. The rudder
pedals fit quite good!
The dial faces of the instrument panel are on the wrong side, as from the box
the panel is on the wrong side of the window above it. This was designed to
allow light to fall on the panel. So I trimmed a bit off one side and glued it
so you can see it trough the top window. I also filled a nasty sink mark near
the window on the top of the coaming. The floor bit on which the rudder bar goes
should be trimmed according to Roden, but a dry-fit showed the control column
bar which runs from left to right trough the fuselage will be blocked. So I
sanded both parts down to make them fit.
The bulkheads all need to be trimmed to fit, and be careful with the one on
which the gunners seat goes. The instructions are very unclear as to where that
bulkhead goes, but the fuselage drawing on the next page shows where it should
be. There are also a few nasty ejector towers on the fuselage inside, but thanks
to the soft plastic these were easily removed. Then the whole inside was sprayed
wood,wood grained with oil paints and then hand-painted with Tamiya clear
orange. When doing a G.II or 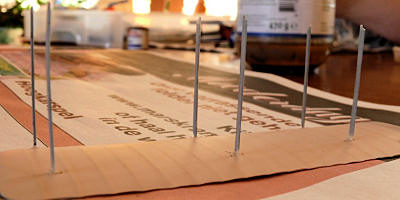
As I felt like I had nothing to do, I added tape seatbelts with thin metal
buckles and made the internal fuselage bracing from thin copper wire stripped
from a computer power cord.
I also noticed from the Datafile
that the bottom opening for the gunner was only on the G.
Then I glued the fuselage halves together -one of them was not 90° at the bottom
so they curved inward. I tried a few gentle ways, but eventually thought the
plastic thick enough and sanded everything flush on P180 grid sandpaper taped to
a glass plate. I didn't really get it 90° so was rewarded with a mis-aligned
centre section of the lower wing. This was corrected with some 0,3mm styrene
strips and filler, then measured to be 90° in relation to the fuselage sides.
The last thing you want on this sort of plane is mis-alignment.
As I was getting rather fed-up with with the fuselage due to the centre seam
cracking open 2 times, I turned my attention to the wings. The datafile was
useful so far, but really shines when assembling the 3 piece top wing. The
centre section has the correct dihedral so I figured by taping that and one
outer end to a glass plate, the dihedral would be OK. The sweep would not, so it
was really nice to be able to look through the glass and check that against the
drawings. After taping everything to the glass, I shifted
 the
centre part a bit and glued one side using Humbrol tube glue for extra strength.
I left that to dry for a few days and repeated for the other side. The wing is
quite large and flimsy. It appeared I had done this quite nice for a change, as
I only needed a few swipes with sandpaper to get rid of the seams.
the
centre part a bit and glued one side using Humbrol tube glue for extra strength.
I left that to dry for a few days and repeated for the other side. The wing is
quite large and flimsy. It appeared I had done this quite nice for a change, as
I only needed a few swipes with sandpaper to get rid of the seams.
At this point I also cleaned up the lower wings and tail parts, and started a job that is quite think-and-plan-intensive as you start, but is just simple later on. I pre-drilled all the rigging holes. I also deepened the holes for the struts and landing gear, as these are quite shallow. At this stage I also removed the appropriate lugs that are moulded on the fuselage for all versions, on which the control wires run. Like the louvres, Roden smartly gives you all options and you simply remove the ones you don't need.
| COLORS & MARKINGS |
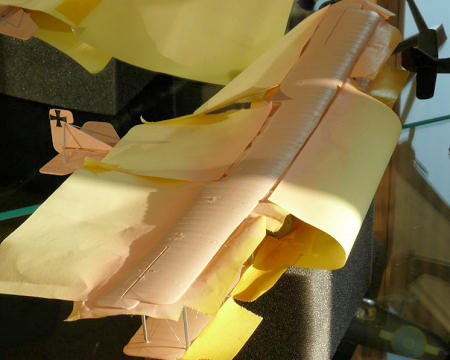
After restoring the seams on the fuselage again, I stuffed the interior with wet
tissue and foam. I downloaded the instructions from the RoG Sopwith Camel for
their clear doped linen recipe (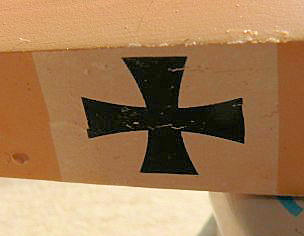 as.
I took the first Acrylic light grey I could get my hands on, in this case Polly
S (the really old one) Light Gull Grey. After that had dried I masked off the
fuselage and painted the appropriate areas Polly S Tan. After that had
thoroughly dried I wood-grained these areas and finished
them by brush-painting Tamiya clear orange. Then it was time for disaster, errr,
decals.
as.
I took the first Acrylic light grey I could get my hands on, in this case Polly
S (the really old one) Light Gull Grey. After that had dried I masked off the
fuselage and painted the appropriate areas Polly S Tan. After that had
thoroughly dried I wood-grained these areas and finished
them by brush-painting Tamiya clear orange. Then it was time for disaster, errr,
decals.
These are the old Roden type: brittle and cracked upon contact with water. I
won't waste too many words about them, but I got them on by brushing Future on
and plunging them on top of that. At least it made sure they could be moved very
carefully and they would stick as well. I had to touch up a few with black and
white paint. One of the (unique) serial numbers was forever lost, but thanks to
a very helpful fellow group-build member I was given a Techmod serial number
that had the missing digits. Thanks again Nico!
I have heard people getting better replacement sheets from Roden, so I could
have gone that route too.
After that, I post-shaded the ribs with heavily diluted Revell Aqua red-brown, still a bit shaky in some areas, but I'm still learning to control my Badger 150. I didn't do any further weathering as the plane I was building looked nice and clean on the photo. I only did a wash with Payne's Gray oil paint on the nacelles that virtually disappeared after flat coating with Revell Aqua flat varnish.
| CONSTRUCTION CONTINUES |
 After
everything was thoroughly dry and flat-coated, I assembled the tail and attached
the external elevator controls. The horizontal tailplanes look as if there
should be a gap between the fuselage and tailplane, but there should not be any.
I noticed this too late. This also resulted in the bottom support strut not
matching the holes, though the top one somehow fitted OK. The attachment points
for the tailplanes are just blobs of plastic, so I reinforced them with a brass
0,5mm pin.
After
everything was thoroughly dry and flat-coated, I assembled the tail and attached
the external elevator controls. The horizontal tailplanes look as if there
should be a gap between the fuselage and tailplane, but there should not be any.
I noticed this too late. This also resulted in the bottom support strut not
matching the holes, though the top one somehow fitted OK. The attachment points
for the tailplanes are just blobs of plastic, so I reinforced them with a brass
0,5mm pin.
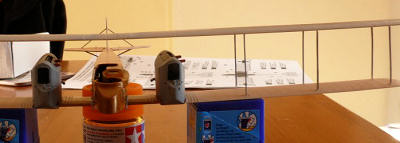
Then it was time for the most feared part: assembling 2 bottom wing outer ends,
2 nacelles, 12 + 12 struts (12 interplane, 12 cabane/nacelle), a fuselage and a
few other assorted bits. I had seen a few built-up Gotha's and noticed the top
wing was usually warped. I tried to avoid that
Here's how I did it, a bit unconventional as far as biplanes go, but it
worked for me!
1)
glue nacelles to wing stubs at the proper position (check with datafile
drawings, they should be very slightly tilted forwards when viewed from the
side) I risked not using reinforcing pins so as to be able to make some small
adjustments.
2)
Superglue all interplane struts to the bottom wing at a slight outward angle
when viewed from the front -again, use the datafile. Also make sure you have the
wing at the proper angle when viewed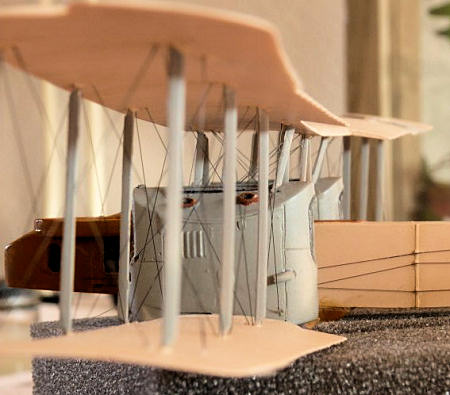 from the side, fit against the nacelle to check! If you don't do this properly
you'll end up with a small backwards stagger like I did.
from the side, fit against the nacelle to check! If you don't do this properly
you'll end up with a small backwards stagger like I did.
3)
If needed (I did); sand a bit off the bottom wings to make sure it's a drop-fit
with the fuselage with nacelles, then align, checking both dihedral and sweep,
use tube-glue and let it dry very well!
4)
Insert the
fuselage-to-wing struts, mine fit quite well
5)
Insert the nacelle-to-wing struts, these were a bit long so I had to trim a bit
off to prevent the top wing from being pushed up and into a warp.
6)
You should now have a Gotha with zero stagger, 3° dihedral and a slight sweep!
With that done, it was time for rigging. Basically it's just pulling the 0,06mm
wire through a black Edding marker, cutting it off, and pull it through 2 holes
and secure with superglue. In theory, that is... my rigging somehow went slack,
maybe I used a wrong type of marker, as I used this wire before and the marker
was new? I managed to tighten most of the wires, only to see other ones loosen,
so a few are still not very tight, but since the ends were cut off already
 there's
no way to tighten them again. I drilled most holes all the way through both
wings; next time I'll drill only the wires from nacelles and fuselage all the
way trough. I'll drill the bottom wing all the way through to be able to tighten
the wires. It saves a lot of clean-up work on rock-hard superglue on a very
visible place. I did the best I could, but the model is very fragile so I
couldn't get all remaining scars away. I simply could not sand all rock-hard
superglue away, and when I tried to I only loosened more wires or sanded dents
in the soft Roden plastic. Lesson learned for the next biplane!
there's
no way to tighten them again. I drilled most holes all the way through both
wings; next time I'll drill only the wires from nacelles and fuselage all the
way trough. I'll drill the bottom wing all the way through to be able to tighten
the wires. It saves a lot of clean-up work on rock-hard superglue on a very
visible place. I did the best I could, but the model is very fragile so I
couldn't get all remaining scars away. I simply could not sand all rock-hard
superglue away, and when I tried to I only loosened more wires or sanded dents
in the soft Roden plastic. Lesson learned for the next biplane!
Rigging itself took me about 2 evenings; just work symmetrically (if you do one
wire on the left, repeat on the right) and work from the inside out. If you do
get it to tighten properly, it really adds strength to a very flimsy plane.
With that done I masked off most areas and painted to top of the top, and bottom
of the bottom wing
| FINAL CONSTRUCTION |
There weren't really a lot of final bits left: some guns, undercarriage,
wheels and rigging for the undercarriage and a few small bits here and there,
such as the hinging part for the forward gun ring, control hinges for the
ailerons, the gun mount for the rear gunner and the prop guards. A quick note on
the prop guards; these go over the fuselage control wires. There are
small attachment pins but no holes in the fuselage. The transparencies look nice
on the sprue but could have been designed for any other plane as well, the fit
is bad. The windows were made with Humbrol Clearfix.
The undercarriage has a small mistake in it; Roden moulds a fairing on the
axles, but as is visible on some photo's the forward part of the axle can be
seen, and the rear part is hinged. This will make it level in flight, but it'll
hang down on the ground. The
 drawings
in the datafile don't show this either, by the way. I noticed it while
everything was in place already. With the few errors already being in the build,
I didn't really bother adding one more by removing the undercarriage so I left
it as is.
drawings
in the datafile don't show this either, by the way. I noticed it while
everything was in place already. With the few errors already being in the build,
I didn't really bother adding one more by removing the undercarriage so I left
it as is.
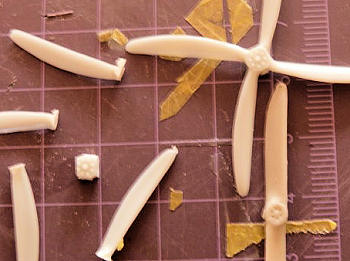
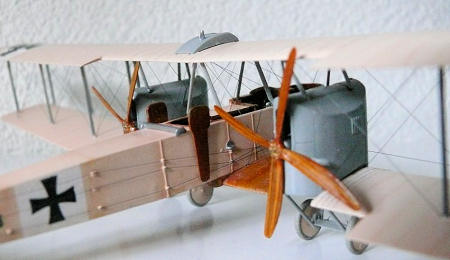
The propellers were last, as they were more work. The G.II pictured in the
datafile appeared to have four-bladed props which Roden do not supply. Neither
do they supply the broad-chord propeller commonly coupled to the Mercedes DIV.
Thanks to Paul Thompson, who was building a HP O/100 converted from an Airfix HP
O/400, I got the four-bladed O/400 propellers he did not need. (Thanks again,
Paul!) These are a bit too big, but the O/400 being a tractor plane with handed
engines, they were reversed in two ways! I cut the blades from the hub,
shortened them, and re-glued them in the proper way to the hubs. Not perfect,
but it'll have to do, and looks quite different from the regular Gotha-norm.
These were painted Humbrol Desert Sand, the laminations masked off, then painted
Humbrol Wood and hand-painted Tamiya clear orange. They were slipped into the
engines (yes, they do spin!), I took a beer, made some photo's and called her
done!
| CONCLUSIONS |
Stock up on filler, superglue, nylon fishing wire and sandpaper: Roden's Gotha
is here! Despite that it may seem like a pretty rough kit, with some proper
planning, patience and references it is quite do-able. Besides, it's the only
injected kit of this
 important
kite. I wouldn't recommend it to a biplane-starter for obvious reasons, but
anyone with a few (Roden) biplanes under their belt should be able to finish
this into a good looking model. The decals are a hit and miss, but I'd advise
you coat them with Microscale Decal stuff to prevent them from disintegrating in
the water, just in case, as there's no more aftermarked for these early Gotha's.
important
kite. I wouldn't recommend it to a biplane-starter for obvious reasons, but
anyone with a few (Roden) biplanes under their belt should be able to finish
this into a good looking model. The decals are a hit and miss, but I'd advise
you coat them with Microscale Decal stuff to prevent them from disintegrating in
the water, just in case, as there's no more aftermarked for these early Gotha's.
Despite my own flaws, mostly the gaps between the nacelles and bottom wing
resulting from trying to correct the backwards stagger and the superglue
cleanup, I'm very happy with it, and it certainly draws attention, even from
those who have zero interest in the hobby, with it's gazillion rigging wires,
handsome color scheme and 34cm wingspan. I'll definitely do the G.IV using the
lessons learned in the future, but use Techmod decals instead.
| REFERENCES |
Windsock Datafile “Gotha!” by P.M. Grosz
First Strategic Bombers group build on Modelbrouwers Forum (in Dutch, but lots of images): http://forum.modelbrouwers.nl/phpBB2/viewforum.php?f=103
March 2009
Copyright ModelingMadness.com. All rights reserved. No reproduction in part or in whole without express permission.
If you would like your product reviewed fairly and quickly, please contact me or see other details in the Note to Contributors.