Roden
1/72
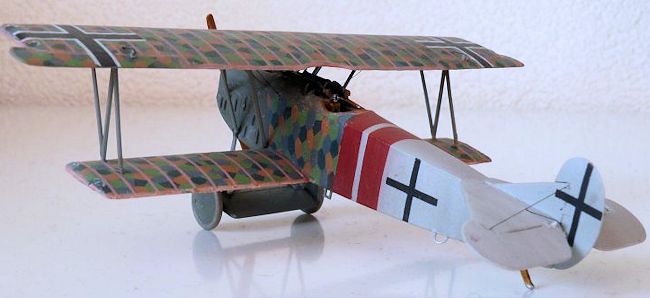
Fokker D.VII
(Late, Albatros built)
| KIT #: | 033 |
| PRICE: | €7,95 |
| DECALS: | Five options |
| REVIEWER: | Jeroen Koen |
| NOTES: | Techmod 4 color lozenge and rib tapes |
| HISTORY |
Being one of
the, if not the, most famous aircraft
to emerge in the Great War, designed by Reinhold Platz, urgently needed due to
the Albatros and Pfalz designs needing replacement, well liked by those who flew
it, respected by those who flew against it, and having a long post-war career is
probably well known, even by people who are not that much into World War 1
aviation. It is, due to it's lack of rigging and relatively simple construction,
also one of the best aircraft models to start WWI modelling with -there are many
schemes without, or close to it, lozenge fabric.
Since all of
the above is probably pretty common knowledge, let's focus a bit on the Albatros
built D.VIIs. These were known as Fokker D.VII (Alb). Albatros, and it's
subsidary, Ost-Deutsche Albatroswerke, known as OAW, were still producing
outdated D.Va and even older D.IIIs. The latter were mostly made at the OAW
plant in Schneidemühl, now in Poland. After winning the early 1918 fighter
competition, Fokker could not keep up with the massive demand for this new
aircraft, so it was decided to have Albatros, who lost out
 with their own
designs, and OAW produce the aircraft as well. Grudgingly Albatros accepted,
after being made clear that they either produce D.VIIs, or get out of the
fighter business entirely. Due to the speed things would have to move to get the
new fighter to the units at the front as quickly as possible, Fokker supplied a
basic set of drawings and sent a pattern aircraft on loan to both Albatros at
Johannistal, and OAW at Schneidemühl. Both quickly got to work; OAW copied the
pattern aircraft fairly closely, but Albatros, who were used to being one of
premier fighter designers, modified it with a few clever inventions of their
own, such as the split axle wing and a host of small refinements making
maintenance that little bit easier.
with their own
designs, and OAW produce the aircraft as well. Grudgingly Albatros accepted,
after being made clear that they either produce D.VIIs, or get out of the
fighter business entirely. Due to the speed things would have to move to get the
new fighter to the units at the front as quickly as possible, Fokker supplied a
basic set of drawings and sent a pattern aircraft on loan to both Albatros at
Johannistal, and OAW at Schneidemühl. Both quickly got to work; OAW copied the
pattern aircraft fairly closely, but Albatros, who were used to being one of
premier fighter designers, modified it with a few clever inventions of their
own, such as the split axle wing and a host of small refinements making
maintenance that little bit easier.
During it's
production run, many modifications were made, including cowling vents, exhausts,
radiators, and a host of other modifcations and improvements. The basic
powerplant was the reliable Mercedes D.III, rated in the 160hp class, but later
models provided as much as 200+ hp. Truly sought after were the BMW IIIa engined
models. Fokker designated these with an F suffix, but Albatros and OAW did not,
making identification difficult.
All factories
made their own modifications, so finding exact details without a clear photo or
a serial number is difficult best!
| THE KIT |
Three of the
sprues are used throughout the Roden series of Fokkers, and include all parts
for those other versions as well. As such, you get an extra axle wing, wheels,
and some other small parts. Sprue Z, Rodens generic engine and weapon sprue,
contains both the Mercedes and BMW engines, as well as some unused machine guns
and odds and ends. Since this sprue is used throughout most Roden German
air craft kits, quite a bit of flash is present. Detail-wise everything looks
excellent: excellent engine and guns (as far as plastic can go without photo
etch, I would say), nice ribs on the wings and subtle frame tubing shows through
the fuselage fabric. No fake linen texture there, either. Control surfaces are
moulded very thin (you can see through them when held against the light) and
have thin trailing edges.
craft kits, quite a bit of flash is present. Detail-wise everything looks
excellent: excellent engine and guns (as far as plastic can go without photo
etch, I would say), nice ribs on the wings and subtle frame tubing shows through
the fuselage fabric. No fake linen texture there, either. Control surfaces are
moulded very thin (you can see through them when held against the light) and
have thin trailing edges.
Unique to the
Albatros version is the nose/radiator and of course the fuselage halves, with
the proper louvres and asymmetric upper cowling. In the instructions you'll be
instructed to remove some of the louvres for some versions, and even some upper
cowling parts for other versions.
However,
there is a large mould blemish on the left upper wing that requires removal (it
is also present on my other two Roden D.VIIs so is apparently not an incident
with my particular kit), and quite a bit of flash everywhere.
Decals look
somewhat glossy and while the registration is decent, look like a typical Roden
affair. They look much like same type as on my Fokker E.V, and those actually
worked. There are four sheets; one each with upper and lower lozenge, one with
rib tapes, and one for the rest of the markings. The lozenge decals are not
sized to the kit, but separate bolts that you have to fit yourself. The colours
look better than what came with the E.V/D.VIII, though I can't comment any more
than that due to a lack of expertise in that area.
There are three nearly identical silvery-white tailed versions for Jasta
34b, differing only in the fuselage band, (black/white/black, double red, or
double green) and two with the black fuselages and white tails of Jasta 40.
These have either a white heart, or eagle head symbol on the side, and both of
these have no upper cowling panels, allowing a good look at the engine.
-Fokker built
(early)
-Fokker
D.VIIF with BMW engine (late)
-OAW built
(early)
-OAW built
(mid)
-Albatros
built (early)
-Albatros
built (late)
As you can
see there are still a few basic variations missing, and even then, most of those
will require small or larger modifications -ranging from engine panel removal,
cowling vents, access doors, or grab handles.
| CONSTRUCTION |
Having built
more than one Roden kit, I started out with removing all parts I would need for
my version, and cleaning them up, especially the mating surfaces, since those
seem to have a tiny amount of flash on them, making fit iffy. A tiny bit of
sanding helps a lot getting some Roden kits together. On my earlier E.V I was
positively surprised by the fit. On this D.VII I was surprised as well...
The D.VII
reminded me of two teams working on separate projects, which are supposed to be
joined together in the end. However, both teams would be working in a dark room
without guidance or contact with each other.
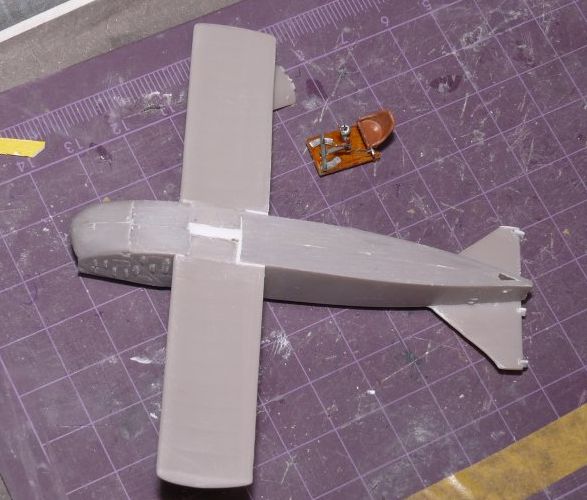
 The result
speaks for itself... the whole fuselage is about 1,5mm wider as all the parts
that are supposed to go in and around it. That includes instrument panels,
cockpit floor, wings, horizontal tail, and to top it off, the fuselage is also
about 1,5mm taller than the rudder. Sheesh!
The result
speaks for itself... the whole fuselage is about 1,5mm wider as all the parts
that are supposed to go in and around it. That includes instrument panels,
cockpit floor, wings, horizontal tail, and to top it off, the fuselage is also
about 1,5mm taller than the rudder. Sheesh!
Disappointed,
but steadfast, I first started with some sub-assemblies to see what else
awaited. The cockpit was assembled, and turned out to be too narrow, so at least
it would fit. The instrument panel (yes, the D.VII had one) would not, so it was
padded with some styrene and sanded until it fitted in the taped together
fuselage halves. The horizontal tails had their forward cut-out enlarged, only
to find out they are shorter than the fuselage by about 2mm, and the fin/rudder
did not fit any better, but I left that for later, after the halves were glued
together. That was also done with the too shallow recess in which the horizontal
tails fit, as-is they sit nearly on top of the fuselage, not only looking odd,
but also helping the rudder bottom not lining up with the bottom of the fuselage
by about 2mm. After partially assembling the engine, I tried to shove it in the
fuselage. Since this sprue is used on nearly all Roden German aircraft I had
already anticipated this not fitting at all. After removing the engine support
from the fuselage and sanding the walls paper thin, I could fit the engine. Only
the handle at the back, which is not supposed to go into the engine opening
itself, but protrude from a small opening aft of that, went wayyy to far into
the engine compartment. This also results in the exhaust not fitting, as the
cylinder closest to the cockpit is completely hidden now.
After cutting nearly all off the engine block front, leaving the cylinder
part alone, I was also able to dry-fit the radiator in place, as well as having
that handle protrude from the proper opening. A surprising benefit of this
hacking is also that the exhaust now fits properly,
and it actually clears the wing
struts there as well! Surprisingly, the radiator front is the proper width to
fit the fuselage, which is probably explained by the fact that it comes from the
same sprue as the fuselage... There are gaps and ridges all around that, so
don't expect to escape without filling and sanding!
Bored yet?
Hopefully
not, so lets turn to the interior, with which normal people building normal kits
usually start. Having established that most of the things that are supposed to
go in and around the fuselage fit now, the interior was painted up. I applied
Techmod lozenge on the sidewalls, and oversprayed that with Radome Tan to
simulate them being inside-out-lozenge fabric. Obviously the pattern should be
mirrored, but I'm not really bothered by that. I then painted the framing with
Tamiya RLM-grey/green XF-22, and applied lozenge decals to the seat. Some D.VIIs
had their seats wrapped in lozenge. Shaping a cushion from Milliput proved to be
beyond my talents. I painted the rudder pedals steel and added tiny dabs of
black and white to the instruments and compass. The stick, with typical Albatros/OAW
throttle control (nice detail) was left out for later, but painted at the same
time. I also made a rear bulkhead, and since that was fabric on the real thing
too, I applied more lozenge decals. I then made eyelets and added the Eduard
pre-painted German WWI seatbelts to the seat and rear wall, making things look
quite busy.
 Having
finished up the interior, it was time for the lower wing. First of all I sanded
off all flash and rough edges, and very carefully sanded the blemishes on the
left lower wing. Those were then polished out, and offered to the fuselage.
Obviously these were from a different sprue (or perhaps a different kit?) so
they did not fit the cut-out in the fuselage. I figured there were two ways to
fix this. Either sand away a part of the wing to make it narrower, or cut the
wing centre (on top of which the cockpit sits) and pad it with Evergreen to make
it wider. The first option sounds easy, but the wing spars are moulded on top of
the centre section, so it is quite hard to file at the wings themselves. I
didn't even try, though later read some people had made this work. One advantage
of this is not having to re-drill the strut holes for the outer wing N-struts,
since after widening the centre section these will not line up with the top wing
any more. Obviously... speaking of the top wing, after the lower one was cut and
padded with 2mm Evergreen and left to dry, I cleaned up the upper wing. This is
supposed to be straight as a plank on the top, and tapered on the bottom.
Intentional or not, on all my three Roden D.VIIs the top is bowed. Out came the
boiling water and straight piece of glass for some old fashioned straightening.
After a few attempts the shape stuck, and it was further examined and put aside
for now.
Having
finished up the interior, it was time for the lower wing. First of all I sanded
off all flash and rough edges, and very carefully sanded the blemishes on the
left lower wing. Those were then polished out, and offered to the fuselage.
Obviously these were from a different sprue (or perhaps a different kit?) so
they did not fit the cut-out in the fuselage. I figured there were two ways to
fix this. Either sand away a part of the wing to make it narrower, or cut the
wing centre (on top of which the cockpit sits) and pad it with Evergreen to make
it wider. The first option sounds easy, but the wing spars are moulded on top of
the centre section, so it is quite hard to file at the wings themselves. I
didn't even try, though later read some people had made this work. One advantage
of this is not having to re-drill the strut holes for the outer wing N-struts,
since after widening the centre section these will not line up with the top wing
any more. Obviously... speaking of the top wing, after the lower one was cut and
padded with 2mm Evergreen and left to dry, I cleaned up the upper wing. This is
supposed to be straight as a plank on the top, and tapered on the bottom.
Intentional or not, on all my three Roden D.VIIs the top is bowed. Out came the
boiling water and straight piece of glass for some old fashioned straightening.
After a few attempts the shape stuck, and it was further examined and put aside
for now.
Since the kit
was not quite challenging enough I decided in all my wisdom to separate the
rudder and elevators. The soft plastic makes this quite easy, and after cutting
off the control surfaces I made some narrow cuts and inserted strips of plastic
to act as support and simulate hinges. These were also put aside. Since the axle
wing between the wheels is also far to narrow, I used 1mm styrene on each side
as padding to widen it. This does mean the wheel axles have to be replaced, but
that was something for later. Quite a lot of sanding and filling later, the axle
wing looked acceptable.
As the
fuselage was now completely dry, I took a coarse sanding stick and sanded the
cut-out for the horizontal tail deeper, so that would fit somewhat level with
the fuselage top. A dry-fit of the fin and rudder revealed the rudder was still
too high by about 2mm. Since, as I mentioned earlier, the horizontal tail is
also too short, I also had to think about that. Cutting 2mm off the rear
fuselage would be quick, but a large area of the fuselage sides would have to
sanded back into shape to flare out towards the rudder, des roying all the
beautiful detail. I decided to take the easy way out (hah -there isn't any on
this kit, as I were to find out later!) and added a sliver of Evergreen to the
cut-out of the tail, moving it backwards and allowing it to line up with the
fuselage end. The too-short rudder was solved by sanding 1mm off the bottom of
the fuselage. Voilà! After some glue and filler, the horizontal tail, fin (off
centre to the right!), rudder and elevators were posed. One
method I did not think of at the time but might try on the next, would be
to sand 1mm or so from the mating surfaces, thinning the fuselage and making it
also easier to fair in the rudder, and shorten the fuselage -which, when
compared with the Windsock planes, is too long anyway. After much cursing and
fiddling the lower wing was also assembled into the fuselage, the engine room
flooded with superglue and the engine attached where it would mate, since I had
earlier cut off all the lugs and shelves on which it is supposed to go... I
dropped some extra where it would touch and called it quits. Then the nose piece
was added, and the whole thing left to dry with loads of clamps, tape and rubber
bands. Fortunately the Roden plastic is quite soft, so by using more than normal
amounts of glue I was able to squeeze plastic out, requiring only a small ridge
to be sanded, and virtually no gaps. Surprise!
roying all the
beautiful detail. I decided to take the easy way out (hah -there isn't any on
this kit, as I were to find out later!) and added a sliver of Evergreen to the
cut-out of the tail, moving it backwards and allowing it to line up with the
fuselage end. The too-short rudder was solved by sanding 1mm off the bottom of
the fuselage. Voilà! After some glue and filler, the horizontal tail, fin (off
centre to the right!), rudder and elevators were posed. One
method I did not think of at the time but might try on the next, would be
to sand 1mm or so from the mating surfaces, thinning the fuselage and making it
also easier to fair in the rudder, and shorten the fuselage -which, when
compared with the Windsock planes, is too long anyway. After much cursing and
fiddling the lower wing was also assembled into the fuselage, the engine room
flooded with superglue and the engine attached where it would mate, since I had
earlier cut off all the lugs and shelves on which it is supposed to go... I
dropped some extra where it would touch and called it quits. Then the nose piece
was added, and the whole thing left to dry with loads of clamps, tape and rubber
bands. Fortunately the Roden plastic is quite soft, so by using more than normal
amounts of glue I was able to squeeze plastic out, requiring only a small ridge
to be sanded, and virtually no gaps. Surprise!
After
sanding, and some minor filling, I shot a thin coat of primer and redid some
areas needing further attention. Then the interior was inserted from the top,
and the gun decking installed. Surprisingly someone must have had a good day, as
the width is perfect, but the length is short this time -easily solved with a
sliver of Evergreen. More sanding ensued, and the top wing holes were measured
out, found not to fit any more, and re-drilled. The old holes, as well as the
ones in which the centre struts are supposed to go were filled as well. After
all this, you didn't expect the struts to be of perfect length and fit their
intended holes, didn't you? ;-)
For a tenth
of a second I thought about separating the ailerons, too, but that thought was
quickly dismissed when I dry fitted the guns. These were found to sit too high,
so their openings were filed out to make them fit better, instantly forgetting
the aileron thing entirely.
| COLORS & MARKINGS |
By this time
the cockpit was stuffed with some foam and another, more even, coat of primer
shot on everything, including the parts separated from the sprue’s earlier that
had in the meanwhile also been cleaned up. Further sanding and filling was done,
and those areas touched up with primer. Satisfied, I drilled all holes for
rigging and control wires at this time. Fortunately there aren't that many on a
D.VII.
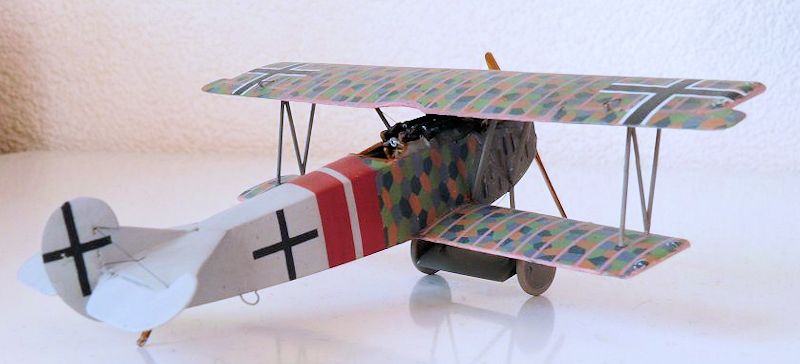
The paint
scheme I had selected turned out to be quite complex to mask and paint. I
started out with the “silvery white” rear fuselage, the unit colour of Jasta
34b. I mixed some white with aluminium and sprayed that on, using Revell Aqua.
As back then I had not mastered those, the finish was rough and uneven, but
wanting to proceed I masked and painted the red fuselage bands and painted the
nose, struts, axle wing, and a few other items Tamiya XF-22 RLM grey/green.
Unfortunately I had paint bleed from the red bands
 on the silvery white, and
wasn't very happy with that colour either. Not just the colour itself, but the
coat was too thick and rough.
on the silvery white, and
wasn't very happy with that colour either. Not just the colour itself, but the
coat was too thick and rough.
I kept the
cockpit stuffed and taped it off, then put it in a bag and sprayed oven cleaner
over it. After a few hours it was removed from the bag, to reveal a naked D.VII
again. I quickly removed the cockpit masking, hoping it would be unaffected
-which it, fortunately for now, was!
On a less
happy note I found out oven cleaner will also attack normal filler, as well as
superglue, so my engine was on the loose (quickly remedied by again opening the
superglue floodgates) and the filling and re-sanding was just another boring and
tedious step towards completion. One step forward, two back, as they say. I
re-primed, re-filled and re-sanded another time until I was happy again, and
shot my trusty enamels this time, again mixing flat white with aluminium. The
coat was on pretty good, but the aluminium highlighted some areas needing more
sanding and filling. Which, again, was done, the paint flared out, and in a
stroke of genius I kept some of the mixture to repair the damage, which was also
helpful in painting the underside tail struts later.
Leaving that
to dry I masked and painted the red bands, and since the rest would be covered
in lozenge, I freehanded the nose and top decking towards the cockpit again with
Tamiya RLM grey/green.
A small note
on the red bands of Von Greim's aircraft... in the Fokker D.VII anthology there
is a colour profile that is just like Roden's -inside the book, however, is a
picture showing the bands were pretty sloppy and uneven. I did not like that
look, so I went with German straight and tight. They might have done that on the
real aircraft, too, after all!
Since the
colour plate on the back of the box happened to be in 1/72 scale (thanks for
that, Roden!), I used it to make a paper template for the patch of lozenge that
would go on the side of the fuselage, between the red bands and the metal nose
cowling. Both sides were then applied, glued on using Dutch equivalent Future,
as apparently Techmod forgot glue on the backside making the decals fall off
immediately after they were dry without the Future. Already scratching my head
on how those decals would go over the curved wing tips later, I noticed the
Tamiya nose colour was still not entirely dry, even after a few days. I managed
to strip it off using alcohol, without damage to rest, or so it appeared...
until the patch of lozenge decal, including und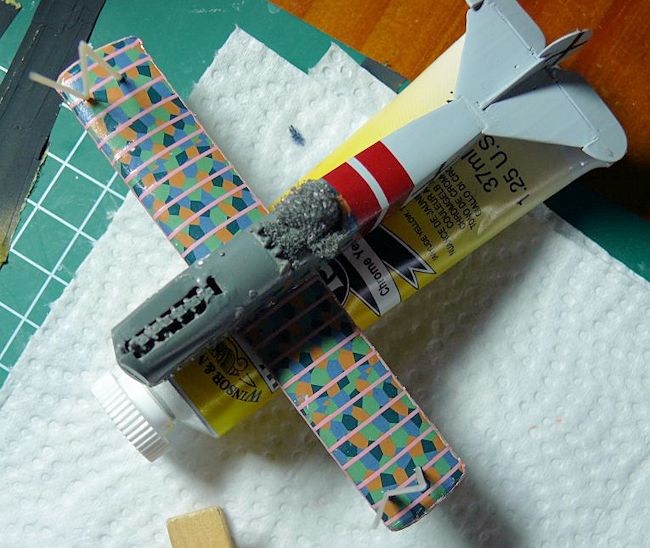 erlying paint, fell of the model.
Sigh. I scraped the rest off, but found the last bit of decal to be stuck on the
gloss red paint of the band. Forcing myself to live with the ridge, I re-shot
the nose (this time it went well and dried quickly), re-used my template and
re-applied the side decals, then the tiny bit over the top near the cockpit.
With that done, I turned to the wings....
erlying paint, fell of the model.
Sigh. I scraped the rest off, but found the last bit of decal to be stuck on the
gloss red paint of the band. Forcing myself to live with the ridge, I re-shot
the nose (this time it went well and dried quickly), re-used my template and
re-applied the side decals, then the tiny bit over the top near the cockpit.
With that done, I turned to the wings....
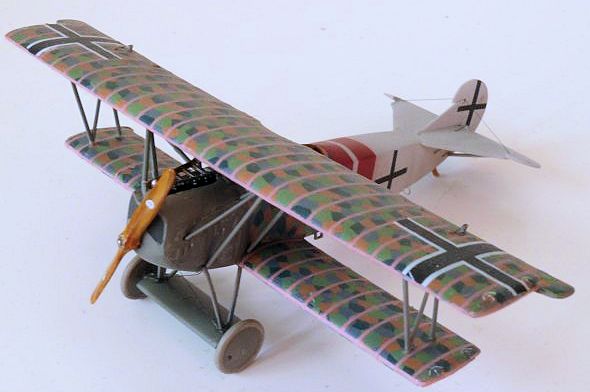
To prevent
being too long winded... HORRIBLE! The Techmod decals would neither stick nor
conform to the wing tips, flake off at the slightest touch, even after liberal
applications of Future, both underneath and on top. I lost count on how many
individual patches I had to cut and apply to fix the flaked off bits. I used
paint on many places on the wing tips. Never again Techmod lozenge.
Having
suffered through that, the rib tapes are equally bad. They don't only go on the
ribs, but also around the leading and trailing edges, as well as the wing tips.
I attempted one on the thick leading edge of the top wing, and had it either
straight or broken, so I quickly abandoned that. They are also about 1/48th
scale width, but were all I had, so I applied them to the wings nonetheless.
Slicing them in half to reduce the width results in a jagged edge and many
fractions. After liberal coats of Future before and after they still silvered. I
mixed oil pains in the appropriate shade and hand painted the leading- and
trailing 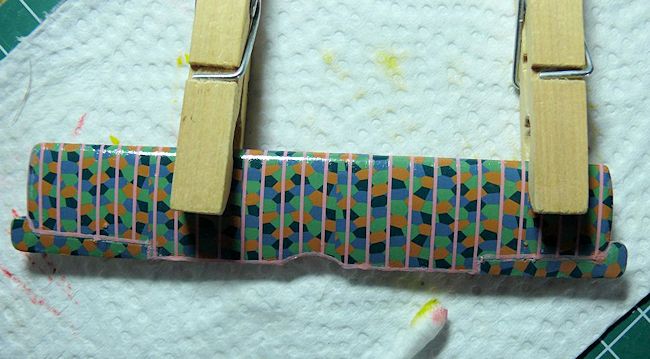 edges, as well as the wing tips and aileron outlines. The ailerons were
done separately, as they were covered spanwise. And yes, it
is noticeable! Control surfaces did
not have ribtapes applied on the real thing, so I didn't apply them to the model
either. I also shot a thin coat of Tamiya Smoke over the lozenge decals to tone
the overly bright colours down.
edges, as well as the wing tips and aileron outlines. The ailerons were
done separately, as they were covered spanwise. And yes, it
is noticeable! Control surfaces did
not have ribtapes applied on the real thing, so I didn't apply them to the model
either. I also shot a thin coat of Tamiya Smoke over the lozenge decals to tone
the overly bright colours down.
Yes, I know,
still long winded... after the purple clouds had lifted and the wings were safe
to touch I slathered the appropriate areas with wet Future and applied the Roden
decals over the lozenge. The same was done for the fuselage. I actually had only
one fuselage cross broken, but repairable, by moving it too quickly off the
backing sheet. The Roden decals take years to come loose from the backing, even
with hot water. No wonder it took me four years to finish this model.
Unlike older
Roden decals at least they did not shatter into a million pieces on contact with
water, though they are still stiff and uncooperative -and immune to any setting
solution, so I had to slice some of them to go over control surfaces.
More Future followed to hopefully safeguard them from further handling.
| FINAL CONSTRUCTION |
Being a
biplane, quite a lot of construction happens after painting. The first thing I
did was restore some of the control horns with tiny bits of Evergreen, some were
broken off, others simply missing in the original kit. I then gave the forward
cowl and control surface lines a dark grey wash, and added some very mild
chipping to the metal cowl parts.
Then it was
time for a flat coat with Revell Aqua, adding control wires and rigging with
0,06mm fishing line pulled through a black marker, and final assembly of all
pre-painted parts such as wheels, guns, propeller, struts... and top wing! :)
Obviously
this is not as simple as it sounds -dare I say that the cut-outs for the struts
in the axle wing are not deep enough, should have a slight angle, the N struts
need about 1 to 1,5mm taken off the rear bottom
 end so that that wing does not
end up too far forward and low, and that some of the other struts need a bit of
fiddling and cutting to properly fit? By the time the top wing rests on the N
struts, rest is easily adapted. After trying to fit the tail support struts on
the bottom I found out that moving the horizontal tail backwards resulted in
them being too short. Life is also too short to be bothered by now, so I glued
them where they touched. A real modeller would have replaced or lengthened them.
The long fuselage I mentioned earlier also shows up with regard of the location
of the tail skid -it sits at the proper place, but is too far forward with
regard to the tail support struts. Another reason to try to shorten the fuselage
and sand the mating surfaces from the cockpit aft to make the tail fit better on
the next one -should I ever attempt one! :-)
end so that that wing does not
end up too far forward and low, and that some of the other struts need a bit of
fiddling and cutting to properly fit? By the time the top wing rests on the N
struts, rest is easily adapted. After trying to fit the tail support struts on
the bottom I found out that moving the horizontal tail backwards resulted in
them being too short. Life is also too short to be bothered by now, so I glued
them where they touched. A real modeller would have replaced or lengthened them.
The long fuselage I mentioned earlier also shows up with regard of the location
of the tail skid -it sits at the proper place, but is too far forward with
regard to the tail support struts. Another reason to try to shorten the fuselage
and sand the mating surfaces from the cockpit aft to make the tail fit better on
the next one -should I ever attempt one! :-)
The final
items attached were the propeller, wheels, control stick, boarding step, and I
fabricated the prominent aft-fuselage grab handles from thin wire.
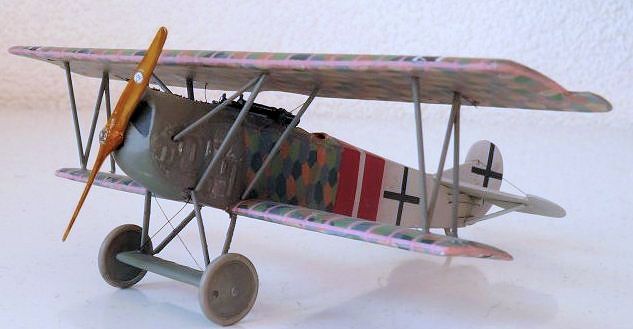
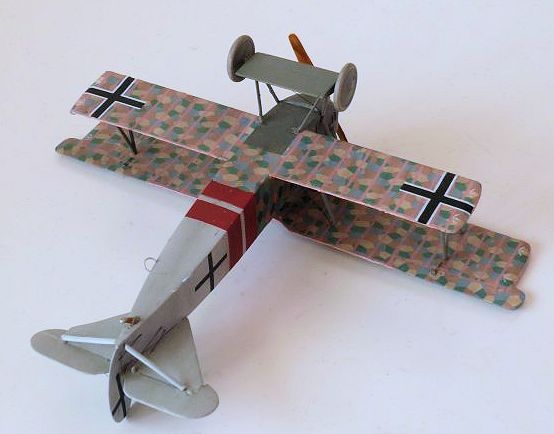
Although it
matches the drawing on the box rear perfectly, on the finished model I can't
help noticing that either the fuselage is not only too long, but also seems too
tall. Either that, or the top wing sits too low. Anyway, it is finished, and so
am I on this model! :-)
| CONCLUSIONS |
Seriously, I
am a fan of Roden kits and have more than a few of them, both built and in the
stash. They require care and patience, but are generally accurate and great to
build either out of the box or superdetailed. One of those was the Gotha -though
far more complex, it is a much better kit. I built that one somewhat
continuously in about six months. This Fokker was started for a group build
celebrating 10 0 years of Fokker in 2009, but finally extended over a period of
four years, burning me out on everything WWI in the process. So now I can say I
built it for 100 years of WWI... It was done in short stints, after getting fed
up again and again after another setback, of which there were many. Not all of
this is the kits fault of course: I made some stupid errors myself, and the
quality of the Techmod lozenge and all the problems I had with that didn't
really help progress and motivation either. The width of the fuselage in
relation to everything else is simply inexcusable, though. In the end I guess
some models just seem to attract all the bad karma!
0 years of Fokker in 2009, but finally extended over a period of
four years, burning me out on everything WWI in the process. So now I can say I
built it for 100 years of WWI... It was done in short stints, after getting fed
up again and again after another setback, of which there were many. Not all of
this is the kits fault of course: I made some stupid errors myself, and the
quality of the Techmod lozenge and all the problems I had with that didn't
really help progress and motivation either. The width of the fuselage in
relation to everything else is simply inexcusable, though. In the end I guess
some models just seem to attract all the bad karma!
I made this
review rather extensive (sorry if I got long winded!) in the hope of helping
someone to bring one of those to an end. Shake and bake it is not, but it is not
unbuildable either -if you know what to expect you can plan ahead. It'll be a
long time before I do another, at least until someone comes out with decent 1/72
lozenge decals.
Thanks to
Scott for letting me review another WWI kit, which forced me to finally get this
thing cleared off the bench to make room, and not finish it by the time we
celebrate 100 years of Fokker D.VII first flight! Stay tuned for that one later!
:-)
| REFERENCES |
Fokker D.VII
Anthology 1, 2 and 3 (Windsock Publications)
The drawing on the back of the Roden box
March 2015
If you would like your product reviewed fairly and fairly quickly, please contact the editor or see other details in the Note to Contributors.