Roden 1/32 Fokker Dr.I
| KIT #: | 601 |
| PRICE: | $35.98 MSRP |
| DECALS: | Four options |
| REVIEWER: | Otis Goodin |
| NOTES: |
| HISTORY |
 Probably all that needs to be said about
the Fokker Dr1 has already been said. It is probably the most recognizable
symbol of WWI aviation, despite the fact that only 320 were produced and
its operational life was only about a year. No doubt this fame is due to
its distinctive appearance (three wings), and the fact that it was the
final mount of the most famous ace of WWI, if not all time, Manfred von
Richtofen, aka The Red Baron.
Probably all that needs to be said about
the Fokker Dr1 has already been said. It is probably the most recognizable
symbol of WWI aviation, despite the fact that only 320 were produced and
its operational life was only about a year. No doubt this fame is due to
its distinctive appearance (three wings), and the fact that it was the
final mount of the most famous ace of WWI, if not all time, Manfred von
Richtofen, aka The Red Baron.
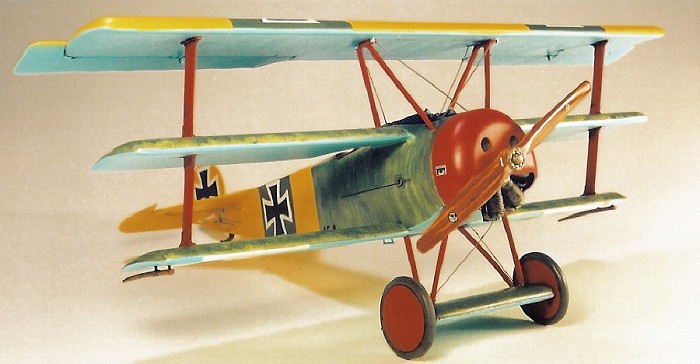
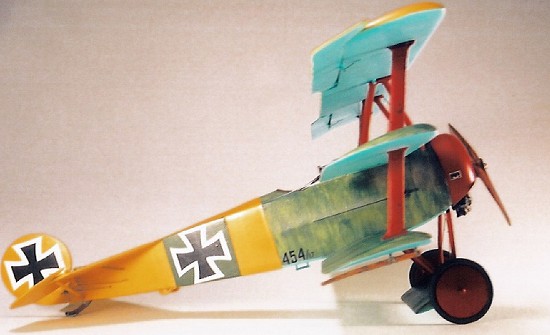
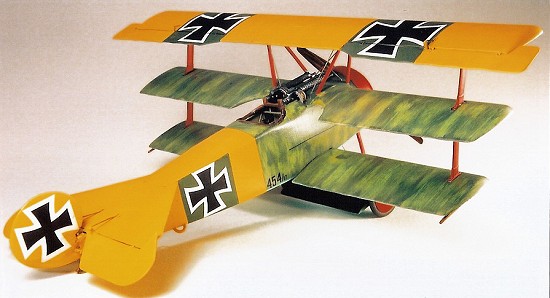
Speaking of von Richtofen, I chose to model a Dr1 flown by his brother, Lothar. No slouch himself, Lothar accounted for the destruction of 40 enemy aircraft, and was the leader of Jasta 11. A former cavalry officer, he painted his aircraft in a distinctive yellow and red motif, the yellow color representing his former cavalry regiment. Unfortunately, this airplane was destroyed in a crash on March 13, 1918 after the top wing failed. Despite severe facial injuries, Richtofen survived the crash and the war, only to be killed in a flying accident in 1922.
| THE KIT |
 The kit
is the recent 1/32 scale release by Roden. (For more details
refer to the preview
by Scott). You will find that this kit is very similar in quality to other
Roden kits, meaning that overall the kit is accurate, well molded, but
somewhat fiddly to assemble. There are some minor fit problems, but nothing
that detracts from the overall appearance of the kit. In fact, the kit
builds into a fine model of the Fokker Dr1. I am personally thrilled to see
Roden and other manufacturers produce WWI kits in 1/32 scale. Because of
the relatively small size of WWI planes, I believe 1/32 is the ideal scale
for WWI aircraft. The completed kit measures 7.25 inches long with a
wingspan of 9 inches. I compared this to a 1/48 scale version of a WWII
Japanese Frank model I have, and found that, even in the larger scale, the
Fokker Dr 1 actually takes up less tabletop space. I eagerly await more
1/32 scale kits from Roden and other manufacturers.
The kit
is the recent 1/32 scale release by Roden. (For more details
refer to the preview
by Scott). You will find that this kit is very similar in quality to other
Roden kits, meaning that overall the kit is accurate, well molded, but
somewhat fiddly to assemble. There are some minor fit problems, but nothing
that detracts from the overall appearance of the kit. In fact, the kit
builds into a fine model of the Fokker Dr1. I am personally thrilled to see
Roden and other manufacturers produce WWI kits in 1/32 scale. Because of
the relatively small size of WWI planes, I believe 1/32 is the ideal scale
for WWI aircraft. The completed kit measures 7.25 inches long with a
wingspan of 9 inches. I compared this to a 1/48 scale version of a WWII
Japanese Frank model I have, and found that, even in the larger scale, the
Fokker Dr 1 actually takes up less tabletop space. I eagerly await more
1/32 scale kits from Roden and other manufacturers.
| CONSTRUCTION |
Roden
divides construction of the kit into numerous subassemblies which are then
brought together as the completed model. I began assembly with the cockpit.
The Dr 1 was built in the usual Fokker fashion, a steel tube frame covered
by 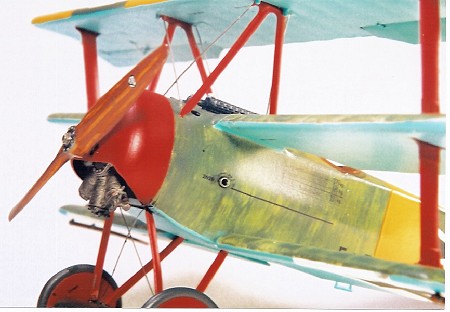 fabric, in this case clear doped linen. Roden provides all the
essentials, except for lap belts and shoulder harness, and I added these
from the Eduard set. The only other extras I added to the cockpit were some
support cables to the framework and rudder cables running along the floor.
I used invisible thread painted Steel to simulate the cables. Fit of the
parts is generally good, although I recommend constant fitting and
refitting to make sure things will close up when you glue the cockpit
halves together. Construction is complicated by the addition of ammo boxes
and the fuel tank, as well as a couple of errors in the instructions. For
instance, Part 16C, which is supposed to fit between the ammo boxes, is
shown as being located in the same position as part 22C, which extends
upward from the rudder pedals.
fabric, in this case clear doped linen. Roden provides all the
essentials, except for lap belts and shoulder harness, and I added these
from the Eduard set. The only other extras I added to the cockpit were some
support cables to the framework and rudder cables running along the floor.
I used invisible thread painted Steel to simulate the cables. Fit of the
parts is generally good, although I recommend constant fitting and
refitting to make sure things will close up when you glue the cockpit
halves together. Construction is complicated by the addition of ammo boxes
and the fuel tank, as well as a couple of errors in the instructions. For
instance, Part 16C, which is supposed to fit between the ammo boxes, is
shown as being located in the same position as part 22C, which extends
upward from the rudder pedals.
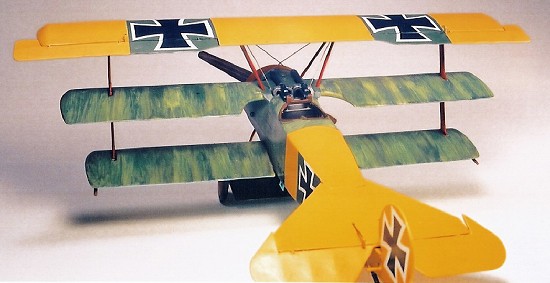
Assembly of the wings is straightforward, except for the now famous error in the instructions with the end caps. Parts 7A and 8A actually attach to the top wing instead of the middle wing. Parts 11D form the end caps for the middle and bottom wings. The ailerons and control horns on the top wing are molded separately, a nice feature. The same is true of the elevator attachment to the stabilizer. I wish all manufacturers would do this, as I really hate having to separate these parts myself. Speaking of the stabilizer, Roden has molded it with a large recessed flat area in the middle. I’m not sure what reference they were relying on, but it didn’t look like any I had ever seen before so I filled this area with plastic card that was puttied and sanded smooth.
Before completing the undercarriage assembly, I would recommend painting the axle wing, wheels, wheel covers and struts separately before assembly, especially if they are going to be different colors as was the case here.
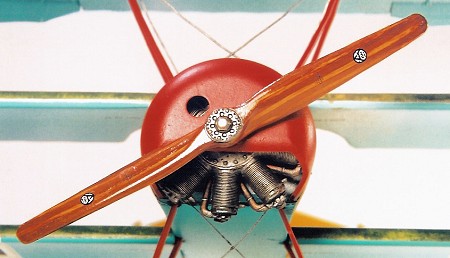 Roden
provides a really nice engine which looks great when assembled and painted.
Unfortunately, I ran into fit problems when trying to attach the engine
cowl to the fuselage, and had to remove part of the engine to make the cowl
fit over it. I had problems getting a smooth fit of the firewall to the
fuselage and that may have contributed to the cowl problems.
Roden
provides a really nice engine which looks great when assembled and painted.
Unfortunately, I ran into fit problems when trying to attach the engine
cowl to the fuselage, and had to remove part of the engine to make the cowl
fit over it. I had problems getting a smooth fit of the firewall to the
fuselage and that may have contributed to the cowl problems.
Once the various subassemblies were complete I set about putting everything together. The fuselage halves required a fair amount of filling and sanding to get a smooth finish, as did the attachment of the mid and bottom wings to the fuselage. The stabilizer went on and required only a little Mr. Surfacer to fill the gaps. I broke the rudder off a few times during assembly and painting so I would wait until the last minute before attaching it.
Compared to assembling most biplanes, attaching the wings to the triplane
was actually a snap. Care must be taken, however, to be sure that both the
mid wing and bottom wing are square and level with each other or else the
whole thing will be off. The two interplane struts are each molded as one
long strut that runs from the bottom wing, through the mid wing and
 into
the top wing. It did require some fitting, cutting and sanding to get the
struts to fit properly in the mid wing so that they would sit properly in
the bottom and top wing slots, (which I also had to enlarge) but once in
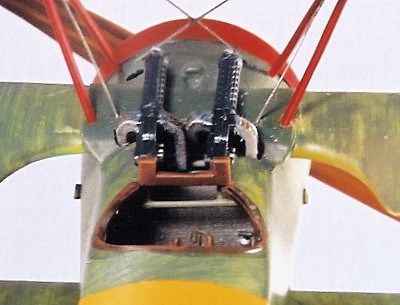
place, they were sturdy and straight. Be sure to attach the machine guns
prior to attaching the top wing. You will need to enlarge the fuselage
opening for the guns so that they will fit. Speaking of the guns, Roden
provides two sets of machine guns, one a fully molded set, and the other
set molded so that you can add photoetched cooling jackets (not included
with the kit). I am among the world’s worst at rolling and installing
photoetched jackets, and this kit proved no exception. After my failed
attempts, I opted for the fully molded set, but decided to modify them by
removing the terribly inaccurate gun sights, and replacing them with
photetched ones. This worked fine except that I kept knocking them off and
losing them until I eventually lost all four of the ones I had. So, you
will notice that these machine guns have no gun sights.
into
the top wing. It did require some fitting, cutting and sanding to get the
struts to fit properly in the mid wing so that they would sit properly in
the bottom and top wing slots, (which I also had to enlarge) but once in
place, they were sturdy and straight. Be sure to attach the machine guns
prior to attaching the top wing. You will need to enlarge the fuselage
opening for the guns so that they will fit. Speaking of the guns, Roden
provides two sets of machine guns, one a fully molded set, and the other
set molded so that you can add photoetched cooling jackets (not included
with the kit). I am among the world’s worst at rolling and installing
photoetched jackets, and this kit proved no exception. After my failed
attempts, I opted for the fully molded set, but decided to modify them by
removing the terribly inaccurate gun sights, and replacing them with
photetched ones. This worked fine except that I kept knocking them off and
losing them until I eventually lost all four of the ones I had. So, you
will notice that these machine guns have no gun sights.
Returning to the wings, since most of
the support for the top wing is provided by the interplane struts, the
cabane struts attach easily once the t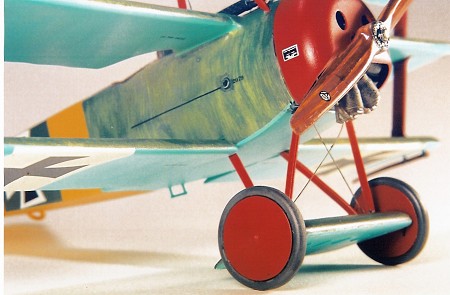 op wing is in place. However, the
instructions are less than clear on the exact location of where the cabane
struts attach to the top wing. On the underside of the top wing there are
two sets of “knobs” that represent the attachment points for the struts.
The question, though, is do the struts attach to the inside (closer to the
cockpit), outside (away from the cockpit) or in between the knobs? My
references were not clear on how the original airplane was constructed at
this point so I just decided to go with what worked best. In this case, I
attached the cabane struts to the inside of the knobs.
op wing is in place. However, the
instructions are less than clear on the exact location of where the cabane
struts attach to the top wing. On the underside of the top wing there are
two sets of “knobs” that represent the attachment points for the struts.
The question, though, is do the struts attach to the inside (closer to the
cockpit), outside (away from the cockpit) or in between the knobs? My
references were not clear on how the original airplane was constructed at
this point so I just decided to go with what worked best. In this case, I
attached the cabane struts to the inside of the knobs.
After the wings, I attached the undercarriage assembly, rear landing strut, handles, and finally the propeller. There are two choices of propellers, one obviously an Axial design and the other probably a Heine. I chose the Axial because I had the decals for it. I finished up with the remaining rigging, which is fairly minimal. I used steel wire for the rigging between the cabane struts and invisible thread painted steel everywhere else.
| COLORS & MARKINGS |
I began by painting the interior fuselage walls with Polly Scale Clear Doped Linen. To try to show the effect of the exterior streaking showing through the linen, I then painted some streaking over the painted interior, and then covered it with a thin hand painted coat of Clear Doped Linen. The effect is subtle, in fact, probably too subtle, because it is difficult to see once the model is completed. Oh well, better luck next time.
The interior framing, as well as the joystick, rudder pedals, gun mounts and other metal tubing were all painted RLM Grey. The floor and the joystick handles were painted with Gunze Wood Brown, glazed with some Brown Testor’s enamel for grain effect. The seat was painted Model Master Leather, weathered with Burnt Umber. The seat belts were painted Gunze Sail Color, also weathered with Burnt Umber. The ammo boxes, fuel tank, and various other interior parts were painted Tamiya Flat Aluminum.
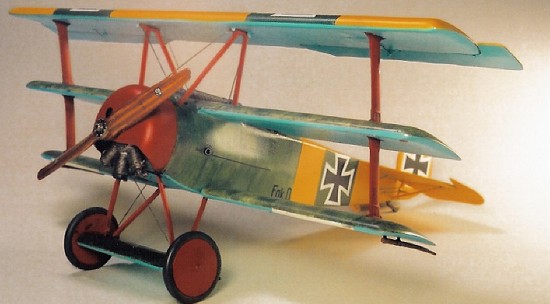 The fuselage and wings were first
painted with Polly Scale Clear Doped Linen to represent the fabric over
which the green streaking was applied. Once this was dry, I masked off the
upper portions and painted the undersides with Polly Scale USSR Underside
Blue. There are lots of references to Fokkers having their undersides
painted in a turquoise blue color. One theory is that the clear dope finish
(which actually had a yellow hue to it) applied over the blue undersides
gave it the turquoise effect. To me, the Polly Scale USSR Underside Blue
comes pretty close to turquoise. Also note the thin line of turquoise that
wraps around the bottom edge of the fuselage sides.
The fuselage and wings were first
painted with Polly Scale Clear Doped Linen to represent the fabric over
which the green streaking was applied. Once this was dry, I masked off the
upper portions and painted the undersides with Polly Scale USSR Underside
Blue. There are lots of references to Fokkers having their undersides
painted in a turquoise blue color. One theory is that the clear dope finish
(which actually had a yellow hue to it) applied over the blue undersides
gave it the turquoise effect. To me, the Polly Scale USSR Underside Blue
comes pretty close to turquoise. Also note the thin line of turquoise that
wraps around the bottom edge of the fuselage sides.
Before painting the streaking, I masked off the blue undersides. The streaking was obtained by using a thinned mix of Model Master Dunkelgrun enamel, applied with a brush I use for drybrushing. I used enamel because it dries slower than acrylic and is easily removed with paint thinner in the event it is applied too heavily in areas, which at times it was. I just kept working at it, adding and removing paint as needed. I tried to get a finish that was somewhat even overall, but making sure the streaking was applied heavier in some areas.
The cross backgrounds on the wings and fuselage of Lothar’s triplane show up darker in period photos. It is thought that the white background was painted out with the same color used to apply the streaking, so I did the same here, masking off the backgrounds and painting them with dark green. I then masked over the green areas and proceeded to paint the yellow on the top wings and back portion of the fuselage, tail and rudder. In reality, the yellow applied to the real aircraft was probably a thin coat that allowed some of the undercoat to show through. Afraid I couldn’t do that finish justice, I chose to apply a covering coat of Model Master RLM 04, Gelb.
 The top of the axle wing is painted with
Dunkelgrun, but with a much more solid effect than the rest of the
aircraft. The cowling, wheel covers, interplane, cabane and undercarriage
struts were all painted Model Master Insignia Red. The engine is a base
coat of Tamiya Metallic Gray, given a wash of Burnt Umber and drybrushed
with some Gunze Burnt Iron. The machine guns are painted Model Master Gun
Metal, drybrushed with Tamiya Metallic Gray. The wheels are painted RLM 66,
and the rigging is painted Metallic Gray.
The top of the axle wing is painted with
Dunkelgrun, but with a much more solid effect than the rest of the
aircraft. The cowling, wheel covers, interplane, cabane and undercarriage
struts were all painted Model Master Insignia Red. The engine is a base
coat of Tamiya Metallic Gray, given a wash of Burnt Umber and drybrushed
with some Gunze Burnt Iron. The machine guns are painted Model Master Gun
Metal, drybrushed with Tamiya Metallic Gray. The wheels are painted RLM 66,
and the rigging is painted Metallic Gray.
I used the kit propeller and painted it to represent the laminated construction of the real thing. I gave it a base coat of Model Master Tan, then applied thin strips of tape to represent the laminate layers. I then painted it with Gunze Wood Brown. Once dry, I removed the tape leaving a two-tone prop. I then gave it a wash of Testor’s Brown which served to unify the two colors. I gave the prop a coat of Future, applied the decals, and sealed them with a second coat.
After the painting was finished, I gave the kit my usual coating of Future to provide a glossy finish for the decals. Except for the upper wing crosses, which come from the kit, I used the Cutting Edge Modelworks Fokker Dr 1 Part 2 set from Meteor Productions for the decals. The quality is excellent, and they go on using the Microscale system. The Roden upper wing crosses should be applied with just water and a soft cloth or brush to press out the bubbles. Roden seems to have improved their decals immensely for this kit. Once the decals had set up, I sealed them with another coat of Future. After some minor highlighting with Model Master Burnt Umber enamel, the whole thing was finished off with a coat of Polly Scale Satin Finish.
| CONCLUSIONS |
Despite the minor fit problems, this was a most enjoyable kit to build. I think any modeler of modest skills could successfully complete it. Working in 1/32 is much easier on the hands and eyes, and I look forward to other kits from Roden and other manufacturers. The Fokker Dr 1 offers a multitude of markings to model, and I plan to learn from my mistakes on this one to build better ones in the future.
October 2005
If you would like your product reviewed fairly and quickly, please contact me or see other details in the Note to Contributors.