Wingnut Wings 1/32 Pfalz D.XII
| KIT #: | 32019 |
| PRICE: | $69.00 |
| DECALS: | Two options |
| REVIEWER: | Otis Goodin |
| NOTES: | Superb kit all the way around. |
| HISTORY |
 Although
its square tipped wings often led Allied pilots to confuse it with the Fokker,
performance deficiencies made the differences obvious to the Jasta pilots who
had to fly it. While the Pfalz was as fast as a Fokker in level flight and even
faster in a dive, it could not climb well over 3000m and, fatally, it was not as
maneuverable in combat. A few Pfalz were equipped with the coveted BMW IIIa
engine and managed to compare quite favorably with the Fokker. But alas the BMWs
were hard to come by and those that did were more often than not assigned to the
Fokker DVII which, by the time the Pfalz had its bugs worked out, was the
favorite aircraft of the German Air Service. A few Pfalz DXII survived the war.
One is at the NASM in Washington DC where it sports its inaccurate red color
scheme from its appearance in the movie
The Dawn Patrol.
Another is owned by the Seattle Museum of Flight (formerly the Champlin Fighter
Museum). There is also one in Paris and one at the Australian War Memorial ANZAC
Hall. The Australian version is essentially the model shown here, although there
are some slight differences in the camouflage.
Although
its square tipped wings often led Allied pilots to confuse it with the Fokker,
performance deficiencies made the differences obvious to the Jasta pilots who
had to fly it. While the Pfalz was as fast as a Fokker in level flight and even
faster in a dive, it could not climb well over 3000m and, fatally, it was not as
maneuverable in combat. A few Pfalz were equipped with the coveted BMW IIIa
engine and managed to compare quite favorably with the Fokker. But alas the BMWs
were hard to come by and those that did were more often than not assigned to the
Fokker DVII which, by the time the Pfalz had its bugs worked out, was the
favorite aircraft of the German Air Service. A few Pfalz DXII survived the war.
One is at the NASM in Washington DC where it sports its inaccurate red color
scheme from its appearance in the movie
The Dawn Patrol.
Another is owned by the Seattle Museum of Flight (formerly the Champlin Fighter
Museum). There is also one in Paris and one at the Australian War Memorial ANZAC
Hall. The Australian version is essentially the model shown here, although there
are some slight differences in the camouflage.
| THE KIT |
Wingnut Wings released the Pfalz DXII kit in August
2011. I was very happy to see it as very few DXIIs have been produced as models,
and, to my knowledge, none in 1/32 scale. As usual, the quality is terrific and
certainly sets a new standard for models of this aircraft. Five versions of the
DXII are offered in the kit: (1) Aircraft number 1394/18 sporting a gray
fuselage with blue trim; (2) 1445/18, also with a gray fuselage, but with red
markings; (3) 2454/18 “K1”, probably the most familiar version of this machine,
 sporting a
four color fuselage with black markings on the rear section (a second version of
this aircraft is also shown minus the purple and pale green on the fuselage);
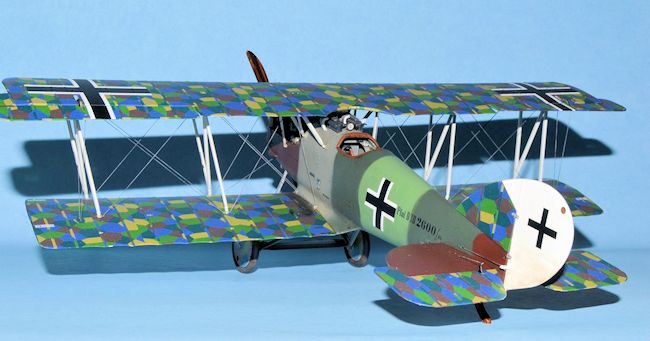
(4) 2486/18, a similarly marked version flown by Paul Vogel; and (5) 2600/18,
the version shown here. When this aircraft was originally shipped to Australia
after the war, notes about the aircraft stated that it was “old, could be rigged
complete but not flown.” Other than that, very little is known about the
aircraft although it is believed to have seen operational use. The aircraft has
had numerous repairs, paint touch ups, etc. over its life, and was last given a
complete restoration in 2008.
sporting a
four color fuselage with black markings on the rear section (a second version of
this aircraft is also shown minus the purple and pale green on the fuselage);
(4) 2486/18, a similarly marked version flown by Paul Vogel; and (5) 2600/18,
the version shown here. When this aircraft was originally shipped to Australia
after the war, notes about the aircraft stated that it was “old, could be rigged
complete but not flown.” Other than that, very little is known about the
aircraft although it is believed to have seen operational use. The aircraft has
had numerous repairs, paint touch ups, etc. over its life, and was last given a
complete restoration in 2008.
The kit contains five sprues of gray plastic, a clear
parts sprue, a photo etch panel for seat belts and guns, and 2 pages of
exquisite decals. The lozenge decals have the rib tapes already added making
application much simpler. Wingnut Wings continues to find ways to make
construction of WWI aircraft easier, eliminating many of the barriers (and
excuses) for not building them.
| CONSTRUCTION |
 painting a
bedroom or working on your car. If you like you can add a little rigging in the
cockpit but don’t go overboard because most of it won’t be seen.
painting a
bedroom or working on your car. If you like you can add a little rigging in the
cockpit but don’t go overboard because most of it won’t be seen.
After the cockpit is complete
attach the engine bay which consists of a rear wall, two horizontal support
beams and three support formers designed to connect it all together. This is
attached to the completed cockpit bay. If you like you can add the fuel tank,
ammo magazine and empty belt container, although the instructions don’t mention
this for a couple of pages.
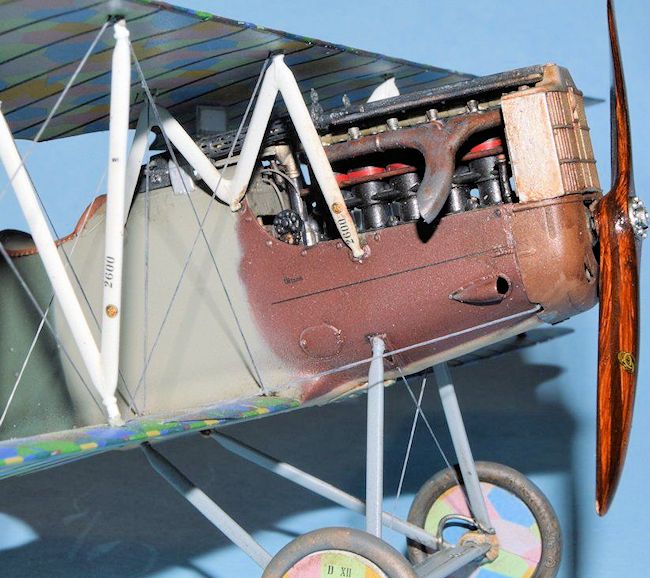
The engine is next on the agenda
and Wingnut provides a lot of detail, good instructions and some great pictures
of the real thing for your reference. I’ll say what I always say about these
engines: You have enough information to detail them to your heart’s content, or
you can simply build it as provided and still end up with a very nice looking
engine. How much of the engine you wish to display will probably determine the
level of detail you wish to add. The Pfalz mostly flew with the 200hp
Daimler-Mercedes IIIa engine, and we’ve seen these in a few other kits. After
completing the engine I left mine aside and installed it later.
Next the cockpit and engine bay are
installed in the left fuselage half, to which is then joined the right half. I
recommend spending a little extra time here making sure everything fits
correctly before gluing the halves together. I’m not sure I installed mine in
exactly the right spot as I later had some issues attaching the front cowling
and radiator. I would use these pieces to make sure the
 cockpit/engine
bay is far enough back in the fuselage. I think mine should have been about an
eighth of an inch deeper because the front cowling wouldn’t fit right until I
carved away some of the front of the engine. Once everything was installed it
doesn’t show, but better to solve this problem beforehand instead of after the
cockpit is installed. Once the fuselage was joined some minor puttying was all
that was needed to eliminate any seams.
cockpit/engine
bay is far enough back in the fuselage. I think mine should have been about an
eighth of an inch deeper because the front cowling wouldn’t fit right until I
carved away some of the front of the engine. Once everything was installed it
doesn’t show, but better to solve this problem beforehand instead of after the
cockpit is installed. Once the fuselage was joined some minor puttying was all
that was needed to eliminate any seams.
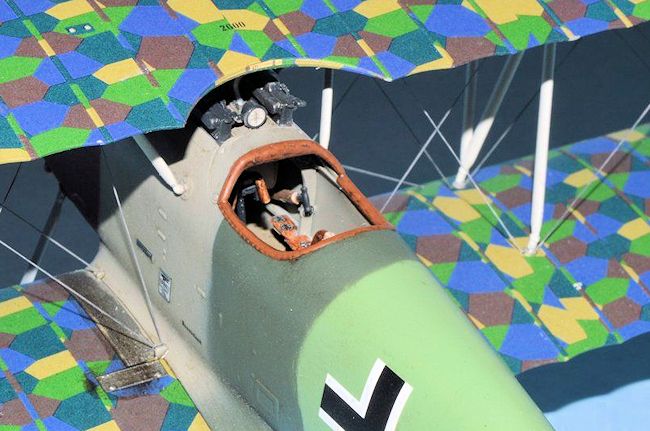
Next up was the cockpit coaming and
machine guns. Instead of the photo etch guns supplied by Wingnut, I used a set
of Spandaus I purchased from Ultracast. The big advantage to these is that the
cooling jackets are already rolled, something that I have never been very good
at. The guns are made by Master, from Poland, and although a bit expensive
($16.95), it’s worth it to me to end up with better looking guns. I put off the
gun installation until later, but this is a good time to install the coaming and
tend to any of the details associated with it, including some of the wiring. I
also test fit but did not install the cover that fits over the machine gun bay,
as well as the tachometer, although I did paint and decal it. These parts were
installed before the top wing was added. I also painted and weathered the
radiator, but saved it for later.
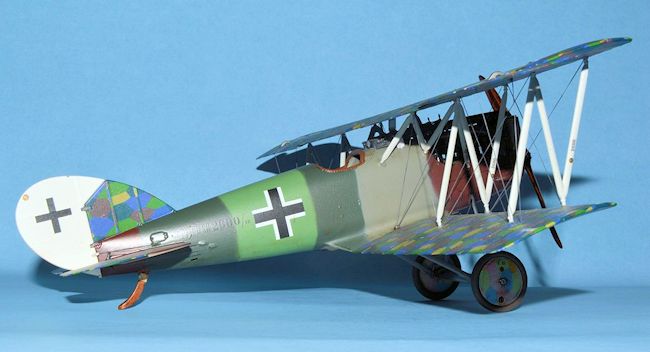
 I glued the bottom wing section to the fuselage,
then added the horizontal tailplane, the vertical fin and a few fuselage scoops.
I painted and put aside the rudder and rear flaps. Take care when adding the
flaps as each one is separate, although they should both occupy the same angle
whether you display them in an up, down or neutral position.
(At this stage I chose to paint the fuselage which I
will cover in the next section).
I glued the bottom wing section to the fuselage,
then added the horizontal tailplane, the vertical fin and a few fuselage scoops.
I painted and put aside the rudder and rear flaps. Take care when adding the
flaps as each one is separate, although they should both occupy the same angle
whether you display them in an up, down or neutral position.
(At this stage I chose to paint the fuselage which I
will cover in the next section).
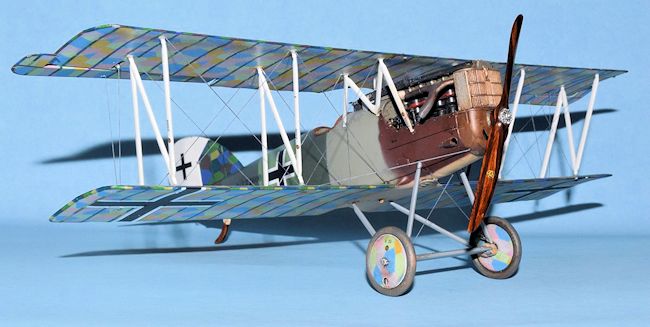
Following this I installed the
engine, machine guns and the flash guards. The flash guards were a little
tricky, but they sure add a lot to the engine/gun assembly. I decided to wait on
the exhaust, and also decided not to install the side cowlings to show more of
the engine.
Next it was time to install the
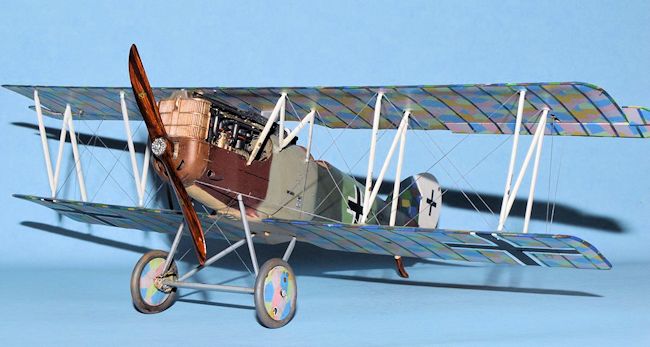
cabane struts in preparation for installing the top wing. Following that I began
to add the EZ Line for rigging to the underside of the top wing. It’s tedious
but not technically difficult (although I was cross eyed by the time I
finished). I drill the holes in the underside of the top wing just a little
deeper than they are from the factory. I then add the lines one at a time,
placing a small drop of super glue in the hole then using a pair of cross grip
tweezers to carefully place the EZ Line in place. Once all the lines were in
place I installed the top wing onto the cabane struts and let it set up
overnight. The next day I began adding the interplane struts. It does matter
which struts go where so be sure to follow the instructions and keep them
identified while painting and decaling before assembly. The interior struts are
slightly shorter than the exterior ones. I installed the struts, interior ones
first, taking care not to get all the loose unattached rigging tangled up with
the struts.
Once all the struts were in place
and dry I then finished installing the rigging for the wings. I had previously
drilled holes all the way through the bottom wing in the designated locations
with a pin vise and a number 78 drill bit. You could use a number 80 bit but
it’s a little harder to get the squiggly EZ Line through the holes. Once I pull
the line through the hole I use my cross grip tweezers to grab the line and hold
it in place while I put a drop or two of super glue in the hole on the bottom
side of the lower wing.
 After
letting it set up for about a minute I just move on to each line until they are
all done. I then trim off the excess line and add a little more super glue to
each spot to complete the job. Wingnut Wings has included some individual
lozenges on the decal sheets that you can use to further cover the exit holes
for the rigging. Wingnut has information on their web site for a different
method of attaching the rigging without drilling all the way through the wing. I
haven’t tried it yet, but I’m sure it works well and you don’t have to worry
about patching the holes in the bottom of the wing.
After
letting it set up for about a minute I just move on to each line until they are
all done. I then trim off the excess line and add a little more super glue to
each spot to complete the job. Wingnut Wings has included some individual
lozenges on the decal sheets that you can use to further cover the exit holes
for the rigging. Wingnut has information on their web site for a different
method of attaching the rigging without drilling all the way through the wing. I
haven’t tried it yet, but I’m sure it works well and you don’t have to worry
about patching the holes in the bottom of the wing.
Once the top wing was installed and
rigged it was time to finish things up. The landing gear is a well designed
piece that looks authentic, although it’s not very strong, especially when
supporting the finished airplane. Use care here, and I recommend assembling as
much of it as possible, including the wheels, before attaching it to the
fuselage. The rear flaps were added to the horizontal stabilizer; the exhaust,
radiator and tail skid installed, and finally the propeller was attached. Final
rigging of the undercarriage and the tail section complete the job.
| COLORS & MARKINGS |
 The engine crankcase was painted MM Aluminum and
the upright cylinders were painted Gun Metal. The rocker boxes were painted MM
Jet Exhaust, and a few small parts were picked out in brass. The exhaust was
painted an initial coat of Jet Exhaust, then drybrushed with MM Rust as well as
some dark gray to represent smoke discoloration. Decals were applied to the
engine and to the exhaust per the instructions prior to any weathering. The
whole engine area was then weathered with a wash of Burnt Umber and Black.
The engine crankcase was painted MM Aluminum and
the upright cylinders were painted Gun Metal. The rocker boxes were painted MM
Jet Exhaust, and a few small parts were picked out in brass. The exhaust was
painted an initial coat of Jet Exhaust, then drybrushed with MM Rust as well as
some dark gray to represent smoke discoloration. Decals were applied to the
engine and to the exhaust per the instructions prior to any weathering. The
whole engine area was then weathered with a wash of Burnt Umber and Black.
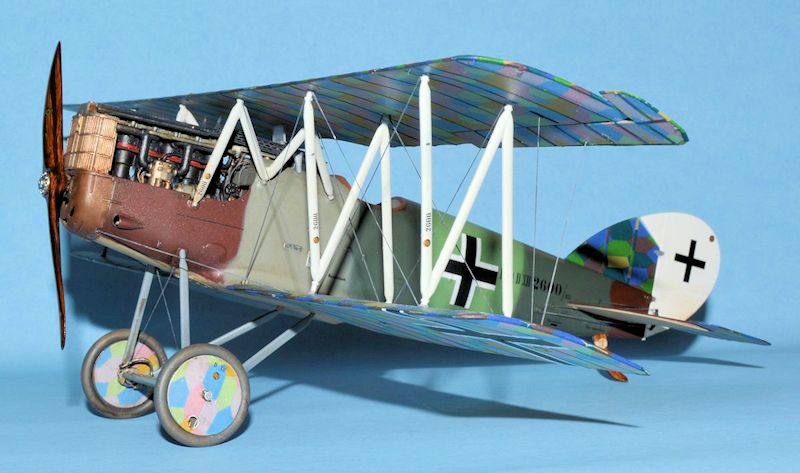
The assembled fuselage was painted
in the four color pattern typical of these aircraft although instead of purple
this aircraft used dark brown. The colors applied were Gunze Cocoa Brown, RLM
Grau, MM Dunkelgrun, MM Pale Green, Dunkelgrun again, followed by another shot
of Cocoa Brown at the rear. The horizontal tailplanes were also painted brown.
The front half of the fuselage underside and the bottom of the tailplanes were
painted Gunze Radome Tan to represent the creamy dope applied here. The fuselage
was then given a coat of Future after which the decals were applied. The
undercarriage was painted in MM Neutral Gray, while the tires were painted in MM
Schwarzgrau RLM 66 then weathered in a lighter gray and some Tamiya Buff. The
front lower cowling was also painted Buff to represent the “light chocolate”
color indicated in the notes from the Australian War Museum.
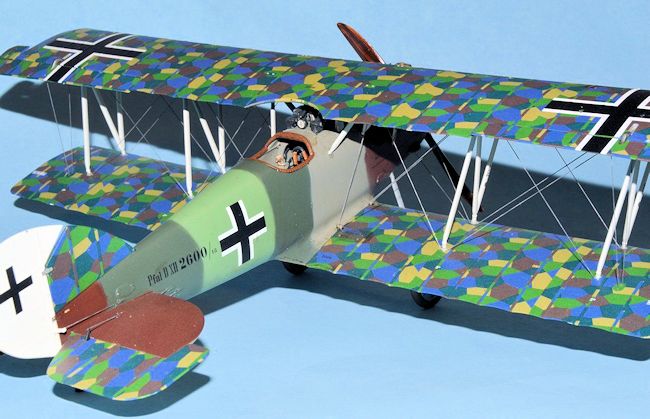
As mentioned earlier, having the
rib tapes already included as part of the lozenge decals made application of the
lozenge much easier and faster. The first step is to paint the surfaces to be
covered in lozenge. As a rule I use RLM Grau but I think any neutral color w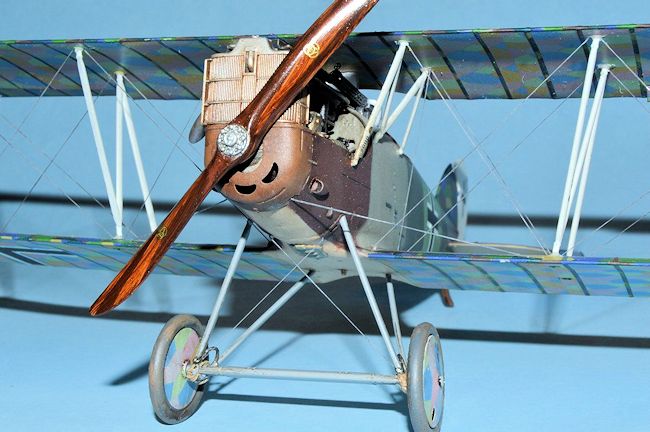 ould
work fine. Next I sprayed the surfaces with a good coat of Future to give a
glossy finish for the decals to adhere to. The lower lozenge was applied first
making sure to line up the rib tapes with the ribs. The upper surfaces were then
applied. In addition to the rib tapes for the ribs, the upper surface lozenge
also includes tapes for the edges so be sure to allow some overlap for these.
Although Wingnut tells you not to, I used a good amount of MicroSol to get the
edges to lay down. It didn’t cause any problem with the decals, although the
recommended method is to use a hair dryer to get the decals to conform to the
surface. I’ve never had any success with that method so I’ll continue using my
MicroSol as long as it works. After the wings and flaps were covered I installed
the lozenge for the vertical fin and the wheel covers.
ould
work fine. Next I sprayed the surfaces with a good coat of Future to give a
glossy finish for the decals to adhere to. The lower lozenge was applied first
making sure to line up the rib tapes with the ribs. The upper surfaces were then
applied. In addition to the rib tapes for the ribs, the upper surface lozenge
also includes tapes for the edges so be sure to allow some overlap for these.
Although Wingnut tells you not to, I used a good amount of MicroSol to get the
edges to lay down. It didn’t cause any problem with the decals, although the
recommended method is to use a hair dryer to get the decals to conform to the
surface. I’ve never had any success with that method so I’ll continue using my
MicroSol as long as it works. After the wings and flaps were covered I installed
the lozenge for the vertical fin and the wheel covers.
Before installing the top wing the
Spandau machine guns and the flash guards were painted with Gun Metal and
highlighted with a little aluminum and rust. The wing struts were all painted
with Model Master Lichtgrau, then Futured and decaled as needed. The windshield
frame was painted Aluminum and it was applied with clear parts cement.
The whole model was given a coat of Clear Satin finish to tone down the glossiness of the Future. Before installation the propeller was painted MM Tan, the laminations masked off and painted a darker shade, then the whole thing given a treatment of Griffin’s Burnt Umber to complete the wood finish. The prop was then given a coat of Future, the decals added, and another coat of Future applied.
| CONCLUSIONS |
I thoroughly enjoyed building the Pfalz DXII and
I’m pretty pleased with the result. I believe this is one of the easier Wingnut
Wings kits to build and I heartily recommend it to wingnuts of all persuasions.
If you’ve never built WWI before this is a good place to start, and, if you
have, there’s plenty of challenge to keep you motivated.
Viel Gluck!
| REFERENCES |
Windsock
Datafile No. 41, Pfalz D.XII, P.M. Grosz; Windsock Worldwide, Vol.27, No.5;
Wingnut Wings Pfalz DXII kit instructions
Otis Goodin
October 2014
If you would like your product reviewed fairly and fairly quickly, please contact the editor or see other details in the Note to Contributors.