Airfix 1/72 Albatros D.Va
| KIT #: | ? |
| PRICE: | ? |
| DECALS: | One option |
| REVIEWER: | Stephen Foster |
| NOTES: |
| HISTORY |
The Albatros DV was a derivative of the earlier and very successful
D III single seat scout and employed the same sesquiplane layout (where the
lower wing has a much narrower chord than the upper wing. This gives better
manoeuvrability but at the cost of structural weakness). One of the design
changes in the D V was that the fuselage was made into an oval cross
section, not flat sided like the D III
 so that
the attachment of the lower wing to the fuselage had to be changed. The
wings of the D V were attached to stub sections built into the fuselage in
order to maintain the same span but these joints were not properly tested
and were a point of serious weakness such that when the machine was put into
a steep dive the stresses which caused the wing to twist (a feature of the
sesquiplane layout), placed so much strain on the wing root joint that it
failed with catastrophic results for the pilots, several of whom crashed and
were killed as a result. No solution to this problem was found and as a
result pilots were at a disadvantage against opposing machines which could
escape by turning into a steep dive. Furthermore the overall performance of
the D V was little better than the D III it was intended to replace, but
such was the pressure on the German Airforce that they continued to use the
D Va, a strengthened version of the D V, in considerable numbers until
November 1918.
so that
the attachment of the lower wing to the fuselage had to be changed. The
wings of the D V were attached to stub sections built into the fuselage in
order to maintain the same span but these joints were not properly tested
and were a point of serious weakness such that when the machine was put into
a steep dive the stresses which caused the wing to twist (a feature of the
sesquiplane layout), placed so much strain on the wing root joint that it
failed with catastrophic results for the pilots, several of whom crashed and
were killed as a result. No solution to this problem was found and as a
result pilots were at a disadvantage against opposing machines which could
escape by turning into a steep dive. Furthermore the overall performance of
the D V was little better than the D III it was intended to replace, but
such was the pressure on the German Airforce that they continued to use the
D Va, a strengthened version of the D V, in considerable numbers until
November 1918.
| THE KIT |
The
Airfix Albatros DV a is an old kit as it was one of the first to be issued
by the company in 1957. It is therefore pretty basic by today's standards,
yet for many years it was one of only a few WW1 aircraft in 1/72 scale. It
was re-issued a couple of years ago with new transfers but the moulds were
the originals. Compared with some modern offerings this is a bit of a
challenge to make into a good model, but the effort required is actually not
all that great and a reasonable replica can result if a little time and care
is taken with it as I hope to show. In spite of what has been written in
articles about the size and shape of the fuselage aft of the cockpit, in
fact it is the nose which is too short and shallow. This is very difficult
 to put
right so it is best left alone as very few people are able to tell anyway. I
made some other modifications which I will describe below but it is for the
individual modeller to decide how much restoration and detailing (if any) to
add.
to put
right so it is best left alone as very few people are able to tell anyway. I
made some other modifications which I will describe below but it is for the
individual modeller to decide how much restoration and detailing (if any) to
add.
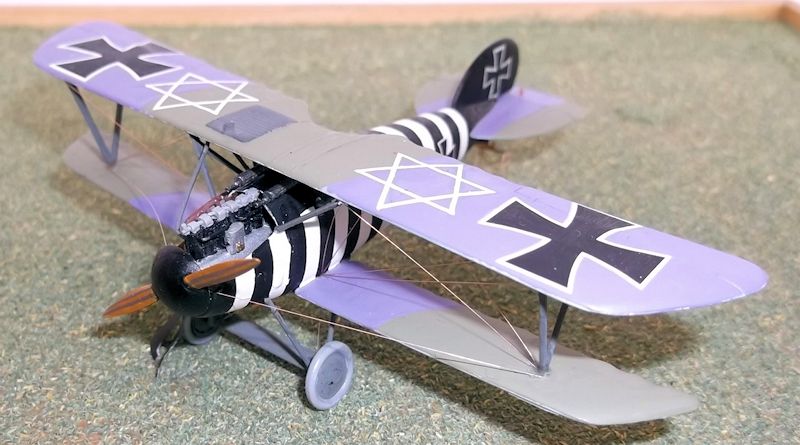
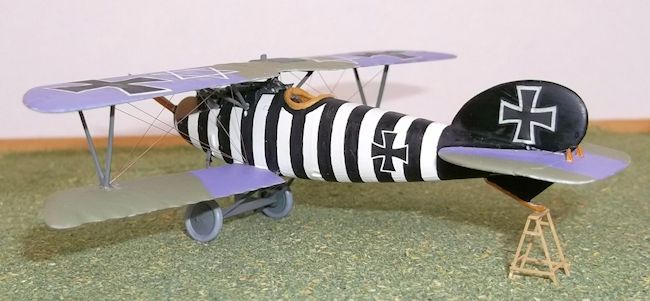
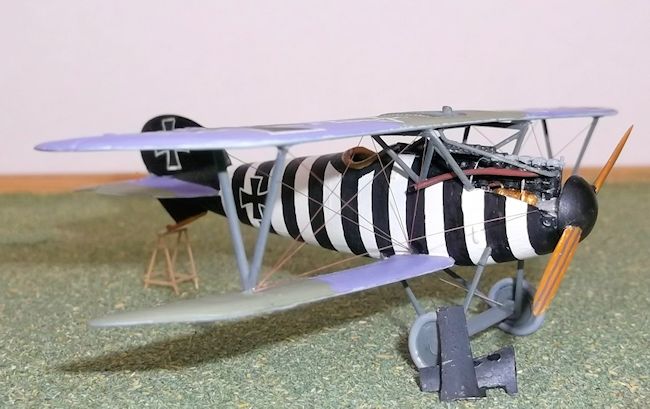
I was inspired to make this model in part by an article by Lol Watson on the Airfix Tribute Forum and in order to take a trip down memory lane. When I was a teenager I did not have the skills to carry out conversions or elaborate painting schemes and was a bit frustrated as a result. Then I saw in a boys comic an article about a German WW1 pilot who flew an Albatros DV with zebra stripe markings and I decided to paint a model in this scheme. I do not remember who the pilot was and as there were several aircraft marked in different variants of zebra striping I cannot now be sure who the subject of the article was. However a little research on the internet led me to the riseofflight.com website and an image of an aircraft flown by Ltn. Rudolf Windisch of Jasta 32 in the summer of 1917 and I chose this to be the subject of my model. Windisch started flying bombers and reconnaissance sorties on the Eastern Front in 1916, but transferred to fighters in early 1917 and was posted to Jasta 32 where he adopted the scheme illustrated on the rise of flight page. He was credited with 8 victories with Jasta 32 and transferred to become commander of Jasta 66 in February 1918, where he was credited with another 14 victories before he was forced down and disappeared on 27 May 1918. His fate is not known. According to the rise of flight website two versions of his personal scheme are recorded in photos with wider borders to the national crosses and wider lines for the stars.
| CONSTRUCTION |
This is a simple kit to construct but it has no internal detail at
all so at least a seat and bulkhead at the rear of the cockpit should be
added. Seat belts are easily made from paper and a control stick from rod if
necessary, but fortunately little can be seen of the cockpit interior when
the top wing is on. The engine is crude to say the least and in my kit was
missing altogether, so I decided to make an engine from scratch using
laminated card to make the block and thick sprue filed to the correct
diameter for the cylinders. Scraps of card and rod were used for the
cylinder heads and rocker arms and fuse wire for
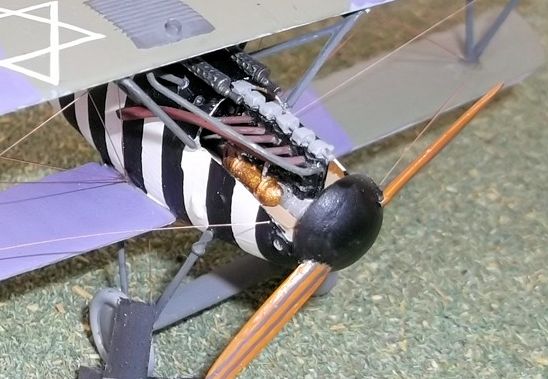 the
pipes on the sides. Stretched sprue was used for the inlet pipes and an oil
tank was made from sprue filed to shape. A new exhaust system was made from
rod and card. The engine covers were cut from the fuselage and new ones made
from 10thou card which was bent around the handle of a paintbrush. A new
spinner was shaped from laminated card and new propellor blades were cut and
shaped from card.
the
pipes on the sides. Stretched sprue was used for the inlet pipes and an oil
tank was made from sprue filed to shape. A new exhaust system was made from
rod and card. The engine covers were cut from the fuselage and new ones made
from 10thou card which was bent around the handle of a paintbrush. A new
spinner was shaped from laminated card and new propellor blades were cut and
shaped from card.
The lower
wing to fuselage joint is poor and needs packing with 10 thou card. Check this
carefully before assembly and glue the card to the underside of the fuselage
first. When fixing the wing check carefully for alignment and then fill the gaps
with filler and rub down. The tail unit comes in two pieces which also do not
fit well so I removed the elevator, glued the stabilisers to the fuselage and
filled the gaps and rubbed them smooth. I then cut a new elevator from 30 thou
card, sanded it to aerofoil section and glued it into place. The holes for the
cabane struts on the left side of the fuselage are also too low and should be
filled and new ones drilled. Use the positions of the holes on the right side as
a guide as these are in the correct places. The machine guns are best thrown
away and replaced with those from another kit or, as in my case, I managed to
find some from Aeroclub, although these are very rare now. I added the cartridge
chutes to the guns from card. I also drilled a hole for the return pipe from the
wing radiator on the left fuselage side. The undercarriage legs fit reasonably
well but a little filler may be needed in the holes. I also added the ends of
the legs between the top of the lower wing and fuselage and the small rings
around the top of the front legs but again this are very minor details. I added
a rectangle of 10 thou card with one side scored under the top wing t represent
the lower side of the radiator and drilled two holes to take the radiator pipes.
| COLORS & MARKINGS |
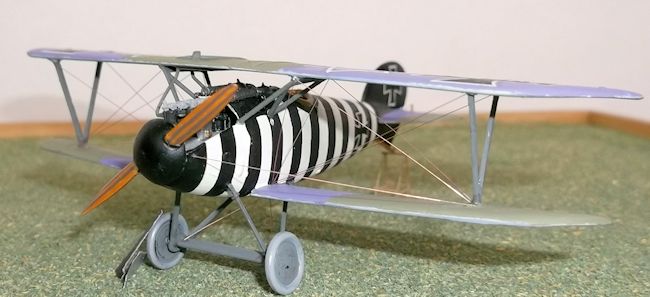 carefully
measured and marked with pencil dots. I hand painted the stripes as trying to
mask them was almost impossible on the tapering fuselage sides. The underside of
the wings and tail were painted in Humbrol light blue (H 42) and the upper
surfaces Humbrol purple (H 44) and Revell green (SM 362). These are close enough
to the original colours which varied considerably anyway. The engine cylinders
and guns were painted black with a little silver mixed in to give a metallic
sheen, and the engine block silver with a little grey. Struts, radiators and
radiator pipes, undercarriage legs and wheel discs were RLM grau, tyres light
grey. The tail skid was light wood as were the propellor blades. The dark
laminae were Humbrol Brown Bess (an old colour no longer available). The exhaust
was rust (H 113). The crosses on the wings and fuselage should have come from
the kit but mine did not have any. Sadly Airfix did not reply to my request for
a set but I managed to find some courtesy of a kind fellow modeller. The tail
crosses were from an old set of transfers which I found in my spares box. The
stars of David were made from Letraset lines touched in with white paint.
carefully
measured and marked with pencil dots. I hand painted the stripes as trying to
mask them was almost impossible on the tapering fuselage sides. The underside of
the wings and tail were painted in Humbrol light blue (H 42) and the upper
surfaces Humbrol purple (H 44) and Revell green (SM 362). These are close enough
to the original colours which varied considerably anyway. The engine cylinders
and guns were painted black with a little silver mixed in to give a metallic
sheen, and the engine block silver with a little grey. Struts, radiators and
radiator pipes, undercarriage legs and wheel discs were RLM grau, tyres light
grey. The tail skid was light wood as were the propellor blades. The dark
laminae were Humbrol Brown Bess (an old colour no longer available). The exhaust
was rust (H 113). The crosses on the wings and fuselage should have come from
the kit but mine did not have any. Sadly Airfix did not reply to my request for
a set but I managed to find some courtesy of a kind fellow modeller. The tail
crosses were from an old set of transfers which I found in my spares box. The
stars of David were made from Letraset lines touched in with white paint.
| FINAL CONSTRUCTION |
| CONCLUSIONS |
For a kit of its age this stands up well. These old kits are simple and by today's standards crude, but they are cheap and very easy to make. It is up to the individual modeller what detail or refinement to add but with a little effort a presentable model can be made which looks a good deal more expensive than it really cost. In addition the number of different colour schemes to choose from is huge. German fighters in WW1 were some of the more colourful wartime machines and no two were the same. They do not need to be complicated to achieve a dramatic effect as I hope mine shows, but you can have an individual model with just a paint job.
Back to the Previews Index Page
Back to the Previews Index Page