
Eduard 1/72 Fokker Dr.I
| KIT #: | Various |
| PRICE: | $10.00 - $20.00 |
| DECALS: | One to five options |
| REVIEWER: | Bill Michaels |
| NOTES: | Multiple builds |
| HISTORY |
The Fokker Dr.1 Triplane needs no introduction, so I won't attempt to cover material already covered in depth in multiple reviews here and elsewhere.
Back in late 2020, I built
the newer Revell 1/72 Fokker Dr.1. That kit was molded in bright red plastic. At
the time, I didn't want to do the “done to death” all-red triplane of Ma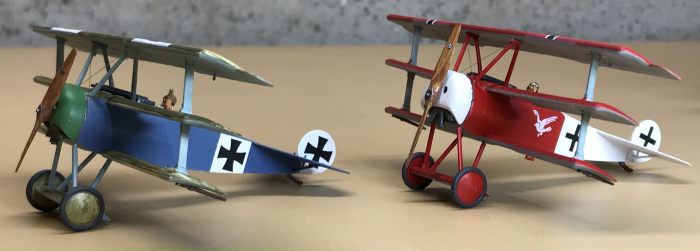 nfred
von Richtofen. While searching for a scheme that would be easy to paint over red
plastic, I spotted the latest Eduard Profipack kit in my stash, with the
all-black plane flown by Josef Jacobs on the boxtop. All the markings for that
option were unique to Jacobs' plane, so I could still do any of the other four
remaining options in the donor kit. So I went ahead and built the Revell kit,
painting it all black. Once that kit was finished, I found myself wanting to do
more – to build a collection of colorful Fokker Triplanes-- my own Flying
Circus.
nfred
von Richtofen. While searching for a scheme that would be easy to paint over red
plastic, I spotted the latest Eduard Profipack kit in my stash, with the
all-black plane flown by Josef Jacobs on the boxtop. All the markings for that
option were unique to Jacobs' plane, so I could still do any of the other four
remaining options in the donor kit. So I went ahead and built the Revell kit,
painting it all black. Once that kit was finished, I found myself wanting to do
more – to build a collection of colorful Fokker Triplanes-- my own Flying
Circus.
Since building the one Revell kit, I have built 9 more Triplanes, 8 of which were Eduard kits. The builds were a mix of Profipack and Weekend Edition kits, a couple from the stash, and the rest were recent purchases. My goal was to build a colorful variety, using kit options and some others from the large collection of profiles on www.Fokkerdr1.com.
| THE KIT |
The Eduard 1/72 Fokker Dr.1 triplane was first released in 2000, and has since been followed by a bunch of releases in standard, Profipack, and Weekend Edition kits. The color of the plastic has changed over time, older versions were molded in tan, while the later ones are molded in dark gray plastic. I built kits from kits released in 2000, 2006, 2009, 2016, and 2018. While the kits were molded in different colors, the quality of the moldings was consistently good throughout. Even the newest kits had no sign of flash or mold wear.
The kits I used, and the year they were released:
 Kit 7016:
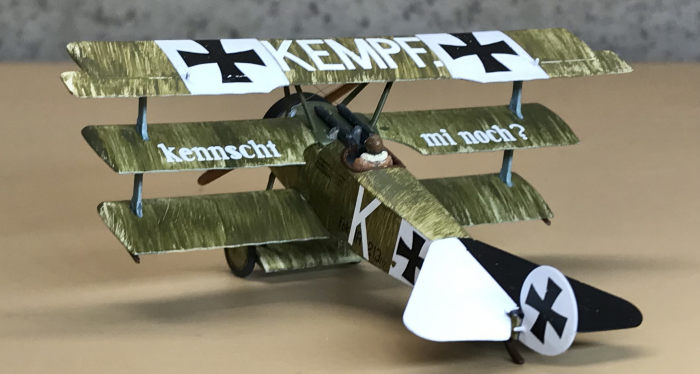
The first Profipack version, with Kempf on the boxtop. (2000)
Kit 7016:
The first Profipack version, with Kempf on the boxtop. (2000)
Kit 7100: Eduard E-day bagged kit, with only Manfred von Richtofen decals. (2006)
Kit 7405: Weekend Edition with Lothar von Richtofen Box art. (2009)
Kit 7438: The current Weekend Edition with Raben's red and white box art. (2016)
Kit 7039: The current Profipack version, with Jacobs' all black balloon buster. (2018)
I had a mix of kits with and without the optional Profipack PE parts. I built all of mine as Weekend Editions, so I didn't use any of the PE. The one change I did do was to put pilot figures in all the builds-- they will eventually all be hanging from the ceiling in a Flying Circus mobile.
For a detailed look at the Eduard kit's contents, see Tom Cleaver's preview of the original 2000 release here: http://modelingmadness.com/review/w1/cleaver72dr1preview.htm
| CONSTRUCTION |
Having built so many copies of the kit, I can say with confidence that this 20 year old molding is still a very good kit. The parts are molded well, and fit is generally quite good.
Construction starts with the cockpit. Like most WW1 fighters in this scale you can't see a lot inside the cockpit, especially if you are adding a pilot figure. The cockpit parts (floor, seat, bulkhead, etc.) all fit well. You can install them without worrying that you won't be able to close up the fuselage! The Profipack kits include the option to shave off some molded sidewall detail and replace it with PE parts, which I didn't do.
The Eduard instructions provide a logical assembly sequence, but don't make any allowance for painting the various schemes. Like most multi-wing aircraft, it is much easier to paint the model before attaching the top wing. Here is my general approach to building these kits. (These are general guidelines that assume you're doing a plane that started with Fokker factory streaked camouflage- an all-one-color model is easier.)
 Build
and paint the cockpit to your desired level of detail.
Build
and paint the cockpit to your desired level of detail.
Assemble the fuselage halves, bottom wing, and stab. (Leave the cowling and engine for later.) Paint the whole thing the base linen color. Paint the middle and top wings now, while you're at it.
Mask the bands on the bottom wing for the background for the crosses. (Most planes had clear linen, not white on the bottom wing. Paint the light blue undersides. (Do the middle and top wing, too.)
Pre-paint all the struts and landing gear parts.
Paint the Fokker streaked camouflage where needed. Mask and paint the tail and fuselage markings as needed.
Install the middle wing, and the wing struts. Check the fit of the guns-- trim the area as needed to make them fit. (I didn't install until the end.)
Apply the decals and a protective clear coat.
Install the top wing.
Attach the landing gear.
Attach the rudder, engine, and cowl.
Apply a final clear coat.
Attach the guns and prop.
Having built so many of these, I have learned a few things along the way. I think I have probably found most of the mistakes you can make when building this kit. (But I'm always open to making a new one!) Some things I learned the hard way:
- The wing struts have a top and bottom. At a casual glance, they look to be symmetrical, but I found that they aren't quite so. If you put them in upside down, they still fit OK on the bottom wing, but the top wing’s angle of attack will be off (trailing edge too low) and then the cabanes won’t fit. (If you know to look for it, it is pretty obvious.)
- Make sure the wing struts are parallel when installed on the bottom and middle wings, when viewed from the side. There’s a little bit of wiggle room in the middle wing’s slot- any misalignment (one leaning a little further forward than the other), it will be magnified by a top wing that is skewed, with a leading edge that is not parallel to the other two.
 - It is easy
to put the stab on upside down (I did it twice!). It is oh, so easy to overlook
the little dimples that are the receptacles for the strut braces on the bottom -
that is the only difference between top and bottom. (The stab has no key or tab
to align the stab with the opening in the fuselage.) I was so focused on making
sure the elevator hinge line was perpendicular to the fuselage centerline that I
twice failed to notice the stab was upside down until after the glue had set.
- It is easy
to put the stab on upside down (I did it twice!). It is oh, so easy to overlook
the little dimples that are the receptacles for the strut braces on the bottom -
that is the only difference between top and bottom. (The stab has no key or tab
to align the stab with the opening in the fuselage.) I was so focused on making
sure the elevator hinge line was perpendicular to the fuselage centerline that I
twice failed to notice the stab was upside down until after the glue had set.
- Pay close attention to part numbers for the landing gear struts- it is very easy to mix them up. I learned to not remove the second one from the sprue until I had glued the first one in place, on the correct side. Ditto for the cabanes!
- I found it best to install the cabanes on the top wing first, let them set for a bit, then attach the wing to the model. The stab braces are very flimsy- I broke about half of them while trying to clean up the sprue attachment point. A similarly sized piece of Evergreen strip styrene is less brittle, and much easier to handle.
- The guns won’t fit properly unless you sand the fuselage opening to make it a little wider. If you don't do this, the guns will sit canted outboard at a 30 degree angle.
- If you are adding a pilot (I used the nice PJ Productions resin figures) don't bother to install the stick, and test fit the figure to see if you need the seat at all.
- The engine shaft is glued to the engine, and later the prop. It is designed so that the engine and prop rotate together, like they should for a rotary engine. The problem is that back end of the shaft has a molded disk to act as a bearing against the firewall -- but it is too thick. This pushes the whole engine forward about half a mm too far, which makes it difficult to attach the cowl to the firewall. I used a knife to shave away the back edges of the disk, and to relieve the edges of the hole in the firewall so the the engine could sit a little closer to the firewall. This is really the only issue the kit has in terms of how it was engineered.)
- The axle stubs for the main wheels are a little too long, and need to be sanded back a bit. (I removed roughly a third of the stub.)
| COLORS AND MARKINGS |
I used markings from the collection of kits to do five of the planes. The other three were pulled together using a mix of leftover markings, painted markings, and extra decals from the decal stash.
Kit markings were used for:
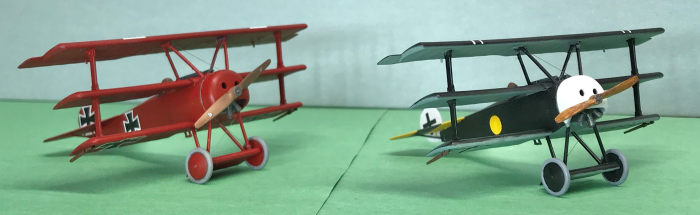
Overall red: Manfred von Richtofen's 425/17, JG1
“Kempf”: Freidrich Kempf, Jasta 2 Boelcke
Red/white: August Raben, Jasta 18
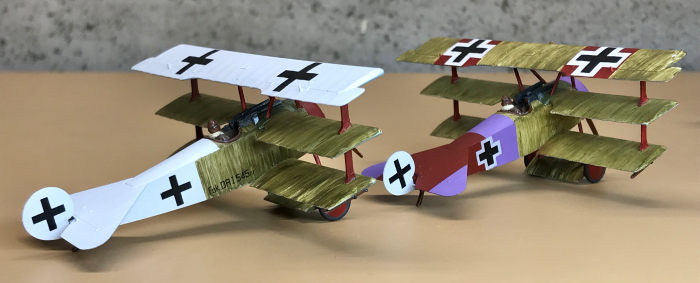
White tail: Hans Weiss, Jasta 11
Yellow: Lothar von Richtofen, Jasta 11 (This one was built about 8 years before the rest of them.)
Schemes not found in any of the kits:
Blue: Willhelm Schwartz, Jasta 13
Lilac: Rudolph Stark, Jasta 34b
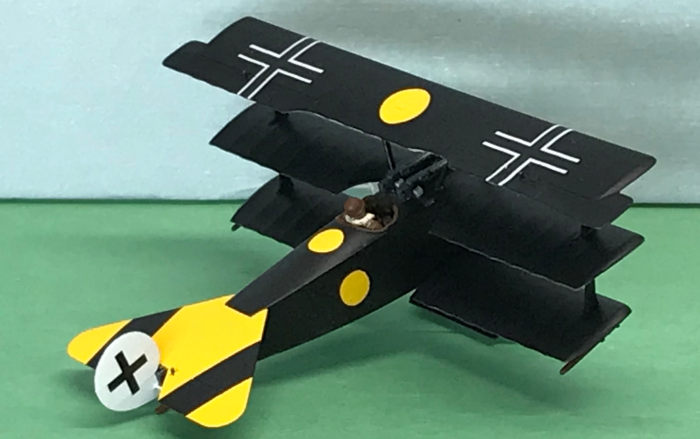
Black with yellow dots: Hans Pippart, Jasta 19
 For the
last three, I ran out of Maltese crosses for the lower wings, so I used my
Cameo4 cutting machine to make masks for painting, I'll be doing more of this in
the future- nothing looks more like painted markings than actual paint!
For the
last three, I ran out of Maltese crosses for the lower wings, so I used my
Cameo4 cutting machine to make masks for painting, I'll be doing more of this in
the future- nothing looks more like painted markings than actual paint!
You won't get far on building a Fokker Triplane collection if you don't want to deal with the Fokker “Factory standard” streaked camouflage. The early planes were covered in clear doped linen, and then the painted. The undersides got a light blue that many sources say was likely close to the WW2 RLM 65 shade. The upper surfaces got a streaks of “olive green”, but I didn't find much of a consensus on what color to use. (I used Model Master Olive Drab enamel and am happy with how it looks.)
There are some good references out there, and some error-filled ones too. Online, I found that the Aerodrome forum and Fokkerdr1.com seemed to have up-to-date, reliable info with documented sources for the info. I would caution modelers to beware some of the older references-- for example, I wouldn't take “skins” created for online flight simulators as accurate. (And makers of ready to fly RC triplanes still make planes purporting to be August Raben's plane, but with bright blue instead of the red!)
All the models were first primed with Stynlrez primer, and all the solid colors on the models were done with Tamiya acrylics. But the Fokker streaked finish needed some experimentation......
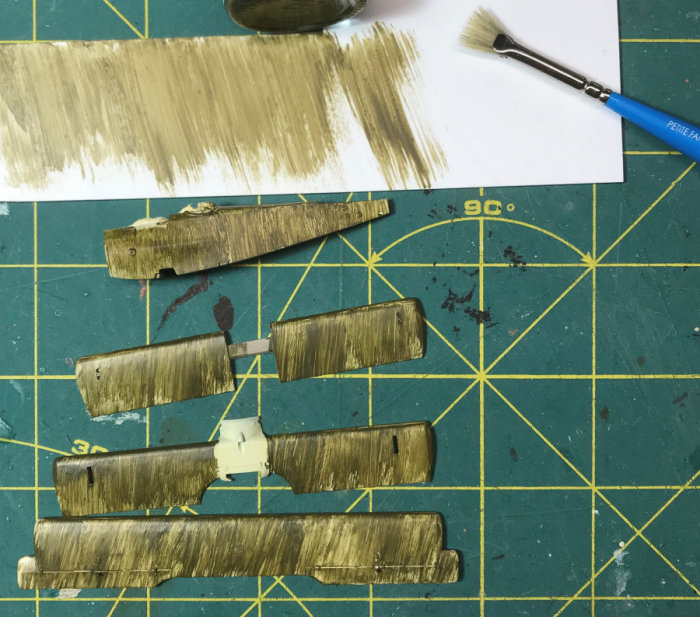
The “recommended” method for painting the Fokker streaks was to copy the full scale procedure. The surfaces on the real planes were painted this way: The worker would load a four inch brush in paint, and paint long strokes from one edge to the other, going as far as he could before the brush completely ran out of paint, He would then reload the brush and continue. The resulted in the streaky finish with dark and light areas.
On models, the typical solution is to paint the linen color with an acrylic, let it dry, and then add a gloss clear coat. Then a small stiff brush would be used to paint the streaks in prototypical fashion, using an artist's oil paint. The oil paint could take many days (or weeks) to dry-- but there are tricks to speed up the process.
I was afraid oil paints would take forever to dry in my cool basement workshop, so I tried an experiment. Instead of using real artist oil paints, I used a slightly thinned enamel paint. I practiced it some sheet styrene first, to get the brush action right, and then tried it on the “axle wing”. I figured if it didn't come out right, no one would really notice. But it worked well, so I went ahead and did the models. The enamel dried overnight, and I am very happy with how it worked out.
The models were gloss coated (I used Future) for the decals. The Eduard decals, old and new, uniformly worked well. I was lucky that the Blue and Lilac planes were painted at the Jasta, so the aircrafts' serial numbers were overpainted- I didn't need to come up with custom decals for that. Once the decals were set, the models were clear coated with a satin clear.
| FINAL BITS |
 Once the
model was coated, the final details were put into place. Rigging on the Dr.1 is
simple- just an “X” for the cabanes, and another for the landing gear. I used my
go-to material- smoke colored invisible thread. I don't bother trying to rig
control cables to the flying surfaces in 1/72.
Once the
model was coated, the final details were put into place. Rigging on the Dr.1 is
simple- just an “X” for the cabanes, and another for the landing gear. I used my
go-to material- smoke colored invisible thread. I don't bother trying to rig
control cables to the flying surfaces in 1/72.
Because the models will end up hanging in a mobile over my desk, I wanted pilots in the cockpits. I had a couple of figures form old Airfix kits, but not enough to man them all. I looked around- there aren't many available. I did find some really nice resin figures made by PJ Productions in Belgium. There is only two poses, but I was able to cut off and reposition the arms to make them a bit more individual. You can get the figures from PJ Productions directly, from Hannants, or from eBay sellers in the US. There are also some 3-D printed options from Shapeways that are less costly, but I'm not sure how good they are.
| CONCLUSIONS |
Recommended. This is a nice kit. In 1/72 scale, this is a small model, but the simple struts and limited rigging make it a straightforward build. The retail price difference between the Weekend and Profipack versions is only $5 USD. That makes the Profipack kit a good value if you don't want the limited decal choices in the Weekend kit-- the difference in price is less than buying an aftermarket decal sheet.
| REFERENCES |
The Aerodrome Forum: www.theaerodrome.com/forum/
Eduard website
ScaleMates.com
Bill Michaels
11 April 2023
Copyright ModelingMadness.com. All rights reserved. No reproduction in part or in whole without express permission.
Review kits courtesy of my wallet.
If you would like your product reviewed fairly and fairly quickly, please contact the editor or see other details in the Note to Contributors.