| KIT #: | 32027 |
| PRICE: | $99.00 SRP |
| DECALS: | Five options |
| REVIEWER: | Jeroen Koen |
| NOTES: | Wingnut Wings Fighting Fokkers part 2 decals and Aviattic lozenge used |
| HISTORY |
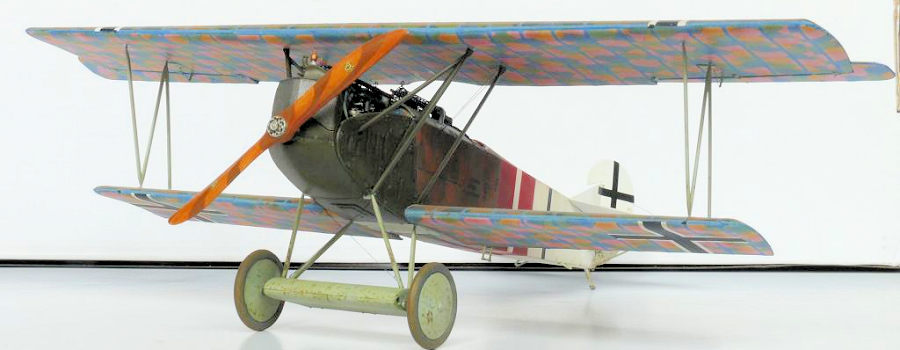
Being one of the, if not the, most famous aircraft to emerge in the Great War, the Fokker D.VII was designed by Reinhold Platz, and was urgently needed due to the Albatros and Pfalz designs basically being obsolete even as they entered service in mid to late 1917. Well liked by those who flew it, respected by those who flew against it, the D.VII also had a long post-war career.
Since all of the above is probably pretty common knowledge, let's focus a bit on
the Albatros built D.VIIs. These were known as Fokker D.VII (Alb). Albatros, and
it's subsidiary, Ost-Deutsche Albatroswerke, known as OAW, (or sometimes AWS,
Albatros Werke Schneidemühl) were still producing outdated D.Va and even
 older
D.IIIs. The latter were mostly made at the OAW plant in Schneidemühl, now in
Poland. After winning the early 1918 fighter competition, Fokker could not keep
up with the massive demand for this new aircraft, so it was decided to have
Albatros, who lost out with their own designs, and OAW produce the aircraft as
well. Due to the speed things would have to move to get the new fighter to the
units at the front as quickly as possible, Fokker supplied a basic set of
drawings and sent a pattern aircraft on loan to both Albatros at Johannistal,
and OAW at Schneidemühl. Both quickly got to work; OAW copied the pattern
aircraft fairly closely, but Albatros, who were used to being one of premier
fighter designers, modified it with a few clever inventions of their own, and a
host of small refinements making maintenance that little bit easier. OAW did the
same quite soon after production started as well.
older
D.IIIs. The latter were mostly made at the OAW plant in Schneidemühl, now in
Poland. After winning the early 1918 fighter competition, Fokker could not keep
up with the massive demand for this new aircraft, so it was decided to have
Albatros, who lost out with their own designs, and OAW produce the aircraft as
well. Due to the speed things would have to move to get the new fighter to the
units at the front as quickly as possible, Fokker supplied a basic set of
drawings and sent a pattern aircraft on loan to both Albatros at Johannistal,
and OAW at Schneidemühl. Both quickly got to work; OAW copied the pattern
aircraft fairly closely, but Albatros, who were used to being one of premier
fighter designers, modified it with a few clever inventions of their own, and a
host of small refinements making maintenance that little bit easier. OAW did the
same quite soon after production started as well.
During it's production run, many modifications were made, including cowling vents, exhausts, radiators, and a host of other modifications and improvements. The basic power-plant was the reliable Mercedes D.III, rated in the 160hp class, but later models provided as much as 200HP. Truly making the best use of the airframe were the BMW IIIa engined models. Fokker designated these with an F suffix, but Albatros and OAW did not, making identification difficult, though it appears most, if not all, BMW engines went to Fokker in Schwerin.
All factories made their own modifications, so finding exact details without a clear photo or a serial number is difficult best! And that does not even account for repairs, swapping of parts, and so forth.
| THE KIT |
There have been
quite a few reviews of Wingnut Wings kits, both on MM, and on other sites. When
I received this kit, thanks to a very, very kind MM reader who read me wrestle a
1/72 Roden D.VII into submission, I was over the modelling moon! Being used to
Roden, Revell and other sometimes less than stellar brands, this is, as has been
written many times before, a superb package. The parts come in separate bags,
and there 5 large decal sheets, four with lozenge decals in 4 and 5 colour (full
sets of both for fus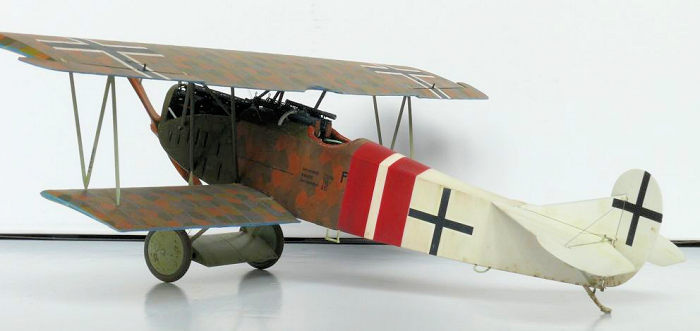 elage and tail). All parts are standard for each of the
D.VII boxes, except for sprue K, which is unique for the Albatros boxing. There
are a lot of parts in the box, evidenced by the fact that it comes in the bigger
2 seater box.
elage and tail). All parts are standard for each of the
D.VII boxes, except for sprue K, which is unique for the Albatros boxing. There
are a lot of parts in the box, evidenced by the fact that it comes in the bigger
2 seater box.
There are five schemes included, some famous (Degelow, Jasta 40), some less so (Uffz Harbers, Jasta 73). There is also a small clear sprue with 2 styles of windscreen, and the gorgeous instruction book annex reference manual. All in all, an impressive package!
And if the comprehensive, Cartograf printed, kit decals aren’t enough, WnW also does more decals for these aircraft. Upon learning that Greim’s Jasta 34b machine was on these, I asked around a bit and got a partial sheet -I pretty much only needed the serial numbers for struts and gear legs.
As of time of writing this review (early 2020) the kit has been sold out for a few years, but you can still get sprue K and the Fokker D.VII “Early” boxing (32067) with the Fighting Fokker decals to get an Albatros D.VII until the full kit might get reissued at some point?
While the kit lozenge looked good, I was impressed with some of the results seen with Aviattic lozenge (which is transparent and will allow more layered effects), so I used standard full-size bolts for the fuselage, and pre-shaped for the wings. More on those later.
| CONSTRUCTION |
In this case, I started by thoroughly browsing through the instructions, and removing all parts “not for use” from the sprue's. As this kit gives a lot of options, and not all parts of Greim’s machine are known, for the “unknowns” I stuck to the Jasta 53 machine “Nickchen IV”. This had serial number 817/18, Greim’s machine was probably 833/18, pretty close.
I then got a bunch of zip-lock bags and carefully removed most parts from the sprue's and sorted them together. I removed the delicate fuselage frames and struts from the sprue's with a JLC razor saw, and managed not to break anything!
As I foresaw a lot of painting, mostly with the same colours, I started working on sub-assemblies first. First of all was the axle wing. WnW give you the option to cut the sides off, showing the exposed bungee cord suspension. This was often done in the field, but not confirmed on Greim’s machine. I liked the look, and 817/18 had them cut off, so I did the same. Be careful though, the little triangles where the axle attaches should not be visible on the sides.
Inspecting some parts I was surprised to see sink marks on one of the fuselage halves near the lower locating pins, and on both halves, near where the rear fuselage frame/screen goes. These were filled and sanded with Mr Surfacer; the exhaust was also assembled and had it’s sink marks filled.
 While the
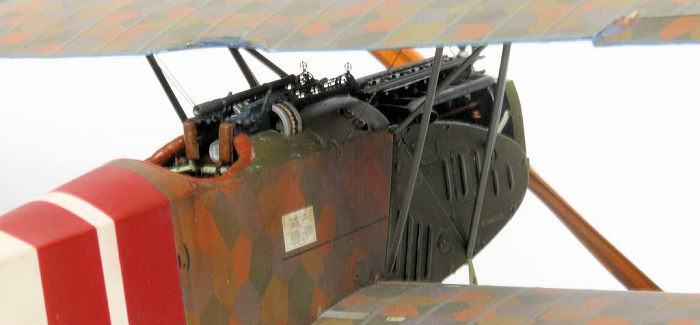
Surfacer was hardening I tackled the engine. It does look very good out of the
box, but with Greim’s machine having the engine very visible due to the lack of
upper cowling, I went a bit further. I replaced the valve springs with copper
wire (0,2mm, taken from an old computer power cord) wound over a drill bit, and
added air, oil, and fuel lines. I also scratch-built the throttle linkages on
the carburettor.. Some great photos are available in the manual, as well as on
the WnW site. After painting it as indicated in the manual and on photos of the
real thing, I added shortened “Master” bolts as spark plugs and used thin copper
wire to run a wire from the plug lead tube to the plug, and from the magnetos to
the end of the plug lead tube. These last wires sure are interesting to install,
and I can see why people replace the plastic plug lead tube with some brass
tube! I drilled the holes in the magnetos while they were still on the sprue, so
they are easier to handle. Making a little centre hole with a needle will also
prevent the drill bit from slipping.
While the
Surfacer was hardening I tackled the engine. It does look very good out of the
box, but with Greim’s machine having the engine very visible due to the lack of
upper cowling, I went a bit further. I replaced the valve springs with copper
wire (0,2mm, taken from an old computer power cord) wound over a drill bit, and
added air, oil, and fuel lines. I also scratch-built the throttle linkages on
the carburettor.. Some great photos are available in the manual, as well as on
the WnW site. After painting it as indicated in the manual and on photos of the
real thing, I added shortened “Master” bolts as spark plugs and used thin copper
wire to run a wire from the plug lead tube to the plug, and from the magnetos to
the end of the plug lead tube. These last wires sure are interesting to install,
and I can see why people replace the plastic plug lead tube with some brass
tube! I drilled the holes in the magnetos while they were still on the sprue, so
they are easier to handle. Making a little centre hole with a needle will also
prevent the drill bit from slipping.
Unfortunately I found out after entirely completing the 200HP version as per the decal instructions (they say which optional parts to use), that this aircraft at the very least had the fat big air pump instead of the small horizontal one. There is a photo in the instructions on which it can barely be seen. As I was so hooked to these models already, I sold of quite a bit of my 1/72 models (including a few that had gotten quite rare in the meantime) and got another WnW kit (the Pfalz D.XII), from which the engine was taken, and which did use the 200HP version, so I could swap around.
The second engine was completed in half the time of the first, with all the same improvements. They were both weathered with dark umber and Payne's grey (a near-black) and given a coat of satin varnish, after which they were set aside for now.
After the engine was assembled I improved the rudder pedals by cutting them off and re-glueing them at an angle. At the same time I added the support bars around them from stretched sprue, and some thin metal wire produced the U shaped loops to which the rigging will later attach. At the same time the control stick and V-shaped aileron parts were drilled with a 0,5mm bit to attach the rigging later.
All other parts were airbrushed with Revell Aqua, except for the wings, which I airbrushed with Revell flat white from their enamel range, in preparation for the transparent Aviattic decals. I used Revell 59 Sky Grey with 25% Revell 57 light grey added for the grey-green interior components, and a mix of flat white and desert sand (10:1) took care of the base-coat for the few wooden parts. I had heard about this model being quite difficult to put together carefully, so I did more than a few dry-fits while adding more parts. I cut some material off the rear interior bulkhead where the side frame pins attach, so I could close the fuselage easily. It’s been written before, even a thin coat of paint will interfere with assembly!
Interior rigging was added with Uschi van der Rosten “Standard” elastic wire, looped through the holes and glued together. A blob of white glue painted linen simulated the linen covering of the turnbuckles as can bee seen on the photo’s of the Mémorial Flight D.VIIF in the manual. Control lines were also done with Uschi wire.
 Further added
details were the gun trigger cables, wires from the stick-mounted throttle to
the floor, and from the side-mounted throttle also underneath the floor. (these
are also visible on the Mémorial Flight aircraft from which photos are
included). On the right I also added the cooling flap control, and the control
rods from the controls to the engine bay on the left. The rear screen was given
Aviattic lower lozenge, the fuselage sides and frames 4 colour lozenge from the
kit itself. Weathering was done by carefully painting highlights with lighter
base colours and washes and filters with oil paints. Very careful chipping was
also done with a 00000 brush and a piece of sponge.
Further added
details were the gun trigger cables, wires from the stick-mounted throttle to
the floor, and from the side-mounted throttle also underneath the floor. (these
are also visible on the Mémorial Flight aircraft from which photos are
included). On the right I also added the cooling flap control, and the control
rods from the controls to the engine bay on the left. The rear screen was given
Aviattic lower lozenge, the fuselage sides and frames 4 colour lozenge from the
kit itself. Weathering was done by carefully painting highlights with lighter
base colours and washes and filters with oil paints. Very careful chipping was
also done with a 00000 brush and a piece of sponge.
I also added the large “lever” on the rear left in the engine bay where the throttle control rod connects to (the other rod goes to the magnetos but can’t be seen if you leave the side cowls on), so I could later connect the engine throttle linkage to that. There is a great photo in the manual of a D.VII without cowl panels showing this very well. It’s not hard to do but makes a difference on an aircraft without upper cowls.
The radiator was improved by adding small “ears” from plastic 0,2mm strip, to which the diagonal support rods go. The other side of these supports goes to the engine frame. They are also very visible, but strangely not included in the kit. A bit of stretched sprue and flattening the ends as, again, per the photo in the manual is not hard to do but looks better to my eyes. I also added the radiator cooling flap to the right inside part of the radiator. This was made from thin copper wire for the hinge, and I found a sketch from a captured aircraft online so that I could make the flap itself from thin plastic card. I you look closely, you can see the designer at Wingnuts made a provision of sorts for this part, as there are some tiny holes where it should go.
The PE for the guns (as I did with the seatbelts earlier on) was annealed and rolled over the provided rod. However, I ended up with a gap on the bottom that was confirmed by others, as well as Richard Alexander at Wingnuts. It would appear the later D.VII Fok Early (32067) has different, improved, parts, though I don’t have that kit so I can’t tell the difference. The exposed bullets of the ammo boxes were improved by adding linen rib tape decals from a WnW rib tape sheet (which I ordered and cut up the pink and blue ones for 1/72 models, so I had the linen left over). I find these look pretty good, and are the right colour already.
 One last
improvement was sanding the edges of the lower forward cowl panel (the one on
which the radiator sits) narrower at the front. This was done because if the
model is fitted with all the cowls, there is space for those between the
forward/upper cowl and the louvred side panels. When not installing the upper
cowls, there is a gap between the side and front/upper panel not visible on the
real thing. By carefully sanding the lower cowl thinner at the front, so it not
longer has the step to the radiator, this can be closed and looks just that tiny
bit better -but then again, I’m probably fussing over nothing anyway!
One last
improvement was sanding the edges of the lower forward cowl panel (the one on
which the radiator sits) narrower at the front. This was done because if the
model is fitted with all the cowls, there is space for those between the
forward/upper cowl and the louvred side panels. When not installing the upper
cowls, there is a gap between the side and front/upper panel not visible on the
real thing. By carefully sanding the lower cowl thinner at the front, so it not
longer has the step to the radiator, this can be closed and looks just that tiny
bit better -but then again, I’m probably fussing over nothing anyway!
Speaking about the cowls, Greim’s aircraft had a metal rear triangular panel that was either hand-made or came from another (non-Albatros) aircraft on the right. Such is the attention to detail, that this is provided in the kit, but as there is no known photo of the left side nose of this machine, I went with the late-style Albatros cowls as they were on Richard Krauts D.VII and indicated in the decal instructions.
The rest was pretty much done as per the manual, though I can’t repeat enough: at each and every step, dry-fit, dry-fit, dry-fit. While glueing the fuselage frames together I used the forward lower cowls as a guide. Eventually I was rewarded with a pretty well fitting fuselage, which needed very little filler. I left off the tailplanes, lower wings and cowl panels, but to ease masking I pre-painted the upper decking FS34079 (I had Lifecolor UA001 on hand so I used that, it’s a nice dark olive green) and glued it to the fuselage.
| COLORS & MARKINGS |
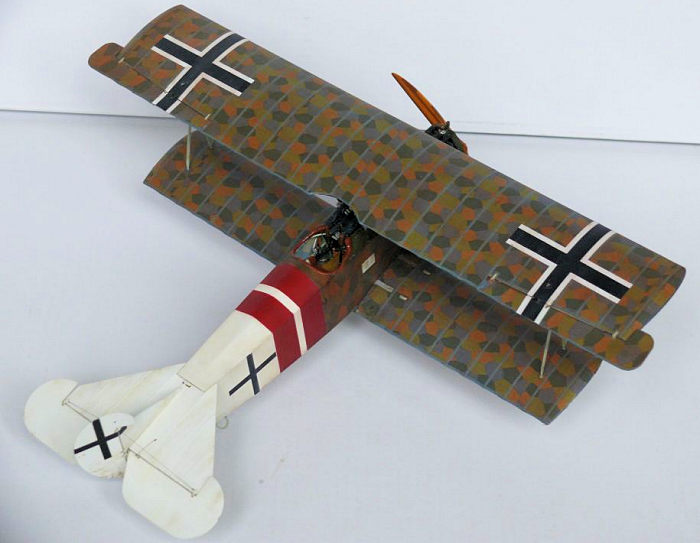
Wings: as I stated earlier, these were painted Revell enamel flat white. The flat is a bit cream, so it makes the transparent Aviattic lozenge slightly less flashy. The lower sides of the wings were given a bit of post-shading with brown between the ribs, I did not bother with the top, as not only is the lozenge darker on top, it would also be given a tinted brown varnish glaze. After that they received a gloss-coat, and some oil paint weathering in selected places. However, the gloss wasn’t quite glossy enough after I started applying decals so I had some silvering underneath. I re-glossed the remaining parts again, and had no issues thereafter. The one piece with silvering was liberally punctured with a needle and carefully had Mr Mark Solvent run in those, which fortunately got rid of most of the silvering.
 The Aviattic decals for the wings are printed in shape, with rib tapes in place,
but still need cutting from the sheet, as the decal film is in one piece. I
found I needed to trim about 0,5mm off the side without the rib tape, as
otherwise they would be slightly too wide, which results in the next segment not
having the printed rib tape on the moulded one. The decal film, once applied, is
hard to cut as it’s quite flexible, but also very tough. I found out that Mr
Mark Softer does a superb job on them, as it hardens the film making the
trailing edge “cuttable”. I did have a hard time with the wing tips of those
thick Fokker wings, and was left with some tiny wrinkles. Their flexibility also
means you have to be careful when pressing them in place to remove water and
air, as this might stretch them, and the rib tapes will not align.
The Aviattic decals for the wings are printed in shape, with rib tapes in place,
but still need cutting from the sheet, as the decal film is in one piece. I
found I needed to trim about 0,5mm off the side without the rib tape, as
otherwise they would be slightly too wide, which results in the next segment not
having the printed rib tape on the moulded one. The decal film, once applied, is
hard to cut as it’s quite flexible, but also very tough. I found out that Mr
Mark Softer does a superb job on them, as it hardens the film making the
trailing edge “cuttable”. I did have a hard time with the wing tips of those
thick Fokker wings, and was left with some tiny wrinkles. Their flexibility also
means you have to be careful when pressing them in place to remove water and
air, as this might stretch them, and the rib tapes will not align.
Any gaps in the (blue) trailing edges were painted in with mixed light blue oil paint, as applying the decals over each other results in a dark patch. Once in place, the lozenge really looks good!
One word of warning on the Mr Mark stuff, though: it is really hot stuff and if left to pool it will easily remove the (laser)print from the decal carrier! So, brush on thinly and if it does pool, absorb it with the point of a kitchen towel -don’t ask how I found out it will remove the print…
Fuselage: this was masked and painted flat white at the same time as the wings. After letting it dry I mixed Revell 34 (Ferrari Red) with Revell 331 (Purple Red, a German railway colour from the past) to get a darker red, and airbrushed the red bands. Unfortunately I made a mistake with their placement, so I sanded them off and re-did them, then masked the bands also, and re-painted the forward fuselage white again as it had overspray. The rear fuselage was painted with Revell Aqua 04 (gloss white, which, unlike the flat one, is a “pure” white). After that I glossed the fuselage with Tamiya X-22 and applied oils in selected places as a first layer of weathering for the decals.
The Wingnut kit comes with pre-shaped decals that fit well, but Aviattic (at the
time) did not have these for the fuselage, so I got normal bolts for the top and
bottom. I made copies of the WnW decals, cut them out, and traced these over the
Aviattic bolts slightly oversize. After careful trimming until they fit snugly,
particularly against the red bands, I added these. The small piece behind the
cockpit was the most difficult, so it was done first. As they are transparent,
any overlap will show as a dark line, so it’s important not to overlap them.
After adding all the lozenge decals I varnished the model lightly with X-22. The
decals looked very bright and factory new, which wasn’t really what I imagined
my model should look like. As was common practice at the time, I wanted to
overspray them with a brown tinted varnish. This is quite a risk, as there is no
going back… I did some tests on scrap pieces of the Aviattic lozenge until I
found a nice mix of Revell 37
 (brick red), 85 (a reddish light brown) and gloss
varnish applied in thin coats resulted in something I liked. The mix has 0,5
parts 37, 0,5 parts 85 and 9 parts gloss varnish. This results in a somewhat
reddish-brown tint that matches well with the red bands. The fuselage was
over-sprayed more heavily than the wings, I did this during daytime and
constantly kept the parts together to see how the effect was building up. The
difficult part is knowing when to stop, though there was much variation on the
real thing. Another bonus, for me at least, is that this overspray with custom
mixed colours removes some of the “sameness” if I were to put it next to other WnW D.VIIs.
(brick red), 85 (a reddish light brown) and gloss
varnish applied in thin coats resulted in something I liked. The mix has 0,5
parts 37, 0,5 parts 85 and 9 parts gloss varnish. This results in a somewhat
reddish-brown tint that matches well with the red bands. The fuselage was
over-sprayed more heavily than the wings, I did this during daytime and
constantly kept the parts together to see how the effect was building up. The
difficult part is knowing when to stop, though there was much variation on the
real thing. Another bonus, for me at least, is that this overspray with custom
mixed colours removes some of the “sameness” if I were to put it next to other WnW D.VIIs.
Eventually I felt I went a little bit too far on the fuselage, but after applying the remaining decals from the kit and weathering with streaks and patches of oil paints I was very happy with them!
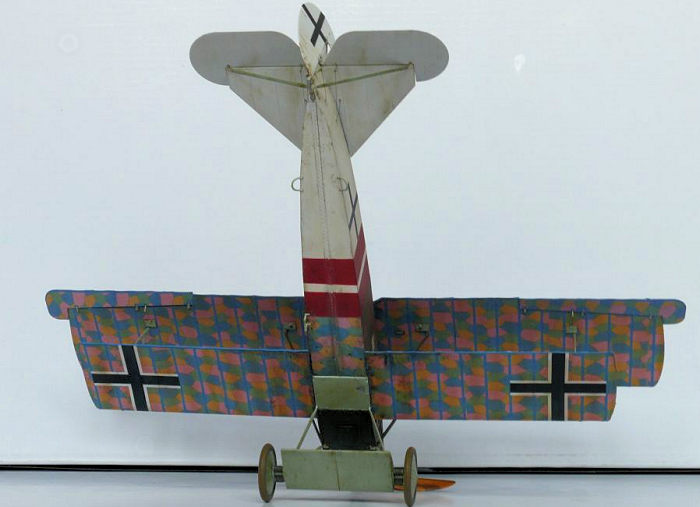
I applied the remaining decals per the decal instructions, except for the wing and fuselage crosses. WnW would have you install the uneven arm crosses on the wings, and provide a fuselage cross without the white outline with the decals for this version. There are no known photo’s of the upper wing of this aircraft, and 817/18 had the normal crosses. As the uneven-arm crosses are also provided in the base kit, I photocopied both and decided on the normal ones, simply because they looked better in my opinion! I also used the fuselage cross from the base kit, with white outline, as when you zoom in on the photo of Greim posing near the tail the outline can be faintly seen against the slightly less white rear fuselage. Obviously the tail does have the uneven-arm style of cross, but I found quite a few photographs from aircraft with mismatched tails so that could have come from another machine as well, as parts-swapping was common. Anyway, the choice is yours :-)
The dark green nose was difficult to weather, but eventually I carefully painted the raised details with 1 or 2 layers of lightened base colour (more controllable than a dry-brush, which I always seem to mess up) and given a wash of black mixed with dark green. Subtle chipping was done with a very small brush and some light grey paint, as I find metal colours stand out too much. Then I applied small dots of Payne's grey, red and yellow oil paints and worked these into the base coat in a circling, vertical, or combination of both, movement. A few Raw Umber streaks and patches finished the weathering.
As a final touch the fabric areas were varnished with Revell Aqua matt and gloss varnish, mixed 2 parts matt and 1 part gloss. The metal areas were painted with a 1-1 mixture so these were glossier, but not too much so.
 Propeller: one of the most visible things on these models is the propeller. I
started with my wood base coat described earlier, but then came the fun part:
masking the laminations. I started with a good picture of a real Niendorf
propeller, but could not get it to work; the laminations either overlapped or
just looked wrong. After 2 tries, looking from the front, I figured I’d better
look from the top and side, as that is how the laminations are built up on the
real thing. The Niendorf, like the Heine, has an almost flat rear side that
makes this a little less tedious, but, interestingly, if you mask this way and
then look from the front the shapes form themselves quite well! I used 0,5mm
wide tape to mask them. There should be 7 laminations, I didn't managed that
much, but got it pretty close. The light areas between the tape were masked with
masking fluid, and then it was painted with Lifecolour Dark Earth, which covered
poorly, and as a result I got ridges and a few imperfections after removing the
masking. One of the advantages of Lifecolour, however, is that it touches up
almost invisibly, which was done. After this had dried I applied X-22 Gloss, and
used a mix of Burnt Sienna and Raw Umber oil paint for the fine grain. This was
glossed again when completely dry, a circle mask was cut, and the hub airbrushed
metal. Don’t forget that the holes in the front hub should be wood colour, as
well. Then I applied the makers decals -with beautiful gold rings and they are
almost completely readable under magnification -amazing, as they are really
tiny! A wash of the front and (separate) rear hub and a satin coat finished it
to my liking.
Propeller: one of the most visible things on these models is the propeller. I
started with my wood base coat described earlier, but then came the fun part:
masking the laminations. I started with a good picture of a real Niendorf
propeller, but could not get it to work; the laminations either overlapped or
just looked wrong. After 2 tries, looking from the front, I figured I’d better
look from the top and side, as that is how the laminations are built up on the
real thing. The Niendorf, like the Heine, has an almost flat rear side that
makes this a little less tedious, but, interestingly, if you mask this way and
then look from the front the shapes form themselves quite well! I used 0,5mm
wide tape to mask them. There should be 7 laminations, I didn't managed that
much, but got it pretty close. The light areas between the tape were masked with
masking fluid, and then it was painted with Lifecolour Dark Earth, which covered
poorly, and as a result I got ridges and a few imperfections after removing the
masking. One of the advantages of Lifecolour, however, is that it touches up
almost invisibly, which was done. After this had dried I applied X-22 Gloss, and
used a mix of Burnt Sienna and Raw Umber oil paint for the fine grain. This was
glossed again when completely dry, a circle mask was cut, and the hub airbrushed
metal. Don’t forget that the holes in the front hub should be wood colour, as
well. Then I applied the makers decals -with beautiful gold rings and they are
almost completely readable under magnification -amazing, as they are really
tiny! A wash of the front and (separate) rear hub and a satin coat finished it
to my liking.
| FINAL CONSTRUCTION |
With everything painted up, the model was pretty much assembled as per the instructions. Due to some unavoidable paint layers, I needed to sand the lower wing front, where it meets the cowl panels, slightly, but it fit well after that. All that care in dry-fitting and scraping paint earlier on paid off when fitting the engine, radiator and cowl panels, as they all fit properly. The diagonal radiator braces were a pain to install, but eventually I got them to sit right.
I installed the forward cabane struts first, but did not glue the “third” leg, which goes through the cowl side panel. This allows some movement and prevents misalignment; if you’re careful and don’t glue them, they can even hold the forward side cowl panels in place, should you like it that way, though I glued my cowls in place.
 I installed the
top wing on these and the N-struts at the same time using normal glue and
letting it dry upside down for a while gently pushed in place with some empty
Tamiya paint jars. The rear cabane struts are rather flexible and can be
installed later, which I did. I didn’t even need glue, they simply snapped into
place. To be sure, I did add some tiny dabs of glue to the holes beforehand.
I installed the
top wing on these and the N-struts at the same time using normal glue and
letting it dry upside down for a while gently pushed in place with some empty
Tamiya paint jars. The rear cabane struts are rather flexible and can be
installed later, which I did. I didn’t even need glue, they simply snapped into
place. To be sure, I did add some tiny dabs of glue to the holes beforehand.
I also installed the tail, fin and elevators, but left off the rudder for now.
After this the control wires were installed, first with Uschi stretch rigging (but I just could not get it to work, if you add CA to it it curves and wrinkles and becomes very hard to install), later with the fishing wire I normally use. After this, the completely assembled undercarriage was installed and rigged. The model is very wobbly, but it seems sturdy enough, and sits straight. One of the last bits was the rudder, which then had the control wires installed, after which the tail braces, hand holds, and foot step were installed.
Lastly, the propeller was pushed in place (it doesn’t need glue), a few dabs of Humbrol Dark Earth carefully applied with a sponge and tiny brush to wheels, lower wings and fuselage, and tail. I took my customary beer, made photos, and called her all done -Cheers!
| CONCLUSIONS |
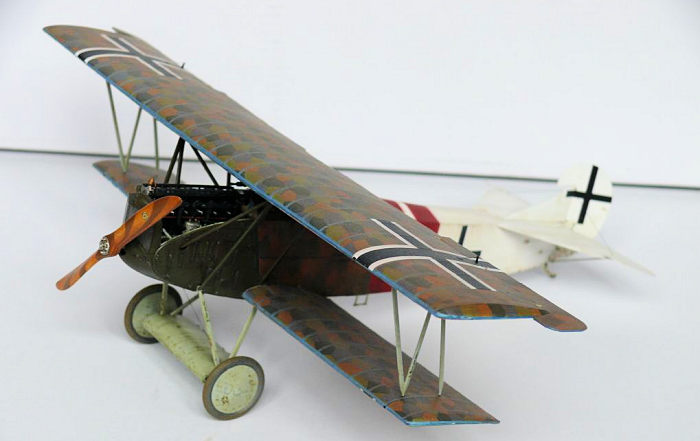
There have been many superlatives written about WnW kits, and many are true. One of the things I tended to notice, is how similar some of them look, as they are so good! I went for something a bit different, with the brown overspray, scratch built details, and lesser-seen scheme. This came out pretty well to my liking. This is really a model I’m proud of, and every time I look at it it reminds me of the generosity of someone I’ve never seen in real life, and of another who so kindly sent me the remaining decals from his built.
 Despite it’s
lack of rigging, this is an impressively complex model of a deceptively simple
and plain looking aircraft. Don’t let the looks fool you, as there is a reason
this model comes in a bigger box as the other single seaters. However, it is
well engineered and out of the box, with careful assembly and paint, will result
in an excellent model. All the provided details suckered me into doing more
details myself, as the scope is there, and most can actually be seen.
Despite it’s
lack of rigging, this is an impressively complex model of a deceptively simple
and plain looking aircraft. Don’t let the looks fool you, as there is a reason
this model comes in a bigger box as the other single seaters. However, it is
well engineered and out of the box, with careful assembly and paint, will result
in an excellent model. All the provided details suckered me into doing more
details myself, as the scope is there, and most can actually be seen.
All in all, I had a great time, and it is really day and night from my previous Roden models. The only drawback is finding interesting stuff to put in this review, which is a lot easier with a poor model! :-)
| REFERENCES |
Albatros Productions Fokker D.VII Anthology Parts 1, 2 and 3
Google found me some photographs with interesting stuff
Wingnut Wings photo archive from the kit and extra decals
WW1 aircraft forum by the late Des Delatorre: https://forum.ww1aircraft.com
29 May 2020
Copyright ModelingMadness.com If you would like your product reviewed fairly and fairly quickly, please
contact
the editor or see other details in the
Note to
Contributors.
Back to the Main Page
Back to the Review
Index Page
Back to the Previews Index Page