| KIT #: | QS-002 |
| PRICE: | $70.00 |
| DECALS: | Four options |
| REVIEWER: | Otis Goodin |
| NOTES: | Good overall, a few minor but fixable issues |
| HISTORY |
The Fokker Triplane, probably the most iconic aircraft of WWI, made its initial appearance on September 1, 1917, when Anthony Fokker presented the first two prototypes to Manfred von Richthofen and Werner Voss. Designated “F.1,” the two Triplanes were each finished in a silvery blue with greenish brown streaking on the upper surfaces. Richthofen promptly shot down two Allied planes over the next few days and declared that German fighter squadrons should be equipped with the Triplane as soon as possible. Fokker ramped up production and eventually produced 320 Triplanes over the next several months, despite some down time to cure deficiencies in workmanship that resulted in upper wing failures and the deaths of several pilots. The Fokker Triplane was maneuverable and had a good rate of climb; however, it was slower than contemporary Allied fighters. Chronic shortages of castor oil made operation of the rotary engine difficult, and eventually led to abandonment of the Triplane.
Werner Voss was given the second Triplane, designated “F.1 103/17.” At the time he was Germany’s second leading ace behind Richthofen and was known as a superb pilot with excellent shooting skills. Originally from Krefeld, Prussia, Voss was the son of a dye factory owner, Maxmillian, and his wife Johanna, who raised their children in the Lutheran faith. Voss grew up in relative comfort in a two-story house with surrounding grounds. Although expected to follow his father into the dye business, Voss was motivated by patriotic desires and in 1914, although underage, he managed to join the German military as a driver. In November 1914, Voss joined the 11th Hussar Regiment and was ordered to the Eastern Front. After receiving the Iron Cross 2nd Class, Voss transferred to officer’s training in June 1915. Because he had flat feet and weak ankles, he was relegated to reservist duties. In August Voss transferred to the German Air Service and began learning to fly. A natural pilot, Voss made his first solo flight in late September 1915. After graduation Voss was retained as a flight instructor.
 In March
1916 Voss was posted to Kampstaffel 20, where he served as an observer on
bombing missions. In September 1916 he was transferred to single-seater scout
aircraft and posted to Jagdstaffel 2 in November. While there he met Richthofen
and, although from different backgrounds, the two became friends. Flying the
Albatros D.III, Voss scored his first aerial victory on the morning of November
26, 1916, and added a second victory that afternoon. By March of 1917 Voss’
victory total exceeded 15, and by April 1 he had victory number 23. On April 8
Voss was awarded the Pour le Merite (the Blue Max), then released for a
month-long holiday. During Voss’ absence Richthofen added another 13 to his
total. The two aces had begun a friendly rivalry, with Richthofen referring to
Voss as “my most redoubtable competitor.”
In March
1916 Voss was posted to Kampstaffel 20, where he served as an observer on
bombing missions. In September 1916 he was transferred to single-seater scout
aircraft and posted to Jagdstaffel 2 in November. While there he met Richthofen
and, although from different backgrounds, the two became friends. Flying the
Albatros D.III, Voss scored his first aerial victory on the morning of November
26, 1916, and added a second victory that afternoon. By March of 1917 Voss’
victory total exceeded 15, and by April 1 he had victory number 23. On April 8
Voss was awarded the Pour le Merite (the Blue Max), then released for a
month-long holiday. During Voss’ absence Richthofen added another 13 to his
total. The two aces had begun a friendly rivalry, with Richthofen referring to
Voss as “my most redoubtable competitor.”
Upon returning from leave, Voss expressed dissatisfaction about his Jagdstaffel commander Franz Walz, whom Voss considered too passive in combat. Walz lacked a background in fighter tactics and often allowed his more experienced pilots to follow their own whims, including solo missions into British territory. Voss expressed his dissatisfaction to a fellow pilot, Rolf Lersner, and went outside the chain of command to petition for Walz’s removal. Upon learning of this, Walz requested reassignment to another squadron, and Voss and Lersner were also removed from Jagdstaffel 2. Voss was sent to Jagdstaffel 5 to assume temporary command. Voss’ victory total continued to climb, and he was later given acting command of Jagdstaffel 29 and, only 5 days later, Jagdstaffel 14.
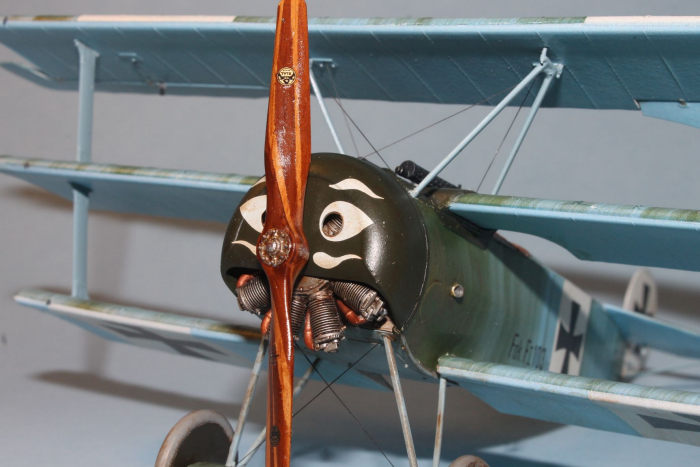
In July 1917 Voss was sent to Schwerin to become one of the test pilots for the F.1 triplane prototype. Voss became enamored with the new airplane because it was easy to fly with light controls, could out-maneuver any previous aircraft, and had a rapid rate of climb. On July 30 Voss moved to command Jagdstaffel 10 as part of Richthofen’s Flying Circus Jagdgeschwader 1. Voss was something of a loner and preferred to leave the details of command to Oblt. Ernst Weigand, while he made his “official” rounds on his motorcycle. On September 1 Voss and Richthofen were each given one of the brand-new Fokker Triplanes. Technically prototypes, the airplanes were designated F.1, with Richthofen’s being number 102/17 and Voss receiving number 103/17. Richthofen immediately took to the sky with it and in short order achieved two victories on September 1. Voss had immediate success too, and by September 11 his victory total was now at 47. Voss painted his cowling with the image of two eyes, eyebrows and a moustache. It is thought that the inspiration came from Japanese fighting kites that Voss had flown with his cousins as a child.
 Voss went
on leave for about ten days and returned to duty on September 23. He went on a
morning mission and shot down an Airco DH.4, although he returned to base with
several bullet holes in his Fokker. Later he enjoyed lunch and visited with two
of his brothers who noticed Voss looking tired and worn. Following the visit
Voss left for another patrol. At the same time, British squadrons were mustering
for their own patrols.
Voss went
on leave for about ten days and returned to duty on September 23. He went on a
morning mission and shot down an Airco DH.4, although he returned to base with
several bullet holes in his Fokker. Later he enjoyed lunch and visited with two
of his brothers who noticed Voss looking tired and worn. Following the visit
Voss left for another patrol. At the same time, British squadrons were mustering
for their own patrols.
Voss had left his wingmen behind as he raced into action. Unfortunately they never caught up to him. At around 18:30 hours, Voss encountered a lone SE.5a and gave pursuit, striking the aircraft several times driving it away. He was instantly joined by another SE.5a and Voss again damaged the British fighter forcing it to land. Suddenly Voss was engaged by ‘B’ Flight of 56 Squadron in their SE.5as, and began a remarkable display of flying skill as he battled, at times, 8 different British pilots. Instead of trying to escape, Voss whirled around and faced the squadron firing at them directly putting one out of action. Voss began zigzagging among the British fighters never holding a straight course for more than a few seconds. Voss put another SE.5a out of action, reducing the odds to six on one. At times Voss appeared to be caught in a crossfire only to come through unscathed. At one point it appeared that Voss could escape the fight by outclimbing them yet he returned again to the fight for more. By this time, he had put bullets in all his attackers’ aircraft.
Voss began firing at James McCudden in a head on attack when suddenly his plane was struck by a starboard burst of machine gun fire from British pilot Hoidge who was apparently unseen by Voss. Following this, Voss, possibly wounded, stopped maneuvering and began a level flight. Arthur Rhys-Davids began a long dive to catch up with Voss, and, once he did, raked Voss’ aircraft with an extended burst that produced no response from Voss. Rhys-Davids gave the Fokker another long burst, causing the Fokker’s engine to stop. A few hundred feet from earth, the Fokker stalled then dropped into an inverted dive, crashing into the ground. The resulting crash destroyed the Fokker, leaving only its rudder intact. McCudden later described the crash as causing the Fokker to disappear into a thousand fragments that seemed like powder. After battling the British for nearly eight minutes, and putting bullets in all of their planes, Werner Voss lay dead on the ground at age 23. The British pilots later paid public tribute to Voss, his amazing flying and shooting. Perhaps McCudden expressed it best when he said: “His flying was wonderful, his courage magnificent and in my opinion, he was the bravest German airman whom it has been my privilege to see fight.”
| THE KIT |
The Meng 1/32 Fokker Triplane was released in late 2020 following the demise of Wingnut Wings. At the time, Wingnut was in the development of two Fokker Triplane kits; however its closure ended that effort. Meng was producing the molds for the Triplane kits and took over production of the kits, releasing this kit late in 2020.
Other than the Roden kit,
there have been no 1/32 Triplane kits to my knowledge, and this release was
welcomed by the hobby community. Although not up to Wingnut standards in terms
of instructions and packaging, it still represents a good addition to the Fokker
Triplane collection of kits available. There are a couple of minor issues
affecting the kit: (1) The wings on some models have a distinct dihedral,
something the original Triplane did not have as the wings were level; and (2)
the right side of the turtle deck attached to the middle wing is prone to bend
or even break off in some models. Both of these defects are easy fixes. The
wings can be straightened by heating the plastic parts in hot (160 degree) water
for about a minute then removing them and gently bending them into shape. After
bending them I then taped mine flat on the work table to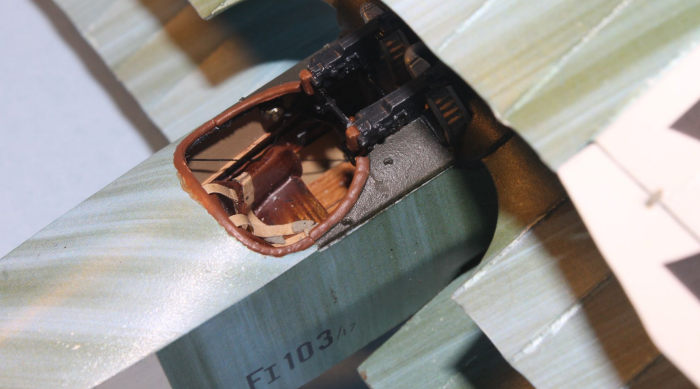 let them cool. If necessary the wings can be reheated and bent again to achieve
additional straightening. The turtle deck can be repaired by using a little CA
glue to strengthen the join to the part. If you should accidentally break yours
off, it can be reattached. Just use care when working with it.
let them cool. If necessary the wings can be reheated and bent again to achieve
additional straightening. The turtle deck can be repaired by using a little CA
glue to strengthen the join to the part. If you should accidentally break yours
off, it can be reattached. Just use care when working with it.
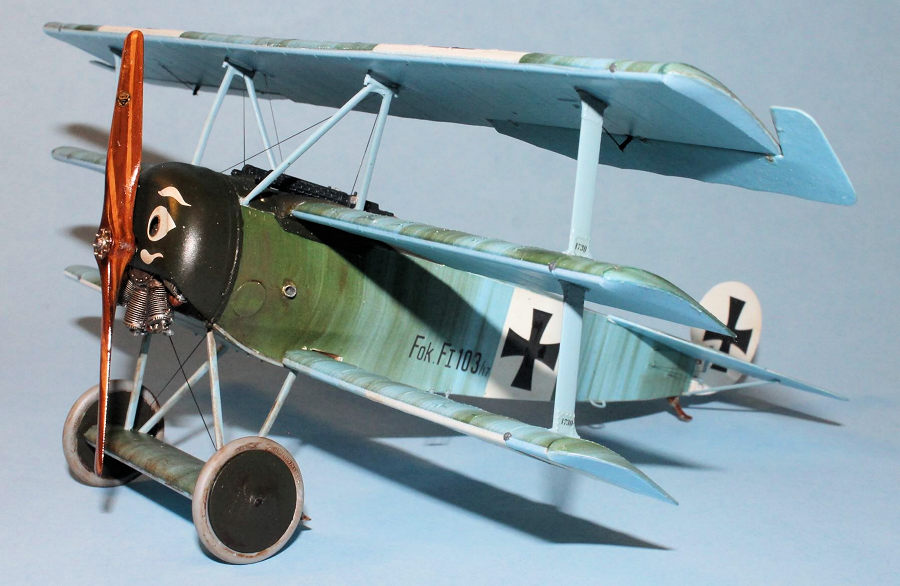
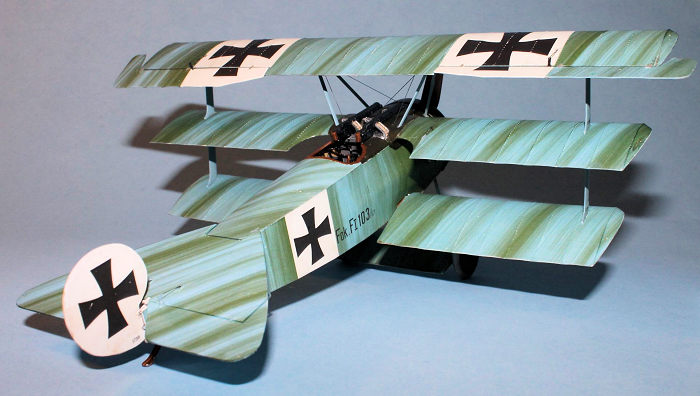
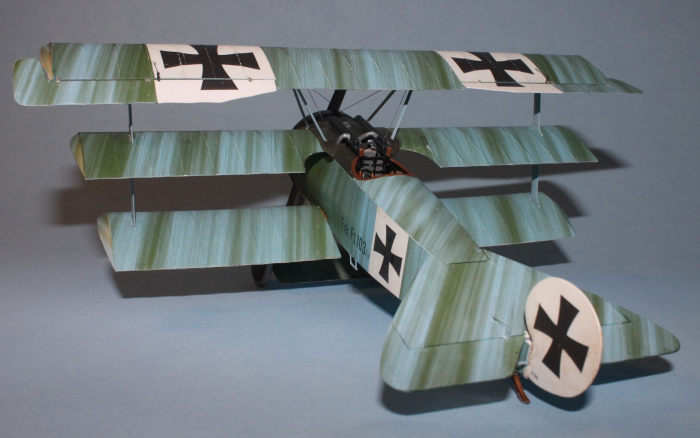
The kit consists of 112 parts in grey plastic, 15 photo etch parts on a single fret, and markings for four options: (1) Version ‘A,’ Richthofen’s all red Triplane in which he was finally killed, number 425/17; (2) Version ‘B,” Voss’ silvery blue Triplane, technically an F.1 prototype numbered 103/17; (3) Version ‘C,’ number 206/17 belonging to Oblt. Hermann Goering; and (4) Version ‘D,’ belonging to Ltn. Walter Gottsch, number 202/17 and sporting yellow and black markings.
The instructions are contained in a small booklet and come nowhere near Wingnut Wings standards, meaning there are no historical photo references, explanations of parts, and the other fun reference material supplied in a Wingnut kit. There are color profiles of each of the Triplane versions in the kit, and color references in the back of the instructions, but interestingly, almost no instructions for which parts these colors apply to. The decals are all contained on a small sheet and are somewhat thick with a matte finish. The few I used did not respond to setting solution at all, even Solvaset. I would recommend finding another source from aftermarket makers. There is a clear parts fret which contains, surprisingly, a reflector sight which I didn’t know existed in WWI. However a little research revealed that reflector sights were first introduced in 1918 and used on Fokker Triplanes, replacing the traditional ring sights.
| CONSTRUCTION |
I decided to do Voss’ airplane for a couple of reasons. One, I had always admired this ace who achieved so much within so short a time. Secondly, I remember building the old Revell 1/28th kit in Voss markings when I was about 10. I distinctly remember the face painted on the cowling and wanted to have a model of this again.
I began construction in the
cockpit by attaching the pilot’s seat to the back panel. To this I added the
shoulder belts which were from HGW rather than using the kit supplied photo-etch
parts. I then began work on the floorboard to which were attached the control
stick and compass. I was about to add the fuel tank to the side framing when I
discovered this piece was missing from my kit. It looked like it had been
detached from the sprue. I knew I had not removed it so it apparently was
detached when the sprue was packaged. Not wanting to attempt construction of one
on my own, I contacted Meng using the email they provided. To my surprise I got
a response within 24 hours asking me to provide them with a photo of the sprue
and a code number stamped on the inside of the boxtop. I even offered to pay for
the missing part but they said that wouldn’t be necessary. Not knowing how long
this would take I began working on other parts of the kit, priming then painting
the wings a base coat of gloss white in preparation for the Aviattic decals I
intended to apply. I also assembled the axle wing which was a two-part top and
bottom assembly. I separated and cleaned up a number of parts including the wing
and landing gear struts. The wings fo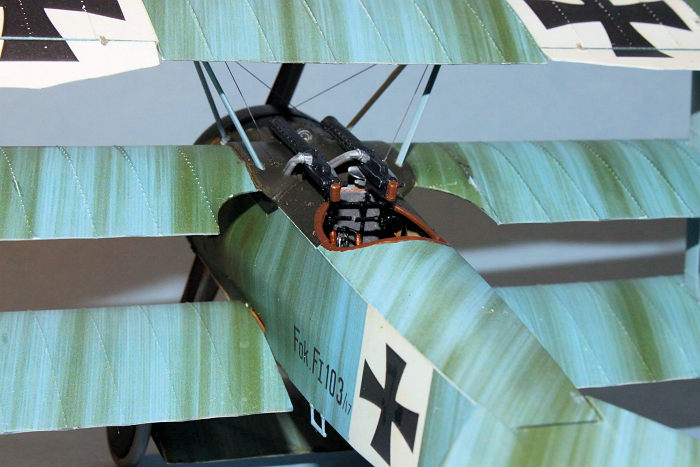 r
the Meng kit are each of one piece instead of a top and bottom that you often
see on Fokker Triplanes. As mentioned earlier, my wings had a slight dihedral
that I corrected by heating and gently bending, then taping them down to a flat
surface to cool in position. I also took advantage of the delay to apply the
Aviattic decals to the wings and tailplane, construct the engine, prepare the
machine guns, and paint the Axial propeller.
r
the Meng kit are each of one piece instead of a top and bottom that you often
see on Fokker Triplanes. As mentioned earlier, my wings had a slight dihedral
that I corrected by heating and gently bending, then taping them down to a flat
surface to cool in position. I also took advantage of the delay to apply the
Aviattic decals to the wings and tailplane, construct the engine, prepare the
machine guns, and paint the Axial propeller.
After about three weeks, the replacement sprue from Meng arrived complete with the fuel tank. I must compliment Meng on their response to my request. Not only did they promptly reply, they also provided detailed tracking information on the progress of my package, and they did it all for no charge. Most impressive.
I got back to work on the cockpit by installing the ammo box to the front of the fuel tank, then also added the rudder pedals to it and some control cables to the gauge at the bottom of the tank. I then attached the completed assembly to the internal cockpit framing, one side at a time. Once the frame was assembled I added the lap belts to the pilot’s seat and positioned the seatbelts casually in the seat. I also added some X rigging to the frame as well as some rigging to the control stick and rudder pedals.
I assembled the two fuselage halves together, as well as the seam along the bottom of the fuselage much like the Wingnut kits. I also added the firewall to the front of the fuselage. Some minor puttying and seam repair was necessary on the top of the fuselage, but that was it. I then primed and painted the fuselage with gloss white in preparation for the Aviattic decals.
| COLORS & MARKINGS |
As with most kits, I began
painting cockpit details first. The interior walls of the fuselage were painted
in Misterkit German Clear Doped Linen. The triangular wood sections on each side
were finished in a wood grain composed by simply applying Griffin’s Alkyd Burnt
Umber to the previously painted CDL. The back panel of the pilot’s seat was also
painted in CDL and given a light wash of thinned Burnt Umber. The pilot’s seat
was finished in Model Master Leather and given a wash of Burnt Umber as well.
The wooden floorboard was painted in MM Tan and given the wood grain treatment
with Griffin’s Burnt Umber. All the interior metal components such as the frame,
rudder pedals, and control stick were painted in Gloss Black. The wooden handles
on the control stick were also given the wood grain treatment with Griffins
Burnt Umber. The ammo box an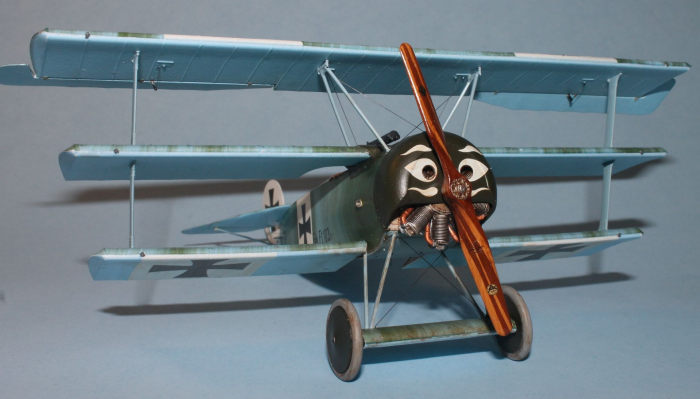 d
fuel tank were painted MM Aluminum, with the visible bullets painted brass and
partially overpainted with Sail Color to represent the cloth ammo belt. The tips
of the fuel spouts were painted MM Brass. The firewall was painted MM Steel,
then weathered with some thinned Burnt Umber.
d
fuel tank were painted MM Aluminum, with the visible bullets painted brass and
partially overpainted with Sail Color to represent the cloth ammo belt. The tips
of the fuel spouts were painted MM Brass. The firewall was painted MM Steel,
then weathered with some thinned Burnt Umber.
With the interior largely painted I turned my attention to applying the Aviattic decals to the airframe. Using Aviattic set ATT32304, I attempted to recreate the brownish green streaked over silvery blue Triplane flown by Ltn. Werner Voss in September 1917. Following the Aviattic instructions, I first painted the surfaces in white using Tamiya Gloss White. To ensure a smooth surface, I gently sanded a few rough spots and repainted those areas. Finally, I applied a coat of Future gloss finish. Aviattic decals are unlike most decals in that they are translucent. They can also be stretched gently and even removed and reapplied if necessary. Just be sure to follow the instructions exactly. When wet, be careful not to rub the surface too much or some color will come off. This can usually be repaired with some paint provided you can match the color of the decals.
I first applied the light blue undersurface decals. Soak the decals in warm water for 10-15 seconds then set them aside to allow the decals to separate from their backing sheet. Because the top wing was so long, I cut this decal in two then matched up the sections. It’s best to let the decals dry overnight, then the next day you can touch up any imperfect areas with decal softener and thinned white glue. Next, I applied the top surfaces making sure they slightly overlapped the underside portion. On the fuselage I applied the spine section then the two sides. The fuselage hatches took some MicroSol to get them to settle down. The axle wing was done the same way, applying the underside first then the top section.
The wheel covers have decals for them, but I decided to paint them in Tamiya Olive Green to match the turtle deck and cowling. I’ve applied Aviattic wheel cover decals before but was never totally satisfied with the appearance. I did apply the Aviattic decals to the rudder.
After the decals have set up for a few days, carefully trim off any excess and touch up areas as needed with MicroSol and/or thinned white glue.
| FINAL CONSTRUCTION |
Now that they were covered in decals, I began assembling the fuselage and wings. First to come is the middle wing which includes the turtle deck. Once attached I added the Spandau machine guns which I painted MM Gun Metal, with the gun chutes painted Aluminum. Photo-etch guns are included but I just used the kit supplied plastic ones. I’m a terrible photo-etch gun barrel roller and I didn’t have a Gaspatch set handy so I just took the lazy way out.
The instructions call for you to add the interplane struts to both the top and bottom of the mid wing. Prior to this I painted them with Misterkit Albatros Light Blue. Before attaching them it will be necessary to remove some paint from the strut ends and maybe even thin them down a bit so they will fit securely into the slots on the wings. After installing the mid wing and struts I added the bottom wing, making sure to paint the middle bar a wood tone before adding it to the bottom of the fuselage. It shows just a little between the wings and fuselage. Once the wing is added, insert the bottom wing struts, then attach the bottom panel to the fuselage.
Next up attach the top wing middle struts which are also painted Albatros Light Blue. This color doesn’t match the underside color, but it is a close match to the upper surfaces with the green streaking over it. I then turned the model over with the top wing on the work desk and applied a little glue into the locations for the interplane and top wing struts. Gently place the top wing struts into their respective locations and carefully turn the model over. Make sure all the struts are fully in place and then just hold the top wing in place with your hands as they set up. I know many folks prefer using a jig to attach wings, but I’ve never used one in all my years of modeling, and I’ve had (mostly) success so far.
 Once the
wings have set up a bit, attach the rear tailplane and rudder to the fuselage.
These went on with no issues. Turn the plane over again and attach the tail skid
and the undercarriage. The axle wing has four separate struts that fit into
exact locations and once in place they fit securely. I recommend adding the
wheels to the axle ends before attaching the undercarriage to the fuselage as it
is a bit tricky to add them afterward. The outer wheel covers are then attached
to the wheels.
Once the
wings have set up a bit, attach the rear tailplane and rudder to the fuselage.
These went on with no issues. Turn the plane over again and attach the tail skid
and the undercarriage. The axle wing has four separate struts that fit into
exact locations and once in place they fit securely. I recommend adding the
wheels to the axle ends before attaching the undercarriage to the fuselage as it
is a bit tricky to add them afterward. The outer wheel covers are then attached
to the wheels.
A few minor, but important details remain. The lifting handles and step are all attached to the fuselage. Next add the completed engine to the firewall, then attach the cowling. There is not a lot of “edge” to hang the cowling on. Very carefully apply cement to the inner edge of the cowling and carefully set it in place. Hold it in place for about a minute. Once fully dry, go back and apply a little white glue to fill any gaps. Once that is dry touch up the area as needed with some Tamiya Olive Green, and finish it with a coat of Future to add gloss.
Probably the most prominent feature of this model is the “face” applied to the cowling. It is thought that Voss had it applied as a reminder of the Japanese fighting kites he and his cousins played with as youngsters. The cowling face included with the Meng kit is inaccurate. To remedy this, I turned again to Aviattic which has produced a sheet of serial numbers, stencils, weights tables, and the Voss cowling face. These are traditional decals, although the face features are all separate decals that you will have to individually apply. Once the cowling was firmly in place, I applied the face decals then sealed them with a couple of coats of Future.
The Voss Triplane had neither a windshield nor wing skids, so I didn’t apply them. I finished up the kit by applying the limited amount of rigging to the tail section, upper wing ailerons, the upper wing struts, and undercarriage. I finished the model by giving it a light coat of Polly Scale Satin finish. After about a month of work, I had a model of Voss’ Fokker Triplane I was happy with.
| CONCLUSIONS |
This first foray for Meng into WWI aircraft is a commendable offering. The kit has been subject to some criticism because it doesn’t live up to the standards of Wingnut Wings kits that so many of us WWI modelers have been spoiled by. But as Triplane kits go, this is one of the best kits available in any scale. In fact, the only better one is Meng’s own 1/24th Triplane that they released about a year ago. This 1/32nd kit is highly recommended.
| REFERENCES |
Wikipedia, Werner Voss.
Windsock Datafile, Fokker Dr.1 Triplane
Meng kit instructions, and numerous references sought out over the many years of building Fokker Triplanes.
12 May 2023
Copyright ModelingMadness.com. All rights reserved. No reproduction in part or in whole without express permission.
If you would like your product reviewed fairly and fairly quickly, please contact the editor or see other details in the Note to Contributors.