Wingnut Wings 1/32 Hannover Cl.II
| KIT #: | 32079 |
| PRICE: | $150.00 or so |
| DECALS: | Five options |
| REVIEWER: | Otis Goodin |
| NOTES: | Outstanding kit. A bit labor intensive but well worth the effort. |
| HISTORY |
Hannoversche Waggonfabrik
AG (Hawa) initially manufactured railway carriages but began building aircraft
under license for other builders such as Aviatik, Rumpler and Halberstadt. By
the end of 1916 Hannover began building their own designs to Idfleig’s C class
specifications. The Hannover Cl. II was developed to serve as a lightweight
escort aircraft for heavier C Type bombers, artillery and reconnaissance
aircraft. They were normally assigned to Schuzstaffel (Protection Squadron),
although later this was c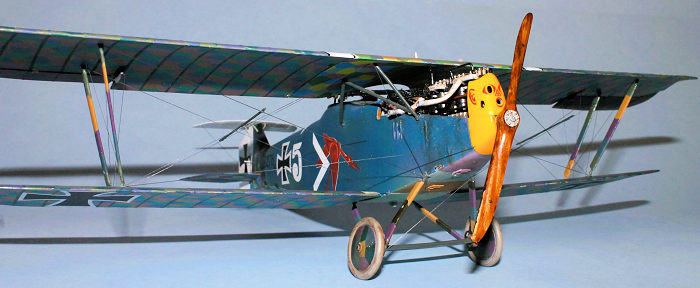 hanged
to Schlachtstaffel (Battle Squadron) following their transition to infantry
support. The Hannover could carry, in addition to small bombs, various camera
models and wireless equipment depending on the mission.
hanged
to Schlachtstaffel (Battle Squadron) following their transition to infantry
support. The Hannover could carry, in addition to small bombs, various camera
models and wireless equipment depending on the mission.
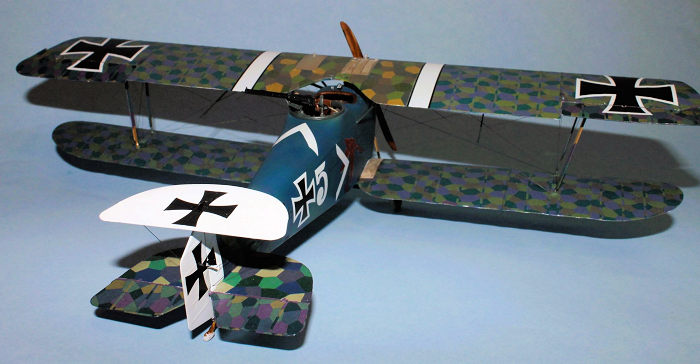
The Hannover wooden framed fuselage was skinned with 1.6 mm plywood which was often painted in large hand painted lozenges. This feature was often overpainted with a thin glaze coat allowing some of the original finish to show through. Prussian Blue, Dark Gray, and Green seem to be the predominant shades used. The wings were constructed of wooden spars and ribs, while the ailerons, top wing center section and tailplane were formed from steel tubing, all covered in either linen fabric and/or thin plywood. It was not unusual to see Hannovers finished with up to ten different lozenge patterns on one aircraft. The most unusual feature of the Hannover was the biplane horizontal tailplane. This design allowed for a shorter width tailplane, giving the observer a clearer view for firing.
The Hannover Cl. II was eventually replaced by the CL. III, a slightly shorter and narrower version of the Cl. II. Following WWI, Hannovers appeared in the Latvian and Polish air forces.
| THE KIT |
 The
Wingnut Wings Early version of the Hannover appeared in 2019. The later version
was issued in 2012. The kit has 261 parts spread over eleven sprues, three large
decal sheets featuring markings to build one of five different aircraft, a
glossy 26-page instruction booklet including detailed photos and color
references. A set of photo etch parts including seat belts and gun barrels is
included.
The
Wingnut Wings Early version of the Hannover appeared in 2019. The later version
was issued in 2012. The kit has 261 parts spread over eleven sprues, three large
decal sheets featuring markings to build one of five different aircraft, a
glossy 26-page instruction booklet including detailed photos and color
references. A set of photo etch parts including seat belts and gun barrels is
included.
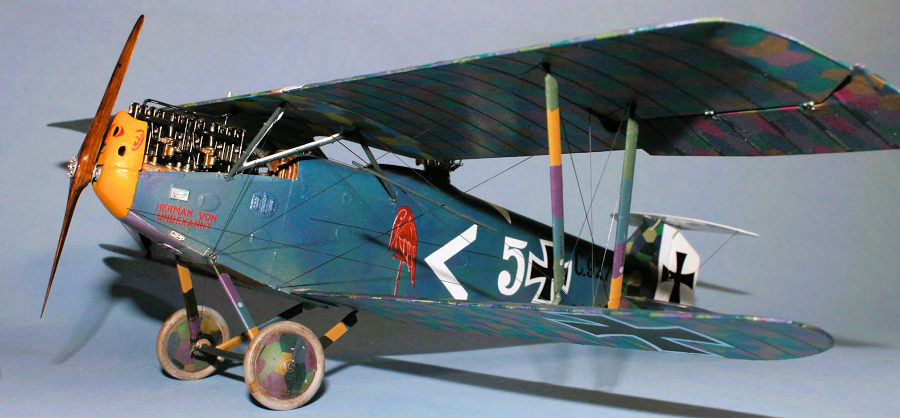
The five possible aircraft featured in the kit are (1)Hannover Cl.II 9280/17, November 1917; (2) Number 9301/17 “White 4” Royal Prussian Schusta 12, March 1918; (3) Hannover 9398/17 “2”, Royal Bavarian Schusta 24b, March 1918; (4) Hannover 622/18 “White 2”, Bayerisch-Fliegerschule 5, 1918; and (5) the plane I chose to build, 9276/17 “White 5”, Royal Bavarian Schusta 27b, late 1917.
| CONSTRUCTION |
As usual, construction begins in the cockpit with assembly of the instrument panel. To it are added a starting magneto, oil pump, the Spandau magazine access hatch, and the rudder pedals. The pedals are encased in metal housings and attached to the instrument panel from the back. Pilot’s seat belts are attached to a support frame to which is attached the seat. This is then added to the cockpit floor and fuel tank, as is the control column. Behind the pilot’s seat is attached a floorboard to which is installed a box for holding photographic plates. Technically these are only used for 2 of the aircraft in the kit, but I added it anyway for looks. Some photo-etch brackets are added to the floorboard, one set to the floorboard edge, the other two directly to the floorboard. A very nice Telefunken Type D Wireless unit is included for those aircraft carrying this, along with some decals for the controls. Although not required for my version, I added it anyway to fill up the back section. There is also a camera available, but I chose not to install it. I then installed the rear wall of the observer’s section to the floorboard, to which are added the seat, seatbelts, and some ammo magazines.
Some rigging is attached to
control horns on the front part of the floorboard on either side of the fuel
tank. A few items are attached to the side of the cockpit walls: an oil tank in
the engine section, a hand pressurizing pump for the oil tank, a clutch for the
wireless generator on the right side, a fuel pump and control handle on the left
side. Th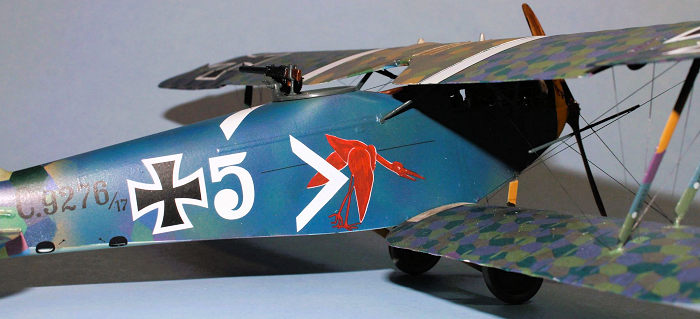 e
engine bearers are assembled and added to the front of the cockpit assembly,
which is then installed in the right half of the fuselage.
e
engine bearers are assembled and added to the front of the cockpit assembly,
which is then installed in the right half of the fuselage.
The instructions call for you to add the Spandau machine gun to the front of the cockpit on the right side. This is a tricky decision to make. It’s certainly easier to add it now while the cockpit is open; however, doing so will leave the gun exposed during the rest of the construction process, possibly allowing it to get knocked off or damaged. I tested it several times and decided to wait until later to install the gun. I also opted to leave off the cowlings on the right side which made it easier to add the gun later.
You can choose to assemble the engine now and install it in the engine bearers, or you can wait until later. Unless there’s going to be a problem installing the engine later, I usually wait to install it. Wingnut provides a detailed 180 hp Argus As. III engine that requires virtually nothing to be added to dress it up. Of course, you can always add a few wires, etc. here and there, but I rarely find that necessary. Once the engine is painted and the exhaust pipes installed, it makes an impressive addition to the model.
Prior to gluing the fuselage halves together, you are given the option of installing a floorboard over the large round hole in the fuselage bottom. If you’re going to add the camera, don’t install it, as this is where the camera peeks out to take photos. Obviously, a lot of interior painting will have taken place prior to gluing the fuselage halves together. That will be detailed in the Painting section later.
The bi-level horizontal tailplane is next to be assembled. Depending on the version being built different braces are added to support the structure. Be careful not to lose the elevator control horn that goes on top of the top tailplane. I lost mine in the carpet somewhere, so I had to fabricate a new one out of plastic card. Next add the elevators, and the rudder to the tail assembly.
The bottom wings are added
next, along with the remaining cowling sections. I left off all but the front
cowling, although I didn’t add it until closer to the end. I added the Spandau
machine gun to the front of the cockpit after first inserting the engine in
place. After painting them, add the wing and cabane struts. If you are going to
add the windshield now, be sure to mask it so it doesn’t get painted over. The
top wing is assembled next. There are three main sections, left, right and
middle, along with the ailerons and the radiator. The ailerons come with the
control horns installed. There is a photo-etch radiator shutter attached to the
underside of the middle section of the wing. There is a minimal, but definite,
amount of separation between the three wing sections so don’t fill it in with
putty or glue. Once assembled, the wing is attached to the cabane and wing
struts. I just attach the wing to the cabane struts first, then go back and a dd
the wing struts one by one, alternating one strut at a time on each side. This
is far easier than trying to attach the wing to eight different strut locations
at once. The top wing went on with no problems, so I set it aside and worked on
the landing gear next.
dd
the wing struts one by one, alternating one strut at a time on each side. This
is far easier than trying to attach the wing to eight different strut locations
at once. The top wing went on with no problems, so I set it aside and worked on
the landing gear next.
The landing gear consists of 12 separate parts: the two arms, the cross beams, the inner wheel hubs, the tires, the little “C” shaped part that holds the wheels in place and allows them to turn, and the outer wheel hubs. Take your time, testing the fit as you go. Some Wingnut kits tend to rock from side to side, as the landing gear legs, while in scale, are simply not strong enough to hold the aircraft stable. Fortunately, there was no such problem with the Hannover.
Depending on your choice of aircraft, instructions call for you to add a generator to the landing gear leg, or an anemometer to one of the wing struts. My version called for neither so I moved on to the propeller. I chose the Germania prop, because I had one already painted, although instructions call for the Neindorf. WWI aircraft could use several different makes of propellers during their useful life, as they were often damaged and replaced several times.
Depending on your version, add the observer’s armament. You have a choice between a Parabellum LMG 14 or a 14/17. Mine used the 14 so I “rolled” the photo-etch cooling jacket and attached it to the gun, then added the magazine holder and movable strut arm to the gun. This was then installed to the fuselage ring atop the observer’s station. I also added a piece of EZ Line from the barrel to the magazine to represent the bracing rod often attached to the gun.
There are several optional accessories that can be added to the aircraft, but I chose not to use any of them. At this point I turned to rigging the Hannover. Rigging is always the one part of WWI aircraft that intimidates most people who have never built them before. That’s certainly understandable, as it is hard to know where to start. I usually start from the aircraft interior and work outward. I also don’t use turnbuckles, as Wingnut advises against it, and I have never had much success with them. The key is to go slow, have good light and a magnifying glass if possible, and plan your steps ahead of time. I use EZ Line and CA glue applied with a sharpened toothpick, but there are other options available. If you’ve never rigged before, read up on it first and practice a few times before attacking your model. The Hannover is not particularly difficult as biplanes go, certainly not compared to a British DH.2. The trickiest part of this airplane was applying the rigging batons to the wing rigging. I used 0.5 plastic rod for the batons, cut to length and applied with a drop of CA glue at each end. The batons acted as tensioners to keep the rigging tight.
| COLORS AND MARKINGS |
Wingnut provides extensive painting and decal instructions. The interior, including the instrument panel, is mostly wood, so I made a wood finish by spraying the interior with Model Master Tan and then glazing it with thinned Griffins Alkyd Burnt Umber, making sure to create a wood grain texture with the brush. The Griffins dries overnight, unlike traditional oils. I applied this technique to the fuselage walls, the floorboard, the observer’s compartment, and the engine area. The seat support brackets were painted with Model Master RLM Gray, as were various metal parts on the interior. The pilot seat is Tamiya Aluminum, with the seat cushion finished in MM Leather and glazed with the Griffins Burnt Umber. The seat belts were painted MM Tan and highlighted with a thin glaze of Burnt Umber. The Telefunken Wireless unit was painted with MM Schwarzgrun with the adjacent handle unit in Wood. The fuel tank was also painted Schwarzgrun with some brass details.
The Argus engine was painted according to instructions with an Aluminum crankcase, and Dark Gun Metal cylinders. Various components were painted Aluminum, Gun Metal, Black and Brass. The tubes for spark plug leads were painted Rust. The exhaust pipes were painted White, then drybrushed with Light Gray.
 Most of the
exterior was covered in some form of lozenge camouflage. I used the kit decals
throughout, in addition to some Aviattic decals described below. The wings are
covered in a four-color pattern of upper and lower surface for the right and
left halves of the wings. The middle section has its own slightly larger
pattern, both upper and lower. I gave this upper section a thinned brown glaze
to tone down the colors. The ailerons are covered in five-color lozenge, top and
bottom, as are the elevators on the tail section. The horizontal tailplane has a
separate four-color pattern from the wings, and the rear of the fuselage, both
top and bottom, has another distinctive lozenge pattern. In all there are ten
separate lozenge patterns clearly visible on the aircraft. The top horizontal
tailplane is White.
Most of the
exterior was covered in some form of lozenge camouflage. I used the kit decals
throughout, in addition to some Aviattic decals described below. The wings are
covered in a four-color pattern of upper and lower surface for the right and
left halves of the wings. The middle section has its own slightly larger
pattern, both upper and lower. I gave this upper section a thinned brown glaze
to tone down the colors. The ailerons are covered in five-color lozenge, top and
bottom, as are the elevators on the tail section. The horizontal tailplane has a
separate four-color pattern from the wings, and the rear of the fuselage, both
top and bottom, has another distinctive lozenge pattern. In all there are ten
separate lozenge patterns clearly visible on the aircraft. The top horizontal
tailplane is White.
Hannovers were often delivered from the factory with large hand painted lozenges on the fuselage. These were often obscured with a thin glaze usually in Prussian Blue, Dark Gray or Green, This particular aircraft had a Prussian Blue finish on the fuselage. I didn’t trust myself to do a good job hand painting the large lozenge so I came up with the idea of using Aviattic 1/24 scale lozenge camo to represent this. I cut it into sections to fit the fuselage and applied it according to directions which means over a white glossy surface. The decals went on well and I was pleased with the result. Then came the process of applying the Prussian Blue glaze. I used Vallejo Prussian Blue thinned to about a 50% ratio, airbrushed on very carefully on a low-pressure setting (10-15 psi). I sprayed it heavier on top and lighter toward the bottom making sure that some of the lozenge showed through. In places I went back over it with some light green, purple and tan to reemphasize some of the lozenge pattern. The bottom of the fuselage was painted in a multi-color pattern of unequal stripes applied horizontally. I used light blue, light green, pink, tan and violet.
The wing and undercarriage struts were also hand painted in a lozenge pattern. I used Misterkit WWI colors of Albatros Medium Blue, Tan and Fokker Dark Green. The wheel covers were covered in kit supplied four-color lozenge.
The front cowling is Tamiya Yellow, the tires are Dark Gray, and the tailskid is given the wood finish treatment. The observer’s ring is finished in Schwarzgrun, and the machine gun is Dark Blue Gun Metal, with a wood finished stock.
The fuselage and wing markings were applied after all the lozenge was finished. The front cowling has a face decal. The prop has two small decals on it so I applied Future to give it a gloss finish, then another coat to seal them.
| CONCLUSIONS |
After about six weeks of steady work, my Hannover was finished. I remember starting the old Eduard 1/48 scale Hannover, but it was somewhat crude and there was so much photo-etch that I gave up on it. Many thanks to Richard Alexander and the crew at Wingnut Wings (before they went out of business) for making a very beautiful and distinctive model. FWIW, Richard and gang are now at Kotare Models, successfully turning out some beautiful Spitfires and who knows what else.
| REFERENCES |
Wingnut Wings kit instructions
Hannover Cl.II, Wikipedia.
Hannover Cl.II, Albatros Publications.
9 November 2023
Copyright ModelingMadness.com. All rights reserved. No reproduction in part or in whole without express permission.
If you would like your product reviewed fairly and fairly quickly, please contact the editor or see other details in the Note to Contributors.