| KIT #: | 016 |
| PRICE: | $ |
| DECALS: | three options |
| REVIEWER: | Dave Cummings |
| NOTES: | Night Raider boxing |
| HISTORY |
 The Gotha was
the first “strategic bomber” designed to attack targets and populace of an
adversary’s home country. The first truly, combat capable, Gotha was the G.II
fielded in April 1916. Many of the deficiencies identified in operational use
gave rise to the G.IV in 1917. Gotha bombing raids brought terror to the British
populace resulting in pulling badly needed fighter squadrons and anti-aircraft
from the front to defend England. As defenses strengthened losses became
critical. Slow and ungainly, they were easy prey for fighters. As would be the
case twenty something years later in WWII, it was decided to switch to night
bombing to decrease losses. One problem plaguing the type from the beginning was
difficulty in landing. Night operations increased this hazard to the point that
landing accidents were the leading cause of Gotha losses. Early aircraft designs
had to account for the limited engine power available. To achieve acceptable
combat performance the center of gravity of the Gotha was balanced for its bomb
load. Once released the airplane became a handful and was prone to nosing over
on landing. The last of the series, the G.V, was given an additional set of
wheels to prevent this.
The Gotha was
the first “strategic bomber” designed to attack targets and populace of an
adversary’s home country. The first truly, combat capable, Gotha was the G.II
fielded in April 1916. Many of the deficiencies identified in operational use
gave rise to the G.IV in 1917. Gotha bombing raids brought terror to the British
populace resulting in pulling badly needed fighter squadrons and anti-aircraft
from the front to defend England. As defenses strengthened losses became
critical. Slow and ungainly, they were easy prey for fighters. As would be the
case twenty something years later in WWII, it was decided to switch to night
bombing to decrease losses. One problem plaguing the type from the beginning was
difficulty in landing. Night operations increased this hazard to the point that
landing accidents were the leading cause of Gotha losses. Early aircraft designs
had to account for the limited engine power available. To achieve acceptable
combat performance the center of gravity of the Gotha was balanced for its bomb
load. Once released the airplane became a handful and was prone to nosing over
on landing. The last of the series, the G.V, was given an additional set of
wheels to prevent this.
| THE KIT |
Don’t have a clue as to the date of this kit. Packed
in a sturdy top opening box are five sprues of light gray plastic, one clear,
two sheets of lozenge camo decal, and one sheet of marking decals for the three
options. 130 parts, not all of which are used. Roden uses common sprues for
different marks of an aircraft. Kits from this Ukrainian company border on
mainstream engineering, but not quite. The parts are well molded and detailed
for this scale. The Parabellum MGs are well done with separate drum magazines.
Wings are scale thin with finely scalloped trailing edges which are spoiled
somewhat with flash. Instructions are good. Decals not so much. The lozenge
sheets were surprisingly easy to work with. The insignia decals were not. Well
printed and thin, mine were brittle and prone to roll up. The 12-page
multi-lingual instruction booklet is pretty good. Steps are logical and drawings
are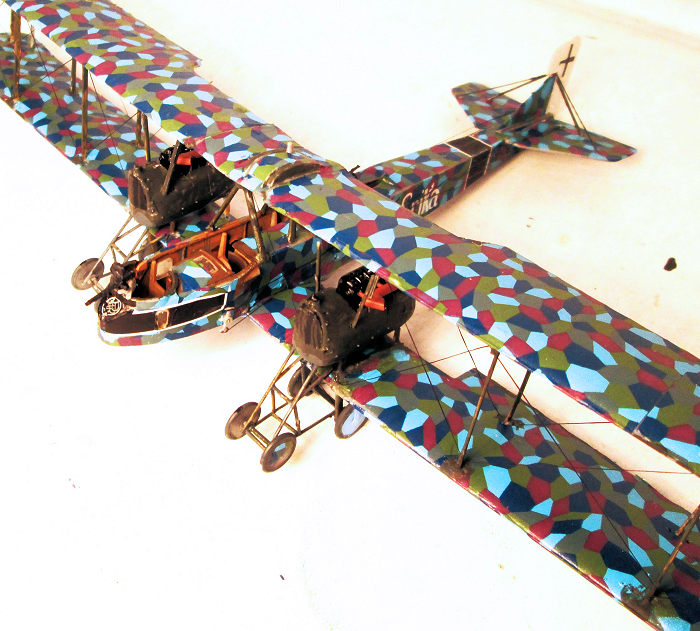 good
with parts numbers and color call outs for Humbrol paints. There are b&w 3-view
paint and decaling drawings for each option. There is a separate sheet of cutout
patterns for the lozenge decal. There is no rigging diagram so one needs to look
at the box top picture and do some research. The sprue attachment points are
thick. Some of the flimsy parts are difficult to cut from the sprue without
breaking. There are no placement guides like tabs into slots or alignment pins
into holes. Everything is butt joined which also makes for a weak glue joint.
There is some flash to be cleaned up which puts small parts in further jeopardy.
Fit is overall good except for the engines. There are three options: w/n 904/16,
Boghol 3, 1918, with the name “Erika” on the side, w/n 947/16, Bogohl 3, 1918
with a large KZ on the side, and w/n 906/16, also of Bogohl 3 but earlier in
1917 so is painted pale blue instead of the lozenge covering.
good
with parts numbers and color call outs for Humbrol paints. There are b&w 3-view
paint and decaling drawings for each option. There is a separate sheet of cutout
patterns for the lozenge decal. There is no rigging diagram so one needs to look
at the box top picture and do some research. The sprue attachment points are
thick. Some of the flimsy parts are difficult to cut from the sprue without
breaking. There are no placement guides like tabs into slots or alignment pins
into holes. Everything is butt joined which also makes for a weak glue joint.
There is some flash to be cleaned up which puts small parts in further jeopardy.
Fit is overall good except for the engines. There are three options: w/n 904/16,
Boghol 3, 1918, with the name “Erika” on the side, w/n 947/16, Bogohl 3, 1918
with a large KZ on the side, and w/n 906/16, also of Bogohl 3 but earlier in
1917 so is painted pale blue instead of the lozenge covering.
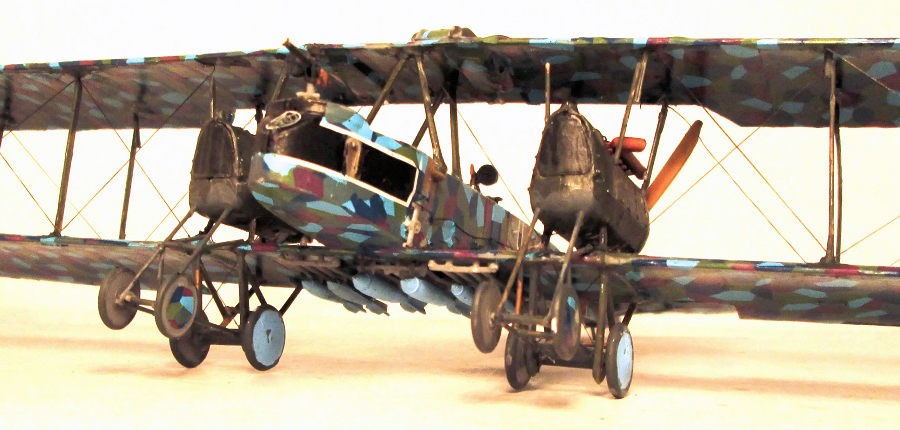
So, in all honesty, I never would have bought this kit for myself. I tell family not to buy me any model kits. You know, you want what you want. But it happens anyway. My daughter-in-law and husband sent me this for my birthday. I really didn’t want to tackle it. But you know the deal, one day when they come to visit, they are going to ask about it. I am far from a master modeler and was immediately intimidated on opening the box. But my task was before me, I was determined to put this thing together. Not being all that inspired by the subject my goal was to just get the thing together. My daughter-in-law wouldn’t know the difference between a well done model, and something just slapped together. So, whatever it takes to survive this ordeal. I wanted to do the 1917 option as it would be easiest not having the lozenge and the anti-rollover bogies. But alas, daughters name is Erica and I suspect this may have had something to do with choosing this kit. So, Erika it is.
| CONSTRUCTION |
I studied the instructions before starting. They
present a logical process, note places requiring drilling and cutting. I began
with cutting parts from sprue. This is aided by relatively soft plastic. A razor
saw is helpful in places. Still, a few delicate things were broken. Much cleanup
of parts needed including removal of some flash. Building begins with a series
of sub-assemblies; guns, interior bits, bombs and such. Interior starts with
clear windows attached inside the fuselage halves. Then a series of bulkheads
and gunner seats. Cockpit includes floor, seat, rudder pedals, instrument panel,
and control column. Kind of sparse but I imagine the real thing was also.
Interior was painted wood brown mostly. Everything fits nicely, despite the lack
of alignment pins. Fuselage done with no issues which greatly boosted my
confidence. You must make your own plan on when and where to apply the lozenge
decal covering. I attached the lower wing center section and figured it best to
cover the fuselage at this point. The cut-out patterns are numbered, and the
placement guide is on the 3-view drawing. You also need to consider cutting the
larger sections in half to make it easier to work with. I really had no issues
here. The lozenge decal is fairly thick so not too difficult to work into place
without tearing. They are a bit resistant to decal solvents, but the exterior is
mostly smooth with no panel lines anyway. The window openings need to be cut
out. With the fuselage covered I also covered the tail planes and painted the
rudder white. With control cables running along the exterior, I determined it
best to finish decaling the fuselage before proceeding. I began with the werk
number. This decal sheet is totally different from the lozenge. I soaked it for
a minute then checked if it was loose, nope, soaked another minute, nope, soaked
another minute and checked. A chunk of number broke loose. Put the rest back in
water and applied that little piece. Then finally the rest was ready to slide
but cracked which I tried to get all together neatly. So now I knew what I was
facing. I used very warm, near hot water for the rest. This helped, but it was
an exercise in frustration. I got it all on. But there are little missing chunks
out of Erika and other places. Oh well, operati onal
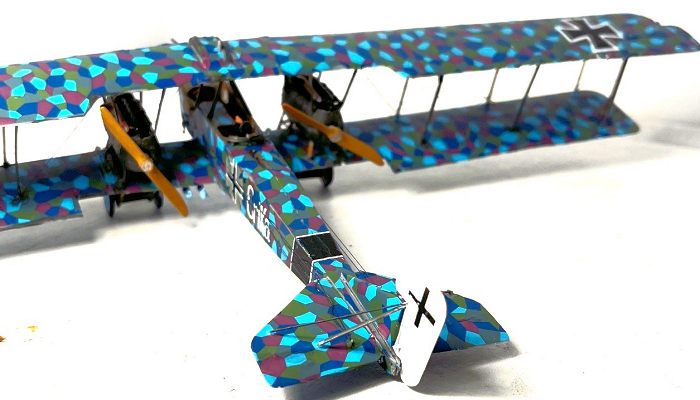
wear and tear. When dry I glued on the tail feathers and supporting struts. One
of these broke in the cutting process. Luckily, I found a suitable replacement
in the spares box. So, a little ragged but fuselage complete. My hopes were
buoyed.
onal
wear and tear. When dry I glued on the tail feathers and supporting struts. One
of these broke in the cutting process. Luckily, I found a suitable replacement
in the spares box. So, a little ragged but fuselage complete. My hopes were
buoyed.
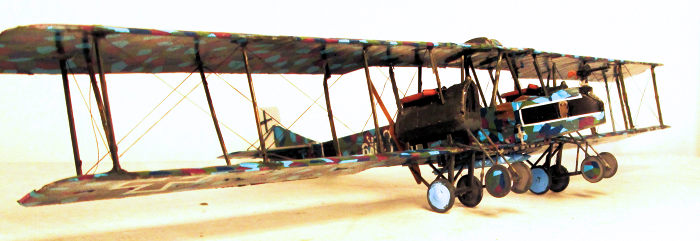
Wings are in three parts. Step 10 is a cutting guide. It shows cutting off a little corner on upper wing, easily done with a sprue cutter. Then they want you to taper the inner edge of both wings to 1.5mm at the trailing edge to provide 3 degrees 10 minutes sweepback. Not having the necessary precision milling machine required, I clamped wings together and gave ‘em a whack with a coarse emory board. These are very long thin wings, and I was concerned about the strength of the butt joined sections. I cut some suitable gussets from thin plastic sheet and glued along the underside joint to add some strength. When covered with lozenge they are near invisible. The instructions have you glue the wings together with 3 degrees 30 minutes dihedral. Not having my slide rule anymore, I stacked a couple nickels under the tips and weighted the center. The wings were then lozenged with no problems, do the lowers before attaching. The wings have some small holes marking strut location. After decaling, these holes have to be located and cleared of decal with a drill bit. You should also enlarge these holes a little to aid strut attachment. If you are an expert modeler, unlike me, you would consider drilling holes for rigging at this point. I didn’t worry about it. Then the wing cross decals were applied. Luckily there are extra crosses, you will probably need them. I did.
The engines consist of nine parts. Here I encountered the only fit issues, and some filler was needed for the engine nacelles. Note there are different exhaust parts for the options. Paint callout for the engines is Humbrol Matt Army Green. I used RLM 72 Green. The engines are mounted on struts to the lower wing center section. Pusher engines are counter intuitive, don’t mount them backwards. Following this I glued the lower wings in place with the afore-mentioned dihedral and gusset method.
And now (drum roll please) it is time to attach the
upper wing. The struts are to scale flimsy thin and taper to a point which fit,
hopefully into their respective mounting holes. Now, real modelers know about
making jigs and such. I don’t. So I just glued struts (22 not including the
cabane struts I added later) to the lower wing and eyeballed getting them
parallel with each other. When dry I turned upside down
 and placed
on upper wing to check strut alignment. Ok, problems. I started bending struts
to fit their respective upper wing holes. Worked with some, some would not go,
some were too long. I noted the four long ones and snipped off the ends with a
sprue cutter. Obviously this meant I would cut too much and they were now too
short. OK, go for it. Got struts fit into place, kind of, and hit them with
liquid cement, generously. I cut some little pieces of strut material from the
spares box. I spliced these onto the too short struts to fill the gap. Not very
professional, certainly not very pretty. But like I said at the beginning, I
just want to get this thing together however possible. After setting, I
reinforced each strut join with a glob of super glue. With that, the hard part
is over and the wing is on. Still belly up, I attached the bombs and racks. Then
the landing gears which went together with no problems, surprisingly. Flipping
her over I attached the cabane struts in place. The lozenge covering has some
shine to it so at this point I sprayed it all with Dullcoat.
and placed
on upper wing to check strut alignment. Ok, problems. I started bending struts
to fit their respective upper wing holes. Worked with some, some would not go,
some were too long. I noted the four long ones and snipped off the ends with a
sprue cutter. Obviously this meant I would cut too much and they were now too
short. OK, go for it. Got struts fit into place, kind of, and hit them with
liquid cement, generously. I cut some little pieces of strut material from the
spares box. I spliced these onto the too short struts to fill the gap. Not very
professional, certainly not very pretty. But like I said at the beginning, I
just want to get this thing together however possible. After setting, I
reinforced each strut join with a glob of super glue. With that, the hard part
is over and the wing is on. Still belly up, I attached the bombs and racks. Then
the landing gears which went together with no problems, surprisingly. Flipping
her over I attached the cabane struts in place. The lozenge covering has some
shine to it so at this point I sprayed it all with Dullcoat.
Next is rigging. For this I had obtained some EZ Line which I had read about. Had not used it before. Wow, it has changed my life from my previous rigging method. My plan was not to do full rigging but enough to give the effect. I used two forceps to hold the line tight against an upper strut joint and hit with a drop of fast setting super glue. When set I stretched it down to the next lower strut joint, let set, then up to the next joint making Ws. Repeat from opposite end making the Xs between wings. Except for setting times this went quickly and easily. Again, not the most professional, but at display case range it looks good. Shiny glue blobs were hit with a dab of flat green paint. Finally, I attached the machine guns and props and it was done.
So, the top wing winds up being a bit too high. The struts are wonky in places. Little chunks of decal markings are missing here and there. But it is an impressive looking little thing, if you don’t look too closely. But at least it is together, which is all I had hoped to do.
| CONCLUSIONS |
Not an easy project for my meager skills. Certainly not a kit for beginners. But everything is there to make a realistic replica for those with the skills and patience to maximize the potential of this kit. I wasn’t able to give this project the effort it deserves. But still, it is an impressive looking piece. I’m sure Erica will be impressed.
| REFERENCES |
Internet, Modeling Madness Reviews.
Dave Cummings
12 January 2026
Copyright ModelingMadness.com. All rights reserved. No reproduction in part or in whole without express permission.
If you would like your product reviewed fairly and fairly quickly, please contact the editor or see other details in the Note to Contributors.