Special Hobby 1/48 Lloyd C.V
| KIT #: | 48013 |
| PRICE: | $29.98 MSRP |
| DECALS: | Three options |
| REVIEWER: | Kyle Bodily |
| NOTES: |
| HISTORY |
The Lloyd C.V was an attempt to build a very strong fast aircraft. For the most part that is what it did. Its almost all-wood construction allowed for a smooth streamlined fuselage that more often resembled a fine piece of furniture rather then a combat aircraft. The wings were quite unique in that they did not have any wing spars. Instead the wing was constructed with 14 spanwise stringers equally spaced around seven ribs and covered with 1.2 mm veneer. While this process was time consuming the wing was light, strong and could withstand much abuse.
 In the field it was discovered that
if the wing was damaged in flight, the ply had a tendency to peel off in the
slipstream and it was not easy to fix. To add to this the ground crews were not
told just how to repair such damage. So even slightly damaged wings were send
back to rear depots for exchange. To add to this the wing had a tendency to
sweat on the in side which would cause the inside plywood to warp or even
delaminate and this was not detectable.
In the field it was discovered that
if the wing was damaged in flight, the ply had a tendency to peel off in the
slipstream and it was not easy to fix. To add to this the ground crews were not
told just how to repair such damage. So even slightly damaged wings were send
back to rear depots for exchange. To add to this the wing had a tendency to
sweat on the in side which would cause the inside plywood to warp or even
delaminate and this was not detectable.
While it was praised for its speed and maneuverability it was considered to be a handful by even experienced pilots.
It mostly served as a spotter aircraft for artillery but was also used as a photo reconnisance aircraft, light bomber, advanced trainer and hack
Only 144 C.Vs were built by just two contractors. The Lloyd and WKF (Wiener Karosserie und Flugzeugfabrik) companies.
After the war Poland operated at least five aircraft. Hungry and Ukraine also used several.
| THE KIT |
This looks to be a really nice kit. First you will find two trees of molded plastic parts and a bag of very nicely done resin detail parts. As if that is not enough you also get a fret of photo-etched parts and a piece of film to build all the neat looking instruments and another piece of film to make the wind screen. When it comes to value the folks at Special hobby are easily at the top of the heap.
 The plastic looks very good with
nice detail and is relatively flash free. The resin is excellent and looks like
it will add a lot to the kit. Just to let you know there are 32 resin parts!
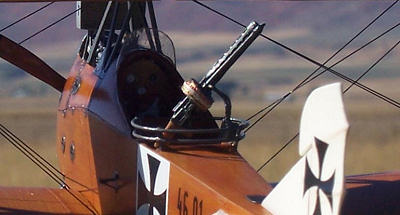
The only draw back that I can see is that they give you a German Perabellum LMG
14 instead of a much more common, for Austria-Hungry that is, was the
Austro-Hungarian Schwarzlose M 7/12. But hay, the Austro-Hungarian did use a
lot of German equipment and the Perabellum LMG 14 can be found mounted on a few
A-H aircraft. So in the end this is no big deal I just think that a Schwarzlose
would have been cool.
The plastic looks very good with
nice detail and is relatively flash free. The resin is excellent and looks like
it will add a lot to the kit. Just to let you know there are 32 resin parts!
The only draw back that I can see is that they give you a German Perabellum LMG
14 instead of a much more common, for Austria-Hungry that is, was the
Austro-Hungarian Schwarzlose M 7/12. But hay, the Austro-Hungarian did use a
lot of German equipment and the Perabellum LMG 14 can be found mounted on a few
A-H aircraft. So in the end this is no big deal I just think that a Schwarzlose
would have been cool.
Now for the decals. All I can say here is that they are some of the best that I've seen. They are crisp and clear with enough to build three different machines. All are first production run Lloyd built aircraft and all had different markings so you will have some nice decals for your parts/spares box.
The instructions look very nice also. They appear to be well made, don’t seem to leave anything out and include a clear rigging diagram as well.
All in all I am getting excited to start building this kit.
| CONSTRUCTION |
I started with the cockpit and found
no real problems here. The entire cockpit is resin and is a little work of
art. It did take a little fitting the resin cockpit in to the fuselage
correctly but nothing major at all. I got the engine coaxed in and closed up
the fuselage. I cleaned up the wings and got them ready to paint. Now you can
use the wings as they are or you can separate then to better resemble the real
aircraft. For this I used a x-acto saw and a little miter box to make my cuts
as accurately as possible. Stuff like this really does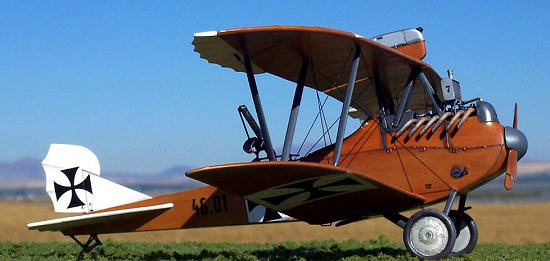 pay off in the end. In
a much easier time building and, I think a better looking model.
pay off in the end. In
a much easier time building and, I think a better looking model.
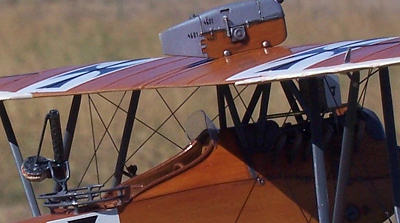
Every thing was going well when I tried to assemble the gun ring. I just could not make it work and the PE metal that it is made out of is quite soft. Well as you might guess it soon became unsalvageable and I built one out of brass wire. I think that the brass wire actually looks better then the PE one also. So, when I build my next one I will just use the PE rings as a template and save the hour-long headache for another kit.
After I assembled the cabane struts I mounted the wing and then did the interplane struts. And found the cabanes to be just a little bit to long. Once again not a big deal you just shorten them.
This kit doesn’t have many locator pins. So, be careful how you line up everything and let things dry thoroughly so you don’t knock something askew while you build. Because of this you will have to really rely on your references and the instructions to get everything lined up. But you can do it, trust me if I can do it you can to.
| COLORS & MARKINGS |
 Well, this aircraft unlike most
Austro-Hungarian or any aircraft of the time was almost all wood. So I started
by painting most all the parts Testers Wood. After this has dried I use oil paints
to simulate the wood grain. This is really not that hard and seems to impart a
convincing wood grain finish. I have several shades of brown and tan that I mix
as needed to get the shades that I want. Then I use a small Hogs hairbrush to
tap on some oil paints in random patterns and than streak it with a stiff
bristle fan type brush. The oil paint will take some time to dry so you can
fiddle with it for a while to get the look that suits you.
Well, this aircraft unlike most
Austro-Hungarian or any aircraft of the time was almost all wood. So I started
by painting most all the parts Testers Wood. After this has dried I use oil paints
to simulate the wood grain. This is really not that hard and seems to impart a
convincing wood grain finish. I have several shades of brown and tan that I mix
as needed to get the shades that I want. Then I use a small Hogs hairbrush to
tap on some oil paints in random patterns and than streak it with a stiff
bristle fan type brush. The oil paint will take some time to dry so you can
fiddle with it for a while to get the look that suits you.
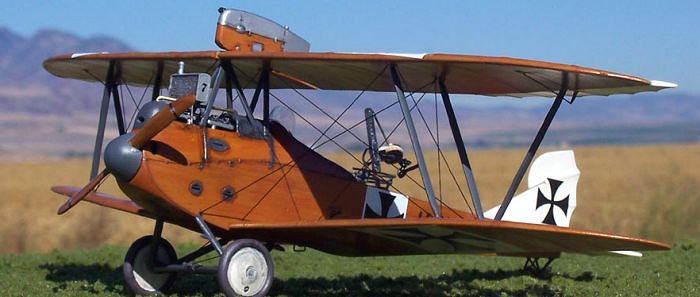
The engine panels were hard to settle on a color. The prototype looks like it had bare metal cowlings while all the production and in service aircraft that I could find pictures of had dark engine panels. Now, this prototype, 40.11 was looked over by Flars engineers and various changes were to be made before Lloyd could start it build it as the C.V. After it was brought up front line standards it was designated as Lloyd C.V 46.01 and was sent to the Russian front. Well to make a long story short I settled on a dark gray for all the engine panels and struts. Testers RLM 66 to be exact.
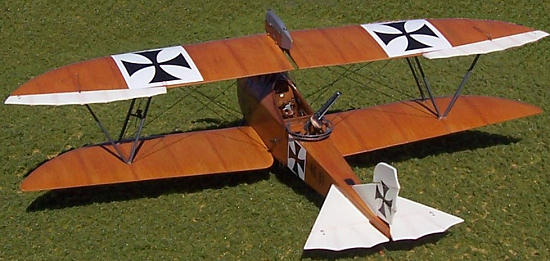
 Another thing is the shade of the
wood. Most of the Lloyd C.V models that I’ve seen built were very dark. Most
references say that they were made out of mahogany, which is a very dark wood.
While all of the pictures of WKF built C.Vs look dark I have not seen any Lloyd
built aircraft with like colored wood. They look to me to be more of a dark
honey color to me so that is the way I did this kit.
Another thing is the shade of the
wood. Most of the Lloyd C.V models that I’ve seen built were very dark. Most
references say that they were made out of mahogany, which is a very dark wood.
While all of the pictures of WKF built C.Vs look dark I have not seen any Lloyd
built aircraft with like colored wood. They look to me to be more of a dark
honey color to me so that is the way I did this kit.
As for the decals, they went on with out a hitch and settled right down. They are opaque which is a big plus when working with a dark surface. I like the really swooping early crosses of 46.01 and I also think that any aircraft with the baby coffin or type II VK machine gun canister mounted on it looks cool. So that’s why I built it.
| CONCLUSIONS |
 For the most part it went together pretty well. I did have
to fiddle with a part or two but I have to say after hearing some pretty hare
raising things about the kit, I was pleasantly surprised. It wasn’t that hard
and the detail was very good right out of the box. Yes you will have to fiddle
with it but I think it is just about on par with any other WWI kit.
For the most part it went together pretty well. I did have
to fiddle with a part or two but I have to say after hearing some pretty hare
raising things about the kit, I was pleasantly surprised. It wasn’t that hard
and the detail was very good right out of the box. Yes you will have to fiddle
with it but I think it is just about on par with any other WWI kit.
Bottom line is that it is under $30.00 with a lot of extras. I don’t really mind doing a little fitting so to me this kit is a very good value. I would recommend it as a first multi-media kit if you feel you’re reedy for a very rewarding challenge.
| REFERENCES |
Austro-Hungarian Army Aircraft of World War One, by Peter M. Grosz, George Haddow and Peter Schiemer
Air Aces of the Austro-Hungarian Empire 1914-1918 by the late Dr. Martin O’Conner
Copyright ModelingMadness.com. All rights reserved. No reproduction in part or in whole without express permission.
October 2006
If you would like your product reviewed fairly and fairly quickly by a site that has over 325,000 visitors a month, please contact the editor or see other details in the Note to Contributors.