Academy 1/72 Sopwith Camel
| KIT #: | F-1624 |
| PRICE: | $ |
| DECALS: | One good, comprehensive set |
| REVIEWER: | George Oh |
| NOTES: | Basic kit, good rib representation. |
| HISTORY |
The Sopwith Camel was a
single-engined biplane fighter that was introduced into combat with the Royal
Flying Corps (RFC) in 1917. It got its name from the hump that covered the
breeches of the two cowling-mounted machineguns. The Camel was a handful for new
pilots because it was naturally tail-heavy and had a heavy engine that spun
about its shaft (to give each cylinder a spell in the cooling airstream). This
made a Camel  pilot's
evasive actions predictable to a Camel's enemies because the torque of the
spinning engine made turning left a haul, but a Camel would readily flick to the
right. Despite this, the Camel was more agile than its enemies, and other RFC
aircraft, with heavy armament to boot. It is arguably the best-known RFC
fighter. Even Snoopy flies one.
pilot's
evasive actions predictable to a Camel's enemies because the torque of the
spinning engine made turning left a haul, but a Camel would readily flick to the
right. Despite this, the Camel was more agile than its enemies, and other RFC
aircraft, with heavy armament to boot. It is arguably the best-known RFC
fighter. Even Snoopy flies one.
"Arghhhhhhh!!! The decals are out of register!!! Curse you, (insert model company name here)!!!."
How many of us have said
that? And what do you do with out-of-register decals? First you identify which
decals you can still use. Then you work-out if you can salvage any of the bad
ones. Finally, you seek-out replacement decals from friends, fellow-modelle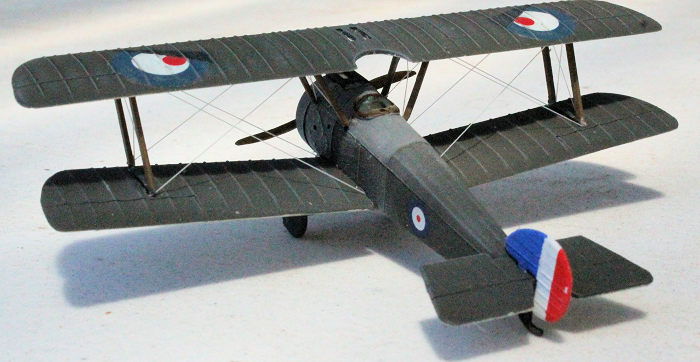 rs,
after-market producers or even the original model company. The unusable
really-bad ones - they are unceremoniously binned.
rs,
after-market producers or even the original model company. The unusable
really-bad ones - they are unceremoniously binned.
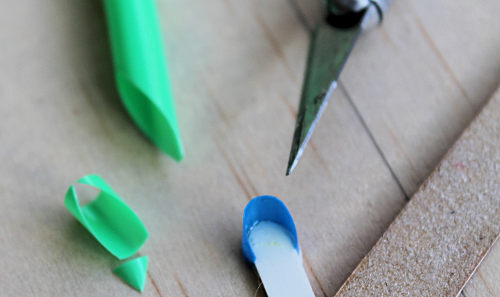
The inspiration.
Over my modelling years, I have received many sets of out-of-register decals , with varying degrees of offset. I have decided to use a set and to display them in public as a protest at my displeasure at the Company's poor quality control measures as evidenced by their releasing of decals with so obvious a fault. But I didn't want to do it on a kit that would cost me an arm and a leg. I expounded my idea of protest to several fellow-modellers as we had a bull session on the night before they went to a local hobby shop (we have several within a two-hour drive). As we jawed, I identified that I would be seeking a cheap Sopwith Camel, because I've never built a Camel before. Next afternoon, one of them presented me with this kit. I commenced building it immediately, to thank you for giving it to me, Ed.
| THE KIT |
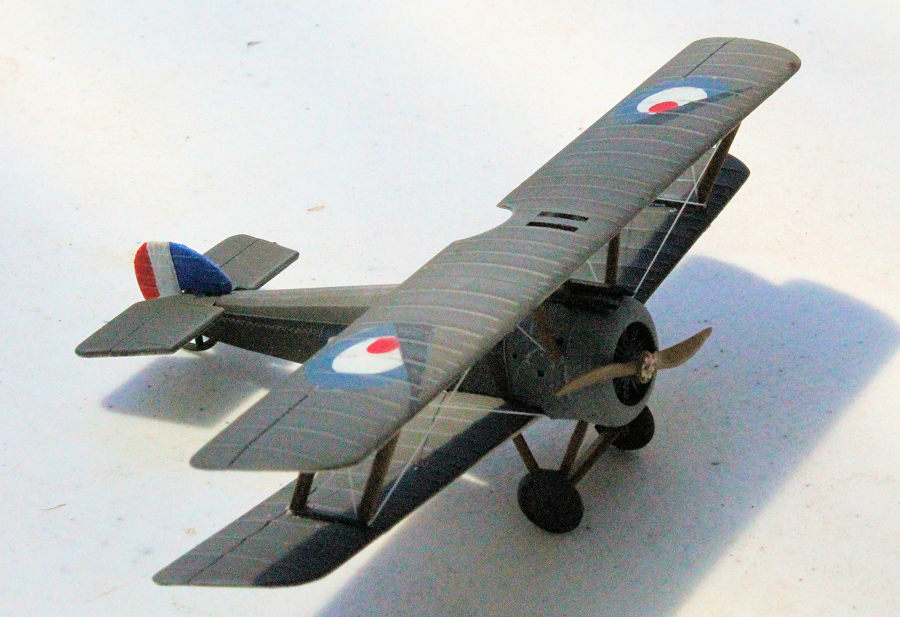
 The Academy
kit is quite a simple affair with only 19 parts. The moulding is quite basic
with the engine front moulded as part of the cowling ring, featureless guns and
a tailplane that looks like it was carved from a plank. On the other hand, the
rib detail is fairly subdued, and the wing trailing edges are beautifully thin.
The cockpit is a joke being a simple socket formed by a floor that connects a
chair-shaped rear bulkhead to a floor-to-coaming instrument panel plate. The
tail skid is another misrepresentation. Surprisingly, the decal sheet is crisply
printed, and in-register (so I won't be using most of it on this build). It
includes four long red stripes to be placed along a white-painted nose. The
instruction sheet is on a single (slightly smaller than A4) sheet with the
assembly guide almost cartoonish in nature. The painting & decal-placement guide
is crisply printed, but lacks any suggestion as to what the required colours
should be. It suggests that the model be painted in the livery of a flying
replica built by Airdrome Airplanes of Missouri, USA.
The Academy
kit is quite a simple affair with only 19 parts. The moulding is quite basic
with the engine front moulded as part of the cowling ring, featureless guns and
a tailplane that looks like it was carved from a plank. On the other hand, the
rib detail is fairly subdued, and the wing trailing edges are beautifully thin.
The cockpit is a joke being a simple socket formed by a floor that connects a
chair-shaped rear bulkhead to a floor-to-coaming instrument panel plate. The
tail skid is another misrepresentation. Surprisingly, the decal sheet is crisply
printed, and in-register (so I won't be using most of it on this build). It
includes four long red stripes to be placed along a white-painted nose. The
instruction sheet is on a single (slightly smaller than A4) sheet with the
assembly guide almost cartoonish in nature. The painting & decal-placement guide
is crisply printed, but lacks any suggestion as to what the required colours
should be. It suggests that the model be painted in the livery of a flying
replica built by Airdrome Airplanes of Missouri, USA.
| CONSTRUCTION |
It took me but a few
minutes to glue the fuselage parts, lower wings and tail-plane together. The fit
was pretty good, but it did need some filler. Knock-out pin scars needed filling
too, then I spray-painted all the loose and
 assembled
bits with Tamiya XF51 khaki drab (which I now reckon, looks too dark). The
engine face, the decking, struts, the flash on the fin and rudder and the
underside linen colour, were brushed-on with various Citadel Miniature paints.
assembled
bits with Tamiya XF51 khaki drab (which I now reckon, looks too dark). The
engine face, the decking, struts, the flash on the fin and rudder and the
underside linen colour, were brushed-on with various Citadel Miniature paints.
For extras, I added (at various times in the build) a seat which I scratch-built from a bit of plastic drinking straw, a gun-sight (from a PE sheet of several dozen that I have), and rigging from the elastic polymer, EZ-line.
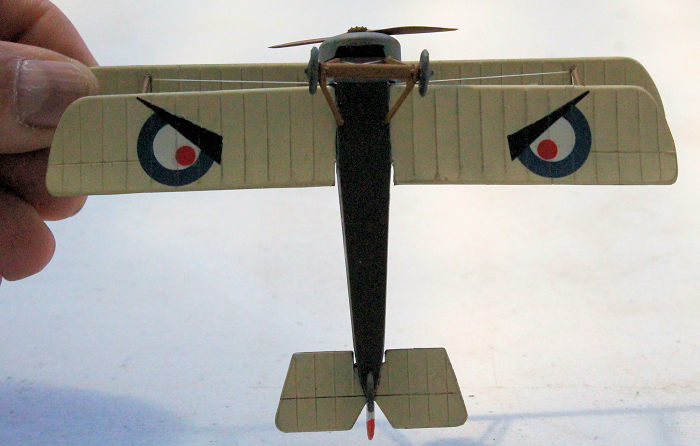
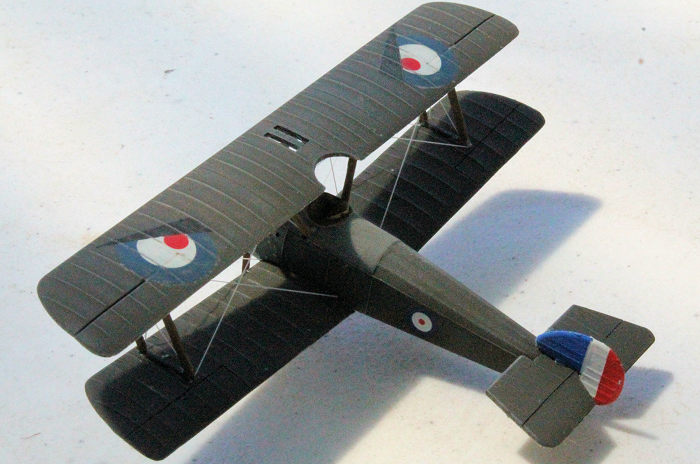
The paint was overcoated with Future so that I could place-on the decals. To utilise the out-of-registeredness of the roundels, I elected to put them on thusly, and to enhance them with black additions. Both sets are different because, after putting-on the top wing set first, a fellow modeller reckoned that they looked cross-eyed rather than angry. My visual inspiration was an angry bulldog from the 'Tom and Jerry' cartoons (which I STILL enjoy, along with the 'Roadrunner' cartoons). Only a couple of the kit decals were used (the fuselage roundels) in place of the horrible out-of-register ones. A clear flat coat followed, to allow the weathering to stick. The rigging material was attached to the upper side of the lower wings where the bases of the struts would be positioned, and at the wing roots. As well, an X of EZ-Line was placed between the one-piece vertical struts and their horizontal connectors, to pre-rig them.
 Now, the
struts and carbane pieces were attached to the lower wings and fuselage. Fit of
the struts (between the wings) was fair. Fit of the carbanes (connecting the
fuselage to the top wing) was abysmal. Rats!! All were correctly aligned to the
top wing by using it as a jig to correctly position them. After a whole day of
drying, I stretched the EZ-Line by only 3%, and attached it to the tops of the
struts and carbanes (which pulled them a little out of alignment) then attached
all the tops to the underside of the upper wing (which put them back in place).
This process, allied with the EZ-Line, ensures that the wings are correctly
aligned relative to each other, and that the rigging remains tight. Attach the
last bits, the legs and wheels, and she was done. , so I lined the up on the top
wing, and glued them where they touched the fuselage. The landing gear had an
equally abysmal fit as the carbanes. This model 'ain't gunna' be no
show-stopper, but what more can you expect from a cheap kit?
Now, the
struts and carbane pieces were attached to the lower wings and fuselage. Fit of
the struts (between the wings) was fair. Fit of the carbanes (connecting the
fuselage to the top wing) was abysmal. Rats!! All were correctly aligned to the
top wing by using it as a jig to correctly position them. After a whole day of
drying, I stretched the EZ-Line by only 3%, and attached it to the tops of the
struts and carbanes (which pulled them a little out of alignment) then attached
all the tops to the underside of the upper wing (which put them back in place).
This process, allied with the EZ-Line, ensures that the wings are correctly
aligned relative to each other, and that the rigging remains tight. Attach the
last bits, the legs and wheels, and she was done. , so I lined the up on the top
wing, and glued them where they touched the fuselage. The landing gear had an
equally abysmal fit as the carbanes. This model 'ain't gunna' be no
show-stopper, but what more can you expect from a cheap kit?
| CONCLUSIONS |
This biplane, as a kit, is
a relatively-simple build that is probably well within the ability of a young
modeller who has a few completed models under his (or her) belt. In fact, my son
built this exact kit when he was eight.
 There are
much better kits of the Sopwith Camel available, so I can't in all honesty,
recommend this kit because of the poor-fitting struts and landing gear. When I
receive out-of-register decals, it makes me wonder if the parent company
exercises any form of quality control. Ditto kits with sink marks, flow marks,
heaps of flash, ill-fitting parts and stupidly-placed knock-out pin scars. Will
my model encourage model kit manufacturers to think twice, or even stop,
releasing out-of-register decals with kits? Definitely not, but my protest still
stands.
There are
much better kits of the Sopwith Camel available, so I can't in all honesty,
recommend this kit because of the poor-fitting struts and landing gear. When I
receive out-of-register decals, it makes me wonder if the parent company
exercises any form of quality control. Ditto kits with sink marks, flow marks,
heaps of flash, ill-fitting parts and stupidly-placed knock-out pin scars. Will
my model encourage model kit manufacturers to think twice, or even stop,
releasing out-of-register decals with kits? Definitely not, but my protest still
stands.
There are modellers out there who think I'm nuts because of this model, and my answer is "You don't have to be mad to be a modeller, but sometimes it helps!". There are others who are quite amused by my model's 'angry eyes'. I don't believe that there ever was, or will ever be, an aircraft so-marked, but I had a LOT of fun building this kit in this way. And it didn't cost ANYONE an arm and a leg.
PS - I'll not list company names because my brother the Barrister advises me that truth is no defence in a Slander law suit.
5 March 2019
Copyright ModelingMadness.com
If you would like your product reviewed fairly and fairly quickly, please contact the editor or see other details in the Note to Contributors.
Back to the Main Page Back to the Review Index Page Back to the Previews Index Page