Eduard 1/48 SE.5a (Wolesley Viper)
| KIT #: | 82131 |
| PRICE: | $30-40.00 street price |
| DECALS: | Several options |
| REVIEWER: | Scott Lyle |
| NOTES: | Pheon Decals #48006, SE5a Hisso and Viper Aces of France |
| HISTORY |
Never the most elegant looking aircraft, the S.E.5 was nonetheless a fast, powerful fighter that was used very successfully by some of the most famous aces of the First World War. Appearing around the same time as the Sopwith Camel, the S.E.5 proved to be the more capable fighter at higher altitudes while the Camel dominated at lower levels. Together the two fighters have invoked comparisons to the Hurricane and Spitfire of World War Two, and they greatly contributed to the Allies gaining and keeping air superiority during the latter part of the war.
Life
for the S.E.5 did not start smoothly however as structural and engine
reliability issues plagued the fighter soon after its introduction during the
spring of 1917. Initially powered by the Hispano-Suiza V8 150 hp engine, the
prototype first flew on November 22, 1916. In early 1917 the power plant was
upgraded to the Hispano-Suiza 200 hp model, and S.E.5’s with that engine became
known as the S.E.5a. During the summer of 1917 however, severe shortages of that
engine drastically hampered production. The majority
 of the engines were sourced
from France, where the engine was also in high demand. French factories filled
French needs first, so the engines that made it to England tended to come from
lesser French factories with poorer quality control. Engine failure became a
widespread problem.
of the engines were sourced
from France, where the engine was also in high demand. French factories filled
French needs first, so the engines that made it to England tended to come from
lesser French factories with poorer quality control. Engine failure became a
widespread problem.
Wolseley Motors of Birmingham had been contract manufacturing the 150 hp Hispano-Suiza for some time, but began making a new version of the 200 hp engine that was direct drive, without the gearing that had plagued the French engines. The new Wolseley engine, known as the Viper, gave the S.E.5a basically the same performance as the Hispano-Suiza powered fighters, but with much improved reliability. The RFC basically declared it the official engine of the S.E.5a, but unfortunately production was slow and it wasn’t until well into 1918 that sufficient numbers were available.
No. 56 Squadron was the first to take the S.E.5 into combat and Albert Ball, despite his misgivings about the type, scored the first kill in an S.E.5 on April 22, 1917. Squadrons No. 24, 40, and 60 soon received S.E.5s. Once the “a” variant arrived the aircraft ultimately served with some twenty-five squadrons. Known for its excellent speed, climbing ability, and fine handling among other things, it was flown by many of the great aces including McCudden, Ball, Bishop, Rhys-David, and Mick Mannock. Some 5,138 were built, and the S.E.5 soldiered on after the war in the air forces of several nations
| THE KIT |
A popular subject, the
S.E.5 has been kitted in 1/48 scale by Aurora, Lindberg, Monogram, and Fuji,
just to name a few. In 2004 Roden blew the previous efforts away with two newly
tooled kits of the S.E.5, only to see Eduard claim the crown in 2017 with the
release of Profipack kits of the Wolseley Viper and Hispano-Suiza powered
versions. Similar to their other Profipack kits, this one comes with two sprues
of gray plastic parts, a large sprue of transparent parts, a sheet of masks, a
color photo etch fret, an instruction manual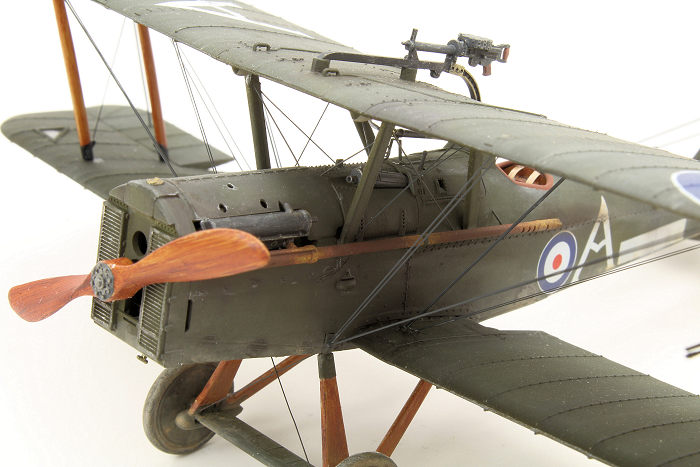 and decals for five different
aircraft. The wings’ control surfaces are separate parts, allowing them to be
posed in different positions. Molding quality throughout is excellent. My only
quibble with the kit is that none of the decal choices are for any of the
prominent aces, forcing you to look elsewhere if you want to go that way.
and decals for five different
aircraft. The wings’ control surfaces are separate parts, allowing them to be
posed in different positions. Molding quality throughout is excellent. My only
quibble with the kit is that none of the decal choices are for any of the
prominent aces, forcing you to look elsewhere if you want to go that way.
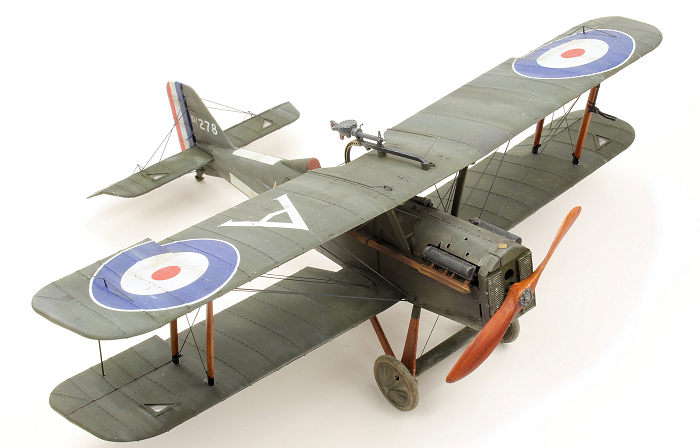
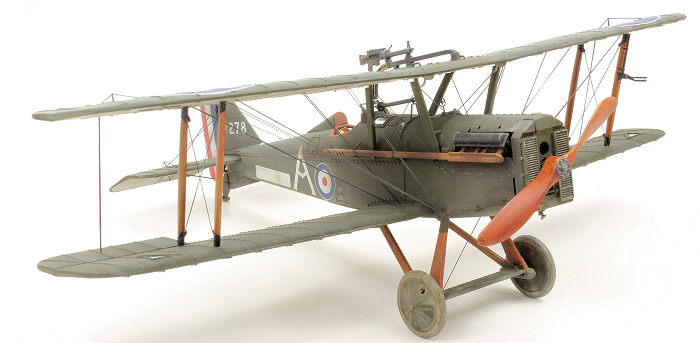
Eduard has come out with a quite a few aftermarket resin and photo etch parts for the kit including highly detailed resin props, radiators, machine guns, wheels, seatbelts, and “stretchers” - small photo etch parts designed to help rig the kit. After going over all of the options I decided that the kit’s radiator, prop, and guns looked good enough but that the wheels were worth upgrading with the resin alternative.
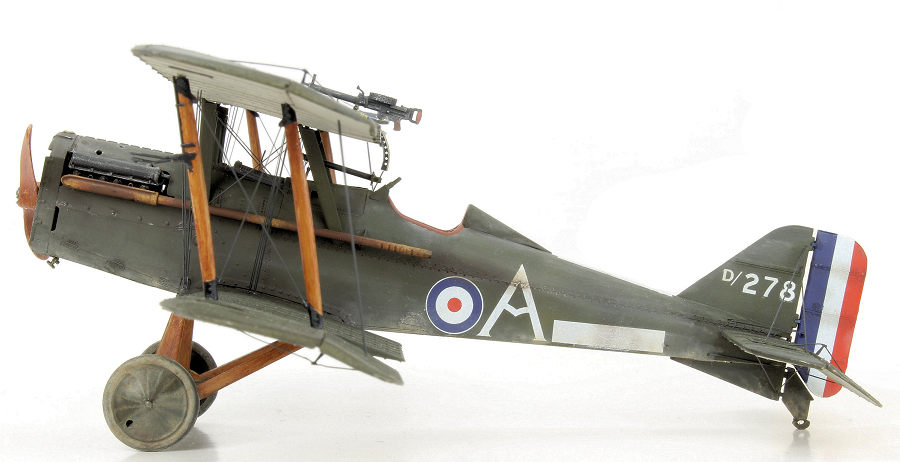
I wanted to finish my model as Mick Mannock’s famous D 278, so I procured the Pheon Decals sheet from ebay. That decal set is very extensive giving you markings for some seventeen different aircraft, including many of the prominent aces.
| CONSTRUCTION |
As usual it all starts in the cockpit, and for this
kit Eduard created a cockpit “module” that fits between the two fuselage halves.
Made up of side wall frames to which you attach the seat, control stick, and
other items, the module framework was made of wood, so I first base coated it
and any other “wooden” parts with Tamiya XF-57 Buff. On top of that I lightly
dragged some Burnt Sienna oil paint to replicate wood grain. Next I picked out a
few more details by hand and then started assembling the module. When you attach
the nicely printed photo etch lap belts to the seat be sure not to wrap them
around the bottom of the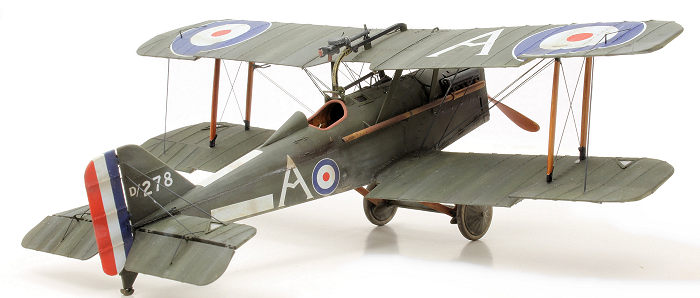 seat or they will keep the seat from sitting properly
on its rails. And if the seat doesn’t sit properly on its rails, it will stick
up too high. And if the seat sticks up too high, it will interfere with the
upper cockpit coaming piece that gets glued onto the fuselage later. And if that
coaming piece doesn’t sit right - I don’t have to tell you about the annoying
seam that will result. Ask me how I know…
seat or they will keep the seat from sitting properly
on its rails. And if the seat doesn’t sit properly on its rails, it will stick
up too high. And if the seat sticks up too high, it will interfere with the
upper cockpit coaming piece that gets glued onto the fuselage later. And if that
coaming piece doesn’t sit right - I don’t have to tell you about the annoying
seam that will result. Ask me how I know…
Once you’ve finished the cockpit module it gets attached to the lower wing, followed by some more cockpit details, one of which is the instrument panel. The panel can be detailed a few different ways: a) paint it and the instruments, b) paint it and add individual photo etch instruments, c) paint it and add individual instrument decals, and d) scrape off the molded-on instruments and apply the photo etch instrument panel and instruments. Unfortunately the wood grain effect printed on the photo etch panel isn’t very convincing, so I opted for option “b”. I then attached the completed panel to the cockpit module, along with a few more details. Next the fuselage halves come together, closing up the cockpit. The fit of the halves was very good, but it’s smart to do some test fitting here to make sure everything cooperates.
Following the instructions, the engine is assembled next. I painted it Vallejo Black Gray and dry brushed it Testors Steel, followed by picking out details in Testors Aluminum and Brass. Very nicely detailed, but a lot of it will unfortunately be hidden when the nose panels are attached.
The
aforementioned coaming piece is painted and detailed next before adding the
horizontal stabilizer and the two lower wing flaps. It’s nice when kit makers
give you separate control surfaces; I posed these with one side slightly up and
the other slightly down (remember to match those angles when you build the upper
wing!) One thing I didn’t realize about the S.E.5a is that it had small
inspection windows in the wings covering the control cable pulleys. Eduard
supplies transparent windows, photo etch frame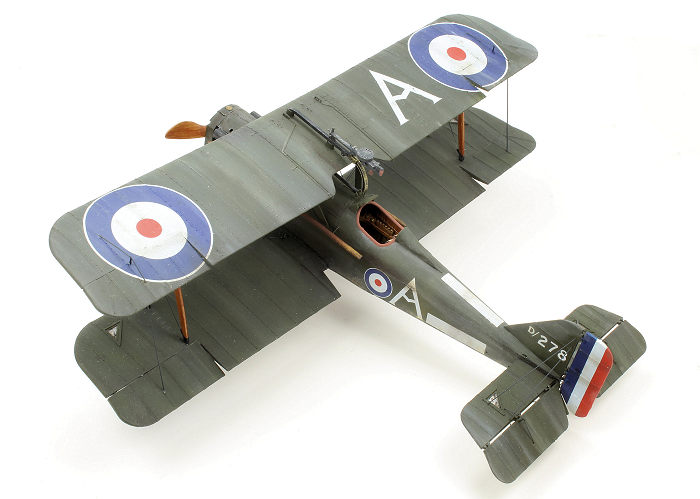 s and masks to cover those pockets
after you paint the tiny details inside. The engine is also added in this step,
sitting firmly on wooden rails in the nose with the two cylinder banks jutting
un-aerodynamically outside of the fuselage.
s and masks to cover those pockets
after you paint the tiny details inside. The engine is also added in this step,
sitting firmly on wooden rails in the nose with the two cylinder banks jutting
un-aerodynamically outside of the fuselage.
In the next step you add the flaps to the horizontal stabilizer, both of which I angled downwards after looking at pictures of the real thing. The Vickers machine gun is added next just in front of the cockpit and angled upwards quite noticeably. It doesn’t seem like it would shoot straight mounted this way – maybe someone knows why it was done this way?
At this point its time to add the aforementioned coaming piece, and unfortunately three of its four seams don’t fall along any panel lines on the aircraft. Butt joints like that are always a pain to sand smooth so I used the edge of my knife to bevel the edges of all of the mating seams. This created a small v-groove that could hold putty and make sanding easier. It still took me a couple of rounds of sanding and filling to make it nice and smooth however.
The top engine cover fit over the engine perfectly, followed by the truck-like radiator and a gun sight mounted on very delicate photo etch brackets. I added the transparent windscreen and then used the kabuki masks included in the kit to mask it and all of the small inspection windows. The upper wing could be added next, but I left it off to ease the painting process. I did add the four struts that attach the upper wing to the fuselage however. I also added stretched sprue rigging to the tail plane, undercarriage, and around the cockpit. That way, after painting, I would only have to rig the wings, when I would be full of vim and vigor.
| COLORS & MARKINGS |
Tamiya’s Liquid Surface Primer was first airbrushed on, revealing a couple of areas needing attention (it always does). I then sprayed Tamiya XF-55 Deck Tan onto the undersides of the wings and fuselage for the Clear Doped Linen surfaces. For the PC-10 upper surfaces I used Tamiya XF-62 Olive Drab, straight out of the jar. I then diluted it with some Tamiya XF-3 Yellow and sprayed random splotches to replicate a faded effect.
 The PC-10 color wrapped
around the edges of the wings and tail plane by a couple of inches. Since I had
already added some fragile rigging I could only mask certain parts of the wing
undersides for airbrushing. The other edges had to be painted by hand, which was
a bit painstaking.
The PC-10 color wrapped
around the edges of the wings and tail plane by a couple of inches. Since I had
already added some fragile rigging I could only mask certain parts of the wing
undersides for airbrushing. The other edges had to be painted by hand, which was
a bit painstaking.
I next painted some of the details like the engine’s cylinder banks, exhaust pipes, and landing gear. That was followed with a coat of Future sprayed onto the areas that received decals. Pheon’s decals were fragile. They tore easily if I used Walthers Solvaset as a setting solution, but performed much better with the gentler Mr. Mark Softer. Once they were set I sealed them with a coat of Tamiya XF-86 Flat Clear.
I next airbrushed a very thin mix of 50/50 Tamiya XF-69 NATO Black/Tamiya XF-64 Red Brown onto the panel lines and around the engine. To add more weathering I applied some small dots of White, Light Earth, and Light Gray oil paints onto the wings and fuselage and streaked them backwards with a brush dampened with thinner.
| FINAL CONSTRUCTION |
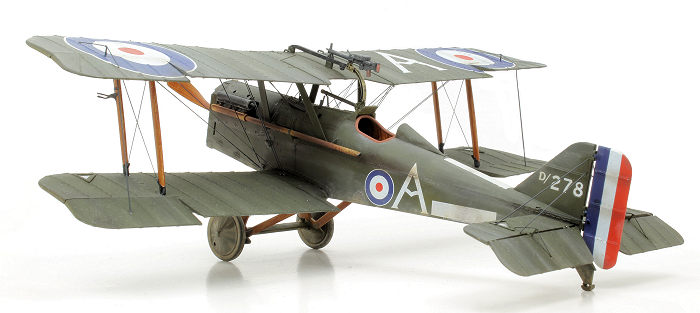
The biplane was still a monoplane so to speak, so it was time to attach the upper wing and add the rigging. A few years ago I built Eduard’s 1/48 Sopwith Camel and found that assembling the upper wing was a nightmare because the struts lacked strong pin-in-socket connections. Well I am happy to say that problem was corrected wonderfully on this kit, with each end of each strut having a solid pin that fits into a hole on either the upper or lower wing.
I had
attached the four fuselage struts earlier so it was a matter of fitting the
upper wing onto those struts first. The fit was very good, with each strut
popping into its hole with a bit of liquid cement. The upper wing was now
already firmly attached to the model, though not yet perfectly aligned, being a
little lower on one end than the other. Test fitting the outer struts revealed
that their lower pins were actually a bit too long and needed to be shortened by
a millimeter or so. With that done I added the two outer struts on the “low”
side, which pushed the upper wing up a bit. I then added the outer struts on the
“high” side which
 needed a little coaxing, but with the use of CA glue the
struts were soon firmly attached. The upper wing ended up being very well
aligned with the lower and very strong. Not bad Eduard. Not bad. On to the
dreaded rigging.
needed a little coaxing, but with the use of CA glue the
struts were soon firmly attached. The upper wing ended up being very well
aligned with the lower and very strong. Not bad Eduard. Not bad. On to the
dreaded rigging.
Turns out the SE.5a has all the rigging. I mean, all of it. What really adds insult to injury is that the rigging between the inner and outer struts is doubled up, two tiny wires sitting side-by-side. Mama mia.
I stuck with stretched sprue and tried to work from the inside out, bouncing them tight with matches and painting them Vallejo Black-Gray as I went. It took a handful of nights to get it done, and the nagging fear of having one break while handling the model never subsided. Got to get this puppy done and into the display case!
When the rigging was finished all that was left was to add the wheels and the prop. The resin wheels required little cleanup and came with masks so you can paint the tires (I used Tamiya XF-53 Neutral Gray), mask them, and airbrush them Tamiya Olive Drab. They were then weathered with washes and pastels to get them suitably “trenchy”.
The prop was painted wood in the same way as the other wood parts and then glued onto its shaft. And that was that.
| CONCLUSIONS |
I really like Eduard’s aircraft models. Yes they are a bit fussier than others, but that is part of their charm. It might just be me, but they seem to go together more like a real aircraft than other models do.
As I build up my collection of 1/48 WW1 fighters, every single one is an Eduard kit. And looking ahead to the fighters of WW2, a majority of those are made by Eduard as well. If some stranger were to ask me what “the best” model company is I’d no doubt say Tamiya, but the fact is, I’ve built more Eduard kits lately than anyone else. Perhaps it’s time to give Eduard their due. Perhaps, to borrow a metaphor from my introductory paragraph, Eduard is the SE.5a to Tamiya’s Sopwith Camel?
| REFERNCES |
- Osprey Publications, Aircraft of the Aces #78, “SE 5/5a Aces of World War 1”
- Palgrave Macmillan, “Mick Mannock, Fighter Pilot”, Adrian Smith
- Squadron/Signal Publications, Aircraft in Action #69, “S.E.5a in Action”
- Wikipedia, the Online Encyclopedia
30 July 2020
Copyright ModelingMadness.com
If you would like your product reviewed fairly and fairly quickly, please contact the editor or see other details in the Note to Contributors.
Back to the Main Page Back to the Review Index Page Back to the Previews Index Page