
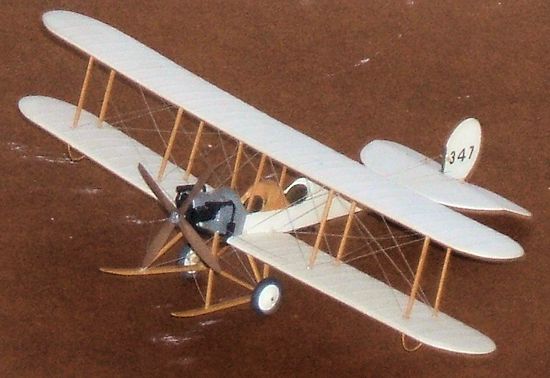
1/72 Royal Aircraft Factory BE.2a
| KIT #: | Based on Airfix 01079 |
| PRICE: | £5.00 |
| DECALS: | Kit offers one option |
| REVIEWER: | S.W. Foster |
| NOTES: |
This is an
advanced conversion which will require previous experience of modelling
WWI aircraft. |
| HISTORY |
The Royal Aircraft
Factory BE series of aircraft were to become infamous as "Fokker Fodder" in 1915
and 1916, and later as sitting ducks for German fighter aircraft in 1917. In
fact it was not the aircraft design itself which was at fault, but the fact that
too many were ordered early in the war, and then deployed by commanders who
should have known better and who chose to ignore the horrendous losses that
resulted from knowingly sending obsolete aircraft and their crews into harms
way. The problem was compounded by the fact that there were no alternative
machines to use in any event - another product of the incompetence of those
running the war from home. In was also a repetition of the mistakes being made
at the time on the ground, where repeatedly men were sent to attack fortified
positions with little or no hope of success with the aim of "wearing the enemy
down". It was not the aircraft that was at fault - it was the way in which they
were deployed.
The BE 2 originated in
1911 when the Royal Aircraft Factory at Farnborough "rebuilt" a damaged Voisin
to their own design. The factory was not supposed to design and build aircraft
at this time, so to disguise this
 the new aeroplane was called a "Bleriot
Experimental" machine, and the designation BE was used for all tractor designs
thereafter. The aircraft was one of the best of its time being stable and easy
to fly, and in the military aircraft trials of 1912 it proved itself to be
superior to all of the other competitors, even though it was not officially
entered. The Army placed orders for several machines and adopted it for
reconnaissance purposes and it was issued to 2, 4, and 6 squadrons of the RFC
where in the latter it soon became noted for long distance flights. By the time
war broke out in 1914 the BE2a and the similar 2b formed the bulk of the
aeroplanes of 2 and 4 Squadrons, and parts of the equipment of the others. Lt.
J. Harvey-Kelly in no 347 was the first to land a British aeroplane in France
after the outbreak of war in 1914: this was the subject of my model. Later the
first British wartime aerial reconnaissance by the RFC was carried out by Lt. G.
W. Mappleback in a BE 2a and Capt. P. Joubert de la Ferte in a Bleriot on 19
August 1914. Some machines made bombing attacks on enemy installations in
occupied Belgium. The first VC to be won by a British airman was awarded to Lt.
W. Rhodes-Moorhouse in April 1915 when he dropped a 100 lb bomb on Courtrai
railway station: he died of his wounds after he had returned in his bullet
riddled machine and reported his results. Be 2a's and b's remained in service
until well into 1915, being used for artillery spotting, photographic
reconnaissance and bombing. Attrition from accidents and losses to enemy action
or engine failure over enemy territory meant that few BE 2a or b 's were left by
August of that year, and those that remained were sent for use as trainers in
the UK. A small number of machines saw active service in the Dardenelles
campaign of 1915 where they were used for artillery spotting and general
reconnaissance. Apart from a few small bombs none of the machines carried
armament: observers did on occasion carry a rifle or pistol but because the
engines were of such low power it was not possible to carry more, and besides an
observer sitting in the front cockpit would not have been able to use a heavy
gun effectively anyway because he was surrounded by struts and wires, as later
crews of the BE 2c found to their cost.
the new aeroplane was called a "Bleriot
Experimental" machine, and the designation BE was used for all tractor designs
thereafter. The aircraft was one of the best of its time being stable and easy
to fly, and in the military aircraft trials of 1912 it proved itself to be
superior to all of the other competitors, even though it was not officially
entered. The Army placed orders for several machines and adopted it for
reconnaissance purposes and it was issued to 2, 4, and 6 squadrons of the RFC
where in the latter it soon became noted for long distance flights. By the time
war broke out in 1914 the BE2a and the similar 2b formed the bulk of the
aeroplanes of 2 and 4 Squadrons, and parts of the equipment of the others. Lt.
J. Harvey-Kelly in no 347 was the first to land a British aeroplane in France
after the outbreak of war in 1914: this was the subject of my model. Later the
first British wartime aerial reconnaissance by the RFC was carried out by Lt. G.
W. Mappleback in a BE 2a and Capt. P. Joubert de la Ferte in a Bleriot on 19
August 1914. Some machines made bombing attacks on enemy installations in
occupied Belgium. The first VC to be won by a British airman was awarded to Lt.
W. Rhodes-Moorhouse in April 1915 when he dropped a 100 lb bomb on Courtrai
railway station: he died of his wounds after he had returned in his bullet
riddled machine and reported his results. Be 2a's and b's remained in service
until well into 1915, being used for artillery spotting, photographic
reconnaissance and bombing. Attrition from accidents and losses to enemy action
or engine failure over enemy territory meant that few BE 2a or b 's were left by
August of that year, and those that remained were sent for use as trainers in
the UK. A small number of machines saw active service in the Dardenelles
campaign of 1915 where they were used for artillery spotting and general
reconnaissance. Apart from a few small bombs none of the machines carried
armament: observers did on occasion carry a rifle or pistol but because the
engines were of such low power it was not possible to carry more, and besides an
observer sitting in the front cockpit would not have been able to use a heavy
gun effectively anyway because he was surrounded by struts and wires, as later
crews of the BE 2c found to their cost.
| CONSTRUCTION |
 Modellers of WW1
aircraft have not been as well served as those who build aircraft of later
periods: this is especially true of the early period of the Great War. Although
kits of the BE 2c are available, they are in the larger scales. For modellers
who have limited space (and finances), many 1/72 scale WW1 model aircraft are
lacking, which means that we have to resort to building them from scratch or
converting from existing kits. When I built this model many years ago the
position re-WW1 aircraft was even worse than today, so I did not think that it
unusual to convert a BE 2 from another model. This was my first attempt to build
a completely new aeroplane from another kit and it was not as difficult as I had
anticipated as the basic shapes are relatively simple, and the most difficult
parts - the wings - can be made from the Airfix DH 4. The same kit can also
provide wheels, struts, propellor, etc and leave spares for other projects.
Modellers of WW1
aircraft have not been as well served as those who build aircraft of later
periods: this is especially true of the early period of the Great War. Although
kits of the BE 2c are available, they are in the larger scales. For modellers
who have limited space (and finances), many 1/72 scale WW1 model aircraft are
lacking, which means that we have to resort to building them from scratch or
converting from existing kits. When I built this model many years ago the
position re-WW1 aircraft was even worse than today, so I did not think that it
unusual to convert a BE 2 from another model. This was my first attempt to build
a completely new aeroplane from another kit and it was not as difficult as I had
anticipated as the basic shapes are relatively simple, and the most difficult
parts - the wings - can be made from the Airfix DH 4. The same kit can also
provide wheels, struts, propellor, etc and leave spares for other projects.
Start with the
fuselage by cutting out the sides and bottom from 20 thou plastic card. Make two
or three formers to put inside the fuselage to keep the unit square and assemble
the sides to the bottom. Add the cockpit details - two seats, seat belts
(optional), a joy stick, rudder bar, etc, and paint the interior clear doped
linen for the sides, brown for the floor. The upper fuselage is made by bending
thin (5 or 10 thou) card over a piece of dowel. Cut out the cockpit apertures
and fill any small gaps and rub down. On the front of the fuselage cement a
plate behind the engine, and one across the fuselage to hold it, from 15 thou
card. The cylinders (4 on each side), were made from sprue or very thick rod
which had been scribed to represent the cooling fins. These should be cemented
together into two blocks and then glued to the fuselage ensuring that they are
at the correct angle. Now cut a piece of 10 thou plastic and curve it and put
 it
on to the top between the cylinders to represent the air intake. Exhaust pipes
are made from rod, with card and thick stretched sprue for the silencers. Shape
the pipes carefully and make up the complete exhaust units but do not put on to
the engine and fuselage assembly
until later.
it
on to the top between the cylinders to represent the air intake. Exhaust pipes
are made from rod, with card and thick stretched sprue for the silencers. Shape
the pipes carefully and make up the complete exhaust units but do not put on to
the engine and fuselage assembly
until later.
Cut the horizontal and
vertical tail surfaces from 20 thou card and shape them to aerofoil section.
Score the horizontal surface to represent the elevators and then glue the unit
to the rear fuselage and fill any small gaps. Cut a rudder post from rod and
cement to the rudder, and add two control horns. Set the rudder assembly on one
side until later.
The wings are cut from
the DH 4 wings. Carefully measure the span and draw the correct shape of the
tips of the BE wings on to the top wing of the DH 4. Cut away the excess
plastic, shape the new tips to the correct plan and reshape the leading and
trailing edges to the correct profile. You will also need to gently bend the
upper wing until it is straight, as BE 2 wings did not have any anhedral. For
the lower wings remove the centre-section of the DH 4 wing, measure the span
carefully and then cut and shape each half of the lower wing. Fill all of the
location holes, slots for struts and aileron grooves in the wings. BE 2a and b
aircraft did not have ailerons as they used wing warping for control. Rub down
the rib detail and gently score shallow grooves for the new ribs on the upper
wing surfaces only. Cement thin pieces of plastic rod or stretched sprue into
the grooves and when these are thoroughly dry gently rub them down with fine
glass paper. Carefully measure the location for the BE 2 struts and drill small
holes in the wings. You will need to drill small holes in the fuselage for both
the wing struts and for the undercarriage struts. Remove the joining pieces on
the top of the DH 4 wing struts and clean the struts up. Glue the lower wings to
the fuselage and when these are dry fill any gaps and rub down. Remember that
there is no anhedral for the wings - i.e. they should be at 90 degrees to the
fuselage sides. Cement the outer wing struts into the lower wings and while
these are still drying, carefully lower the top wing on to them. I put small
blobs of glue into the holes in the upper wing prior to joining the
 wings as
this stops glue being spread over the underside of the wing. Line up and support
the wings, and allow them to dry out. When they are dry you can cement the inner
wing struts one at a time and while they are drying cut and shape the fuselage
struts, which can also be added. Allow the whole assembly to dry out thoroughly.
wings as
this stops glue being spread over the underside of the wing. Line up and support
the wings, and allow them to dry out. When they are dry you can cement the inner
wing struts one at a time and while they are drying cut and shape the fuselage
struts, which can also be added. Allow the whole assembly to dry out thoroughly.
The undercarriage
struts should be measured, and cut and shaped from 20 thou card or pre-shaped
strut material, as should the skids. Drill holes in the top surfaces of the
skids for the struts. An axle is needed from plastic rod - allow enough to fit
into the wheels. Lay the skids on a plan of the undercarriage and cement the
axle to them and allow to dry. Now carefully cement the struts to the skids and
set the approximate angles before lowering the fuselage and guiding the struts
into the holes in the fuselage. Use liquid cement to secure the struts and
support the undercarriage assembly while it dries out. Beware, this is a tricky
operation and will require time and care but if you plan it before you start, it
should go without too many problems. Cut a tail skid from card and four struts
from rod and glue the struts and skid to the rear fuselage, together with the
rudder post and rudder. I used the propeller from the DH 4 and reshaped it, but
did not cement it until after the model had been painted and rigged.
| COLORS & MARKINGS |
 Early RFC machines
were clear doped linen overall (I use a mixture of 3 parts Humbrol white and one
matt cream (74) with a touch of light grey), with light brown struts. The front
of the fuselage was bare metal (I used silver, but aluminium would be equally
suitable), and the engine and exhausts were black. The propeller was natural
wood (dark brown), and the tyres dark grey. The number on the rudder came from
dry rub-down transfers.
Early RFC machines
were clear doped linen overall (I use a mixture of 3 parts Humbrol white and one
matt cream (74) with a touch of light grey), with light brown struts. The front
of the fuselage was bare metal (I used silver, but aluminium would be equally
suitable), and the engine and exhausts were black. The propeller was natural
wood (dark brown), and the tyres dark grey. The number on the rudder came from
dry rub-down transfers.
After painting, the
exhausts, wing skids and wheels can be glued into place, and a step on the port
side of the fuselage (black). Rigging was done using stretched sprue as drilling
holes for thread was step too far for me! The rigging did take a few hours to
complete but it was straightforward.
| CONCLUSIONS |
Building your own models of aircraft or any other subject is great fun but may be more than some modellers want to do. If you do go down this road you must be patient as they take much longer than building OOB, but in my opinion they are much more satisfying and do not require many more skills than are required for super-detailing. If you do add extra detail to your models, it is not such a big step to start conversions and then go on to something as ambitious as this. This was my first advanced biplane conversion and was easier than I had anticipated. If you like early WW1 biplanes there is little option other than to build your own in this scale, but there is no doubt that they attract the attention of others.
| REFERENCES |
There is relatively
little reference material on the early BE 2's. The best was the Profile
publication no 133 BE 2, 2a and 2b, and there are some pictures on the internet.
S.W. Foster
February 2013
If you would like your product reviewed fairly and fairly quickly, please contact the editor or see other details in the Note to Contributors.