| KIT #: | A02101 |
| PRICE: | $15.00 |
| DECALS: | Two options |
| REVIEWER: | Peter Burstow |
| NOTES: | New tool kit |
| HISTORY |
First flown in May 1914,
the BE2c was an upgrade of the earlier Bleriot Experimental series,
incorporating many changes designed to increase stability, seen then as
desirable. Compared to the earlier BE2b, it had revised wings with stagger and
ailerons, the earlier models using wing warping. The tail surfaces were changed
with a larger tailplane and a fin fitted before the rudder. On all except the
first few which had the
 older ski type, the undercarriage was an oleo type of
various designs. It was fitted with a variety of engines including the RAF
designed 90hp V8, Renault, Hispano-Suiza and Curtiss.
older ski type, the undercarriage was an oleo type of
various designs. It was fitted with a variety of engines including the RAF
designed 90hp V8, Renault, Hispano-Suiza and Curtiss.
The BE2c was the first of the series to be built in large numbers. It was built by a number of contractors including Vickers, Blackburn, Hewlett & Blondeau, Martinsyde, Beardmore, Graham-White, Eastbourne, Bristol, Armstrong-Whitworth, Daimler, Jonques, Wolseley, Ruston & Proctor, Whitehead and several others. The aircraft varied in detail between the various manufacturers.
The aircraft was widely used, operated by around 70 R.F.C. squadrons, the R.N.A.S, as well as by the Australian Flying Corps and several other countries. It was operated for reconnaissance, bombing, as a day and night fighter, anti-Zeppelin and anti-submarine duties and training. The aircraft, in various models, was operational throughout the first world war, though in the last two years was generally used for second line duties.
There are several survivors in museums, and a number of replicas, both static and flying still around.
| THE KIT |
Released in January 2016, the BE2c is not typical of the new wave of Airfix kits. Around 50 parts in light grey plastic, there is some flash, and the parts are marred with a prominent mould seam. There are ejector pin marks on some of the parts, mostly hidden after construction. The tail plane was slightly short shot, with a section of the surface missing. The few panel lines are very fine and not obtrusive, they are quite inconsistent, with some on one fuselage half only. There is a light hill and valley effect on the flying surfaces. Two jigs are provided to assist in the alignment of the struts.
The
cockpit is furnished with two seats, a control stick and instrument panel, which
are attached to the fuselage floor or sides. Optional outer bay struts are
supplied which have five moulded Le Prieur rockets.
 A Lewis gun on a Strange
mount is also supplied. Two tiny windscreens are enclosed in a separate bag,
both in the style of the observer's screen, the pilot's windscreen was quite
different. Control horns are moulded on the rudder, but not the elevator and
ailerons.
A Lewis gun on a Strange
mount is also supplied. Two tiny windscreens are enclosed in a separate bag,
both in the style of the observer's screen, the pilot's windscreen was quite
different. Control horns are moulded on the rudder, but not the elevator and
ailerons.
The instruction booklet details 26 construction steps in a clear pictorial view. Many of the steps show only one or two parts being added. The steps suggest Humbrol colours for the parts. There is a little trap in steps 6 and 7 which show the use of the supplied jig to align the inter-plane struts, only a fine print note at the bottom of the page indicates that the jigs should not be attached. There are several diagrams showing the wing and control rigging.
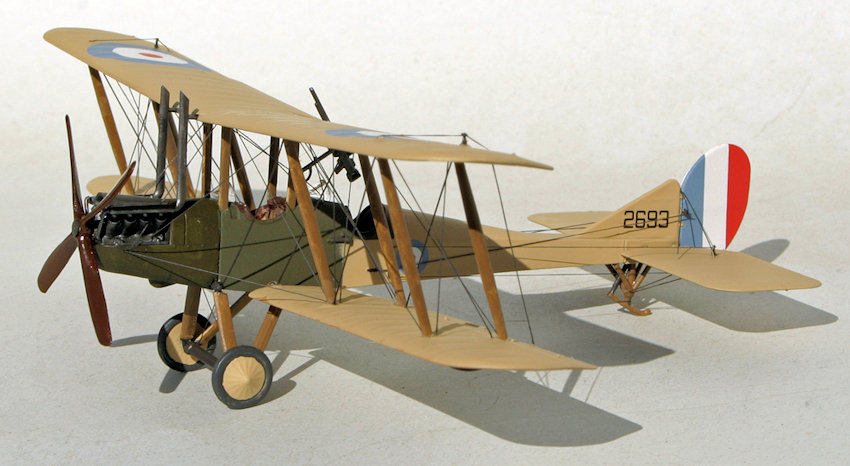
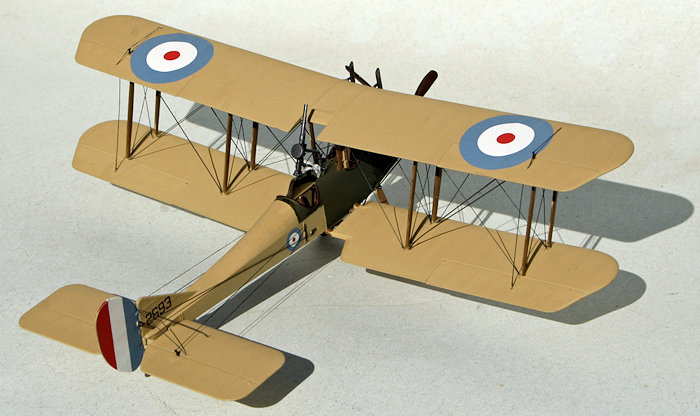
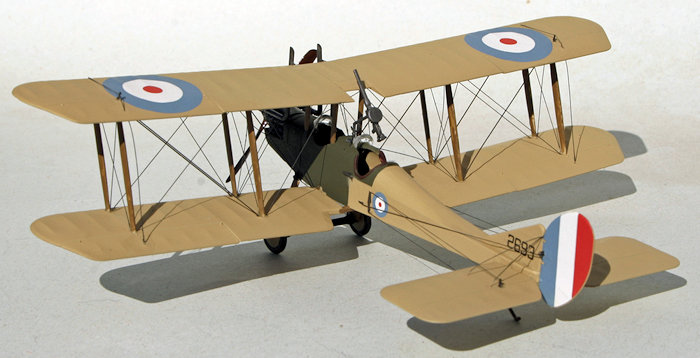
Two decal options are supplied for 2693, a Ruston, Proctor & Co. Ltd. built machine used by 39 squadron Royal Flying Corps, and 8407, built by Eastbourne Aviation Co. Ltd. for the Royal Naval Air Service. Two full page colour profiles show the options, with Humbrol paints both numbered and named.
Two other additional parts are supplied, a second, larger fin which was fitted to some BE2c and the later 2d and 2e, and what appears to be a camera of the type hung beside the pilot's cockpit, maybe another boxing is planned.
| CONSTRUCTION |
Started with the cockpit, adding a fuel tank, rudder pedals, control stick and seats to the floor, this was then fitted to the right fuselage half, which also had the rather minimal instrument panel with integral cabane struts attached. I then painted the cockpit a combination of light sand, dark earth and black. The four instruments were supplied as decals.
The fuselage was then closed up, fit was not good, with several sunken areas along the top seam, a fill and a sand was needed, a bit tricky between the cabane struts. I then added the front bulkhead and cabane part. That got me to the end of step 5.
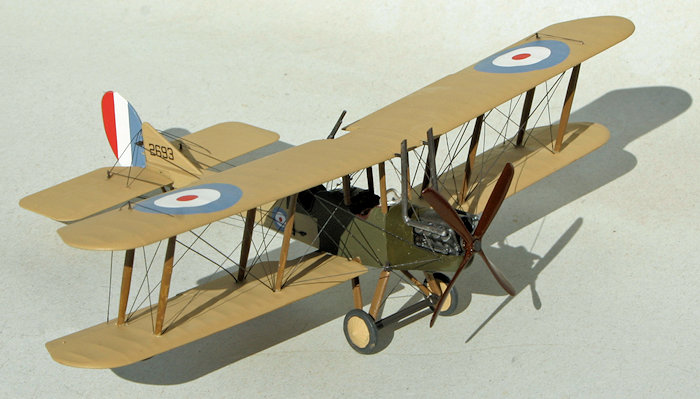
I then departed from the instructions, skipping wing and tail construction, and moving to step 13, which was assembling the engine bay, which was then attached to the fuselage. I then assembled the detailed, five part V-8 engine, but didn't add the top cover plate. The engine assembly was set aside for a bit of detail painting.
I stuffed the cockpit openings with foam packing as a mask, then primed the fuselage and painted it olive green, as a reasonable facsimile to PC10. The forward fuselage section was then masked. The rest of the build involved a lot of skipping back and forward through the steps, I do like to do things my way.
Next I added the tail-plane, the little bit to hold the tailskid, the fin, and then the rudder. I didn't add the tailskid just yet. On to the wings, first I drilled out rigging holes in the lower wing, there were dimples marked on the surface, but really not deep enough for secure glueing. I then added the upper wing, having a rigid cabane structure made the job very easy. Before the glue set, I added the struts, forgetting until later that there was a jig supplied, too late now. I didn't add the pilot, windscreens and gun, which according to instructions, should be done before the upper wing was placed.
| COLORS & MARKINGS |
With the airframe mainly
together it was time for paint. First a spray with Tamiya grey primer, a bit
hard to see against the grey plastic, but it did show up a couple of glitches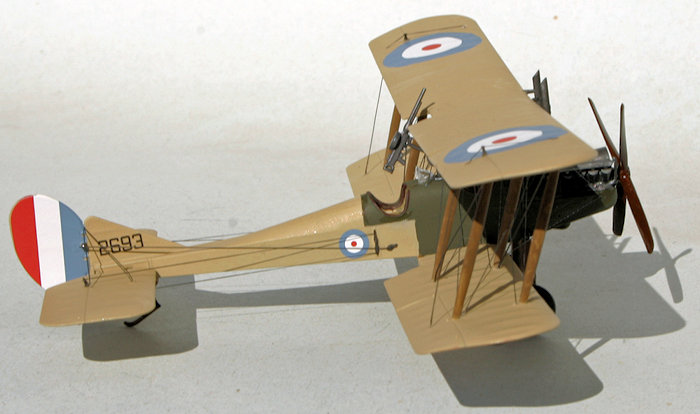 which needed fixing. I did do some experimenting with highlighting the wing
ribs, using first a black Sharpie, then a brown felt tip pen, neither looked any
good when covered with the sand colour, so I gave the area another coat of the
primer which covered the pen marks. Then gave the airframe a coat of Tamiya
TS-46 “Light Sand” which is a (not very good) substitute for unbleached linen.
which needed fixing. I did do some experimenting with highlighting the wing
ribs, using first a black Sharpie, then a brown felt tip pen, neither looked any
good when covered with the sand colour, so I gave the area another coat of the
primer which covered the pen marks. Then gave the airframe a coat of Tamiya
TS-46 “Light Sand” which is a (not very good) substitute for unbleached linen.
I unmasked the forward fuselage and brush painted the inside of the engine bay Tamiya XF-84 Dark Iron, the instructions suggest gun-metal but that was too dark. I painted the cabane and inter-plane struts brown to simulate wood. I painted the still separate engine with Mr Metal Iron, then did a bit of dry-brushing with Mr Metal Steel. I then gave the airframe a coat of floor polish.
Next I added the decals, choosing the 39 squadron R.A.F. version. After decaling I applied another coat of floor polish, as I have found that lacquer tends to destroy Airfix decals. When that was dry, I gave it all a coat of Tamiya flat clear lacquer.
| FINAL CONSTRUCTION |
Next was rigging, I found a good rigging diagram in the “In Action” book, and used that and several photos, rather than the somewhat confusing and incomplete kit instructions. I used my usual method with smoke coloured invisible mending thread. I was again amused by the thought of having something both invisible and coloured, it doesn't take much to amuse me, and I needed some relief while doing the rigging.
I pre-painted the rigging
line with Mr Metal Colour Iron, I have found that lacquer based paints stick to
the nylon line much better and doesn't form beads. For the flying wires I
 used
2kg fishing line, in photos they are obviously heavier, and also duplicated,
which I didn't attempt. Rigging was easy enough, but tedious and time consuming.
It took several sessions over a few days to get the rigging done.
used
2kg fishing line, in photos they are obviously heavier, and also duplicated,
which I didn't attempt. Rigging was easy enough, but tedious and time consuming.
It took several sessions over a few days to get the rigging done.
Then I added the tiny windscreens and the gun, which was cut from the mounting and refitted at a different angle. I added the engine and exhaust assembly, then added the engine cover, which I had pre-painted Mr Metal Steel. A bit more rigging, two of the lines had to be threaded through the exhaust manifold. The final bits to add were the propeller, wheels and the tail skid.
I found some small control horns on a brass fret from another kit, they had supplied an extra ten or so, probably on the theory that some would get lost. I added the tiny parts to the elevator and ailerons. I then added some control wires, using EZ elastic line for the rudder, and Uschi line for the elevators and ailerons.
| CONCLUSIONS |
A straightforward and easy build of what had been, until the release of the new tool Airfix kit, an aircraft which was only represented by short run injection, vacform or very expensive resin in this scale.
I had the impression that this kit may have been a test shot, due to the general poor quality of the moulding, there was far more flash, mould seams and glitches than is normal with the recent Airfix kits. The instructions were extremely pedantic, and though following them in order would produce a model, there would be a lot of difficulty painting and rigging if built in the sequence suggested. The decals were also a rather strange colour.
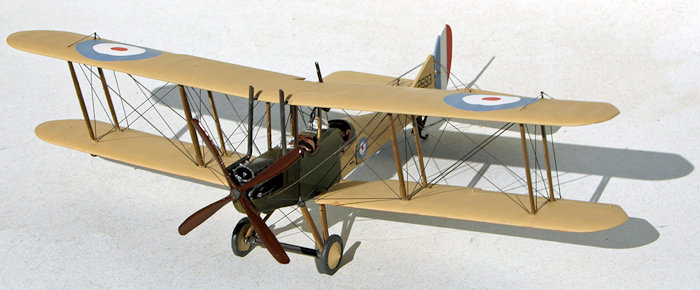
Despite my reservations the kit went together well, and the final result looks good. The rigid cabane structure, with the struts moulded to bulkheads, and the one piece wings, meant no worries with getting the wing alignment and dihedral right.
Probably not a good kit for a beginner to biplanes, the two bay structure adds a bit of complication and a lot of extra rigging. Recommended for those that have built a few biplanes and are up for a little challenge.
| REFERENCES |
https://en.wikipedia.org/wiki/Royal_Aircraft_Factory_B.E.2
Peter Cooksley, BE2 in action, Squadron/Signal, Carrollton, 1992.
Kit Instructions.
March 2016
Copyright ModelingMadness.com
Thanks to
for the review kit. You can find this kit at your favorite hobby shop or on-line
retailer. If you would like your product reviewed fairly and
fairly quickly, please
contact
the editor or see other details in the
Note to
Contributors.