Aeroclub 1/48 FE.2b
| KIT #: | K 417 |
| PRICE: | $20.85 from Aeroclub |
| DECALS: | one option |
| REVIEWER: | Kyle L. Bodily |
| NOTES: | Limited run kit with white metal detail parts. |
| HISTORY |
Many people may not know this, but the Red Baron was shot down on Friday the 6th of July 1917 by a FE.2b. Such is the case with most of the aircraft of the Great War. If it’s not a Sopwith Camel or a Fokker Tri-plane, people just didn’t believe the aircraft made any difference in the war. However the opposite is more the truth. One such aircraft that fits in this category is the FE.2b. The FE.2b is an aircraft that outside of the die-hard World War One crowd is often mistaken for the DH-2. Both were pushers of Maurice Farman type and both were what the Germans called Lattice Tails. However, that is about where the similarity ends.
 The FE.2 was a two
seat fighter when it first entered service in January 1916. Over time it
ended up as a Home defense fighter and as a night bomber. It was powered
by a 120/160 hp Beardmore. Ironically this was an Austro-Daimler inline
six cylinder water cooled engine built under license by William Beardmore &
Co. Later it was just known as the Beardmore engine.
The FE.2 was a two
seat fighter when it first entered service in January 1916. Over time it
ended up as a Home defense fighter and as a night bomber. It was powered
by a 120/160 hp Beardmore. Ironically this was an Austro-Daimler inline
six cylinder water cooled engine built under license by William Beardmore &
Co. Later it was just known as the Beardmore engine.
Like many of the aircraft built by the Royal Aircraft Factory, some of the most easily damaged and the most labor intensive parts were interchangeable with other aircraft. The outer wing main planes were such a part. They were identical to those on most models of the BE.2 and BE.12. This forward thinking showed its value in combat throughout the war.
A single seat type was used to help stave off Hauptman Ernst Brandenburg’s England Gaschwader and Fregattenkapitan Peter Strasser’s Zeppelin menace, but it was not considered as good as the BEs that were being used for the same task. Some FE2bs were even used in anti-sub patrols. By late 1916 it was considered to be out classed for day combat operations but could be found in daytime service until the middle of 1917 and operated as a night bomber until the Armistice.
Production on the FE.2 started in October 1915 and they were produced until May 1919 with a test bird in service until 1924. This was back in the day when an aircraft went from conception to production in a few months and most aircraft were pulled from service within a year of first seeing practical use.
The Fee or Fetubi,
(pronounced “Fee-two-bee” all run together and depending on your accent,
sounding almost like someone spitting) was sturdy and relatively
comfortable to fly. It was quite stable and a good camera platform.
However its relatively average performance coupled with its stability and
awkward gun emplacements put the aircraft at a disadvantage. Yes, it
is true, the FE.2b was Fokker Fodder. The most difficult area to
defend a pusher is to the rear because it is very unhealthy to shoot
through your propeller if you don’t have a synchronized gun. This is
where the incredible bravery comes in. The observer would extend the
rear gun pylon high enough to allow the gun to be shot over the wing, he
would then, without a seat belt or any other restraint device (it was
thought by many at this time that
 seat belts were too
restricting and as such DANGEROUS!!!!!!), would climb up on the rudder
pedal covers and fight for his and the pilots life against an attack from
the rear. Add to this, that the pilot may not want to fly straight
and level during the attack and the gunner is standing on something akin to
the top rung of a step ladder, you know the step with all the warning
stickers, at 10,000 ft cruising along at close to eighty miles per hour.
Now let us talk about controlling your FEAR! Even with such a gallant
defense the FE.2bs suffered greatly.
seat belts were too
restricting and as such DANGEROUS!!!!!!), would climb up on the rudder
pedal covers and fight for his and the pilots life against an attack from
the rear. Add to this, that the pilot may not want to fly straight
and level during the attack and the gunner is standing on something akin to
the top rung of a step ladder, you know the step with all the warning
stickers, at 10,000 ft cruising along at close to eighty miles per hour.
Now let us talk about controlling your FEAR! Even with such a gallant
defense the FE.2bs suffered greatly.
It was just such a crew that fell to Manfred von Richthofen on the 17th of September 1916. The aircraft was FE.2b No.7018 and it was crewed by Lionel Bertram Frank Morris, Pilot and Tom Rees, observer/gunner of number 11 Squadron 3rd Brigade Royal Flying Corps. On this morning 11 and 12 Squadrons were sent out to bomb Marcoing Station. 12 Squadron flew four BE2ds as the bombers with no defensive gunners as they were laden with bombs. That is where 11 Squadron comes in; they were acting as fighter escort.
The 17th of September 1916 is an important day in aviation history. It was the first day that Jasta 2 had enough aircraft to put a true fighting unit together and begin to operate as Oswald Boelcke had envisioned a fighting unit should.
In late 1916 the German Air Service was going through a great change. Up until this point fighters were just part of a unit’s aircraft livery. Many units had a hodge podge mix of what ever they could get. The German Air Service was adopting the new Jagdstaffelen or Jasta system for all fighter aircraft and Oswald Bolcke was called back to active service to help implement it. Oswald was withdrawn from active service after the death of Max Immelmenn. Because it was felt Bolcke’s death would be too much for the German people to take after Immelmann’s death.
Oswald Boelcke was
a theorist and student of air combat. Upon his arrival to the front he was
given command of Jadgdstaffel Nr.2 and a free hand to implement his ideas
and theories. Then he got to recruit any pilot he wanted. One pilot was
a young gentleman who up till now had only flown two-seaters into combat
named Manfred Albrecht Freiherr von Richthofen, yes that was his full and
correct name. (Freiherr is the German word for Baron) Manfred had
i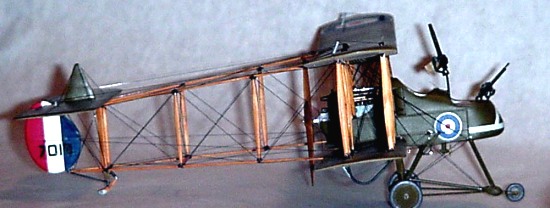 mpressed Boelcke back when he was an observer/gunner in two-seaters and
Bolcke had also impressed Manfred. After a while Manfred talked Bolcke in
to teaching him how to operate an aircraft. Yes, it was Oswald Boelcke who
gave the Red Baron his first flying lesson.
mpressed Boelcke back when he was an observer/gunner in two-seaters and
Bolcke had also impressed Manfred. After a while Manfred talked Bolcke in
to teaching him how to operate an aircraft. Yes, it was Oswald Boelcke who
gave the Red Baron his first flying lesson.
After some training and some time to get enough aircraft to work as a coherent and cohesive unit, Jasta 2 was ready to make history. The theory that would be tested was the idea of using a large disciplined force of purpose built single seat fighters and specialized tactics to achieve air supremacy. On this day the RFC would be attacked by just such a unit. All the German pilots flew Albatros fighters, a very fast and maneuverable aircraft with two synchronized Spandau machine guns, and they would be led by Oswald Boelcke.
As the force of
BE.2ds and FE.2bs were making their way to the target. Jasta 2 noticed
anti-aircraft bursts in the vicinity of Cambrai and decided to
investigate. At about 11:00 am German time 10:00 am English time the
battle was engaged. Oswald Bolcke attacked the lead FE.2b and brought it
down near Equancourt where it was set on fire by its crew before they were
captured. Hans Reimann brought a second FE.2b down and Manfred got the
third FE.2b. He went for the last machine, moved in close and fired. The
engine seized and the aircraft began to glide. The gunner, Tome Rees, must
have put up quite a fight, remember he was standing outside of the forward
cockpit and shooting over the wing, because Manfred states in his combat
report that FE.2b kept shooting at him as it was going down. He further
states that the gunner did not stop shooting until he had finally shot him
dead. At this point he broke away and the pilot Lionel Morris landed at
Flesquieres, on a German Airfield. Manfred landed at the same field and
ran over  to the FE and watched with the growing crowed as the crew was
taken out of the aircraft and Lionel Morris was rushed by ambulance to a
near by hospital. Sadly, Tom Rees had been killed in the air and Lionel
Morris would pass away enroute to the hospital.
to the FE and watched with the growing crowed as the crew was
taken out of the aircraft and Lionel Morris was rushed by ambulance to a
near by hospital. Sadly, Tom Rees had been killed in the air and Lionel
Morris would pass away enroute to the hospital.
This was the first confirmed victory for the Red Baron. It was also the day that the modern idea of air combat embodied by the Bolcke Dicta was tested. On this day Oswald Bolcke became the father of modern air combat.
Before it was all over, four FE.2bs and two BE.2ds had been shot down. Three FE.2bs by Jasta 2 one by Jasta 4 and the two BE.2ds were brought down by ground fire. This was only a taste of the losses the British would suffer in Bloody April 1917.
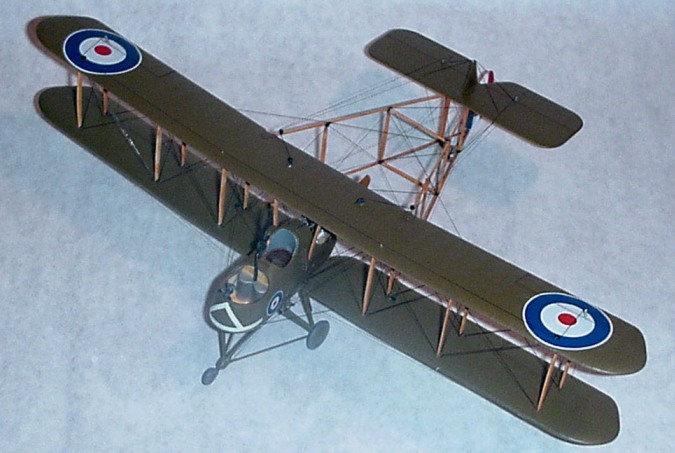
Royal Aircraft Factory FE.2b No.7018 is the subject that I chose to model because of the events of this day.
| THE KIT |
Aeroclub is an English company that has been around for some time now and has mostly been engaged in after market detailing items. They are best known for white metal castings that were quite well done. You can also find some old vac-u-form kits that were manufactured by them.
This kit is a
limited run kit. But if you want to build something esoteric you won’t
find it in a main stream manufacturer. It is also what is known as a
multi-media kit. Unlike the more common multi-media kits this one does not
have resin or photo-etch 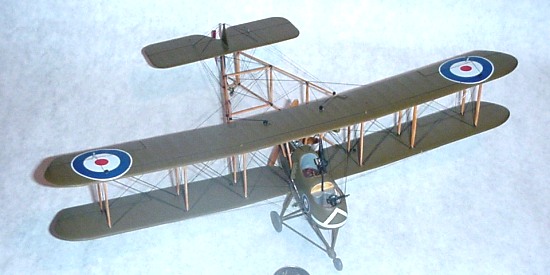 parts. What you will find in the box are two
building mediums, molded plastic parts along with about a pound of white
metal detail parts and a sheet of decals to build one of two aircraft.
Both are quite well documented in the Windsock Data File.
parts. What you will find in the box are two
building mediums, molded plastic parts along with about a pound of white
metal detail parts and a sheet of decals to build one of two aircraft.
Both are quite well documented in the Windsock Data File.
The plastic parts are molded in a light tan color and are quite ridged. Like most other limited run kits the molding gates are quite large and care needs to be taken during the clean-up process. You will also find that the kit does not have alignment pins, however because of the nature of the model you do not have much need for them anyway.
The white metal parts are of the same quality that Aeroclub has become known for. Some parts are very small and get bent easy, so be careful. All the struts for this kit are white metal. This makes the struts almost indestructible. If you have ever built struts out of extruded plastic you will know what I mean. Struts need to be ridged and that is what you get here. All in all I think you are given all the parts necessary to build a nice kit straight from the box. But this is my first Aeroclub kit so I don’t know how it would actually go together.
| CONSTRUCTION |
Well, the aircraft is quite airy. The main components consist of a main nacelle, two sets of wings and an empennage. Sounds simple right.
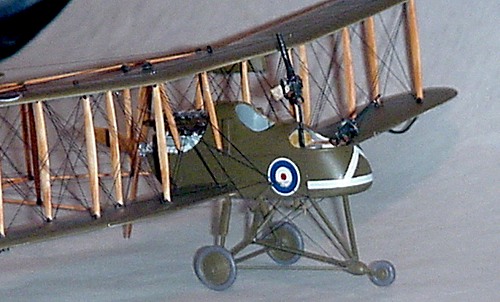
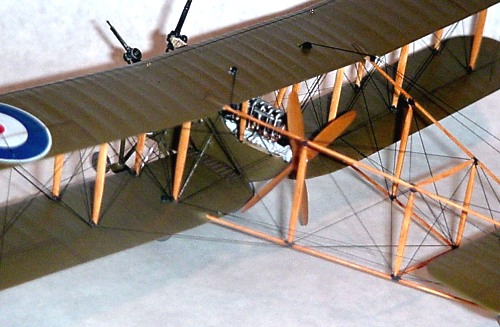
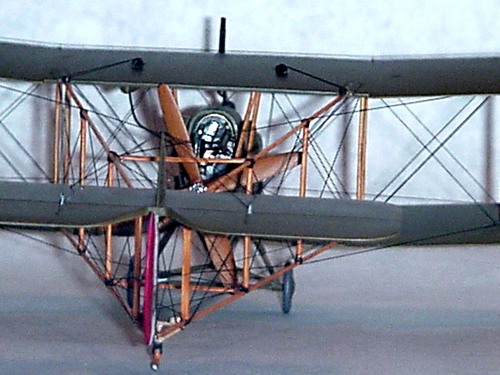
I started with the nacelle. The bulk heads are metal and don’t quite fit perfect so a little work needs to be done to get everything right. However they are not too big so the two halves fit together nicely. I can see how if you really wanted to, you could build most of the cockpit from scratch and make a showstopper. I finished this with the engine. I did not mount it at this time because I think that it would be easer to mount it after full assembly and rigging.
 The
wings are in three pieces and have good strong attachment points. I put
the same dihedral on them and mounted the lower wings to the nacelle. It
is very important to match the wings as closely as possible because the
inter-plane struts are the same length. This will help in alignment of the
wings and make your job much easer. It is surprising but in pieces parts,
there is not much to this kit. It has gone together quickly and with only
the standard fiddling that is expected with a short run kit.
The
wings are in three pieces and have good strong attachment points. I put
the same dihedral on them and mounted the lower wings to the nacelle. It
is very important to match the wings as closely as possible because the
inter-plane struts are the same length. This will help in alignment of the
wings and make your job much easer. It is surprising but in pieces parts,
there is not much to this kit. It has gone together quickly and with only
the standard fiddling that is expected with a short run kit.
I have built several lattice tails and have found that they are not that hard. The first one that I did just about killed me until I found some little secrets to help. First this is a delicate kit especially before you rig it. As I build the latticework I like to rig it as I go. This adds much needed strength to the parts. Remember this aircraft is delicate like a butterfly, so don’t handle it roughly. Marry the wings before you even try to add the tail booms. LET THE PARTS CURE THOROUGHLY BETWEEN STEPS!!!! This is not a race.
I next painted all the components and prepped them for final assembly. I drilled all the necessary holes to rig. No matter how hard you try you always seem to miss a hole and you have to go back and do it, but if you get most of them it sure makes rigging easer. Last part to my prep was to decal the kit except for the roundels on the bottom wing.
 Now for the fun
part. The part that pulls all your work together. Mounting the top
wing!!! Dun-dun-da. I super glued all the Inter-plane struts to the
bottom wing holding the strut in place by hand and getting it as straight
as possible. There are a lot of struts so take your time. I supported the
lower wings all the way out to the wing tips. You will put some weight on
the wings as you marry them and this could cause the joints to fail. You
need to think of all the ways to take the variables out of the build so a
rewarding build does not turn to a disastrous build. Not all the struts
will line up so take your time and work them in to place. Because the
struts are cast metal they give a little, just don’t bend them so much that
you cause the paint to chip off. Metal paint chipping on wooden struts
just doesn’t look right. I rigged the wings as much as I could to this
point. I used a box to hold the aircraft nose down. Then I attached the
two sides of the lattice tail which are just five little points the size of
a pencil lead that hold the whole thing together. I rigged as much as I
could and attached the tail planes. Once again I rigged as much as I
could. There is a pattern here- build, then reinforce. This helped to
make the model less fragile, in a relative way of course.
Now for the fun
part. The part that pulls all your work together. Mounting the top
wing!!! Dun-dun-da. I super glued all the Inter-plane struts to the
bottom wing holding the strut in place by hand and getting it as straight
as possible. There are a lot of struts so take your time. I supported the
lower wings all the way out to the wing tips. You will put some weight on
the wings as you marry them and this could cause the joints to fail. You
need to think of all the ways to take the variables out of the build so a
rewarding build does not turn to a disastrous build. Not all the struts
will line up so take your time and work them in to place. Because the
struts are cast metal they give a little, just don’t bend them so much that
you cause the paint to chip off. Metal paint chipping on wooden struts
just doesn’t look right. I rigged the wings as much as I could to this
point. I used a box to hold the aircraft nose down. Then I attached the
two sides of the lattice tail which are just five little points the size of
a pencil lead that hold the whole thing together. I rigged as much as I
could and attached the tail planes. Once again I rigged as much as I
could. There is a pattern here- build, then reinforce. This helped to
make the model less fragile, in a relative way of course.
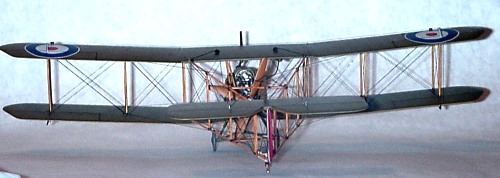
Now with the model mostly together and rigged, I added the under carriage, engine and any little bits necessary to finish the look. I added a few last rigging lines and was done.
| COLORS & MARKINGS |
 As I
said earlier I wanted to build a specific aircraft and found that not much
is known of this aircraft. I mean as to how it looked on the day in
question. So this gives the builder a little license to do your best, but
in the end you build what you build is just that, your best educated
guess.
As I
said earlier I wanted to build a specific aircraft and found that not much
is known of this aircraft. I mean as to how it looked on the day in
question. So this gives the builder a little license to do your best, but
in the end you build what you build is just that, your best educated
guess.
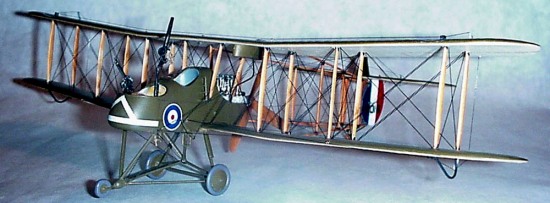
I painted the upper surfaces PC-10 which was not a truly standard color. But ranged between brown/tan to a greenish drab. The U.S. Olive Drab of World War Two is based off this color to give you an idea of its shade. The under surfaces were Clear Doped Linen or CDL for short. The decals are from the kit and are kind of thick. They did settle down with the help of Solv-set. I made the serial numbers for the rudder and the Number 11 Squadron symbol that is on the nose by hand from old decals.
| CONCLUSIONS |
This kit was far from easy because of all the rigging. But it is one of the most impressive models when finished. It is large and almost without exception attracts the eye with its complexity. I would recommend that you get some rigging experience before you start a lattice tail you get a number of kits with rigging under your belt. I am often asked how long does it take to get the rigging skills to attempt something like this and all I can say is you will is “You will be ready when you can snatch this pebble from my hand” Rigging is kind of a Zen thing for me. I find that I just forget about all my problems and just clear my head and focus on the model. The struggle is the reward and this kit was rewarding!!!!!!!!!!
June 2005
If you would like your product reviewed fairly and fairly quickly, please contact the editor or see other details in the Note to Contributors.