Wingnut Wings 1/32 Salmson 2-A2 “USAS”
| KIT #: | 32059 |
| PRICE: | $119.00 |
| DECALS: | Five options |
| REVIEWER: | Otis Goodin |
| NOTES: |
Superb kit, lots of detail, great instructions. |
| HISTORY |
Emile Salmson was a French industrialist who ran a successful business building aircraft engines. During WWI, his firm developed 9 and 18 cylinder water-cooled radial engines derived from the Swiss Canton-Unne’ design. The company turned its attention to aircraft design and building, with the Salmson-Moineau SM 1 reconnaissance plane being its first design. The SM 1 was a three-seat biplane with twin propellers powered by a single Salmson engine in the nose of the fuselage. The SM 1 was not particularly successful, and only 155 were built.
Salmson developed the 2-A2 from its work in developing a replacement for the Sopwith 1 ½ Strutter in the A2 (tactical reconnaissance) role. Salmson had built the Sopwith under license, but the Salmson 2 was an original design, powered by the 9Z water-cooled engine. After some initial control problems were resolved, the Salmson 2-A2 was ordered into production. Beginning in mid-1917, some 3200 were built and delivered by the end of the war. The only known “defect” was the fact that the pilot and observer were placed too far apart in the airplane to communicate effectively.
 The Salmson
had a maximum speed of 116 mph at sea level, and a range of 310 miles. Its
service ceiling was over 20,000 feet. It was armed with a forward Vickers
machine gun, and twin Lewis guns for the observer. The airplane had a wingspan
exceeding 38 feet, and was almost 28 feet long. One of its primary features was
its self-sealing fuel tank, lessening the chance of an onboard fire. Overall,
the Salmson was considered a rugged, fast and reliable airplane, suited for
multi-role duty as a reconnaissance, bomber and fighter aircraft.
The Salmson
had a maximum speed of 116 mph at sea level, and a range of 310 miles. Its
service ceiling was over 20,000 feet. It was armed with a forward Vickers
machine gun, and twin Lewis guns for the observer. The airplane had a wingspan
exceeding 38 feet, and was almost 28 feet long. One of its primary features was
its self-sealing fuel tank, lessening the chance of an onboard fire. Overall,
the Salmson was considered a rugged, fast and reliable airplane, suited for
multi-role duty as a reconnaissance, bomber and fighter aircraft.
The Salmson 2-A2 served with both the French and American air services. The Americans ultimately purchased 700 Salmson, and their service was generally successful. After the war, the Salmson saw service in Czechoslovakia, Poland, Belgium, Peru, Spain, and Russia. The Salmson was also licensed for production in Japan, where it operated under the name “Army Type Otsu 1.” It is estimated that up to 1,000 Otsu were built.
| THE KIT |
Wingnut Wings released the USAS Salmson kit in
December 2013, along with another version of the Salmson kit containing four
French versions and one Japanese version, known as the Otsu. The USAS version
contains parts and decals allowing the builder to build one of five different
Salmson aircraft flown by USAS crews: (1)
 Salmson
2-A2 ‘24’, flown by the 1st Aero Squadron in October-November, 1918; (2) Salmson
‘18’, flown by the 91st Aero Squadron in late 1918, with 3 confirmed victories;
(3) Salmson ‘17’ of the 186th Aero Squadron flown in mid-1919; (4) Salmson ‘8’
of the 1st Aero Squadron as it appeared in June 1919, even though it flew during
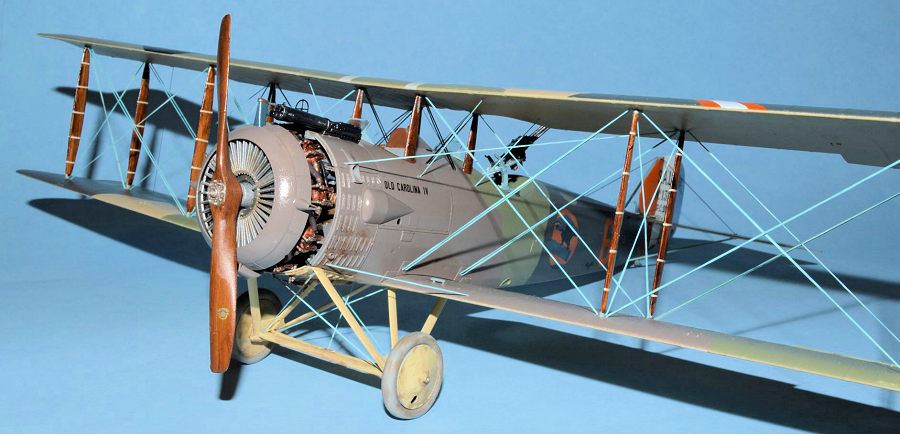
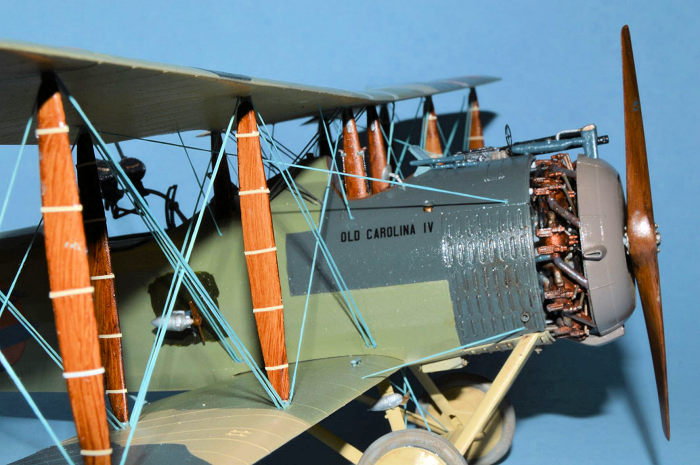
the war where it compiled 13 victories; and (5) the version I chose to model,
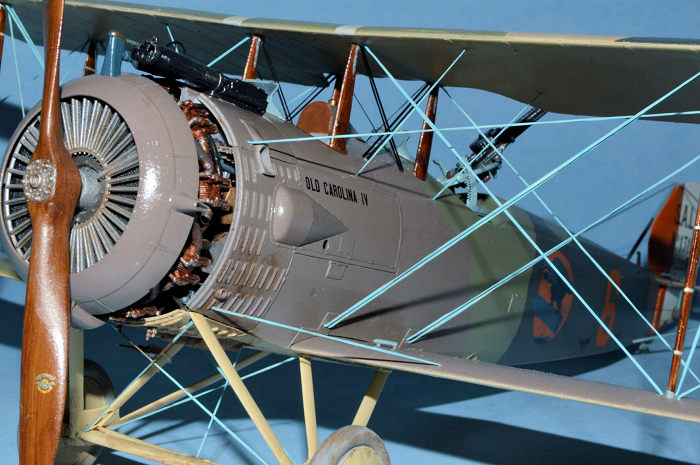
Salmson 1319 ‘6’, nicknamed “Old Carolina IV”, flown by the 12th Aero Squadron
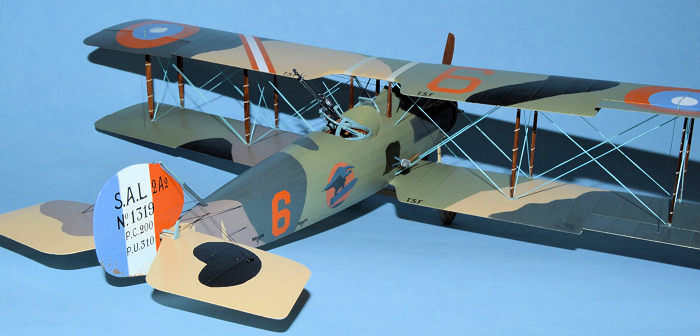
in late 1918. All versions feature the standard French 5 color camouflage,
except for (4) above, which features a slightly different scheme.
Salmson
2-A2 ‘24’, flown by the 1st Aero Squadron in October-November, 1918; (2) Salmson
‘18’, flown by the 91st Aero Squadron in late 1918, with 3 confirmed victories;
(3) Salmson ‘17’ of the 186th Aero Squadron flown in mid-1919; (4) Salmson ‘8’
of the 1st Aero Squadron as it appeared in June 1919, even though it flew during
the war where it compiled 13 victories; and (5) the version I chose to model,
Salmson 1319 ‘6’, nicknamed “Old Carolina IV”, flown by the 12th Aero Squadron
in late 1918. All versions feature the standard French 5 color camouflage,
except for (4) above, which features a slightly different scheme.
The kit contains 163 injection molded plastic parts, 13 photo-etched parts, a page and a half of Cartograf decals, and a 28-page glossy instruction book complete with vintage reference photos to assist in construction. The parts, including clear parts, are contained on eight sprues. A few parts are omitted, and these are clearly marked in the instructions.
| CONSTRUCTION |
As is the norm, construction begins in the cockpit which is a highly detailed affair. Beginning with the floorboard, various parts are assembled to it including frames, rudder pedals, the wireless assembly, control column, battery, and signal lamp. The wireless unit has a clear plastic cover through which can be viewed the “guts” of the wireless, represented by a couple of decals.
Following this, the observer’s fold-down seat was installed in the rear section, and the pilot’s seat was installed to the front of the internal fuel tank. The instrument panel was detailed with the addition of a generator bracket, pulsometer, compass, and pump switch. Various gauges were painted and decaled, and the instrument panel installed to the front of the floorboard.
Additional framing was added to the floorboard, to
which were attached various levers and fittings. The framing also includes
built-in cabane struts which later attach to the bottom of the upper wing. A
reconnaissance camera was added to the observer’s section, and various rigging
lines were installed t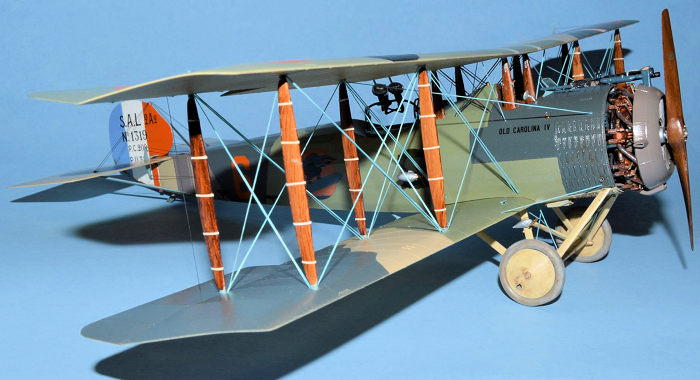 hroughout
the interior. The completed interior assembly was installed in the starboard
fuselage side, to which the port side was then added.
hroughout
the interior. The completed interior assembly was installed in the starboard
fuselage side, to which the port side was then added.
Attention then turned to the 260hp Salmson 9Z engine. Construction begins by gluing the cylinder halves together to which are added push rods, intake pipes, mounting plate and magnetos. At this stage you could choose to add some additional wiring and other details for realism. The radiator was then assembled, including exhaust pipes and radiator shutters. This assembly was installed into the radiator cowl and exhaust ring. Two external exhaust pipes are added to the radiator cowl. Once the engine assembly was complete I set it aside for later installation.
Back to the fuselage, the cockpit coaming was added. A small bit of puttying was needed for a smooth finish. A couple of side panels, a top and underside panel were added to the fuselage. I omitted a couple of panels to display some of the engine. The fuselage was puttied a bit to eliminate some small gaps. The bottom wing, minus ailerons, was added to the fuselage. I went out of order from the instructions and moved on to the tail section. I added the stabilizer which, interestingly, does not have ailerons. Instead, the entire stabilizer moved up or down as needed to assist in flight. Prominent control horns were added to the stabilizer prior to installation. I drilled small holes in the ends of each control horn with an 80 bit, through which I threaded the control lines. However, this is a delicate task and not necessary to achieve a realistic look. I also added the single control horn to the rudder, and, after painting and decaling, attached the rudder to the rear of the fuselage. A rudder support strut, with the addition of a photo-etch bracket, was then attached to the front edge of the rudder and secured to the fuselage. Finally, elevator support struts were attached to the underside of the stabilizer and connected to the fuselage.
The top wing is composed of five parts that must be
assembled into one wing: a middle section, left and right sections and two
ailerons. I assembled the wing, less the ailerons, and puttied the sections as
needed. I painted the wing and set it aside, and then turned my attention to the
interplane struts. These struts were painted, decaled and set aside for
installation. The instructions call for you to install the struts first and then
attach the top wing to all the struts. My experience has been that this is a
more difficult process because it requires you to line up, in this case, twelve
holes in the bottom of the wing, and then attach the top wing to all the struts.
I had better luck attaching the top wing to the four cabane struts, and then
going back and attaching the interplane struts one at a time. Wingnut provides
deep attachment points for the struts, and once in place they are secure. O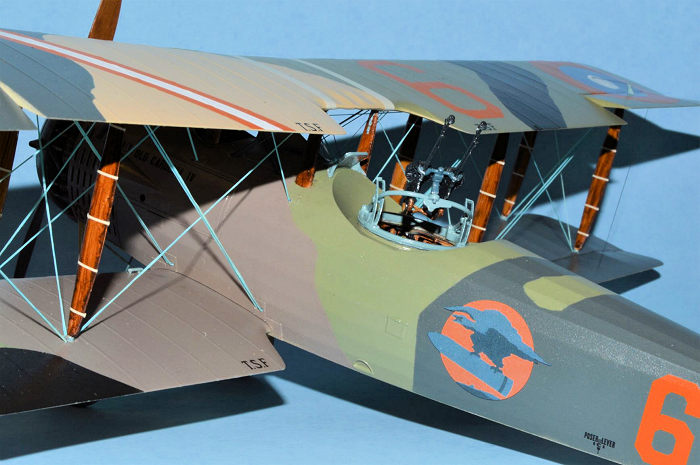 nce
all the struts were in place, I placed the model on the edges of the kit box to
line the wings up as they set. (See the Wingnut Wings website, Hints & Tips).
nce
all the struts were in place, I placed the model on the edges of the kit box to
line the wings up as they set. (See the Wingnut Wings website, Hints & Tips).
Once the wings were secure, I began the rigging process. “Old Carolina” had RAF style rigging, meaning a single landing wire and double flying wires, instead of the standard French rigging which used double wires for both. I drilled out the “pre-drilled” rigging attachment points a little deeper, and prepared to rig the wings using EZ Line “Heavy” for most of the wing rigging. I had read somewhere that the Salmson used “Horizon blue” rigging lines so I opted for light blue EZ Line. My usual approach is to attach one end of the line to the underside of the top wing using super glue, and let it set up a few minutes before attaching the other end. I will usually attach two or three lines at a time, then go back and attach the other end to the top of the bottom wing. I cut the line just short of the attachment point and stretch it using tweezers. If I cut it too short I inevitably must replace the line because the tension on the line makes it hard for the glue to hold it. I work from the inside out of the airplane. With the Salmson, I first attached the short rigging lines between the cabane struts. I had some difficulty getting the glue to set up promptly, so I switched to a new bottle and it worked better. Once the cabane rigging was complete, I installed the “X” rigging between the interplane struts. After this, I installed the single landing wires first, then added the double flying wires. Make sure you attach the single landing wires to the second attachment hole from the wing edge. This enables the landing wire to be clear of the flying wires when you install them. I then installed the additional eight separate wires leading from the wings to various points on the fuselage. Next, I added the ailerons and control horns, and rigged these using EZ Line Fine. I then moved to the tail section and applied the six rigging lines from the control horns to the fuselage, and applied the rigging from the stabilizer to the rudder. By the time I finished rigging the entire airplane (about a four-day process), I had installed over 70 separate rigging lines, not to mention the ones I had to redo. Difficult? No. Tedious and eye-crossing? Yes!
Following wing installation and rigging, I added the undercarriage and rigged it. The Salmson struts are thick and sturdy. Wingnut offers two options for the wheels, one “normal” round set, and the other, a pair of wheels that are flattened a bit on the bottom to properly display the effect of the weight of the aircraft on the tires. I opted to go with these simply because they are more realistic. Rigging the undercarriage is straightforward, although I do recommend drilling the necessary holes in the undercarriage before gluing it to the airplane. It’s also best to rig it before installing the wheels.
I added a few details to the airframe such as the forward machine gun, gunsight, optical gunsight, mirror, and the two external generators, one on the fuselage and one on the undercarriage. I also added the radiator header tank and water pipe to top of the engine cowling next to the machine gun. The observer’s twin machine guns and scarf ring assembly involve ten separate parts plus two rigging lines. However, once complete, it’s a very nice addition. Finally, I added the two windscreens and the propeller, and assembly was complete.
| COLORS & MARKINGS |
 Beginning
with the interior, the fuselage walls were painted with Misterkit French Clear
Doped Linen. The framing was painted in wood grain using Model Master Tan and
glazed with Griffin’s Alkyd Burnt Umber. The cockpit floor, framing and wireless
aerial were all painted in the wood grain finish, except for the rear section
which was painted Clear Doped Linen. The rudder pedals, control column, battery,
signal lamp, internal fuel tank, and various metal parts were all painted in
Dark Horizon Blue (Tamiya XF18). The pilot and observer’s seats were painted
with MM Leather and glazed with Burnt Umber. The instrument panel was detailed
by painting it in the wood grain finish, painting various dials Black, Silver
and Horizon Blue, and decaling them per the instructions. The cabane struts were
painted wood grain, with the brackets on the struts painted MM RLM Light Blue to
represent Light Horizon Blue. The pilot’s seat belt was painted Medium Green.
Beginning
with the interior, the fuselage walls were painted with Misterkit French Clear
Doped Linen. The framing was painted in wood grain using Model Master Tan and
glazed with Griffin’s Alkyd Burnt Umber. The cockpit floor, framing and wireless
aerial were all painted in the wood grain finish, except for the rear section
which was painted Clear Doped Linen. The rudder pedals, control column, battery,
signal lamp, internal fuel tank, and various metal parts were all painted in
Dark Horizon Blue (Tamiya XF18). The pilot and observer’s seats were painted
with MM Leather and glazed with Burnt Umber. The instrument panel was detailed
by painting it in the wood grain finish, painting various dials Black, Silver
and Horizon Blue, and decaling them per the instructions. The cabane struts were
painted wood grain, with the brackets on the struts painted MM RLM Light Blue to
represent Light Horizon Blue. The pilot’s seat belt was painted Medium Green.
The engine cylinders were painted Tamiya Copper, the pushrods MM Steel, the intake pipes MM Aluminum, and the mounting bracket was painted Dark Horizon Blue. The radiator itself was painted MM Flat Black, the radiator shutters were painted Aluminum, and the exhaust pipes were painted aluminum, then weathered heavily with MM Rust and Gunze Burnt Iron. The whole engine was weathered with a wash of Griffin’s Black and Burnt Umber.
The major part of painting the Salmson involved
applying the French five color camouflage. The actual French colors used
contained a small amount of aluminum powder in the paint mix which gave it a
pearlescent finish, but I didn’t attempt to replicate this. I used Misterkit
acrylic paints, as they have the most accurate colors. I order them directly
from Misterkit in Italy, and I usually get them within two weeks. After priming
the aircraft with a light coat of MM Ghost Gray matte enamel, I then painted the
underside of the fuselage and wings with French Clear Doped Linen. I painted the
upper surface colors following the illustrations in the instruction booklet. As
a rule, I applied the colors in a light to dark sequence, so I started with
Beige, then went with Light Green, Chestnut Brown, Dark Green, and finally
Black. The Dark Green has a definite Gray tint to it. There is one
 small
Olive Drab patch on the starboard side of the fuselage that looks like it was
hand painted on, so that’s how I applied it using Tamiya Olive Drab. The metal
panels on the real Salmson were painted in closely matching gloss Ripolin
paints, so I just applied a layer of Future by hand to these areas to give it a
glossy finish. The undercarriage was painted in the Clear Doped Linen color, and
the tires were painted Tamiya Medium gray, then weathered with Tamiya Dark Earth
and Dark Gray. I used Tamiya tape to mask as needed, and, because I primed the
model first, I had no problem with the acrylic paint pulling off. Applying the
mask took time, trial, error, and redo. The key for me was not to get in a
hurry, and to study the illustrations and photos closely. Once the camouflage
was applied, I applied Future all over it by airbrush, then applied the major
decals. Afterward I applied a coat of Satin finish.
small
Olive Drab patch on the starboard side of the fuselage that looks like it was
hand painted on, so that’s how I applied it using Tamiya Olive Drab. The metal
panels on the real Salmson were painted in closely matching gloss Ripolin
paints, so I just applied a layer of Future by hand to these areas to give it a
glossy finish. The undercarriage was painted in the Clear Doped Linen color, and
the tires were painted Tamiya Medium gray, then weathered with Tamiya Dark Earth
and Dark Gray. I used Tamiya tape to mask as needed, and, because I primed the
model first, I had no problem with the acrylic paint pulling off. Applying the
mask took time, trial, error, and redo. The key for me was not to get in a
hurry, and to study the illustrations and photos closely. Once the camouflage
was applied, I applied Future all over it by airbrush, then applied the major
decals. Afterward I applied a coat of Satin finish.
The wing struts were painted in the wood grain finish, then Future applied to give it a glossy finish. I then applied the marouflage strip decals to each interplane strut (40 decals in all!). I then “Futured” the struts again before installing them. I painted the bracket ends of the struts in Light Horizon Blue. All the control horns were painted Light Horizon Blue, as were the hand holds on the wings and the observer machine gun scarf ring. The rudder was painted MM Gloss White, then the red and blue decals were applied. I had some difficulty getting them to lay down on the edges, so I used a combo of Micro Sol and Set. This was the trickiest part of the decals.
The external generators were painted aluminum and Dark Horizon Blue. The small propellers were painted MM Wood, then glazed with Burnt Umber. The main propeller was painted the same way, decals added, and a coat of Future was applied. The metal boss was painted Steel and weathered with Burnt Umber. Both machine guns were painted MM Gun Metal, then weathered a touch with Steel and some Gunze Aotaki Blue. The mirror was painted Aluminum, with Future applied to the mirror side. The optical gunsight and radiator header tank were painted Dark Horizon Blue.
Weathering in the form of dirt and mud splashes were applied to the undercarriage and rudder using Tamiya Dark Earth. Some thinned Burnt Umber was applied as oil leakage from the engine.
Finally, after six months of on-again, off-again modeling, the Salmson was finished.
| CONCLUSIONS |
The Wingnut Wings Salmson is an outstanding kit. First of all, it’s big! The wingspan is 14.5 inches, and the fuselage is 10.5 inches from tip to tail. The fit and detail is excellent, and any modeler who follows the instructions closely and takes their time should be able to produce a model to be proud of. I thoroughly enjoyed building the Salmson.
| REFERENCES |
“Salmson 2,” Wikipedia.
GasPatch Models kit summary.
Wingnut Wings kit instructions
26 April 2019
Copyright ModelingMadness.com. If you would like your product reviewed fairly and fairly quickly, please
contact
the editor or see other details in the
Note to
Contributors. Back to the Main Page
Back to the Review
Index Page
Back to the Previews Index Page