| KIT #: | |
| PRICE: | A few tuppence for bits |
| DECALS: | Home printed |
| REVIEWER: | Stephen Foster |
| NOTES: | An important type but not for the beginner |
| HISTORY |
 designed what was to become with some
modifications and a 130hp Salmson-Canton-Unne engine, the Voisin III.
These early machines were designated LA but on later production aircraft
the engine was raised to improve the thrust and these were designated
LAS. The type entered service with the French armed forces in 1914 just
before the outbreak of war, but due to a shortage of suitable designs
the British also ordered them for the Royal Flying Corps and the Royal
Naval Air Service. The first machines were bought form France and
entered service with the RFC in February 1915. 50 were ordered from
companies in Britain and these were largely supplied to the RNAS where
they operated in the Agean, Basra in Iraq, and in East Africa where they
were used against the forces of general von Lettow-Vorbeck. Other
countries which operated the type included Russia (which also built them
under licence), Belgium, Italy, Romania and one which was interned in
Switzerland. The type was so successful that it remained in service
until the end of the war, although in the later years it was used for
night bombing only by the French and British. There is a vacuform kit
available from Flashback in this scale but this is a rather rare item
which is difficult to find. In any event I consider that by the time
that I have cut out and sanded all of the parts and raided the spares
box for some items such as engines and wheelsI might just as easily make
my own.
designed what was to become with some
modifications and a 130hp Salmson-Canton-Unne engine, the Voisin III.
These early machines were designated LA but on later production aircraft
the engine was raised to improve the thrust and these were designated
LAS. The type entered service with the French armed forces in 1914 just
before the outbreak of war, but due to a shortage of suitable designs
the British also ordered them for the Royal Flying Corps and the Royal
Naval Air Service. The first machines were bought form France and
entered service with the RFC in February 1915. 50 were ordered from
companies in Britain and these were largely supplied to the RNAS where
they operated in the Agean, Basra in Iraq, and in East Africa where they
were used against the forces of general von Lettow-Vorbeck. Other
countries which operated the type included Russia (which also built them
under licence), Belgium, Italy, Romania and one which was interned in
Switzerland. The type was so successful that it remained in service
until the end of the war, although in the later years it was used for
night bombing only by the French and British. There is a vacuform kit
available from Flashback in this scale but this is a rather rare item
which is difficult to find. In any event I consider that by the time
that I have cut out and sanded all of the parts and raided the spares
box for some items such as engines and wheelsI might just as easily make
my own.| CONSTRUCTION |
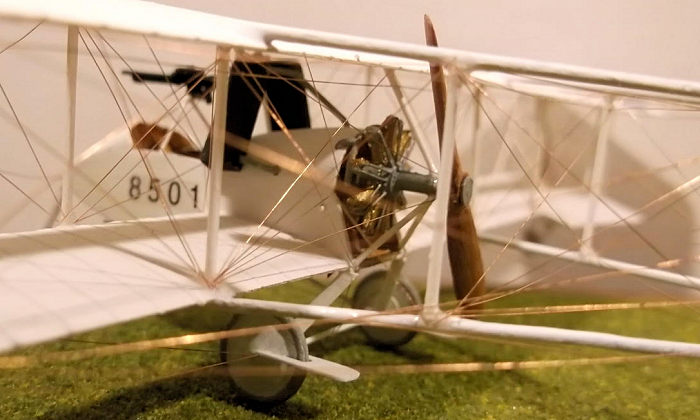
 detail was made up from card and rod. The fuel tank
was from 20thou card and filled with lead fishing weights. The engine
came from an unknown Roden kit donated by a fellow modeller, and was
modified by removing the push rods and replacing them with thin wire.
The drive shaft extension was made from 60 thou rod which had been
shaped with a file. The propeller was carved from strip wood. The wings
were cut from 30 thou card which had been bent in hot water and sanded
to an aerofoil profile I made the ribs from Jammy Dog tape and painted
them to smooth the edges. The struts were made from rod, and the booms
from florists wire. The rudder was from 20 thou plastic card, and the
horizontal stabilizer from 30 thou card which had been bent in the same
way as the wings. I assembled the lower wing halves to the fuselage
nacelle and when this was dry I added the booms to grooves filed in the
wings: I used epoxy resin for this joint as it is much stronger than CA.
I also added the booms to the top wing in the same way. Holes were
drilled in both wings to take the struts later. The radiators were fixed
into place and the model was ready for painting.
detail was made up from card and rod. The fuel tank
was from 20thou card and filled with lead fishing weights. The engine
came from an unknown Roden kit donated by a fellow modeller, and was
modified by removing the push rods and replacing them with thin wire.
The drive shaft extension was made from 60 thou rod which had been
shaped with a file. The propeller was carved from strip wood. The wings
were cut from 30 thou card which had been bent in hot water and sanded
to an aerofoil profile I made the ribs from Jammy Dog tape and painted
them to smooth the edges. The struts were made from rod, and the booms
from florists wire. The rudder was from 20 thou plastic card, and the
horizontal stabilizer from 30 thou card which had been bent in the same
way as the wings. I assembled the lower wing halves to the fuselage
nacelle and when this was dry I added the booms to grooves filed in the
wings: I used epoxy resin for this joint as it is much stronger than CA.
I also added the booms to the top wing in the same way. Holes were
drilled in both wings to take the struts later. The radiators were fixed
into place and the model was ready for painting.| COLORS & MARKINGS |
| CONSTRUCTION CONTINUES |
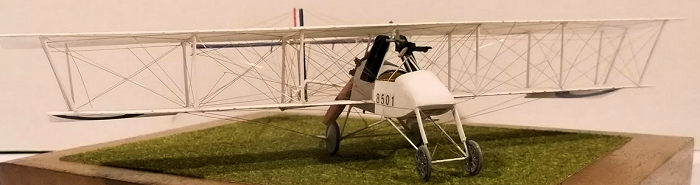 pair were
from Eduard PE with 20 thou rod bent to shape for the tyres. The
undercarriage legs were made from wire from a telephone extension cable,
with the main axle from plastic rod. The front axle was cut from a pin.
The remaining parts were painted at this stage before I rigged the
model with rolled 40 SWG copper wire held in place with CA. The gun
mount was made from stretched sprue and the gun came from Aeroclub:
these were added after the rigging was completed. Having put quite a lot
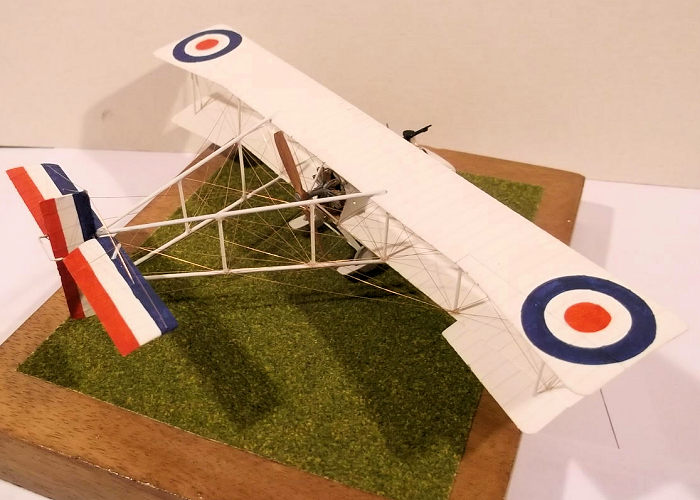
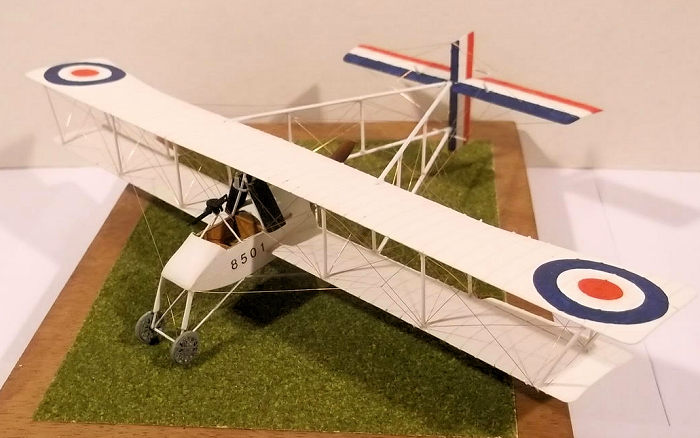
of lead into the nacelle I hoped that the model would sit on its nose
wheels, but after the last parts had been fixed in place, (the
horizontal tail stabilisers), the thing sat back on the rudder! This
left me with only one option - to make a small base from a block of wood
with some felt, and CA on the bottom of all four wheels: it now sits
neatly on its own base in my display cabinet and represents an aircraft
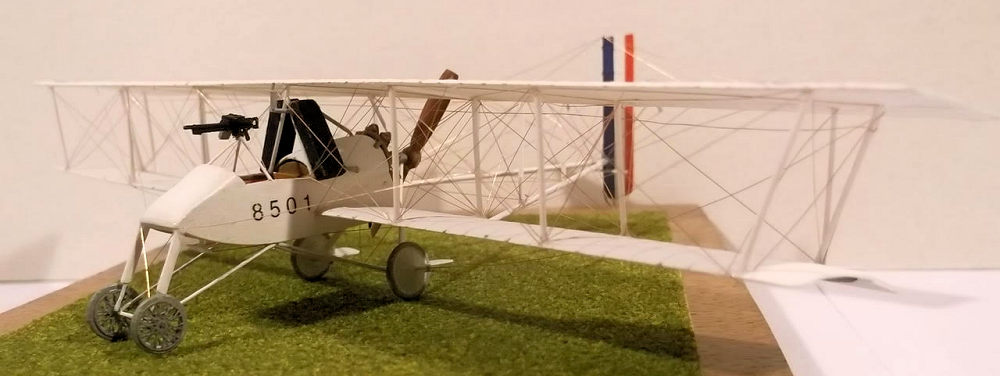
from No 2 Wing RNAS based at Imbros, (a dried salt lake bed), in the
Agean in December 1915. I know that the felt does not look like a salt
pan but nobody knows that this is not correct unless I tell them!
pair were
from Eduard PE with 20 thou rod bent to shape for the tyres. The
undercarriage legs were made from wire from a telephone extension cable,
with the main axle from plastic rod. The front axle was cut from a pin.
The remaining parts were painted at this stage before I rigged the
model with rolled 40 SWG copper wire held in place with CA. The gun
mount was made from stretched sprue and the gun came from Aeroclub:
these were added after the rigging was completed. Having put quite a lot
of lead into the nacelle I hoped that the model would sit on its nose
wheels, but after the last parts had been fixed in place, (the
horizontal tail stabilisers), the thing sat back on the rudder! This
left me with only one option - to make a small base from a block of wood
with some felt, and CA on the bottom of all four wheels: it now sits
neatly on its own base in my display cabinet and represents an aircraft
from No 2 Wing RNAS based at Imbros, (a dried salt lake bed), in the
Agean in December 1915. I know that the felt does not look like a salt
pan but nobody knows that this is not correct unless I tell them!| CONCLUSIONS |
 was insufficient space to put it. If I
had used plastic rod for the booms instead of wire I might just have been
able to get sufficient weight into the nacelle, but that would have meant
risking bendy booms…… Pusher aircraft formed an important element in the
Allied air arms up until 1917, yet they are under - represented by kit
manufacturers except as limited run kits which are usually expensive and
difficult to assemble for many modellers. This model was not the easiest
build I have attempted, but its delicate form and unusual colour scheme made
it worthwhile. I do not recommend it as a first scratch build project, but
if you do have some experience with biplane conversions or scratch builds it
should not be beyond your abilities to make one.
was insufficient space to put it. If I
had used plastic rod for the booms instead of wire I might just have been
able to get sufficient weight into the nacelle, but that would have meant
risking bendy booms…… Pusher aircraft formed an important element in the
Allied air arms up until 1917, yet they are under - represented by kit
manufacturers except as limited run kits which are usually expensive and
difficult to assemble for many modellers. This model was not the easiest
build I have attempted, but its delicate form and unusual colour scheme made
it worthwhile. I do not recommend it as a first scratch build project, but
if you do have some experience with biplane conversions or scratch builds it
should not be beyond your abilities to make one.| REFERENCES |
Stephen Foster
January 2018
Copyright ModelingMadness.com
If you would like your product reviewed fairly and fairly quickly, please contact the editor or see other details in the Note to Contributors.
Back to the Main Page Back to the Review Index Page Back to the Previews Index Page