|
KIT: |
Eduard 1/48 Sopwith Camel |
|
KIT # |
? |
|
PRICE: |
$24.95 |
|
DECALS: |
4 options |
|
REVIEWER: |
|
|
NOTES: |
|
HISTORY |
See the preview for a look in the box at the kit bits.
The Sopwith Camel is deservedly one of the most famous aircraft of the First World War and was arguably the best British fighter to see action. It was terrifically maneuverable and able to "turn on a sixpence," particularly to the right, due to the gyroscopic forces generated by its powerful rotary engine. The Camel was feared by new pilots, due to the fact that until flying speed was reached it was prone to a vicious ground-loop if full left rudder was not held during the takeoff run.
Billy Barker: Canada's Most-Decorated Soldier
Surprisingly William George "Billy" Barker (1894-1930), who remains Canada's most highly decorated soldier and served as a highly successful fighter pilot during the First World War, is not among the best-known pilots of that conflict despite his standing as the most-successful fighter pilot with the Sopwith Camel, and his ranking as Number Two Canadian Ace of all time, behind Billy Bishop and ahead of Raymond Collishaw. This may be due to the fact that the majority of his combat service as a fighter pilot occurred on the Italian Front in 1917-18, rather than on the Western Front with its greater publicity.
 As a boy,
Barker was uninterested in school, spending most of his free time riding
his horse and hunting birds with a shotgun, and became quite proficient
with a rifle while shooting at a variety of ranges around Dauphin and
Winnipeg. His family moved to Winnipeg shortly before the war started. It
seemed only natural when he joined the cavalry following the outbreak of
war in 1914; later, his sense of balance on a horse would stand him in
good stead in the Royal Flying Corps, as would his "hunter's eye."
As a boy,
Barker was uninterested in school, spending most of his free time riding
his horse and hunting birds with a shotgun, and became quite proficient
with a rifle while shooting at a variety of ranges around Dauphin and
Winnipeg. His family moved to Winnipeg shortly before the war started. It
seemed only natural when he joined the cavalry following the outbreak of
war in 1914; later, his sense of balance on a horse would stand him in
good stead in the Royal Flying Corps, as would his "hunter's eye."
Barker arrived in France as a machine-gunner in June 1915, with the First Canadian Mounted Rifles. By this time it had become readily apparent that cavalry was useless in the trench warfare that had developed. Four days after his arrival, he was in the middle of the Second Battle of Ypres. One day, he sat back and watched in amazement as a Fokker Eindecker shot down an British two-seater reconnaissance plane; like many other aces, he decided the best way out of the trenches was to join the Royal Flying Corps. The RFC was in short supply of observers, and they were accepting men from the front with minimal qualifications. However, he was rejected on his first application. Unfazed, Barker, reapplied and was accepted at his rank of Corporal. After six days of training that consisted of map reading, aerial photography and communication techniques for artillery spotting (since he was a machine gunner already he skipped that part), he was given his Observer's badge and posted to No. 9 Squadron at Bertangles, France, flying the outdated B.E.2c over a very active portion of the Western Front.
After several months in 9 Squadron, he was promoted to 2nd Lt. and officially attached to the Royal Flying Corps in April, 1916. Posted to No. 4 Squadron as an observer, Barker's aerial combat career began with the Battle of the Somme, which commenced on July 1, 1916. The B.E.2c's of 4 Squadron were in the thick of the fighting, performing aerial photography and artillery spotting. Over the course of the first weeks of the offensive, almost all of the original crews died or were shot down, except for Barker, who participated in some very dangerous missions spotting enemy troop concentrations from low level and directing artillery fire to their positions. In mid-July he was transferred to No. 15 Squadron, which supported the Canadian Corps. He even managed to kill a German pilot in late July when a Halberstadt scout dove out of the sun onto six B.E.'s, anticipating an easy kill. Despite his location in the front seat, having to fire over the head of his pilot, Barker shot down the German. Two weeks later, he downed a second scout in flames and was Mentioned in Despatches.
 During the
Battle of Cambrai in September 1916, Barker and his pilot showed great
quality and determination during a mission to photograph new German
defensive works. Over the German lines, they were attacked by a pair of
Albatros D.IIs. Most BE2c pilots would have turned tail and headed for
home, but not Barker's pilot. They fought off the two German scouts,
doing so much damage to one that both fled. After completing their photo
mission, they were intercepted by four more Albatroses. Again, they
fought with such skill that they drove them off, returning successfully
to their home field to deliver the photos. This mission brought Barker
his first decoration of the Military Cross.
During the
Battle of Cambrai in September 1916, Barker and his pilot showed great
quality and determination during a mission to photograph new German
defensive works. Over the German lines, they were attacked by a pair of
Albatros D.IIs. Most BE2c pilots would have turned tail and headed for
home, but not Barker's pilot. They fought off the two German scouts,
doing so much damage to one that both fled. After completing their photo
mission, they were intercepted by four more Albatroses. Again, they
fought with such skill that they drove them off, returning successfully
to their home field to deliver the photos. This mission brought Barker
his first decoration of the Military Cross.
On Nov. 18, 1916, Barker's application for pilot training was accepted and he was sent to Narborough, England. A natural pilot, he soloed after an incredibly short 55 minutes of dual instruction in January 1917.
Barker was posted back to No. 15 Squadron, which was now equipped with the R.E.8. In February he was promoted to Captain. The RE8 was a marginal improvement over the B.E.2 series, but was still generally at a disadvantage against German scouts. Barker shot down an enemy plane in March and rapidly became known as the best recon pilot on the front. In April, during the Battle of Arras, he earned another Mentioned In Despatches for directing shell fire onto a trench filled with 1,000 German troops. A few days later, in a low-altitude mission, he directed shell fire directly onto two troublesome long-range artillery guns. His airplane was badly damaged, but he made it back to be awarded a second Military Cross and was promoted to C Flight Commander.
Barker was sent back to England to become an instructor in September, 1917. It was here that he got his first taste of flying in a Sopwith Camel. The fast, temperamental new fighter was a revelation, and he renewed his efforts to be assigned to a fighter squadron. After an extremely low pass over the HQ buildings, he was posted to 28 Squadron, which flew Camels. His first combat mission as a fighter pilot was on October 20, 1917 as part of an air-cover element for a bombing mission to Rumbeke Aerodrome in support of Camels and French SPADs carrying bombs. It was during this time that he made the acquaintance of Camel B6313, which would become his mount for a year of air combat in which he would become the most-successful Camel pilot, and B6313 would become the most-successful individual Sopwith Camel of the war.
 In late
October, Barker became an ace by downing two Albatros D.IIIs. Leading a
flight of six Camels, they spotted German troops in a rainstorm and went
down to strafe them. Moments after their first run, they were surprised
by a flight of Albatroses. Two of the Camels immediately spun in under
fire and Barker was flying for his life. Turning as tight as possible, he
barely cleared a copse of trees, then suddenly pulled up into a loop. He
pulled out of the loop less than ten feet above the ground behind his
opponent and put a burst into the pilot which sent the plane crashing
into the ground. When another D.III got on his tail, Barker repeated the
loop and shot down his sixth aircraft. Two days later, he downed his
seventh German fighter.
In late
October, Barker became an ace by downing two Albatros D.IIIs. Leading a
flight of six Camels, they spotted German troops in a rainstorm and went
down to strafe them. Moments after their first run, they were surprised
by a flight of Albatroses. Two of the Camels immediately spun in under
fire and Barker was flying for his life. Turning as tight as possible, he
barely cleared a copse of trees, then suddenly pulled up into a loop. He
pulled out of the loop less than ten feet above the ground behind his
opponent and put a burst into the pilot which sent the plane crashing
into the ground. When another D.III got on his tail, Barker repeated the
loop and shot down his sixth aircraft. Two days later, he downed his
seventh German fighter.
At about the same time that Barker was making ace, the Italian Army was losing the Battle of Caporetto, a defeat which nearly took Italy out of the war. To demonstrate support for their ally, the Royal Flying Corps decided to send four fighter squadrons and one reconnaissance squadron to Italy. Among those was 28 Squadron.
One British pilot wrote of the war in Italy: "Flying in Italy was a holiday by comparison with that in France. It was a different type of warfare entirely. It was more of a gentleman's war. The scout pilots we encountered in Italy didn't seem to have the same viciousness that we met up with on the Western Front where it was a blood for blood affair. They were not so aggressive in Italy." Nevertheless, while the units might have been smaller, a man could meet death in the air as easily over the Venetian plain as over the fields of Flanders.
Shortly after arrival in Italy in late November, 1917, Barker opening the aerial score for the RFC over Senaglia-Pieve di Soligo when his flight of four Camels was jumped by 12 Austrian Albatros D.IIIs. After 20 minutes of dogfighting, Barker ended the skirmish by downing one of their opponents. Barker described the battle as follows in his combat log: "I dived on one and fired about 50 rounds and he went down in a vertical dive. I followed and as he flattened out at 5,000 feet I got a burst of about 80 rounds at close range. His top wing folded back to the fuselage and then the lower wing came off."
On Christmas
Day, 1917 Barker, Lt. William Hudson and another pilot decided to send
seasons greetings to the Austrians at nearby Motta Aerodrome. They wrote
"To the Austrian Flying Corps from the English RFC, wishing you a Merry
X-Mas" on a large piece of cardboard, then proceeded to fly across the
field wing-tip to wing-tip strafing the open hangar doors and
 torching
the aircraft within. The trio made it back to their base at Istrana and
quietly convinced the mechanics to patch the bullet holes, as
unauthorized flying had been banned by the British commander, Lt. Col.
Phillip Joubert.
torching
the aircraft within. The trio made it back to their base at Istrana and
quietly convinced the mechanics to patch the bullet holes, as
unauthorized flying had been banned by the British commander, Lt. Col.
Phillip Joubert.
On Jan 5, 1918 Barker was awarded the Distinguished Service Order, Britain's second highest award for valor. His colleague, Captain Mitchell described Barker thus: "Whilst one could not say he was a good pilot, he certainly made up for this in his shooting. I was his deputy leader and probably knew more about him than anyone else. I have seen enemy machines break up in the air or go down in flames under his fire long before I realized they were in range."
When not flying Barker was not exactly a model fighter pilot, and probably not a lot of fun. He didn't drink or smoke, didn't carouse with the others, nor participate in the mess hall parties and pranks. He was more likely to be found on the aircraft line doing maintenance on his aircraft, cleaning the guns or talking to the mechanics and armorers. He lived to fly and fight. His only "pranks" were played on the Austrians, like his Christmas Day shoot-up of an airfield and his later invitation to the Austrian aces to join him and his pilots in aerial combat.
On January 24, 1918, Barker opened his balloon-busting score with Lt. Hudson flying wing. Balloons were considered so dangerous that Joubert had ordered his pilots to refrain from attacking them. Allegedly out to test their machine guns and engines, Barker and Hudson spotted two balloons near Conegliano on the Piave River. Barker destroyed both balloons while Hudson strafed the anti-aircraft machine gun positions. On return to base, Barker could only offer the excuse to Joubert that, once he saw the balloons, he forgot all about the order. On Feb. 12, Barker and Hudson again went out to "test their guns." Barker observed that the thick ground mist below provided ideal conditions for attacking balloons. Two large balloons near Fossamerlo were destroyed, along with three smaller ones. During the attack, Barker shot down a defending Albatros D.III, and then swooped down on an Austrian staff car and strafed it into a ditch where it flipped over and exploded.
Barker and Hudson became a team, flying together whenever possible, each protecting the other during attacks, thereby heralding the tactic of two planes flying as "fluid" leader and wingman, alternating when the situation demands it, which is the modern method of air combat.
 On April 10,
1918, Barker was made a Flight Commander in 66 Squadron. On April 17, he
shot down an Albatros D.III, and in May he downed 8 Austrian aircraft. In
June, Barker was awarded his second bar to the Military Cross for work
done in the first two months of 1918; this was his third award of the
Military Cross.
On April 10,
1918, Barker was made a Flight Commander in 66 Squadron. On April 17, he
shot down an Albatros D.III, and in May he downed 8 Austrian aircraft. In
June, Barker was awarded his second bar to the Military Cross for work
done in the first two months of 1918; this was his third award of the
Military Cross.
On May 25, 1918, Barker met up with one of Austria's famous aces, Frank Linke-Crawford. Barker was leading an offensive patrol of Bristol Fighters in his Camel when they met an Austrian formation of 10 machines. Barker immediately attacked and noticed Linke-Crawford's Albatros with its distinctive black and white checkerboard markings. He singled out the Austrian and dove after him, entering into a dogfight. Short bursts of machine-gun fire occasionally broke the air, but neither ace was hit. Barker found Linke-Crawford a superb flyer, but a mediocre shot. Even with the Camel's agility, Barker could not hold Linke-Crawford in his sights long enough for a killing burst. Rather than continue a game that his opponent was obviously good at, and not willing to let him go, Barker circled off to about 200 yards, and came at Linke-Crawford from head on. He began firing as soon as he lined up, and could see his tracers hitting the Albatros. Linke-Crawford dove sharply and headed home, but Barker whipped the Camel about and dove after him. Just before the Austrian reached ground level, Barker caught up to him and put his tracers through the gas tank. Linke-Crawford crashed in flames and died just short of his own airfield.
Even a famous ace like Barker did not escape unscathed. During the summer of 1918, during the final Austrian offensive, he was shot down twice. In the first, he landed in Lake Garda and had to be rescued with a rowboat, while the second time he made a forced landing in the foothills. His Camel hit hard, the undercarriage tore off and it did a flip, landing on its back. He had the airplane pulled off the hillside and rebuilt.
The excellent work done by the flight of Bristol Fighters in 66 Squadron prompted the formation a 139 Squadron, fully equipped with these aircraft. On July 14, 1918, Barker was promoted to Major and given command of it. However, kept B6313. This was not because he didn't think the Bristol Fighter was a good air plane, on the contrary he found it to be an excellent aircraft and frequently led patrols in one. He just couldn't give up his Camel.
 On July 18th,
Barker in his Camel and one of his Bristol Fighters, with some others
from 66 Squadron shot down an entire flight of five Austrians. Barker
shot down an L.V.G. two-seater in flames, the others downed three, and
British AA gunners scored on the fifth aircraft. On July 20, Barker and
two Bristols intercepted a flight of Austrian aircraft attacking Motta
Airfield. Barker downed two Albatross DIIIs and a Bristol downed a third.
By now Barker had 33 enemy aircraft and 9 balloons to his credit, and was
awarded a bar to his Distinguished Service Order, in essence earning the
decoration a second time. In late August, 1918, Barker took the Prince
of Wales on two combat missions over the front in a Bristol Fighter.
On July 18th,
Barker in his Camel and one of his Bristol Fighters, with some others
from 66 Squadron shot down an entire flight of five Austrians. Barker
shot down an L.V.G. two-seater in flames, the others downed three, and
British AA gunners scored on the fifth aircraft. On July 20, Barker and
two Bristols intercepted a flight of Austrian aircraft attacking Motta
Airfield. Barker downed two Albatross DIIIs and a Bristol downed a third.
By now Barker had 33 enemy aircraft and 9 balloons to his credit, and was
awarded a bar to his Distinguished Service Order, in essence earning the
decoration a second time. In late August, 1918, Barker took the Prince
of Wales on two combat missions over the front in a Bristol Fighter.
In September, Barker was ordered back to England to take command of the fighter school at Hounslow. At this time, B6313 was disassembled and packed up for shipment back to England.
Once back, Barker convinced his superiors he needed experience of combat on the Western Front, he went to 208 Squadron in France in October, flying Sopwith Snipe E9102. During two weeks of combat, he was able to shoot down several German two-seaters. On October 27, his total stood at 46 German and Austrian aircraft and 9 balloons. That morning, he sent his belongings on to England, climbed into his Snipe and set off for home, during which he planned a last flight over the Front. Over La Foret de Mormal, he spotted a lone German two-seater and caught up to it at 22,000 feet, The crew was very good; the pilot maneuvered to keep the rear gunner in position to fire at Barker, and the Snipe was hit several times. Barker circled away and came back at the plane and shot the gunner dead from 200 yards. He closed in for the kill hitting the LVG so hard it broke up. But he had made a mistake - like Richthofen and others, he became so involved in the fight he didn't spot the Fokker D.VII climb behind him.
The first
Barker knew of his enemy was when an explosive bullet shattered his right
femur. He banked left, and began a circling fight with the Fokker in
which both lost considerable height before Barker fired a burst into the
Fokker's gas tank, igniting the whole plane. His troubles had only begun
as he then dropped into the top cover Jasta of the entire Jagdgeschwader
III, made up of nearly 60 Fokker D.VIIs! He was attacked from all sides
and directions and Barker was hit in the left thigh. He drove down two
Fokkers in spins. He then fainted from pain and blood loss and fell out
of control for several thousand feet until the rushing air revived him,
where he discovered he was now in the middle Jasta, where the fight
started all over again. In desperation, he picked out a nearby Fokker and
charged it, firing all the time. Just as he reached the other aircraft it
blew apart and fell away. His left elbow was shattered by a bullet. Again
he fainted and the Snipe fell into a spin. He eventually came to and
managed to pull out of his dive and onto the tail of a Fokker in the low
level Jasta, which he shot down in f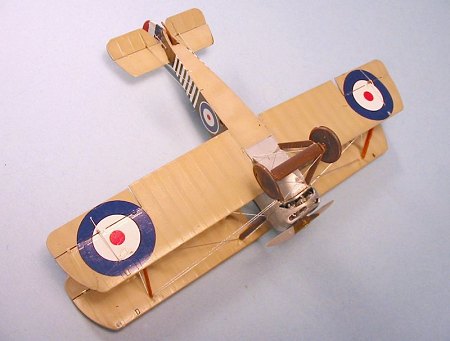 lames. Heading for the Allied lines,
he was intercepted by a German flight. He charged and broke up their
formation, then turned again for the British lines. His gas tank was shot
away from under his seat but amazingly did not catch on fire. He had just
enough strength to flip on a small reserve tank of fuel and headed down
as fast as the Snipe would go, nearly out of control, He crashed at top
speed, flipping the Snipe on its nose. Members of The Highland Regiment
pulled him from the wreckage and were amazed to find him alive. Thousands
of British soldiers, including Canada's General Andrew McNaughton, had
watched the whole fight and were cheering lustily as Barker beat the
entire German Jagdgeschwader.
lames. Heading for the Allied lines,
he was intercepted by a German flight. He charged and broke up their
formation, then turned again for the British lines. His gas tank was shot
away from under his seat but amazingly did not catch on fire. He had just
enough strength to flip on a small reserve tank of fuel and headed down
as fast as the Snipe would go, nearly out of control, He crashed at top
speed, flipping the Snipe on its nose. Members of The Highland Regiment
pulled him from the wreckage and were amazed to find him alive. Thousands
of British soldiers, including Canada's General Andrew McNaughton, had
watched the whole fight and were cheering lustily as Barker beat the
entire German Jagdgeschwader.
Barker's final score, with the six he was credited with in his final battle - for which he was awarded the Victoria Cross - was 52 aircraft and 9 balloons. His wounds were very serious, and the broken bones in his thighs never really healed well, keeping him in constant pain, and a semi-cripple for the rest of his life.
After the war, Barker returned to Canada and with Billy Bishop formed the Bishop and Barker Company, flying Martinsyde two-seaters and HS2L's from Toronto's Island Airport to the Muskoka country north of Toronto. Unfortunately for them both, the company was not successful and they were forced to sell their aircraft to pay debts.
In 1920, Barker joined the newly formed Royal Canadian Air Force and was sent to England as liaison officer with the Air Ministry. While in England, he worked with Raymond Collishaw in the RAF project to choose flying routes throughout the middle east. In 1924, he resigned from the RCAF to become a tobacco farmer in Norfolk County, Ontario. A serious bout of pneumonia in the spring of 1929 forced him to sell his tobacco farm. In January 1930, Barker became the president of Fairchild Aviation Corporation of Canada headquartered in Montreal.
In March, 1930, Fairchild was to demonstrate their newest two-seater aircraft to the Department of National Defence. Before the formal tests, Barker decided to take the aircraft "up for a flip". He took off from Rockcliffe Aerodrome. After some 10 minutes he returned, flying at full throttle very low. Just over the field, he pulled up into a steep climb before stalling at an altitude of 200 feet. He crashed nose-first into the field and was killed instantly.
Over the years, it has been suggested Barker committed suicide, as his years after the war were filled with constant pain, debilitation, and depression. It is impossible to know just what really happened at Rockcliffe that afternoon.
|
CONSTRUCTION |
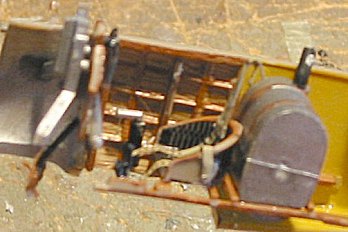 Construction
starts with the cockpit. This kit has the most detailed cockpit of any
Sopwith Camel model I have ever built. Unfortunately, most of that will
not be visible once complete, since the wing is directly over the
cockpit; unless you do the "open center section" top wing - as I did here
- you won't see much. What is there is easy to assemble since it is all
plastic, and looks great once complete. The decal sheet includes
instrument faces and the matting for the seat to give it a look one can
usually only obtain with a resin seat. All one needs to do with this
construction sequence is follow the instructions. Since I planned to
pose the controls dynamically, I made sure to pose the rudder bar and the
control stick in the proper positions for what the control surfaces would
be set for. My only other personal addition was to use some Aeromaster
"light wood" decal for the inner surface of the cockpit side wall, which
I then "varnished" with Tamiya "Clear Yellow" before closing things up.
Once I had the fuselage glued together, I applied Mr. Surfacer to the
centerline seam and set it aside.
Construction
starts with the cockpit. This kit has the most detailed cockpit of any
Sopwith Camel model I have ever built. Unfortunately, most of that will
not be visible once complete, since the wing is directly over the
cockpit; unless you do the "open center section" top wing - as I did here
- you won't see much. What is there is easy to assemble since it is all
plastic, and looks great once complete. The decal sheet includes
instrument faces and the matting for the seat to give it a look one can
usually only obtain with a resin seat. All one needs to do with this
construction sequence is follow the instructions. Since I planned to
pose the controls dynamically, I made sure to pose the rudder bar and the
control stick in the proper positions for what the control surfaces would
be set for. My only other personal addition was to use some Aeromaster
"light wood" decal for the inner surface of the cockpit side wall, which
I then "varnished" with Tamiya "Clear Yellow" before closing things up.
Once I had the fuselage glued together, I applied Mr. Surfacer to the
centerline seam and set it aside.
The flying surfaces are easily assembled. The ailerons, elevators and rudder all attach to the wing, horizontal stabilizer and vertical fin by the hinges, which allows for a very realistic look. Be careful here: these parts are all thin and delicate, and it is extremely easy to knock off an aileron or elevator with the slightest bit of ham-handedness. Once I had gotten rid of the centerline seam on the fuselage, I attached the lower wing and the tail surfaces. The model was ready for paint.
|
CAMOUFLAGE & MARKINGS |
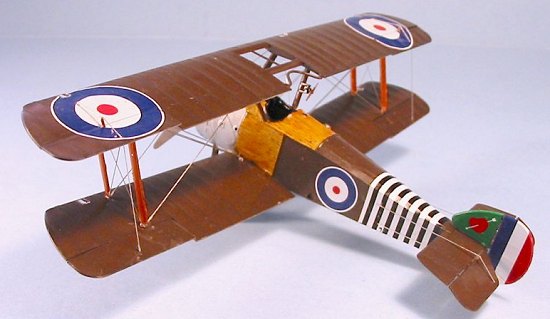
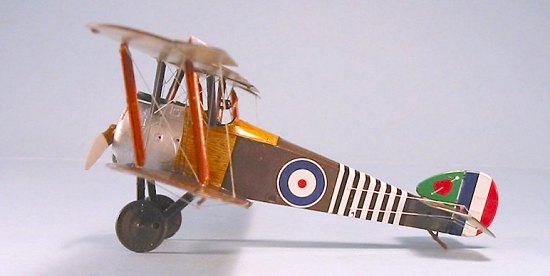
Painting:
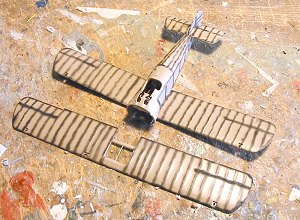 British World
War I airplanes are easy to paint: the lower surfaces are clear-doped
linen, and the upper surfaces are P.C.10. This is a color for which
there is no set shade, as it varied from manufacturer to manufacturer and
from production batch to production batch within an individual
manufacturer's run. It can vary from Dark Green through Khaki to Olive
Drab, to Dark Chocolate Brown, and no one will ever be able to tell you
the color you do your model in is "wrong." However, it seems that from
mid-1917 to the end of the war, P.C.10 tended toward brownish shades, so
sticking to Olive Drab or Dark Brown would be right for any Camels you
make. I mixed up some Tamiya "Khaki Green" and "Red Brown" to get the
shade of dark brown I used here. I used Gunze-Sangyo "Sail Color" for
the clear doped linen lower surfaces. I pre-shaded the model with flat
black on the upper surfaces and dark grey on the lower surfaces, then did
a bit of post-shading of the final colors by applying a bit of white in
the paint and going over the areas between the airframe structure.
British World
War I airplanes are easy to paint: the lower surfaces are clear-doped
linen, and the upper surfaces are P.C.10. This is a color for which
there is no set shade, as it varied from manufacturer to manufacturer and
from production batch to production batch within an individual
manufacturer's run. It can vary from Dark Green through Khaki to Olive
Drab, to Dark Chocolate Brown, and no one will ever be able to tell you
the color you do your model in is "wrong." However, it seems that from
mid-1917 to the end of the war, P.C.10 tended toward brownish shades, so
sticking to Olive Drab or Dark Brown would be right for any Camels you
make. I mixed up some Tamiya "Khaki Green" and "Red Brown" to get the
shade of dark brown I used here. I used Gunze-Sangyo "Sail Color" for
the clear doped linen lower surfaces. I pre-shaded the model with flat
black on the upper surfaces and dark grey on the lower surfaces, then did
a bit of post-shading of the final colors by applying a bit of white in
the paint and going over the areas between the airframe structure.
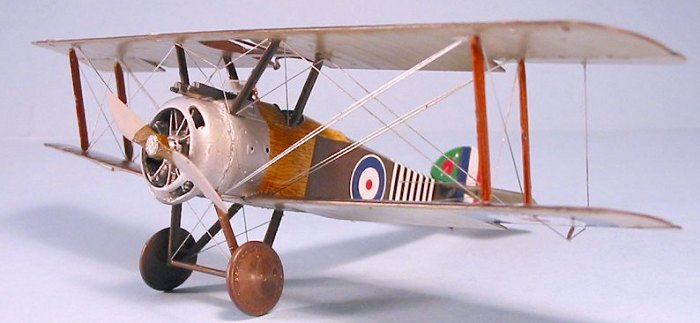
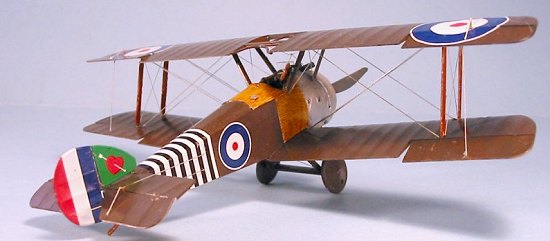
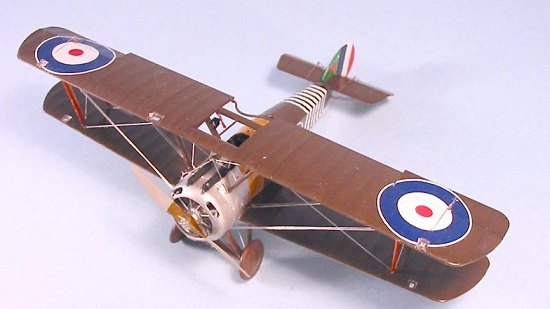
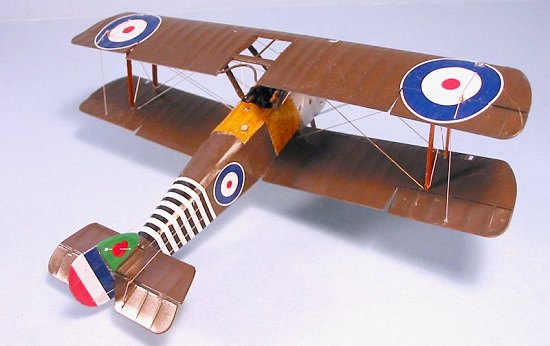
Decals:
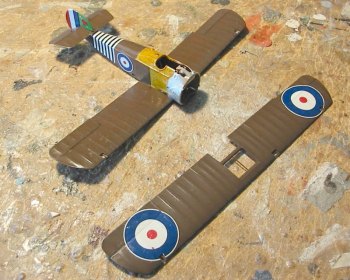 The kit decals
are really excellent, and four terrific Camels can be made using them. I
had determined I wanted to do William Barker's airplane as it appeared in
August 1918 when he commanded 139 Squadron, since I had the Aeromaster
sheet that had the markings. The Aeromaster decals went down easily. The
sheet is made to be used on the Monogram or Blue Max Camel kits, and I
found I had to use the somewhat larger rudder stripes for the Monogram
kit, trimmed down a bit, to fit the rudder of this kit. I also used SuperScale "Emerald Green" decal for the vertical fin. After washing the
model to get rid of dried setting solution, I gave the model a coat of
Future - Camels got progressively shinier as they served, with the castor
oil from the engine gradually coating everything.
The kit decals
are really excellent, and four terrific Camels can be made using them. I
had determined I wanted to do William Barker's airplane as it appeared in
August 1918 when he commanded 139 Squadron, since I had the Aeromaster
sheet that had the markings. The Aeromaster decals went down easily. The
sheet is made to be used on the Monogram or Blue Max Camel kits, and I
found I had to use the somewhat larger rudder stripes for the Monogram
kit, trimmed down a bit, to fit the rudder of this kit. I also used SuperScale "Emerald Green" decal for the vertical fin. After washing the
model to get rid of dried setting solution, I gave the model a coat of
Future - Camels got progressively shinier as they served, with the castor
oil from the engine gradually coating everything.
I used Blue Max "Yew" wood decal for the interplane struts, and Aeromaster "dark wood" for the prop.
I used Aeromaster "Light Wood" decal for the fuselage sides and the turtleback area of the cockpit, "varnished" with Tamiya Clear Yellow.
|
FINAL CONSTRUCTION |
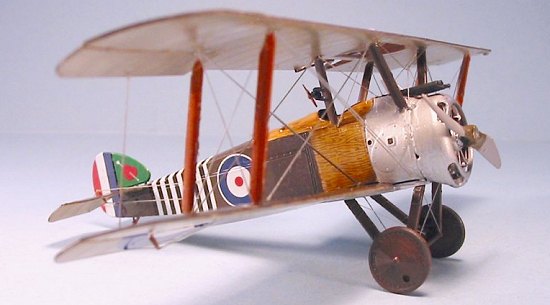
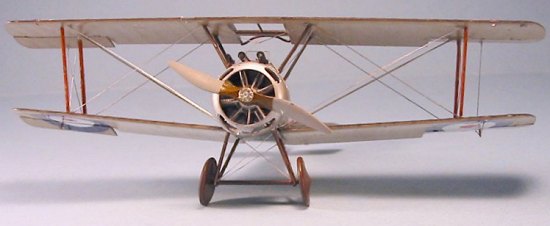
Barker's Camel
is different from others, in that he cut extra cooling vents in the
cowling to take care of the increased heat in Italy. It took me both
cowlings to get one that looked right, drilling these out and cleaning
them up with a #11 X-Acto. If you
 are at all ham-handed in doing these
things, I suggest you do a "standard" Camel, because this was difficult
and was only accomplished by gluing together the parts when it broke,
applying a lot of superglue and Mr. Surfacer, sanding it down and
polishing it out. This was the hardest part of the entire project.
are at all ham-handed in doing these
things, I suggest you do a "standard" Camel, because this was difficult
and was only accomplished by gluing together the parts when it broke,
applying a lot of superglue and Mr. Surfacer, sanding it down and
polishing it out. This was the hardest part of the entire project.
With that out of the way, I superglued the cabane struts in position, then attached the upper wing. When it was properly aligned, I superglued it in position. Then I attached the interplane struts.
When I assembled the landing gear, I bent the axle so it would sit right. To be completely accurate, the entire axle should come up out of the spreader bar, but that involves a lot of "digging," and then making entirely new axles. Bending it so the wheels "toe out" makes it look right, and only the most dedicated World War One "nut case" will know this isn't right.
I rigged the model with .008 steel wire.
|
CONCLUSIONS |
Eduard plans to release the Camel 2.F1 "shipboard fighter" and the "Comic" night fighter. I am sure that not only will I get at least one of each of those, but that there will be several others of this Camel F.1 show up in my World War I collection. If you haven't built a World War I kit before, I unhesitatingly recommend this kit to you.
Kit courtesy of my friend and veterinary adviser, Andy Abshier.
If you would like your product reviewed fairly and quickly by a site that has over 200,000 visitors a month, please contact me or see other details in the Note to Contributors.
Back to the Reviews Index Page