Toko 1/72 Pfalz D.XII
|
KIT # |
119 |
|
PRICE: |
$7.50 |
|
DECALS: |
See Review |
|
REVIEWER: |
Kyle Bodily |
|
NOTES: |
|
HISTORY |
The Pfalz Flugzeugwarke began life producing the Otto pusher biplanes under license from the Otto Company and later acquired the rights to produce Morane Saulnier Type H and L fighters. Other aircraft manufacturers somewhat overshadowed Pfalz Flugzeugwerke and seemed to get all the glory. This should not distract from the fact that Pfalz did shoulder a large portion of the German Aircraft industry throughout the war. One of these unsung heroes was the Pfalz D.XII. This aircraft was quite important to the German late war effort. It is estimated that some 750 to 800 D.XIIs were built before the factory began to tool up for the D.XV in October 1918.
Like most aircraft companies, captured aircraft were studied extensively to learn all their secrets. Pfalz was no exception. The D.III and D.IIIa were heavily influenced by the French Nieuport and the D.XII was heavily influenced by the SPAD S.VII and S.XIII.
As the war progressed the German Jastas were faced with ever increasing numbers of allied fighters and had to change their fighter doctrines. This shift was from free chase to a more controlled and organized attack pattern. This led to the preferred German method of attacking the enemy from above and in mass. After you positioned yourself you dove on the enemy, did your damage and escaped without getting entangled in a dogfight. This was a tactic that the Germans were taught by the French SPAD pilots. The SPAD was fast, could dive like a rock and was very strong. It’s only draw back was that just about any Aircraft could out turn it. The designers at Pfalz knew this and wanted to build an aircraft that could dive well and out turn most of the new Allied fighters like the SE-5 and SPAD. In this endeavor they were, for the most part, successful.
 In reports from the second fighter
competition held 27 May to 21 June 1918, we see a great insight of the Pfalz
D.XIIs performance. When the Pfalz had the BMW D.IIIa engine it was quite a
performer. In fact it was second in climbing to the Rumpler D.I (it out climbed
even the Fokker D.VIIf) and was considered to be of “quite similar value” to the
Fokker by all but one pilot who liked the Albatros D.XII more. In the end both
the Pfalz and Fokker were to be put into production with the Fokker being
favored for the BMW D.IIIa engine. However the hope was expressed by all that
ideally the BMW engines would be divided between the two fighters.
In reports from the second fighter
competition held 27 May to 21 June 1918, we see a great insight of the Pfalz
D.XIIs performance. When the Pfalz had the BMW D.IIIa engine it was quite a
performer. In fact it was second in climbing to the Rumpler D.I (it out climbed
even the Fokker D.VIIf) and was considered to be of “quite similar value” to the
Fokker by all but one pilot who liked the Albatros D.XII more. In the end both
the Pfalz and Fokker were to be put into production with the Fokker being
favored for the BMW D.IIIa engine. However the hope was expressed by all that
ideally the BMW engines would be divided between the two fighters.
In practice almost all the BMW D.IIIa engines were put into the Fokkers and very few of them were installed in the Pfalz D.XIIs. So it is not surprising that the Fokkers were so populer. If BMW could have been able to produce enough engines for both fighters it is almost certain that the Pfalz would have been as, or at least almost as famous as the Fokker D.VII. Since the Pfalz was in fact a very good aircraft and it was an improvement over the older German fighters it was decided that it would be produced with the Mercedes D.IIIa. This engine produced 160 hp compared to the BMW D.IIIa that produced 185hp. The Pfalz was not always popular with airmen or ground crews. The Fokker had no rigging, and the Pfalz had a rigged two bay wing. The Fokker had stellar performance with a 25hp advantage over Pfalz. It is easy to see that if you had to put your life on the line in an aircraft you would pick the Fokker.
In combat the aircraft did perform well. Leutnant Rudolf Stark, CO of Jasta 35b said that most of the pilots that received the Pfalz had preconceived notions and prejudices towards it. However later on the pilots did well. In fact it climbed well and could fly along with the Fokker D.VII in all respects and in a dive it was slightly faster but in turns and combat it was slow and could not compare with the Fokker.
In reality the Pfalz with its 160hp engine, could not compare with the Fokker with its 185hp engine. In fact nothing the Germans had, or the allies for that matter could really compare to the Fokker D.VII. It is intriguing however to wonder, if there were enough BMW D.IIIa engines to go around, What the Pfalz could have done and what impact it may have had on the final days of the First World War.
|
THE KIT |
For a WWI enthusiast, to see all the eastern European companies that have a heavy emphasis on WWI is quite exhilarating. For the most part these kits are very well done and the detail is incredible. This kit is no exception.
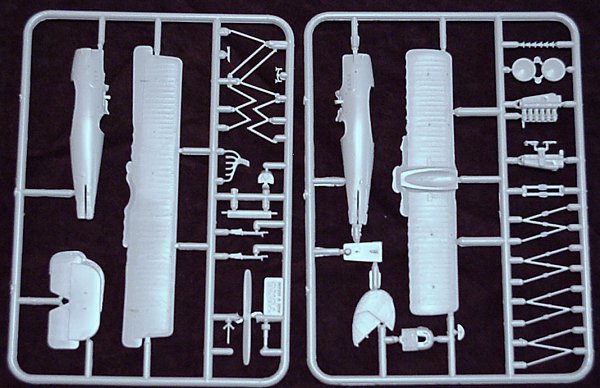
When you open the box you will find two
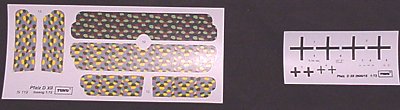
parts trees of light gray plastic, two decal sheets, one containing national
insignia and one containing Lozenge decals for the wings. The instructions are
well written, and the assembly and construction is well diagrammed. However
rigging information is not present in the
 instructions.
The decals allow you to build two aircraft. The first is that of Leutnent G. Klein and one of an unknown Bavarian Jasta. The Lozenge decals are of questionable color so I chose to use Eagle Strike four color lozenge decals.
The parts are molded beautifully with a little flash that is very easy to clean up. The wings are beautiful and thin, in fact some of the thinnest I’ve seen and the car like radiator is very nicely done. The cockpit sides have very nice molded on detail and the engine looks like it could be built and displayed all by itself.
The struts are molded beautifully and very thin, they are to scale and will need some care to not damage when you remove them from the trees. I guess that the only real draw back is the simulated fabric on the wings and tail. It does look better then some of the earlier kits like Revell and Airfix with simulated fabric.
The kit also scales out pretty well using Ian Stair’s drawings. With the wing span being too long and the fuselage being too short. Other wise every thing is quite good. I think that you would have a hard time picking up these discrepancies when the kit is complete.
All in all the kit looks good and should build into a great looking model. I know of five models in 1/72 scale of the Pfalz D.XII Cramer Craft and Classic-Plane both built Vac kits. Veeday, Merlin and Pegasus built injection kits. The Pegasus kit also has some cast metal parts and is quite nice but is now out of production and cost around $20.00. In my opinion however I think that this is the best kit of this aircraft in this scale.
|
CONSTRUCTION |
I started this kit, like most others by removing all the parts from the trees and cleaning up any flash. I painted the cockpit and assembled it. The instructions say to mount the cockpit to the lower wings but this didn’t work for me so I mounted it to the side of the fuselage in a more conventional way and glued the two halves together. I found that the engine was easier to put into the fuselage after it was assembled, however I did need to trim the carburetor to make it fit. The engine does not have supports so after I got it in to the right position I took tiny pieces of spue and glued them to either side of the engine thus making my own engine mounts.
All the D.XIIs lower wings were smoothly contoured into the fuselage so after fitting the lower wings in to the fuselage I used a little model putty to make this joint look smooth.
 Also there is a bit of a
controversy over whether or not the insides of Pfalz aircraft were just
lacquered or if they were painted a light gray. As of the time that I painted
this model I believed that they were lacquered now I believe that all Pfalz and
Roland aircraft, Except for the Roland D.VI were painted light gray on all
internal surfaces. Of course this is just my opinion and does not reflect the
opinion of your publisher or this webzine.
Also there is a bit of a
controversy over whether or not the insides of Pfalz aircraft were just
lacquered or if they were painted a light gray. As of the time that I painted
this model I believed that they were lacquered now I believe that all Pfalz and
Roland aircraft, Except for the Roland D.VI were painted light gray on all
internal surfaces. Of course this is just my opinion and does not reflect the
opinion of your publisher or this webzine.
Another problem that I ran into was the fact that the cut in the rear of the fuselage for the horizontal stabilizer was too long and a little too narrow. So I fixed this by using a flat jewelers file to widen it and a little green to shorten the cut. I didn’t want glue in the stab at this time, so I put appropriate amounts of green putty in the front of the cut, just enough to slightly over fill the portion that I wanted to fill. Let this sit for about five or so minutes just long enough to let a good skin to form on the putty. Now push in the stabilizer till it is in the correct position ant now you can remove the stab. What you now have is a perfect fit for the stabilizer and you can conform the putty to the fuselage contours with a few swipes of a sanding stick. Now I finished getting ready for Decals and painting by drilling all the holes that I would need to rig the kit.
I like to drill the holes only about half way through the under side of the upper wing and all the way through for the bottom wing. I find that this makes it easier for me. I glue the lines to the upper wing and pull them through the lower wing this allows me to very easily and evenly tighten the rigging lines without fear of warping the wings.
After painting the model and all the decals but the lower wing crosses were finished and applied. I put the upper wing on. It went on with only the slightest glitch. The cabane struts need to be adjusted. They take the shape of an inverted W. The front legs need to be adjusted out. It is hard to say how far but I would say about 2 millimeters.
|
PAINT & MARKINGS |
 I start this step by painting all the
surfaces that will be covered with lozenge. I like to use a light color like
tan or white. After letting this dry I applied the lozenge decals. This is
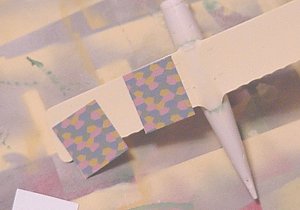
somewhat tedious but it sure looks cool when you are done. First you cut the
strips of decals out, then cut them to the cord length of the wing. Some wings
were covered cord-wise and others were covered span-wise and still others were
covered diagonally. You will have to research the aircraft you intend to model
to
I start this step by painting all the
surfaces that will be covered with lozenge. I like to use a light color like
tan or white. After letting this dry I applied the lozenge decals. This is
somewhat tedious but it sure looks cool when you are done. First you cut the
strips of decals out, then cut them to the cord length of the wing. Some wings
were covered cord-wise and others were covered span-wise and still others were
covered diagonally. You will have to research the aircraft you intend to model
to 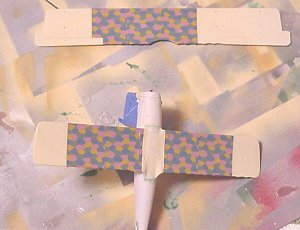 know which method to use. I do the bottom of the wings first and then the
top. You start in the middle and work out on ether side carefully butting the
next decal against the one first placed. Let the decals dry before the next
decal is placed. This is not an easy project because the decals shrink ever so
slightly. This can cause a line at form at the joint and if you overlap the
decals you get a lump there. So you have to lay the decals just right and that
comes with a little practice.
know which method to use. I do the bottom of the wings first and then the
top. You start in the middle and work out on ether side carefully butting the
next decal against the one first placed. Let the decals dry before the next
decal is placed. This is not an easy project because the decals shrink ever so
slightly. This can cause a line at form at the joint and if you overlap the
decals you get a lump there. So you have to lay the decals just right and that
comes with a little practice.
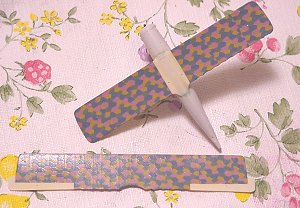
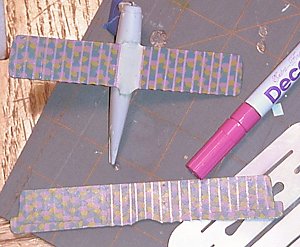
I’ve found a process that makes my life easier and still
gives you the nice looking rib tapes on the lozenge decals. I don’t use those
little decals to do rib tapes, I draw them on with paint markers. I’ve found
that DecoColor opaque paint markers work
 the best for me. I like the Extra-fine
tipped for the rib tapes and Fine-line to reproduce the tapes that marks the
border of the top surface from the bottom. You can find them at most art supply
stores. You will also need to find yourself a strait edge that will bend around
wing surfaces. Also I’ve found that you will need to elevate it slightly so
that the paint will not travel under the edge. I use a metal draftsman eraser
template that I’ve put enough tape under one
the best for me. I like the Extra-fine
tipped for the rib tapes and Fine-line to reproduce the tapes that marks the
border of the top surface from the bottom. You can find them at most art supply
stores. You will also need to find yourself a strait edge that will bend around
wing surfaces. Also I’ve found that you will need to elevate it slightly so
that the paint will not travel under the edge. I use a metal draftsman eraser
template that I’ve put enough tape under one
 edge to keep it from actually
touching the model. It took a little practice but I think it is worth it. Now
it takes me about 1/100th the time to put rib tapes on my models,
That does not include drying time, I like to let it dry for a day or two at
least before I like to handle the parts.
edge to keep it from actually
touching the model. It took a little practice but I think it is worth it. Now
it takes me about 1/100th the time to put rib tapes on my models,
That does not include drying time, I like to let it dry for a day or two at
least before I like to handle the parts.
What I do is lay the wing on an old piece of terry cloth,
like an old towel. This helps to keep the part from moving and rolling when you
work on the under camber. Now, I work from right to left to keep from marring
the newly drawn ribtapes. I line up the
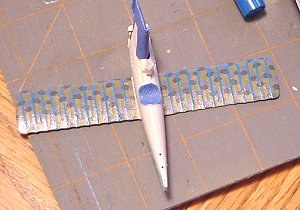 straight edge with the rib and while
holding the marker vertical simply draw the line. When I get about one inch
from the end of the wing I stop and let the part dry. After a reasonable time I
turn the wing around and finish the other side. After the top surface has dried
you can turn the wing over and do the other side. I use a wider marker to make
the tape that divides the upper surface from the bottom.
straight edge with the rib and while
holding the marker vertical simply draw the line. When I get about one inch
from the end of the wing I stop and let the part dry. After a reasonable time I
turn the wing around and finish the other side. After the top surface has dried
you can turn the wing over and do the other side. I use a wider marker to make
the tape that divides the upper surface from the bottom.
It took me some time and practice but I found a system that worked for me. I think that with a little practice just about any one can master this process.
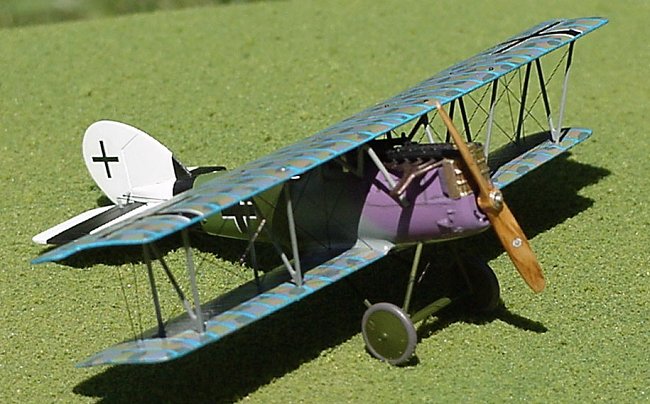
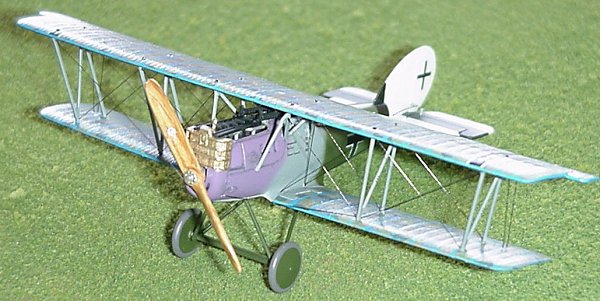
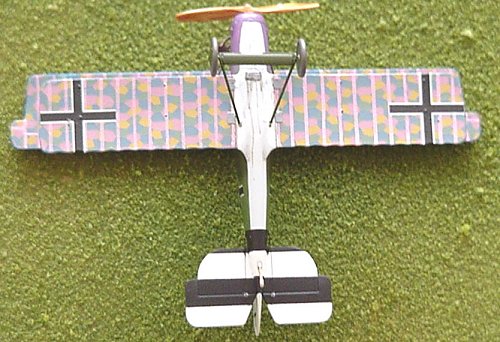
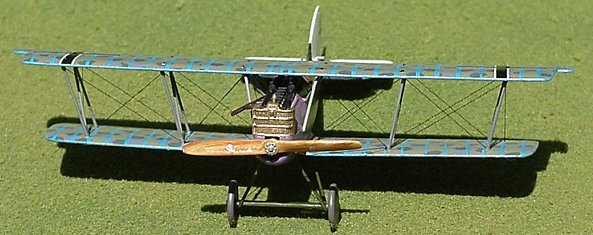
I painted the model in one of the standard paint schemes for the D.XII and gave it the distinctive white and black striped tail of Jasta 23b. The reason that I didn’t want to glue the tail in place was to make it easier for me to paint the striped tail. The individual aircraft that I am modeling was Pfalz D.XII 2486/18 flown by Ltn. Paul Vogel. There is a lot of information on this aircraft. It was captured on 18 September 1918 and became the subject of an extensive study by the British Ministry of Munitions.
|
CONCLUSIONS |
 This was a very rewarding kit for me to
build. The rigging was not that hard. The lozenge decals were a challenge, but
much easier then painting by hand. Also if you bend the cabane struts prior to
the wing attachment, I think you will avoid a lot of grief. The Pfalz D.XII was
individualized very often, so you should be able to find an interesting color
scheme.
This was a very rewarding kit for me to
build. The rigging was not that hard. The lozenge decals were a challenge, but
much easier then painting by hand. Also if you bend the cabane struts prior to
the wing attachment, I think you will avoid a lot of grief. The Pfalz D.XII was
individualized very often, so you should be able to find an interesting color
scheme.
I would recommend this kit to most modelers with moderate experience because the engine needs to be fiddled with, the over sized stab cut out and the need to bend the cabane struts.
|
REFERENCES |
“Windsock Datafile #41 Pfalz D.XII”
Albatros Productions LTD
“Jane’s All the Worlds Aircraft 1919” (Jane’s Fighting Aircraft
of World War I)
“The Ministry of Munitions Report November 1918”
“The Pfalz D.XII Profile Publications #199” Profile
publications Ltd.
Copyright ModelingMadness.com. All rights reserved. No reproduction in part or in whole without express permission from the editor.
If you would like your product reviewed fairly and quickly, please contact the editor or see other details in the Note to Contributors.