
Arii 1/72 O-2A
|
KIT # |
? |
|
PRICE: |
? |
|
DECALS: |
one option |
|
REVIEWER: |
|
|
NOTES: |
|
HISTORY |
In the mid-sixties the single-engine O-1 Bird dog FAC’s were taking a beating over Vietnam and as their planned successor, the OV-10 Bronco, was not going to be delivered any time soon, the Air Force urgently needed a stop-gap multi-engine FAC aircraft. They ordered a militarized version of the Cessna Super Skymaster as the O-2A, featuring additional windows, fire detection equipment, a new instrument panel, underwing pylons, armoured seats and explosion-resistant fuel tanks. In addition 32 aircraft were taken from the civil production line as O-2B’s, fitted with loud-speakers and leaflet dispensers for psy-war duties.
|
THE KIT |

As far as I know there are only two 1:72 O-2’s around, from Airfix and ARII. I have never seen the Airfix kit, but the ARII kit is commonly available. It is part of their range of light aircraft kits, which includes the civil Skymaster as well.
The kit is molded in soft white plastic with the fuselage halves and single piece wings, tailplane and tailbooms as main parts. Detail is a mixture of engraved and raised lines, with a bit of rivet detail. There is some flash and several sink marks.
ARII did not bother to add the roof windows, but did add the extra side windows. Thick, inset transparencies are provided for all windows. The windscreen is very thick on one side and very thin on the other and was damaged beyond use when it came of the sprue.
The interior comprises a floor, seats and an instrument panel with control yokes. The undercarriage is simple, and the shape of the main legs is not quite curvaceous enough. The main wheels are a bit on the slim side. Even though there are no pylons in the kit there are two rocket pods that require a lot of clean-up work. All in all a rather crude kit.
 Instructions consist of a few basic exploded views
with lots of Japanese scribbles and some basic paint call-outs. Decals
are for one unidentified O-2 and of no use whatsoever. They are out of
register and star-and-bar colors are way too light. White high-viz bands
for the wings and the front cowling anti-glare panel are included. The
package is completed by a stand.
Instructions consist of a few basic exploded views
with lots of Japanese scribbles and some basic paint call-outs. Decals
are for one unidentified O-2 and of no use whatsoever. They are out of
register and star-and-bar colors are way too light. White high-viz bands
for the wings and the front cowling anti-glare panel are included. The
package is completed by a stand.
Interestingly the kit comes with almost all the bits to build an O-2B or a civil Skymaster. There is an extra righthand fuselage halve without the extra side windows and (for the O-2B) a loudspeaker. All that is missing are the propeller spinners. This would probably be the easy way out, given the missing roof windows.
|
CONSTRUCTION |
First job was to solve the windscreen problem by carving a wood former and plug-form a new one. After a few attempts I managed to produce a useable, though not perfect windscreen. Not too bad for my first plug form.
Next step was the interior. The four (civil) kit seats were replaced with two more suitable seats from the spares bin, with belts added from metal foil. A radio stack behind the seats was fashioned from some scrap plastic and a rear wall was added too close of the interior. It was painted light grey, with the instrument panel black and some details picked out.
Next the fuselage halves were cleaned up, a cutout for the roof windows was added and the rear air intake was opened up. The cabin windows were installed, leaving all kinds of gaps around the edges, followed by the interior. I added a spacer below the rear of the floor to allow the main landing gear legs to slide in from the outside later on. I opened up the front cowling propeller mounting and added a backing plate to mount the propeller on. This created the open look around the propeller seen on the actual aircraft. The fuselage halves and front and rear cowlings were then assembled. The fuselage halves are not exactly the same length and they are deformed in places so lots of filler was required on all the joints.
After some test-fitting I decided to mount the tailbooms on the wings first so that I could work more easily on the horrible joints. Once these were cleaned up wings and tailplane were mated to the fuselage. This sequence worked out much better than expected because it highlighted that the wing sweepback had to be reduced to get parallel tailbooms. I also had to shorten the tailplane to make it fit. After lots of fiddling and comparing to photographs I was satisfied with the alignment. More filler had to be mobilized to clean up the resulting mess around the wing root and cabin roof area until a smooth finish was achieved. Finally the roof window, made from a piece of flat clear plastic, was added, as were the wing struts, which were a bit too long and had to be trimmed.
|
CAMOUFLAGE & MARKINGS |
 As I had by now grown a bit tired of the kit it took
a while before I got around to painting it. Although there are a
surprising amount of paint scheme options for O-2’s I chose to finish it
in the standard grey paint scheme with white upper wing surfaces. Most of
the details where going to come from a Superscale OV-10 sheet I had lying
around and I surfed the net until
I came across a photograph of an O-2A with a serial that could be made
from the various numbers I had available on this sheet. As a bonus it had
red wheel hubs, adding a nice color touch. The only thing I couldn’t be
sure of was the configuration of the white on the upper wing. In the end
I decided to use the most common configuration.
As I had by now grown a bit tired of the kit it took
a while before I got around to painting it. Although there are a
surprising amount of paint scheme options for O-2’s I chose to finish it
in the standard grey paint scheme with white upper wing surfaces. Most of
the details where going to come from a Superscale OV-10 sheet I had lying
around and I surfed the net until
I came across a photograph of an O-2A with a serial that could be made
from the various numbers I had available on this sheet. As a bonus it had
red wheel hubs, adding a nice color touch. The only thing I couldn’t be
sure of was the configuration of the white on the upper wing. In the end
I decided to use the most common configuration.
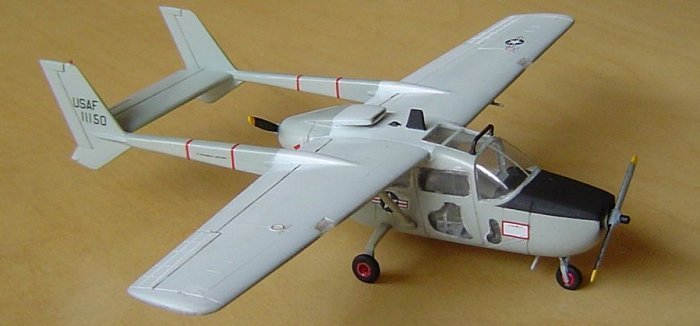
I sprayed the kit with Modelmaster 1731 Aircraft gray and then masked off the top wing, which was sprayed white. I masked the front cowling anti glare panel and sprayed it black. Smaller details were brush painted. As the finish was semi-gloss I put the decals on without adding a gloss coat, which worked out fine. Getting all “ones” of the serials lined up was interesting to say the least, and though I never managed to get them exactly right it was close enough for me. Last touch was some highlighting of the panel lines.
|
FINAL CONSTRUCTION |
With the painting done the smaller bits and pieces
were installed. The towel rail antenna was (of course) way too thick and
it was thinned down as far as I could. The blade antenna was added, and
at this stage I noticed that the cast-on whip
 antenna mount near the
starboard wingtip should have been behind the blade antenna. Rats. I cut
it off and relocated it, but did not have the heart to fully sand away
the traces on the original location, which would destroy the upper wing
finish. I dabbed on some white paint and decided to call it a battle
damage patch.
antenna mount near the
starboard wingtip should have been behind the blade antenna. Rats. I cut
it off and relocated it, but did not have the heart to fully sand away
the traces on the original location, which would destroy the upper wing
finish. I dabbed on some white paint and decided to call it a battle
damage patch.
I gave up on the rocket pods and have not (yet) added pylons below the wings. Some other time maybe. The landing gear was painted and installed, although I first re-sculpted the brake pads a bit. The nose gear looked okay enough to me after some cleanup. Now all that remained was adding the pieces of squarish plastic that were supposed to be the props. I carved and sanded them as good as I could and they look much better now, though not very convincing. Maybe I will run into some replacements later on.
|
CONCLUSIONS |
This kit is not the easiest one to build, but with a bit of effort and replacement of the transparencies and propellers a decent model can be build, with lots of scope for detailers in the well visible cockpit area. It looks nice on the shelf sitting next to the Bronco and the Bird dog, which shows well how surprisingly small the O-2A actually is.
As for accuracy the span is almost spot-on at 161 mm, but the length is a good 7 mm short at 119 mm. To me though it certainly looks like a Skymaster.
|
REFERENCES |
Lots of internet sites
October 2003
Copyright ModelingMadness.com. All rights reserved. No
reproduction in part or in whole without express permission from the editor. If you would like your product reviewed fairly and fairly quickly, please
contact
the editor or see other details in the Note to
Contributors.