
Tamiya 1/48 F-4B Phantom II
| KIT #: | 61121 |
| PRICE: | $123.00 SRP |
| DECALS: | Three options |
| REVIEWER: | Dan Lee |
| NOTES: | Hypersonic Models F-4 Ejection Seats (Navy) |
| HISTORY |
Brief History of the Phantom
The F-4 Phantom II aka "Rhino", "Double Ugly", “the "Flying Anvil", "Flying Footlocker", "Flying Brick", "Lead Sled", the "Big Iron Sled" and the "St. Louis Slugger” was the primary fighter bomber of the US Navy and USAF during the Vietnam War and to the early part of the 80s.
It was originally conceived as an “attack” fighter armed with four 20mm cannons. Later, the cannons were deleted (which was later regretted) and the mission changed to a Mach 2 fighter intercepter armed with radar guided missiles. It soon was designated the F4H-1 and named the Phantom II instead of Satan or Mithras.
The first Phantoms reached the Fleet in 1961 when VF-74 “The Be-Devilers” flew them. By 1964 less than half of the US Navy’s fighter squadrons were equipped with the F-4 Phantom. In 1962, the USAF was dismayed to find out that the F-4 had better performance than the latest interceptor in the USAF inventory. USAF would later purchase the Phantom as the F-110 “Spectre” (under the unified service designation became the F-4C and they dropped “Spectre.”)
The Phantom developed a reputation as an adaptable and dangerous opponent. It could not outmaneuver the Mig-17, 19 or 21 but it was a fearsome energy fighter that used its thrust advantage from the twin J-79 turbojets to zoom out of any bad situation or for “zoom and boom” high speed attacks if the pilots had Air Combat Maneuvering Experience. Its combat record was hampered by the lack of an internal gun and reliable missiles (the radar guided Sparrow being the least favorite missile behind the IR guided Sidewinder) and many crews lacked dogfighting experience/training so Phantom crews were in tough against their Vietnamese, Soviet and Chinese opposition.
 Things
changed when Top Gun was started by the US Navy in 1969. Using secretly captured
Mig 17s, 19s and 21s as well as A-4s for dissimilar air combat maneuvering
training, US Naval Aviators (Phantom drivers mostly as Crusader drivers kept
their dogfighting skills) relearned how to dogfight. Many of these graduates
helped wipe out a large portion of the VNAF during Operation Linebacker and
Linebacker II for that oft quoted 12:1 Kill ratio.
Things
changed when Top Gun was started by the US Navy in 1969. Using secretly captured
Mig 17s, 19s and 21s as well as A-4s for dissimilar air combat maneuvering
training, US Naval Aviators (Phantom drivers mostly as Crusader drivers kept
their dogfighting skills) relearned how to dogfight. Many of these graduates
helped wipe out a large portion of the VNAF during Operation Linebacker and
Linebacker II for that oft quoted 12:1 Kill ratio.
By the mid 1970s, the Phantom was slowly replaced in the USN by the Tomcat and Hornet while the Eagle and Falcon were replacing them in USAF squadrons. 5195 Phantoms were built around the world and some are still flying today.
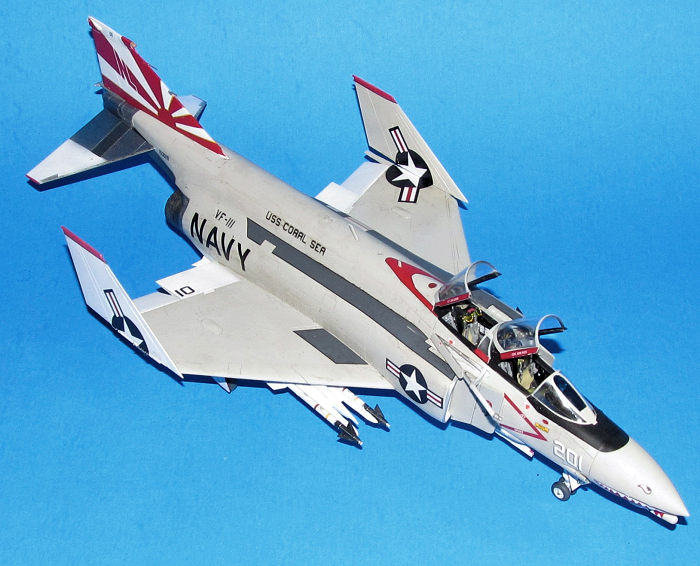
VF-111 Sundowners
The Sundowners were originally designated VA-156 The Iron Tigers, but in 1959, they were designated VF-111 the day after the original Sundowners were disestablished. They flew the F11F-1 Tiger till 1961 when they transitioned to the F-8 Crusader. In 1964, they were then designated VF-26 and then several days later re-re-designated as VF-111.
The Sundowers flew F-8 Crusaders for most of Vietnam War and suffered the highest combat losses for any Crusader squadron deployed to Vietnam. In 1971, the Sundowners became a Phantom Squadron and served on board the USS Coral Sea. The subject of this model review was flown by Lt Gary Weigand and Lt jg Bill Freckleton who scored the Sundowners' first and only Vietnam War air to air kill (a Mig-17) on March 6th 1972. In 1978 the Sundowners transitioned to the Grumman F-14A Tomcat which they flew until the squadron was disestablished in 1995 as part of the Cold War drawdown. Of note, the Sundowners were among the squadrons featured in Top Gun. In 2006 VFC-13 from NAS Key West became VFC-111 and adopted the name Sundowners.
NL201
The plane was repainted to show off TOP GUN in 1972 at NAS Miramar which is why it was missing most of its stencils. Later it was restored by members of VFC-111 to its original Sundowner scheme and is now the gate guard for VFC-111's base, NAS Key West.
| THE KIT |
Tamiya introduced their 1/48 scale F-4B Phantom in 2021. It continues their state of the art design and engineering of model kits of complex but relatively easy to build kits such as the F-14A/D and P-38 Family of models. It definitely looks like based on the parts layout and sprues that Tamiya will be producing other models of the Double Ugly including the long nose F-4E family and the US Navy (J, N and S) marks of the Phantom in the future.
 It comes
with three different schemes of Vietnam War era Mig Killers from VF-51, VF-111
and VF-161 as well as two very complicated decals sheets with the extensive
stencils markings that Phantoms have been well known for. Tamiya also throws in
a canopy masking sheet (not precut though.)
It comes
with three different schemes of Vietnam War era Mig Killers from VF-51, VF-111
and VF-161 as well as two very complicated decals sheets with the extensive
stencils markings that Phantoms have been well known for. Tamiya also throws in
a canopy masking sheet (not precut though.)
The kit has 14 sprues (with 2 duplicates for the weapons and fuel tanks) with 12 of Tamiya's light grey plastic and two clear sprues with open/closed canopies. and some almost 400 very crisp well detailed parts with almost no flash. Also includes two very detailed figures (pilot and RIO) as well as helmet decals with squadron emblems.
Contains several options for loadouts (air to air only) including extra fuel tanks, option for raised wing tips, open/closed canopy and raised/closed refuelling probe. About the only extra one might want is air-to-ground ordinance.
The intakes and exhausts are detailed enough that you probably don't need resin replacements unless you want extreme detail/precision.
| CONSTRUCTION |
Following instructions is probably the best bet for building this kit. The cockpit itself was one of the most challenging paint jobs and assemblies I've dealt with in a Tamiya kit and was the longest part of the build.
Gone are the days of simply
spraying the interior Dark Gull Grey and brush painting various panels black. I
actually followed the Tamiya instructions for painting the cockpit components as
t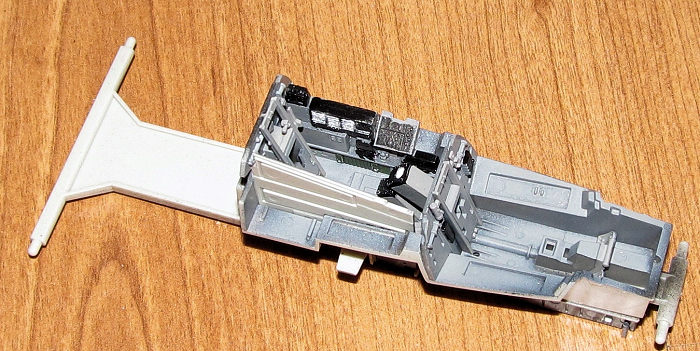 he
Phantom's interior was quite a bit more colorful in real life. It took a bit of
masking and brush painting to do the interior (including nose wheel well and the
engine exhausts) of the Phantom following Tamiya's extensive instructions.
he
Phantom's interior was quite a bit more colorful in real life. It took a bit of
masking and brush painting to do the interior (including nose wheel well and the
engine exhausts) of the Phantom following Tamiya's extensive instructions.
I found that the build dragged (for several months as work/life kicked me in the butt) as I was working on the interior parts to complete the model enough such that I could seal up the fuselage halves. The way Tamiya designed the Phantom is that there isn't much seams to sand/fill. It is quite a bit of ingenious industrial design, but it is quite complex and it is best you follow the build sequence or you might find yourself having to tear apart your freshly glued fuselage to insert parts into it (not that I know anything about that.)
The instrument panels were painted Dark Gull Grey then sprayed with a gloss coat so I could apply the decals. I had some issues with the new Tamiya decals as they don't slide as well as the older thicker decals did. I nearly ruined both IP decals, but was lucky enough to recover one but ruined the other so I had to use the IP decal from the 2nd kit I bought.
The intakes were done next with the engine intake faces painted dark Aluminum and the intakes themselves painted flat white. Tamiya should be commended for designing the intakes (and marking them left and right for those of us who get mixed up with which side is which) such that they line up with the supports and making them very easy to install.
It was at this point I glued the various external intakes, cockpit parts, nose wheel well and engine parts into the fuselage and closed it up. I didn't have to fill/sand the seams as I didn't need to (a first!) as they were designed that way. I glued the rest of the fuselage parts (minus the exhausts) into the fuselage assembly without much trouble. In fact the only seams I had to sand on this kit were the leading edges of the wings and tail, the stern stabilizer mount as well as the fuel tanks and Sidewinder AAMs. FYI, my last Phantom build (a Hasegawa kit) required a lot more sanding.
Meanwhile I primed (dark grey) then painted the interior parts (flat white) of the main landing gear wheel wells.
 As this
build dragged on for several weeks, I assembled and painted a bunch of small
parts including the wheels and landing gear. I didn't have a masking set for the
wheels, but I used my heavy duty circular cutter for the first time to make
proper masks for the wheels. The homemade masks worked out really well. The fuel
tanks required a fair amount of sanding and filling.
As this
build dragged on for several weeks, I assembled and painted a bunch of small
parts including the wheels and landing gear. I didn't have a masking set for the
wheels, but I used my heavy duty circular cutter for the first time to make
proper masks for the wheels. The homemade masks worked out really well. The fuel
tanks required a fair amount of sanding and filling.
I glued the wings together with the leading edge glued together using CA glue instead of Tamiya Extra Thin glue to eliminate the phantom seam. The wing attaches to the underside of the fuselage and there was a bit of a seam. I used Vallejo plastic putty to fill the seam and wiped away the excess with damp Q-Tips. I did not add the folding wingtips as I had to paint them separately. I also chose to have the refueling probe extended just because.
The leading edge seam was sanded smooth with various grades of sandpaper and polishing cloths. Meanwhile I assembled the leading edge of the rudder and carefully sanded the seam smooth due to the pitot tubes there.
Later the canopies were sanded and polished (to remove that centerline seam) then dipped in Future to remove most of the damage. They were masked using Tamiya's masks. The stern stabilizer mount was assembled, glued together and sanded smooth.
Lastly, I attached the nose cone minus the chin radar warning receiver. There were some slight gaps that need some Vallejo plastic putty and I was ready for painting.
| COLORS & MARKINGS |
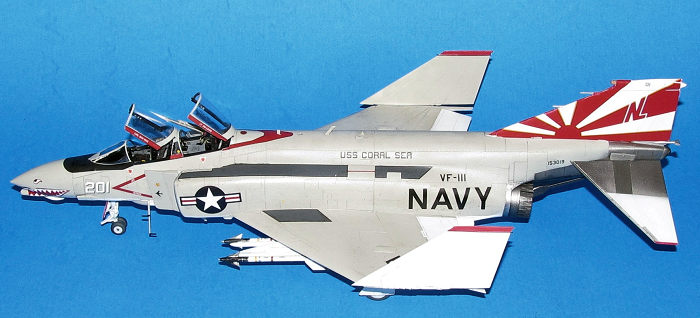
I chose the Sundowners markings because I like the colorful Sundowners markings (and as a kid I had made an MPC 1/72 scale Phantom with similar markings... but it was totally inaccurate as it was an all white Navy F-4B with F-4E nose and nozzles because I thought they looked cooler.) The other reason is that NL201 wasn't covered in several hundred stencils. Nostalgia and laziness!
Didn't need to preshade/paint it black (except the main landing gear wheel wells) because it was a very clean airframe so I began painting with flat white on the bottom. When the paint dried, I masked off the undersides and sprayed on Xtracrylix Light Gull Grey topside. After a few days, I sprayed on Vallejo Acrylic Gloss in preparation for the decals. BTW, the area of most difficulty to mask was the nose.
 The various
smaller parts were painted flat white including the rudder (and then sprayed
with the same gloss coat.) It was at this time I glued on the chin RWR to the
nose. The wingtips were painted flat white, light gull grey and gloss coated,
but the tips were also masked off and painted gloss red.
The various
smaller parts were painted flat white including the rudder (and then sprayed
with the same gloss coat.) It was at this time I glued on the chin RWR to the
nose. The wingtips were painted flat white, light gull grey and gloss coated,
but the tips were also masked off and painted gloss red.
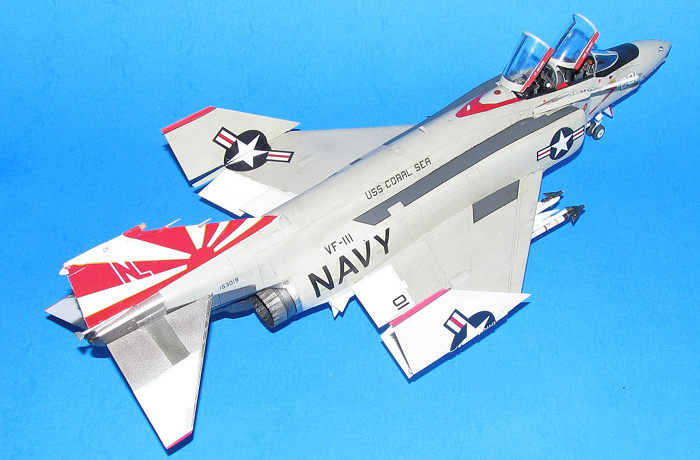
The tailplanes were the most difficult paint job. I had to prime, mask off and paint the various metallic shades (steel, dark aluminum and jet exhaust using Vallejo Metal Color paints) then mask again, paint the white and red tips. Easy to type, a few hours to do. The same applied to the stabilizer mount. Lastly, I had to mask off the trim around the exhausts and spray it using Vallejo dark aluminum.
I decided to take on the most difficult decals, the Sundowner tail markings. I applied some water to the surface (to reduce friction) and added the decal to the port side. It took some time and minor grumbling to adjust the decal into the correct position. It was then when I hit it was Microsol Set and let it sit overnight before doing the starboard side. I did the same for the starboard side. Unfortunately I still needed to do some touchups and used Gunze Red Madder paint applied with a brush as the Sundower red was slightly lighter than the darker Tamiya gloss red.
The sharkmouth markings on the nose were easier to do as they didn't wrap around the chin mounted RWR. The rest of the decals went on well. Tamiya is kind enough to provide decals for the folded wingtip configuration so I used them. The canopy decals were a touch more difficult as they didn't seem to want to line up with the canopy sills. I ended up using Solvaset to get those down.
This particular Phantom just came from the paint shop so I used a browner watercolor wash to highlight some of the panel lines. I used a dirtier wash for the engines and tailplanes. Once everything was dried, I sprayed on a light coat of Gunze Flat coat for the final.
| FINAL CONSTRUCTION |
The Sidewinder and Sparrow AAMs were assembled and glued together. The detail is pretty good with these parts. They were painted and then the numerous decals were added to them. It took a few days to build them, but the missile detail makes the effort worth it.
Next the landing gear was added. Again, follow the sequence of build to avoid any headaches. I glued in the refuelling probe with a dab of CA glue so that it could hold the correct angle. The stabilizer mount and tailplanes were added. Next the already painted centerline fuel tank and Sidewinders were added using tiny drops of CA glue. I didn't use the wing tanks because I forgot to drill out the holes.
The exhausts proved to be the biggest pain in the butt of this kit as they were fiddly to assemble and paint. I followed the paint recommendations and nearly went insane attempting to mask them paint the various exhaust petals till I remembered I could use a damn paint brush. Some sections were dry brushed.
 I then
tried to assemble the exhausts. It took a couple of tries to figure out where I
should put the petals and eventually I finally figured it out. After the glue
was cured, I gently inserted each exhaust into place and glued it with a small
dab of Tamiya Extra Thin cement.
I then
tried to assemble the exhausts. It took a couple of tries to figure out where I
should put the petals and eventually I finally figured it out. After the glue
was cured, I gently inserted each exhaust into place and glued it with a small
dab of Tamiya Extra Thin cement.
With that out of the way, I could finally finish the cockpit and canopy. I attached some black thin gauge wire to the RIO's instrument panel and then stuffed the wires down the rear of the pilot's seat. It isn't accurate, but I just wanted to add them for details.
The pilot's IP and HUD were glued in place. I used a tinted insert from Furball Decals for the HUD color on the windscreen which was held in place with a drop of Future. It is a touch darker than it should be but also didn't take several hours of work to get the correct lighter clear color.
I opted to use Hypersonic's resin seats instead of the kit ones. I primed and painted the details on the seat and glued in the various hoses and lines as per the instructions. Don't forget to add the resin tabs in the back which mount into the tabs used by the kit seats. I inserted each seat into place, only held in place by the resin tab and they had the proper height (unlike my experience with other resin seats.)
Tamiya should be commended for added a lot more detail to the canopy parts than any model maker I can recall. They added the sills and the retraction gear is extremely detailed. They also provide parts for both open and closed canopies. These parts were painted as per instructions. As I prefer open canopies, I glued in the various open canopy retraction parts and let them dry before gluing them in place.
Lastly came the various clear bits which proved to be a pain as those tiny parts flew with disturbing regularity from my tweezers. If they required painting, I used Vallejo clear colors and a small paint brush with Elmer's glue to hold them in place.
| CONCLUSIONS |
The Tamiya F-4B is an amazing kit that I found to be both simple and complex to build. The various sub assemblies were simple to put together and there's almost no seam work required. However, the painting and complex sequence of parts will have some modellers scratching their heads especially if you don't read the instructions beforehand so I wouldn't call this the typical Tamiya shake and bake kit.
Once you put it together, it will look amazing. I would recommend this kit for experienced modellers and those beginners who have the patience with such a detailed kit.
2 June 2023 Copyright ModelingMadness.com. All rights reserved. No
reproduction in part or in whole without express permission. If you would like your product reviewed fairly and
fairly quickly, please
contact
the editor
or see other details in the
Note to
Contributors.