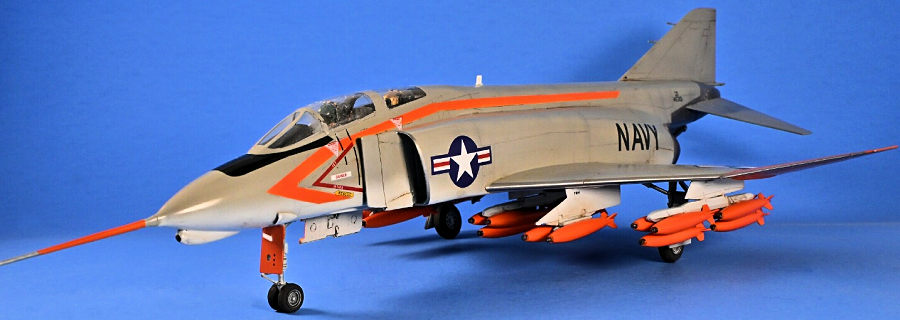
Hasegawa/Falcon 1/48 F4H-1F Phantom II
| KIT #: | P5/4591 |
| PRICE: | $35/20.00 |
| DECALS: | 2 options |
| REVIEWER: | Chuck Horner |
| NOTES: | Cutting Edge Decals |
| HISTORY |
McDonnell built 47 of the production-test airframes, designated F4H-1F, then after 1962, F-4A. These were all non-combat-ready aircraft and differed from the production F-4B with a smaller nose, a “flat” canopy with the rear seat buried deep in the fuselage, hooded intakes with smaller splitter plates and the less powerful J79-GE-2 engines.
Number eleven, 145310b (the “b” indicating the second of five production blocks), first flew on 29 August 1959. It was assigned to the weapons separation testing program.
Its famous photo was taken on 22 April 1961. By this point in time, the Air Force had become interested in the aircraft as a tactical fighter-bomber. McDonnell and the Navy put on a demonstration of the aircraft’s carrying capacity with twenty-two, 500 lb., Mk.83 bombs. It made an accurate bombing run with this load in front of Air Force personnel at Fort Bragg, North Carolina. This and other factors convinced the Air Force to buy their own version, the F-4C.
 145310b was one of two back-up Phantoms to take part in the “Sageburner”
program which ultimately set a world speed record of 1,390 mph in a
100-Kilometer Closed Course in 1960 and a low altitude world speed record of 902
mph at 100 feet in 1961.
It continued to perform in various test programs and was last assigned to VF-101, a non-combat, work-up squadron, until the end of its flying career in September 1964. Following its stand-down, the aircraft was placed in storage with only 461 flight hours on it.
The plane was put on public view during the 1976, Bicentennial display at the Philadelphia Naval Yards, after which it was officially stricken and sold for scrap.
It was here that the New England Air Museum entered the picture. We found the de-milled hulk in a private scrap yard outside of Philadelphia and managed to acquire it just before the torches cut it up.
Getting it to Connecticut a project in itself. In 1983, a sea-going barge was bringing us the Sikorsky VS-44 (a large 4-engine, flying boat) from Florida. The barge stopped in Philadelphia to load on the Phantom, then again in New Jersey to load on a Coast Guard HU-16 Albatross. The F-4 and HU-16 were off-loaded in New London, CT and made the remaining 50 miles by road to the Museum. The VS-44 was off-loaded at Stratford, CT where Sikorsky volunteers started its restoration.
Both the HU-16 and VS-44 were ultimately restored and placed on display at the museum. The F-4 languished in outdoor storage until 1995, when the museum de-accessioned it. From Connecticut, it ended up at Kal-Aero in California. Rich Wall acquired it in 2003 and began a long-term restoration project to bring it back to flying condition. In recent years, the project has been for sale and is considered 85% complete.
| THE KIT |
 This is the second of two 1/48 scale Phantoms that I converted from an
F-4B to an early F4H-1, in this case Bu.No. 145310b, the eleventh Phantom built.
Why number eleven? Two reasons: First it is probably the most famous of the
first Phantoms. In most every Phantom publication that mentions the early F4H-1
history, there is a color or B&W picture of this plane in flight, carrying
twenty-two, 500 lb. bombs. Second, the New England Air Museum, where I was the
Operations Director in the 1980’s, owned this aircraft for a short while.
I used the same two kits back in the early 2000’s. About eight years ago, it made a crash landing from a table top and then turned into a cat toy while I was at work. I was not pleased with the kitty-innocent-look when I arrived home. The model was not repairable.
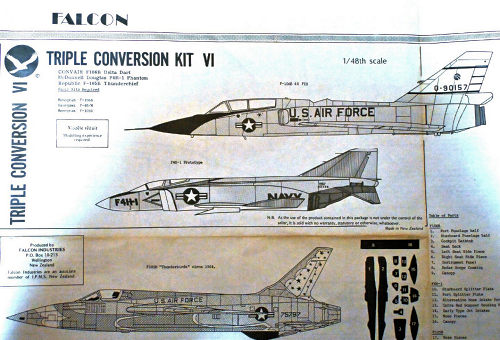
I really liked the look of these first Phantoms and last year I decided to try and duplicate it. The donor kit, Hasegawa’s F-4B, has been around in one form or another since the 1980’s and is still available today. The conversion kit is the Falcon Triple Conversion vac-u-form. This kit includes a single sheet of parts to convert an F-106A to a two-seat B, an F-105D to an early B and F-4B to the F4H-1. It was originally released in the late 1990’s and I was surprised to still see it listed in Falcon’s catalog. Unfortunately, none of the on-line stores had it in stock. Three months later it was still nowhere to be found.
 I was lamenting this at my model club meeting when a fellow member said
that he had the kit and gave it to me at the next meeting. I already had the
resin conversion kit for the Academy F-4B and decided to build both conversions
at the same time. This ended up being more of a challenge than I thought with
the two very different construction techniques.
The Falcon kit supplies the smaller nose, a one-piece “flat” canopy and the early intakes. The rest of the conversion is Hasegawa parts.
As an aside, only an F-4B kit can be used to convert to an early F4H-1. Starting with the F-4C, larger main wheels were used which created a hump on the upper wing.
When I was more than halfway completed with this build, I got an email from one of the web stores saying that this Falcon kit had finally been restocked.
| CONSTRUCTION |
The mention of a vac-u-form kit sends many modelers screaming from the room. Yes, it has some unique assembly steps, but in the end, it’s still a styrene plastic model with parts that need to be glued together. For anyone starting out with a vac-form, a conversion is the best route. There are fewer vac pieces and the donor kits usually supplies most of the detail parts.
Since vac kits come on a flat sheet of plastic, the first step is to cut them out. This is not as difficult as one might think. First, I take a fine-point Sharpie and outline the piece. Using a sharp #11 blade, I scribe around the part, with the blade at a 45-degree angle, following my black line. I then simply bend the plastic on the cut line and the part snapes out.
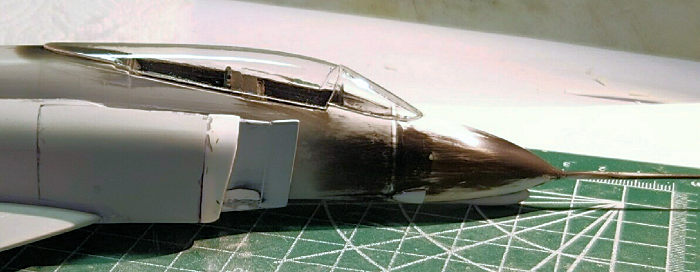 With parts cut from the backing sheet, I now had to remove the extra
plastic on the edges, which is the thickness of the backing sheet. I took a
large sheet of hardware-store, wet-dry sandpaper – 340 to 400 grit – glued to a
piece of glass. This allows for even sanding of the parts. I sand until the ink
line I applied earlier, is just about to disappear.
Since vac-plastic is generally thinner than kit plastic, you may have to add some support structure to the inside but at the very least, gluing tabs. These are small plastic sheet strips glued to one side of the piece. They serve the same purpose as the alignment pins on kits plus provide a larger gluing area.
The next step is to bring out the Hasegawa kit and remove the nose. The cut-line is clearly marked on the vac instructions and a razor saw made quick work on the two fuselage halves. I put these aside for the moment and turned to the more difficult task – creating two McDonnell-Stanley ejection seats.
Through the 1950’s, aircraft manufacturers created their own escape devices. In this case, McDonnell had contracted with the Stanley Company to create ejections seats for the Phantom. The practice, in general, create major maintenance problems for the Navy. Every early jet had its own seat design, with its own unique parts and maintenance procedures – and there were failures.
About the same time as the Phantom began production, the Navy settled on a prime ejection seat manufacturer -- Martin-Baker. All aircraft manufacturers were told to contract with Martin-Baker to create seats for their jets. To say the least, the industry was not quick to make the changes. The Martin-Baker’s didn’t appear in the Phantoms until the B-model.
I had a good example of this early seat in the resin conversion set for Phantom#1. I noticed that the upper part of the seat was shaped very similar to those in the A-7. I took the two seats from my Hobby Boss A-7K and began the modifications.
I added some small detail pieces to the header, including a pull ring
from wire and a pair of guild rails on the back to fit into the Hasegawa
cockpit. I also replace the lower seat sides with a diff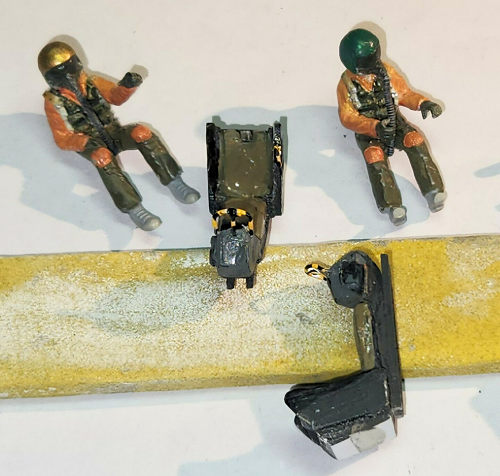 erent shape from sheet
plastic. I wasn’t worried about adding much detail to the lower part since the
seats would be filled with pilots and the closed canopies would restrict what
could be seen. I painted the seats black with the pull handles yellow and black
I finished the cockpit pretty much per kit instructions except I had to take out the rear cockpit’s step-up floor to make it level with the front cockpit. This was so that the seat and pilot would fit under the flatter rear canopy.
I returned to my nose cone and glued the two halves together. Phantom #11 had acquired the infrared housing under the nose by this point in time, which Falcon supplies in the conversion. I now needed to attach the long nose probe.
I had created two nose probes from brass rod and plastic tubing for both conversions. Unlike the solid resin nose of #1, the vac nose is hollow with no support. I created a number of rough-cut bulkheads to fit in the nose cone with holes to support the metal probe. This worked out fine.
With the cockpit done I joint the two fuselage halves together and glued on the new nose. I added 10mm long gluing tabs on the nose cone that reached into the hollow fuselage a strong connection.
The intakes were next. These first Phantoms saw continuous physical changes as testing proceeded. The Intake were the most noticeable. Falcon provides the intakes for Phantom #1, but by the time of the famous photo, engineers had literally taken a hack-saw and cut off the entire top hood of the intakes. This gave a funny leading-edge line, being a graceful curve on the sides and an abrupt square-off line across the top. I duplicated this with a cut from my X-acto knife.
The splitter plates had not acquired their final shape yet, but by-pass chutes had been added to the top and bottom. I created these with folded paper, cut to shape and coated with super glue.
The Hasegawa intake pieces are not a great fit and require some sanding and filling. The Vac-form pieces were worse. I decided to use a combination of the kit and vac pieces. I cut back the kit piece and added just the front edge of the vac piece. This worked out well and the modified intakes were blending in to the fuselage.
I was ready to finish the cockpit area. I glued my pilots, with their orange flight suits, to my modified ejection seats and add short strips of masking tape to form the over-the-shoulder straps to the top of the seats. The seats and pilots fit snuggly in the cockpits and I was ready for the canopy.
 The conversion uses the kit windshield and a vac clear canopy. I
carefully cut this out and dipped it in Future. I added some thin plastic strips
to the inner canopy rails and glued the entire piece to the fuselage. I then
spent several days (with drying time) filling in the gaps with white glue and
plastic wedges. I had to hand mask the canopy but the panel lines were so soft
that I had a lot of trouble getting this done.
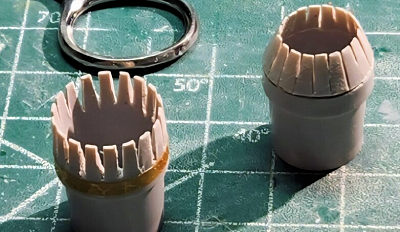
The dash-1’s had the early J79-GE-2 engines which had less thrust and slightly smaller exhaust nozzles. I emphasize this by closing these. I cut out the space between each peddle and forced them together. I cleaned them up with some sanding and filler.
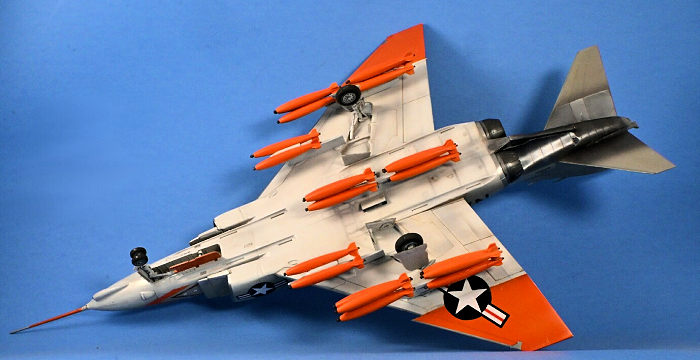
My final task before painting was to prepare the twenty-two Mk. 83 bombs. For my first build of Phantom #11, I had cleaned out all of the Mk.83’s from my Hasegawa weapons sets. After the “crash” of the first build, I had saved all of these. Now I began a “restoration”. I removed them from their TER and MER racks and lightly sanded each in prep for repainting. I had originally used a paint that was too red but now had the correct orange. Although a bit tedious, I had this all done in one evening and was ready for the paint shop.
| COLORS & MARKINGS |
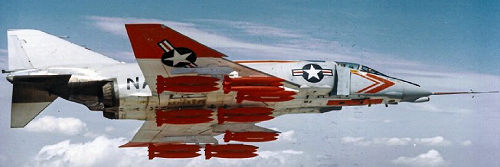 These aircraft were painted in the standard Navy scheme of Light Gull
Gray on top and white on the bottom and the top of all control surfaces. The
leading edges of the wings, tail and intakes were a dark silver. I used Tamiya
Lacquer’s for these. The exhaust area was the same as later Phantoms with
various shades of burnt silver.
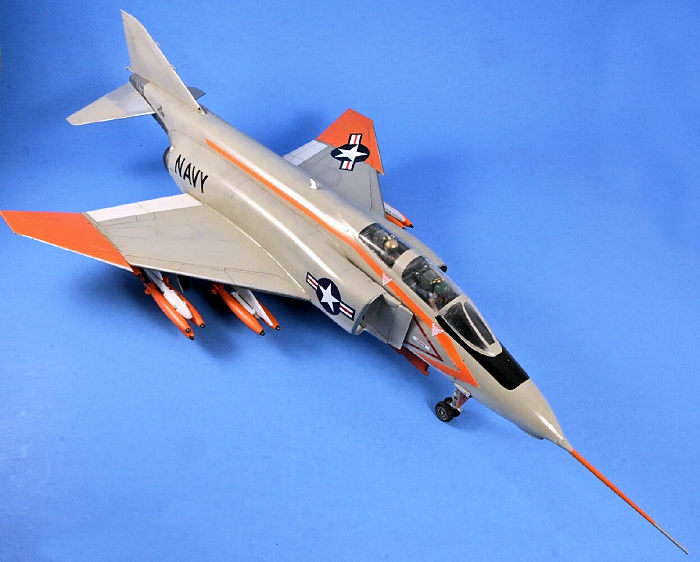
For the markings of these early Phantoms, you have to not only know which airplane but which time-frame as well. All aircraft were different and many had multiple markings over its life. For Phantom #11, at the time of the bomb drop, it had International Orange outer wings, top and bottom, orange nose gear door and nose boom, and a large orange fuselage side stripe that ran nearly its entire length. In addition, all of the bombs were painted orange. I use the MRP brand for this color, same as I used on Phantom #1. This is a very fine lacquer paint that comes ready to spray and goes on very evenly with a semi-gloss finish.
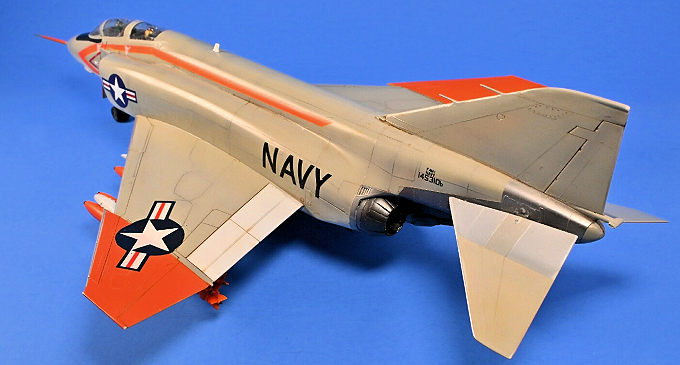 For the final test markings, I returned to the Cutting Edge F4H-1 decal
sheet which had everything I needed for #11. For the large fuselage stripe,
there was a paper mask included. I cut this out but quickly realize that I could
never get this to lay flat on the fuselage or as it passed behind the intake
splitter plate. I took the positive portion of the mask and taped it to the
fuselage. With a pencil, I put edge markings along its length. With the paper
removed, I used Tamiya thin tape along the marks to create my mask. I did this
for both sides and sprayed it orange.
To finish the build, I spayed a coat of semi-gloss clear over the entire model, added the landing gear and then the bombs. The MER racks were on the outer and center pylons with six bombs each and the TER racks were on the inner pylons with two bombs each. No Sparrow missiles were carried for this flight.
| CONCLUSIONS |
I am very pleased with these builds, now having both Phantom #1 and #11 next to each other. It was an interesting experience building the resin/Academy F-4B conversion and the vac/Hasegawa conversion at the same time. In the end, neither finished model stands out over the other, both look good on my shelf.
| REFERENCES |
Birth of a Legend McDonnell F4H-1 Phantom II, Tommy H. Thompson, Ginter Publication, 2018
26 October 2026
Copyright ModelingMadness.com. All rights
reserved. No reproduction in part or in whole without express permission from
the editor. If you would like your product reviewed fairly and fairly quickly, please contact the editor
or see other details in the
Note to
Contributors. Back to the Main Page
Back to the Review
Index Page
Back to the Previews Index Page