Tamiya 1/48 F-4N Phantom II
| KIT #: | 61121 |
| PRICE: | $75.00 |
| DECALS: | Three options |
| REVIEWER: | Hans Gertje |
| NOTES: | Hypersonic conversion 48044 $20. Furball decals, Flying Leatherneck launch rails. Eduard belts, Omask masks for intakes and wheel wells. |
| HISTORY |
Welcome to Ghost Town. Marine Fighter Attack Squadron 531 (VMFA-531) was the first commissioned Marines night fighter squadron. They were first designated as VMF(N)-531 when established in 1942 amidst the cauldron of World War II. They were founded on the growing need for night fighters as a necessary tool to support ground troops and defeat the threat of night bombers, which were widely used in the European theater. While Marines aviation was growing in strength and number, little support existed at the time for the idea of dedicated Marines night fighters.
After Marines leadership pushed for and received their commissioned unit, 531 had to start completely from scratch, initially with no pilots or planes. When finally assembled as a combat-ready unit with pilots and aircraft, they deployed to the Pacific Theater to combat Japanese forces. Indicative of their humble origins and the nascent night fighter concept, their provided aircraft was the PV-1 Ventura. Itself a naval patrol bomber originally designed as an airliner, these planes were equipped with radar and guns. While far from the ideal platform for the night fighter mission, they eventually claimed night kills, some guided by ground-based radar.
After World War II, the Grey Ghosts would continue their unique mission of stalking the enemy at night, equipped with much more suitable planes. They flew the F7FN Tigercat in the Korean War, then later equipped the jet-powered F3D Skyknight and F4D Skyray. Their mission and designation would change as the technology and combat environment of the Cold War evolved, becoming VMF(AW)-531, with “AW” indicating their intrinsic all-weather capability due to equipping radar.
 The unit
would acquire the F-4B Phantom in 1962. They were the first Marines unit to
become part of NORAD, and were soon involved in the Cuban Missile Crisis, coming
very close to engaging Cuban MiGs. Following their final redesignation as
VMFA-531, they deployed to Da Nang in 1965, becoming the first Marines squadron
on the ground in the Vietnam War. Their mission changed to air interdiction and
close air support.
The unit
would acquire the F-4B Phantom in 1962. They were the first Marines unit to
become part of NORAD, and were soon involved in the Cuban Missile Crisis, coming
very close to engaging Cuban MiGs. Following their final redesignation as
VMFA-531, they deployed to Da Nang in 1965, becoming the first Marines squadron
on the ground in the Vietnam War. Their mission changed to air interdiction and
close air support.
After their WESTPAC tours, the Grey Ghosts would join Carrier Air Wing 17 and toured the Mediterranean aboard the USS Forrestal in 1972. They were one of several Marines units to be selected for transition to the new F-14 Tomcat, but the program was cancelled and Marines F-14s never saw the light of day. The Grey Ghosts instead retained the Phantom and would receive remanufactured versions of the aging F-4Bs. These upgraded jets were redesignated the F-4N and received various avionic upgrades, smokeless engines, and electronic countermeasures.
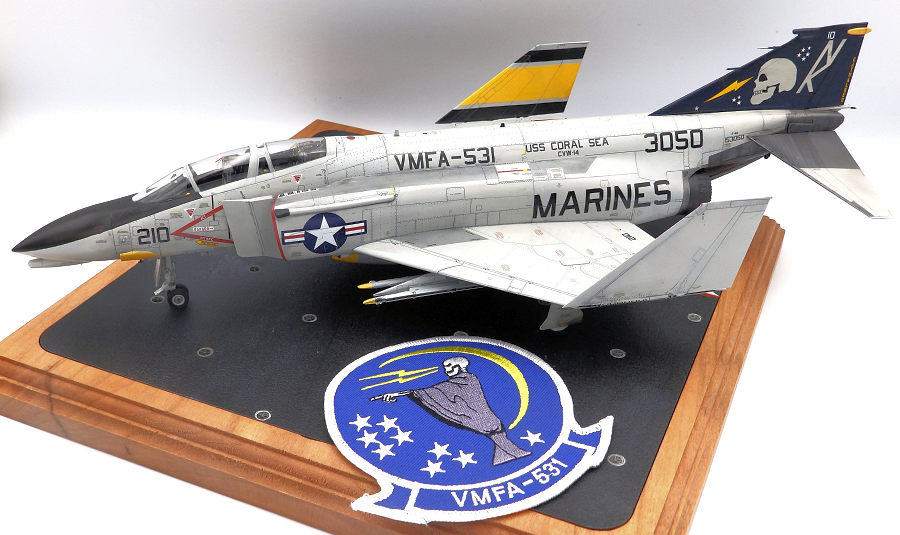
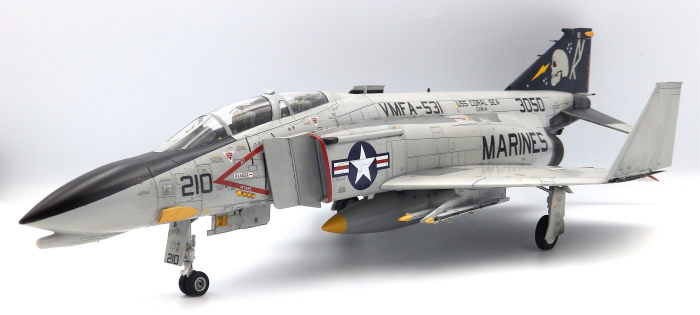
The Grey Ghosts would play one last important combat role in the turbulent period of 1979-1980. In joining VMFA-323 aboard the USS Coral Sea, they formed the first ever exclusively-Marines fighter assembly for a carrier air wing. Aboard the Coral Sea, aka the “Ageless Warrior”, they would support Operation Eagle Claw, a failed extraction mission during the Iranian Hostage Crisis. They performed combat air patrols to protect US forces in the region. To distinguish them from Iranian F-4s, the starboard wings were painted with black and yellow recognition stripes. These were promptly removed after the mission.
The Grey Ghosts retired their F-4s in 1982 and transitioned to the F/A-18 Hornet. They remained in the fleet for during the 1980s, and saw a deployment to Thailand, which was the first for the Marines in Southeast Asia since the Vietnam War. The unit did not participate in Operation Desert Storm, but many of its pilots and aircraft were attached to Marines squadrons involved in the conflict. In 1992, VMFA-531 decommissioned, ending a unique 50-year history.
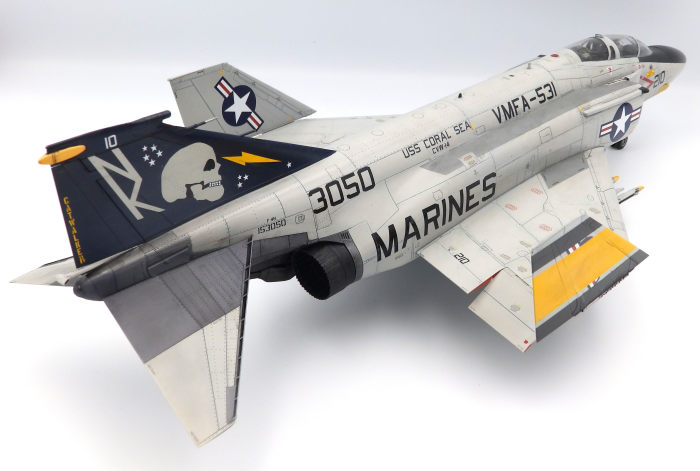
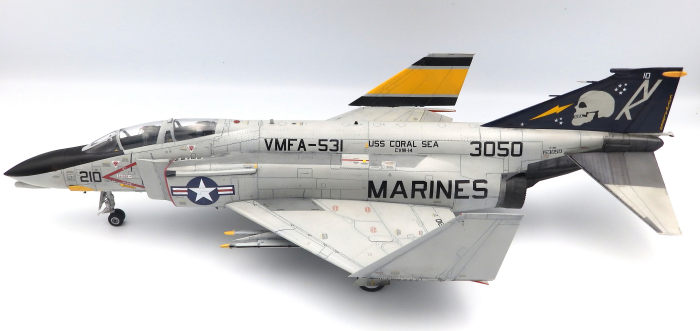
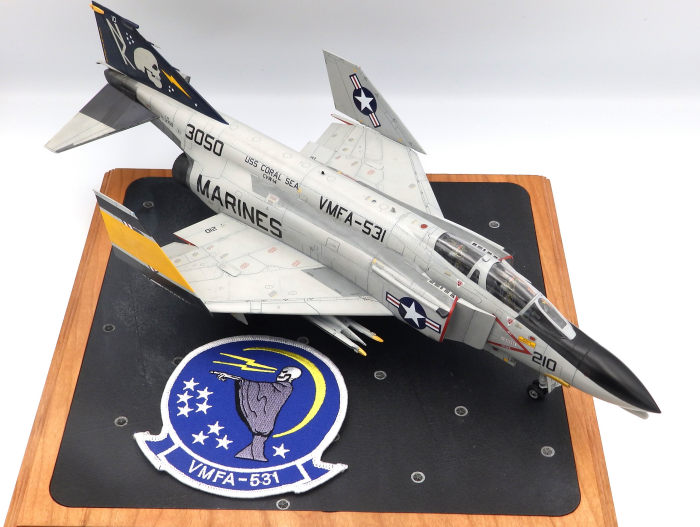
VMFA-531’s insignia featured a robed skeletal figure, ominously pointing and shooting two lightning bolts from his eyes, presumably to his next victim which has no hope of escape, even in darkness. He is surrounded by a dark blue night sky with a moon and clusters of stars numbering five, three, and one, all referencing the squadron’s number and night fighter lineage. VMFA-531 would frequently decorate their aircraft tails with some variation of this insignia’s features.
| THE KIT |
Released to wide acclaim in 2021, Tamiya’s 1/48 F-4B is generally regarded as the state of the art in model kits, with precision engineering and finely detailed parts and surfaces. However, five years since, we’ve seen three F-35 variant kits and a 1/72 F-14, but no new releases of many other F-4 variants from the Big T. It’s especially perplexing given the popularity of this iconic jet. What gives?
At any rate, Hypersonic Models quickly filled one of these variant voids by providing a simple conversion kit that allows the builder to make an F-4N. It provides some of the details for an F-4N that the Tamiya kit doesn’t, mainly the DECM fairings and RIO instrument panel, and an alternate fin cap for jets that didn’t have the double ECM sensor configuration. Tamiya thankfully did design their F-4B with a future F-4N release in mind, as there are connector points for the fairings on the intakes that are removed if normally building a B. See my preview here for more information: https://modelingmadness.com/others/conversions/48044.htm
 Tamiya’s
F-4B is indeed a grand kit to behold. The box is huge, yet being stuffed with
over a dozen part trees makes it difficult to repack everything. Included are
options to build with wings folded, canopy open or closed, and flaps/airbrakes
down. A full complement of missiles and droptanks means you don’t need to go
spending extra on the aftermarket. Same goes for the seats—they are beautifully
detailed and only need seatbelts. Tamiya even includes a sheet of canopy masks,
albeit not precut, and no provisions for wheels.
Tamiya’s
F-4B is indeed a grand kit to behold. The box is huge, yet being stuffed with
over a dozen part trees makes it difficult to repack everything. Included are
options to build with wings folded, canopy open or closed, and flaps/airbrakes
down. A full complement of missiles and droptanks means you don’t need to go
spending extra on the aftermarket. Same goes for the seats—they are beautifully
detailed and only need seatbelts. Tamiya even includes a sheet of canopy masks,
albeit not precut, and no provisions for wheels.
The biggest drawback for
this kit is the decals, being the overly thick kind you usually get from
Japanese manufacturers. Three options are provided, all of them among the most
famous F-4B schemes from VF-51, VF-111, and VF-161. On close inspection, some of
the markings have a perplexing “pixelated” look to them, particularly in the
color gradients on the VF-161 markings. If there’s one area I don’t mind
spending on in aftermarket, it’s decals, so I’m happily using a Cartograph-printed
sheet from Furball Aero Design instead. You can read more about the USMC Rhinos
Part 3 sheet
here.
| CONSTRUCTION |
As you might expect, Tamiya’s new Phantom goes together very well, so I will mainly discuss the few areas that took some extra effort, and the Hypersonic kit I used. The build started with insertion of panels into the fuselage parts, all which fit perfectly. The cockpit was then painted and assembled along with the nosewheel bay and engines. The fuselage and wings were then assembled and joined. I painted the instrument panels (including the Hypersonic F-4N panel) per kit instructions and simply used the kit decals for the gauges, which looks great after some setting solution allows them to be pressed into the raised details. After spraying some Winsor & Newton Galeria flat varnish, I simulated the dial glass with drops of gloss.
After painting the interiors of the intakes and assembling them, it was time to add the first Hypersonic F-4N component—the DECM antennas. The challenge here was 1) removing them from the cast without breaking them as they were quite delicate and 2) attaching them with CA glue without smearing too much glue everywhere. Ultimately, my inelegant method was attaching them with Loctite gel CA, holding them flush in place, and cleaning up the excess glue while it was still wet. The surrounding gaps were filled with Perfect Plastic Putty after glue had dried. Hypersonic’s kit also provides a fin cap for the tail with only the rear antenna, but the aircraft I chose to portray has both, so I used the Tamiya kit part.
 There were
some gaps to clear up on this model. It may have been due to how I assembled the
parts, but some seams presented on the upper join of the intakes, the join of
the fuselage halves between the wing surfaces and engines, and the joins for the
folded wingtips. I experimented with several different methods for filling these
and struggled quite a bit with ghost seams. Unmixed Mr. Surfacer, CA glue, and
my first use of sprue goo all went into these seams with varying degrees of
success, and I ultimately banished the ghost seams after a lot of persistence.
There were
some gaps to clear up on this model. It may have been due to how I assembled the
parts, but some seams presented on the upper join of the intakes, the join of
the fuselage halves between the wing surfaces and engines, and the joins for the
folded wingtips. I experimented with several different methods for filling these
and struggled quite a bit with ghost seams. Unmixed Mr. Surfacer, CA glue, and
my first use of sprue goo all went into these seams with varying degrees of
success, and I ultimately banished the ghost seams after a lot of persistence.
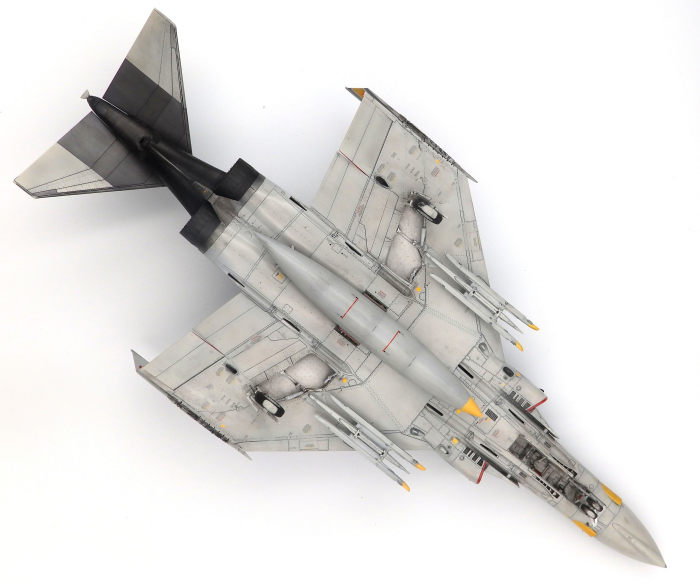
I wanted to build this jet without ordnance, but Tamiya’s AIM-9 launch rails are devoid of detail and would look wrong without missiles, so I procured some LAU-7 launch rails from Flying Leathernecks. They needed some filler after attaching them to the pylons but were generally easy to attach and look very nice.
One deviation from the instructions was temporarily attaching part of the heat shield tail section with blutak instead of gluing it in, as you must attach the moving UHT as part of this assembly. By temporarily attaching this part without the UHT in place, you can achieve a uniform paint coat on the metal surface and not have the UHT get in the way of masking.
Returning to cockpit assembly, I also attached some Eduard seatbelts to the very nicely detailed kit seats, as I was unhappy with how scratchbuilt belts with the kit decals were turning out. The canopy parts were also a source of trouble as they often are. The forward windscreen part cracked after removing from the sprue, so I requested a replacement from Tamiya USA. The canopy parts also have a seamline across the top that must be sanded down, so I polished this away. I used the single-piece to display the canopy closed. After dipping in Quickshine (the newest replacement for Future) I assembled the painted interior canopy parts.
Once all the cockpit parts were fully detail-painted and inserted, I added some flat-black painted wires to spruce up a couple areas like the visible area in front of the Hypersonic panel and then gave everything a wash with brown and black oil paints. I attached the canopies with fumeless Bob Smith Industries CA glue. The kit canopy masks were carefully cut with a fresh #11 blade and mostly fit well.
| COLORS & MARKINGS |
According to references, these F-4Ns at the time were painted entirely with FS16440, aka “Light Ghost Grey,” which is offered by Gunze as H/C315. The paint used at the time was a very durable Dupont product that maintained its gloss, and these jets were generally clean on top at least. Therefore, I went with subtle preshading to add a little variation underneath. The tail was painted FS15044 “Insignia Blue”, using Gunze H326.
 Some small
but key details were masked off and painted on. The black anti-glare panel on
the nose, tips of the intake ECM antennas, and tips of the underside sensors
were painted Tamiya X-18 semigloss black. The “football antenna” on the tail,
tips of the Sidewinder rails, tip of the large center fuel tank, and air scoops
behind the nosecone were painted Gunze H329, FS13538 (“Insignia Yellow”). Prior
to hitting these parts with the yellow, I spayed on some white Mr. Surfacer 5000
with a drop of red paint mixed in to make it pink, which made the yellow
application easier. The lip of the intakes were painted H327, FS11136 (“Insignia
Red”).
Some small
but key details were masked off and painted on. The black anti-glare panel on
the nose, tips of the intake ECM antennas, and tips of the underside sensors
were painted Tamiya X-18 semigloss black. The “football antenna” on the tail,
tips of the Sidewinder rails, tip of the large center fuel tank, and air scoops
behind the nosecone were painted Gunze H329, FS13538 (“Insignia Yellow”). Prior
to hitting these parts with the yellow, I spayed on some white Mr. Surfacer 5000
with a drop of red paint mixed in to make it pink, which made the yellow
application easier. The lip of the intakes were painted H327, FS11136 (“Insignia
Red”).
The heatshield area and UHT was painted first with Tamiya LP-11 (silver). Following this, I simulated the “heat shock lines” with 0.4 mm Aizu micron tape—very thin. This area was hit with Gunze Metal Color Dark Iron, giving the stripes a very dark contrast, so this was followed by layers of Gunze Metal Color Iron and Aluminum. I also used post-it notes as a quick masking method to paint the heat shield panels with subtly different shades of metal color. The final appearance of this area would be finished in the weathering steps. The burner cans were painted flat black and dry brushed with Model Master Chrome Silver.
 After a
total gloss coat with Winsor & Newton Galeria Gloss, it was decal time. As
usual, Furball Aero Design makes decaling a treat, though I did find that the
sheet doesn’t offer a total complement of stencil markings. After applying the
major markings from the Furball sheet, I turned to the Tamiya kit stencils.
Although they are indeed thick with carrier film, they are finely printed, and
some are grouped in the same film for ease of application. I hit all of these
with some extra Tamiya Mark Fit Strong.
After a
total gloss coat with Winsor & Newton Galeria Gloss, it was decal time. As
usual, Furball Aero Design makes decaling a treat, though I did find that the
sheet doesn’t offer a total complement of stencil markings. After applying the
major markings from the Furball sheet, I turned to the Tamiya kit stencils.
Although they are indeed thick with carrier film, they are finely printed, and
some are grouped in the same film for ease of application. I hit all of these
with some extra Tamiya Mark Fit Strong.
After decals were complete, I decided to paint on the recognition stripes this plane wore for a brief period during Operation Eagle Claw. The Furball sheet instructions helpfully provide information on the stripes’ dimensions and colors. VMFA-531 wore gloss black and flat yellow stripes, so I used Tamiya X-18 Semi-gloss black and XF-3 Flat Yellow. As these were painted over the national insignia on the starboard wing, you can see part of the decal underneath the stripes.
As these jets were kept fairly clean and had resilient paint, I didn’t weather this model too heavily. Mainly I focused on the tail and engine section, dappling and slathering oil paints on the underside of the heatshield, based on photos of the real aircraft. The walkways were given a light wash of black and brown oil paints. I used my typical Tamiya Grey Panel Line wash, and applied Tamiya Weathering Set B pastels (soot and rust) to various parts of the aircraft’s underside. The landing gear, pylons, and belly tank all attached easily without fuss. Some final touches included attaching the rearview mirror above the RIO’s canopy and painting the wing and tail lights.
| CONCLUSIONS |
 Add this to
the list of positive reviews for the Tamiya F-4B. It was generally a pleasure to
build and paint, and nothing is overly complicated or challenging if one follows
the instructions. The parts fit like a glove thanks to great engineering. My
only negatives are the way the tail section and UHT assembles, but this was
easily worked around. The decals are on the thick side, but the stencils are
still usable. Hypersonic Models’ F-4N conversion kit is also highly recommended,
it perfectly serves its purpose, and experienced modelers should find it easy to
use. The Furball USMC Rhinos Pt. 3 decals and Flying Leathernecks LAU-7
launchers are great accessories as well. The result is another very beautiful
and unique model for the display case.
Add this to
the list of positive reviews for the Tamiya F-4B. It was generally a pleasure to
build and paint, and nothing is overly complicated or challenging if one follows
the instructions. The parts fit like a glove thanks to great engineering. My
only negatives are the way the tail section and UHT assembles, but this was
easily worked around. The decals are on the thick side, but the stencils are
still usable. Hypersonic Models’ F-4N conversion kit is also highly recommended,
it perfectly serves its purpose, and experienced modelers should find it easy to
use. The Furball USMC Rhinos Pt. 3 decals and Flying Leathernecks LAU-7
launchers are great accessories as well. The result is another very beautiful
and unique model for the display case.
2 June 2026
Copyright ModelingMadness.com. All rights reserved. No reproduction in part or in whole without express permission.
If you would like your product reviewed fairly and fairly quickly, please contact the editor or see other details in the Note to Contributors.