Fine Molds 1/72 F-4J 'USS Midway 1978'
| KIT #: | 72743 |
| PRICE: | ~$60.00 |
| DECALS: | three options |
| REVIEWER: | Hans Gertje |
| NOTES: | Air-to-Air Missile Set - Fine Molds 1:72 - FP31, New Ware 1/72 F-4J masks, Quickboost MB Mk. 7 1/72 ejection seats, Eduard 1/72 ejection seat handles |
| HISTORY |
Fighter Squadron 161 (VF-161), nicknamed the “Chargers,” was active for nearly three decades and saw significant action in various periods of tension during the Cold War. Primarily known for equipping the F-4 Phantom for most of their existence, VF-161 first saw combat action with this aircraft in the Vietnam War. The Phantom’s versatility meant that VF-161 saw its share of strike missions in addition to air combat with VPAF MiGs.
 First
equipping the F-4B, VF-161 launched from carriers USS
Constellation
and Coral Sea
on several WESTPAC tours in the late 1960s. Then from 1971 on, the Chargers
would become a regular aboard the USS
Midway for well over a
decade. They remained involved throughout the Vietnam conflict until its final
days in 1975, claiming several MiG kills and assisting in the evacuation during
Operation Frequent Wind.
First
equipping the F-4B, VF-161 launched from carriers USS
Constellation
and Coral Sea
on several WESTPAC tours in the late 1960s. Then from 1971 on, the Chargers
would become a regular aboard the USS
Midway for well over a
decade. They remained involved throughout the Vietnam conflict until its final
days in 1975, claiming several MiG kills and assisting in the evacuation during
Operation Frequent Wind.
Later equipping the F-4J aboard the Midway, VF-161 toured the world as part of the US Navy’s global military presence. In the late 1970s and early 1980s they made several visits to the Korean Peninsula and the Middle East during periods of unrest and crisis in those regions.
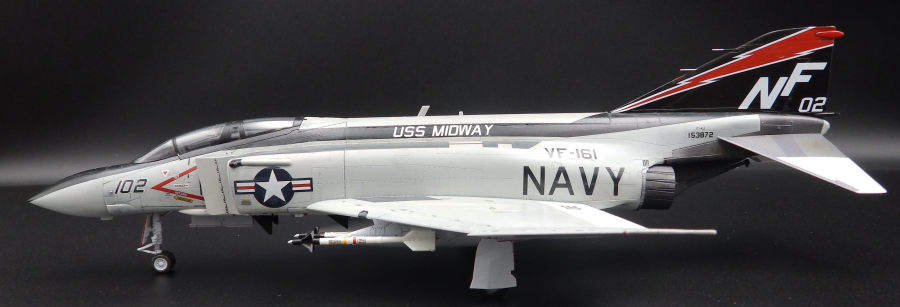
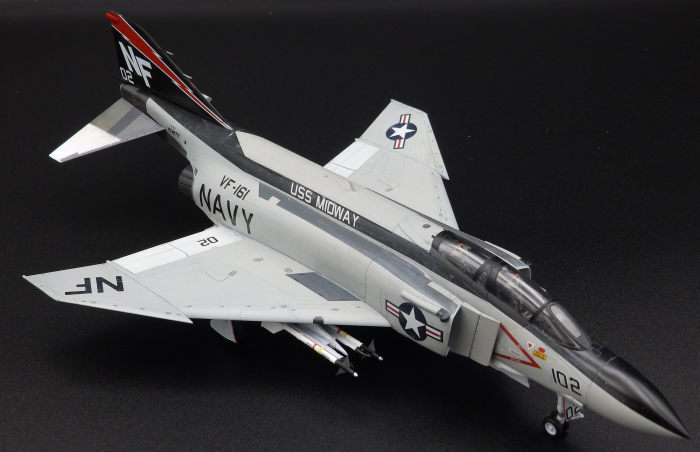
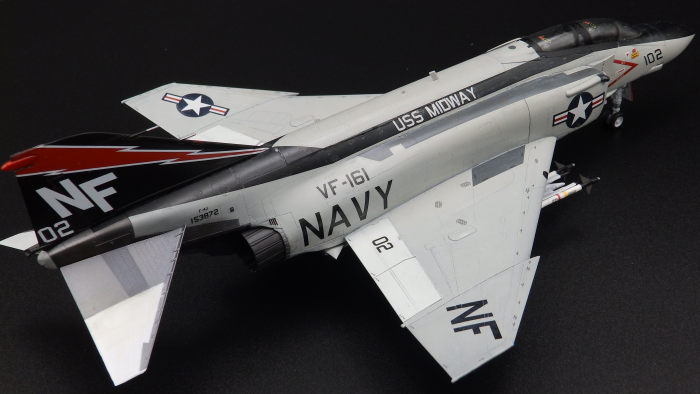
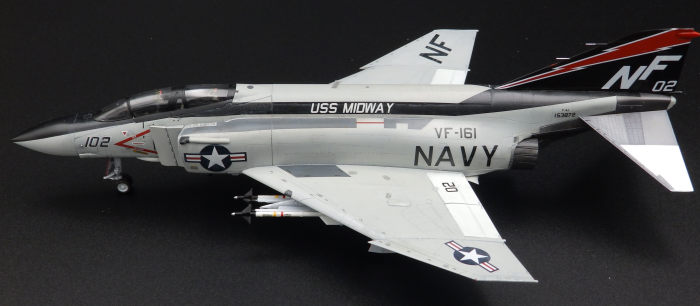
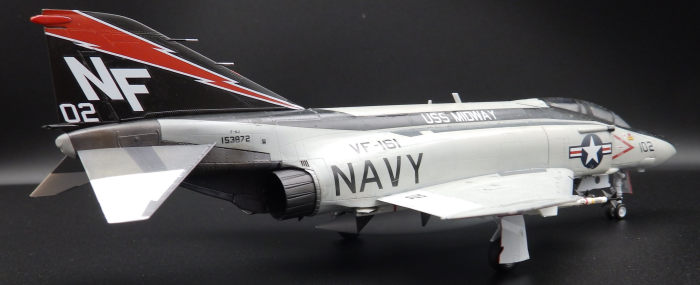
On their 1972 WESTPAC cruise, the Chargers adopted a simple but striking livery scheme featuring a black stripe along the upper fuselage along with an all-black tail with a red lightning bolt. They would retain this until the Navy switched to low visibility schemes in the 1980s.
VF-161 would complete their final cruise in 1986, after which they transitioned to the then-new F/A-18 Hornet and were redesignated as VFA-161. They were stationed at NAS Lemoore for a short time before they were disestablished in 1988.
| THE KIT |
 As much as I
love a big plan for a model with cool aftermarket decals and parts, sometimes
you see the box art of a kit and decide that’s all you want and need. That’s how
I felt with this boxing of Fine Molds’ F-4J. Knowing that Fine Molds is one of
the best in the business when it comes to kit design and construction, and
totally in love with the VF-161 livery, I simply had to give this one a build
straight out of the box. You can read Editor Scott’s preview of the kit here
https://modelingmadness.com/scott/viet/previews/finemolds/72743.htm:
As much as I
love a big plan for a model with cool aftermarket decals and parts, sometimes
you see the box art of a kit and decide that’s all you want and need. That’s how
I felt with this boxing of Fine Molds’ F-4J. Knowing that Fine Molds is one of
the best in the business when it comes to kit design and construction, and
totally in love with the VF-161 livery, I simply had to give this one a build
straight out of the box. You can read Editor Scott’s preview of the kit here
https://modelingmadness.com/scott/viet/previews/finemolds/72743.htm:
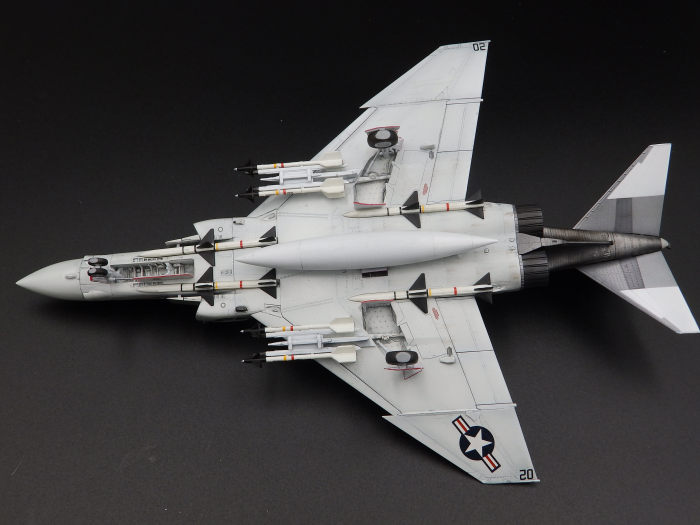
Since Fine Molds follows the proud Hasegawa tradition of not including weapons, I caved and bought their recommended weapons set for this F-4, along with a New Ware mask set and some Quickboost ejection seats. So, not truly a build out of the box, but no special decals or detail sets.
| CONSTRUCTION |
 Starting with
the cockpit, I painted interiors with Gunze Dark Gull Grey. The instrument panel
decals were applied, and I gave everything an enamel wash. The forward fuselage
is assembled with large locator pins ensuring a perfect fit. The intakes have
full trunking with fanblade detail inside that I painted silver and then glued
to the forward fuselage.
Starting with
the cockpit, I painted interiors with Gunze Dark Gull Grey. The instrument panel
decals were applied, and I gave everything an enamel wash. The forward fuselage
is assembled with large locator pins ensuring a perfect fit. The intakes have
full trunking with fanblade detail inside that I painted silver and then glued
to the forward fuselage.
Assembly of the fuselage and wings was very quick—perhaps a bit too quick, as I made a mistake that would affect the rest of the build. The part that comprises the “spine” of the fuselage had a very tight fit, and I didn’t assure it was seated well enough. This lead to a small step along both lengths of the fuselage and near the tail.
Once I got this far, the instructions told me to proceed with painting and decaling the model. While that progressed, I “worked ahead” on parts like the metal tail assembly and exhausts, which are helpfully attached after painting is complete.
| COLORS & MARKINGS |
The F-4J was painted with the Gunze Light Gull Grey over Insignia White that was typical for Navy jets until the 80s. The nose and tail were painted Tamiya X-18 Semi-Gloss Black. These black sections would be joined by two long black stripe decals. This is where the previous assembly error came back to haunt me, as the steps interfered with how the decals fit along the fuselage. These being the typical Japanese kit decals with thick carrier film did not help, as I learned after the fact that they would have worked better if I used much hotter water and Mr. Mark Setter/Softer instead of Micro Set/Sol. That said, the decals certainly are nice, and many of the stencils are grouped together for ease of application.
 Elsewhere, I
experimented with a few Mr. Metal Color paints such Iron and Aluminum, thinned
with Mr. Rapid Thinner. These gave the best metallic finish I have achieved yet.
I also experimented with some masking to achieve some subtle heat stain effects
on the tail and exhausts. The landing gear, doors, weapons, and other fiddly
accessories were painted as well.
Elsewhere, I
experimented with a few Mr. Metal Color paints such Iron and Aluminum, thinned
with Mr. Rapid Thinner. These gave the best metallic finish I have achieved yet.
I also experimented with some masking to achieve some subtle heat stain effects
on the tail and exhausts. The landing gear, doors, weapons, and other fiddly
accessories were painted as well.
So it was that I never quite got the right fit for the stripes, and had to paint over some grey gaps between the tail and stripes where they should have seamlessly met. The step also caused some cracks to occur in the stripe decals that had to be remedied with Tamiya semi-gloss black.
I had some help from New Ware Kabuki masks for the wheels and canopy, which worked great. The Quickboost seats were painted and adorned with some Eduard ejection seat handles. All the landing gear, doors, and weapons fit together quite nicely and were easy to attach.
I weathered the model with Tamiya Grey Panel Line Accent Color, Tamiya weathering pastels, and some Windsor & Newton oil paints.
| CONCLUSIONS |
 It’s a shame
that this build feels marred with my unforced errors, because Fine Molds really
does make a nice model F-4, and I highly recommend it. This build reinforces
past lessons I’ve learned about taking as much time as you need, and making sure
everything fits exactly as you can. We’re all our own worst critics. That said,
this model still looks really nice in the display cabinet. The surface detail is
exquisite, and the parts all mostly fit like a glove. The Phantom is certainly
up there with my favorite planes, and this was one of many I plan to build. The
VF-161 scheme is so cool, I’ll probably build it again in 1/48. I highly
recommend this kit.
It’s a shame
that this build feels marred with my unforced errors, because Fine Molds really
does make a nice model F-4, and I highly recommend it. This build reinforces
past lessons I’ve learned about taking as much time as you need, and making sure
everything fits exactly as you can. We’re all our own worst critics. That said,
this model still looks really nice in the display cabinet. The surface detail is
exquisite, and the parts all mostly fit like a glove. The Phantom is certainly
up there with my favorite planes, and this was one of many I plan to build. The
VF-161 scheme is so cool, I’ll probably build it again in 1/48. I highly
recommend this kit.
(Editor's note. When I was with VQ-1, we did 12 week detachments to Atsugi. I worked in the avionics shop, that was located in a WWII era hangar that was shared with CAG-5. I would often see a plane from this unit, in these markings either in the hangar outside the shop door or on the ramp when the air wing was in town. Nice to see someone do a model of it.)
23 January 2026
Copyright ModelingMadness.com. All rights reserved. No reproduction in part or in whole without express permission.
If you would like your product reviewed fairly and fairly quickly, please contact the editor or see other details in the Note to Contributors.